Hello everyone
Another battle report from the SlowGrow League organised by Albatross Albert.
This was a showdown between Basilea and Xirkaali at 2000pts fighting the Push scenario.
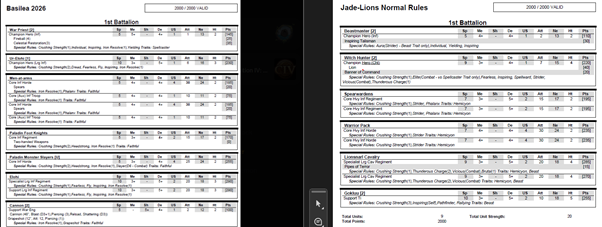
I had won the previous engagement against the Xirkaali player, but I had learned that his Lionsnarl Cavalry could be deadly, and he had two again, as well as a full army of hemicyon units making them faster and arguably more deadly than my own forces with their Crushing Strength and Thunderous Charge abilities. They also had superior mobility as they had Strider, including the Lionsnarl thanks to a Beastmaster being present in the army.
The carrying of tokens would slow them, and I had high nerve, healing magic and Iron Resolve on my side, as well as the ability to outpace them with my Elohi. I knew I had to be careful with the placement of my Men at Arms hordes, as I had equipped them with spears to grant them phalanx, to hopefully soften the inevitable charges, as well as some screening units to keep my punchier in the units for longer. A good match-up of styles.
Below are the army lists:
Deployment
We started deployment, laid out per the below image. The Xirkaali had a very strong flank with two Lionsnarl Cav, which I had put a single MaA horde with spears and an Elohi unit to delay, whilst the majority of my units deployed to the centre of the map.
I had brought a cannon for the first time since my first ever game of KoW, I was burned before with poor dice rolls but I was willing to give artillery another chance. Planting it on my right flank and giving it the ability to see essentially all of the battlefield with the exception of the far end with the Lionsnarl and behind a hill in my opponents deployment zone (and a building on the halfway line).
The Xirkaali also went heavy into the centre, leaving a single SpearWarden unit on my right flank, which would threaten my cannon, or a possible flank charge into my centre if I advance too quickly. I wasn’t too worried by this as I had a few units that would be close enough to my main force that I could send a unit or two to engage them if required.
On review, I feel I left a few too many gaps in my central line that could have been exploited, and my central Elohi was in my front rank, when I should probably have secured them behind a screening unit.
I also had positioned to use the terrain to my advantage… except my opponents entire army had Strider, which made some of my choices not relevant.
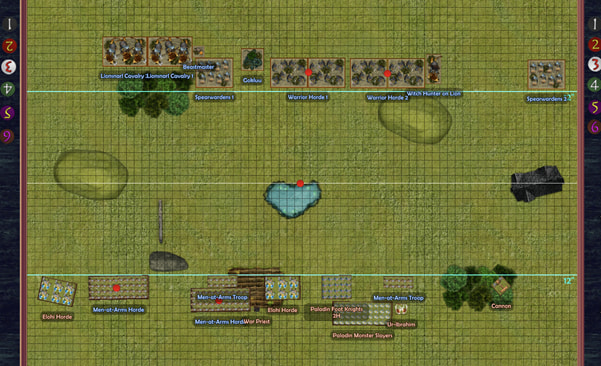
We rolled a 2 for the number of tokens in our deployment zone per the Push scenario and both armies gave them to large infantry hordes.
Xirkaali – Turn 1
As is standard on first turns, this was mostly the moving up of units and trying to gauge where the distance on possible counter charges. My opponent had mentioned he was nervous of my Elohi after our last battle, so knowing I had a slightly longer charge distance on some of my units gave me some confidence.
Spear wardens on my right flank moved up and started threatening a flank into most units on the right flank, but he was blocked by the House on the field.
Most other units moved up cautiously, playing with the distance
Lionsnarl were aggressively moving up on my left flank, sizing up against my Elohi and MaA.
Basilea – Turn 1
I used this turn to move up my left flank MaA and move my Elohi behind them to be a part of any counter charge that was required.
My central army advanced cautiously, with some positioning by my Monster Slayers to be able to shift to the right flank and engage any enemy units there if required.
My cannon missed entirely during shooting, not a great start!
Xirkaali – Turn 2
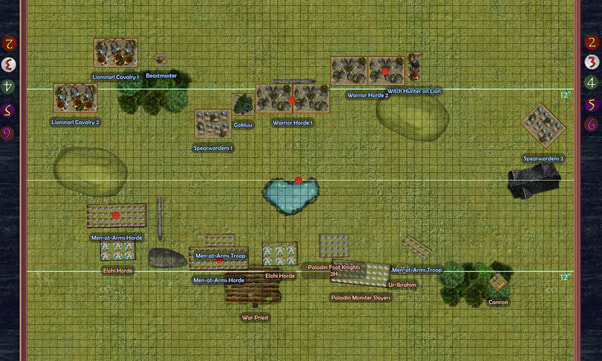
An aggressive turn from the Xirkaali this turn, sending Spear wardens into my MaA troops and the Gokluu into my Elohi. The Gokluu was an intimidating threat given the Crushing Strength (3) on it, however due to an unlucky dice roll only 4 wounds went through.
My opponent also attempted the Sic Em order, but failed on the Spear Wardens, the rest of the army then moved forward to prepare a charge on the following turn.
The exception here is the LionSnarl who spent time positioning within the forest to then be able to attack on my left flank.
My opponent decided to abandon his own tokens as a means of retaining the speed of his army, intending to take my tokens from routed units. A brave strategy, and an aggressive one.
Basilea Turn 2
I had to respond to this early aggression, if I could break the current units, I would be in a better position to handle the remaining units that hadn’t engaged yet.
I attempted to give the command Glory of Hegemon onto my MaA Horde. Unfortunately this didn’t translate into my wounds, only dealing 4 to the Spear Wardens. My troop was still holding for now, but it wasn’t long for this world.
My War Priest used Celestial Restoration on the Elohi, before they went back into the Gokluu, doing 10 wounds after being healed by my war priest. The Gokluu was able to stand its ground and would continue to attack my Elohi next turn.
My Cannon did some work on the right flank, dealing 4 wounds. I also moved up a MaA troop as a sacrificial unit to delay the spear wardens from hitting my flank, or attacking my cannon. Luckily I was able to position them in such a way the Spear Wardens couldn’t slip between them and the house to hit my cannon.
Paladin Greatswords turned to go for the objective or charge the Gokluu next turn (my opponent had cleverly identified the arcs wouldn’t allow them to charge this turn),
My left flank MaA Horde wasn’t able to charge this turn, and the Lionsnarl were going to crack my central force if I didn’t do something. So, hoping my phalanx would hold, I gave the At The Double order to my MaA to force them to charge next turn, with my Elohi still shielded behind them.
Xirkaali Turn 3
First blood went to the Xirkaali this turn.
The Gokluu again attacked my Elohi but only did 2 wounds, reduced to 1 by Iron Resolve after the Nerve check.
The Spear Wardens continued to work into my MaA Horde and Troop, joined by Warrior Horde 1, their combined attacks wiped the troop from my centre, leaving my MaA Horde to face them alone. The MaA Horde took only 3 wounds, down to 2 with Iron resolve.
The Spear Wardens on the right flank were attempting to get to my cannon but didn’t have the space, instead electing to charge my MaA. Doing 8 wounds, wiping them from the board.
The Lionsnarl charged the Men at Arms Horde – Luckily Phalanx hindered the charge, making it a bit more likely for them to survive. Which they did taking only 10 wounds (which feels good for having survived 40 attacks from Elite Cav).
Warrior Horde 2 and Witch Hunter charged into my Paladins with Greatswords, wiping them with a brutal 23 wounds in a single turn.
I am down 3 units, and most of my army is engaged, limiting my tactical options.
Basilea Turn 3
Very much a counter-punch turn for me.
My MaA reformed to avoid wraparound, learned from my previous battle, and hit back into the Spear Wardens in the centre.
My Elohi were able to slay the Glokku, finally killing it, and freeing them up for next turn.
My Paladin Monster slayers charged into the Warrior Horde 2 doing 16 wounds, and excellent result for them!
My leader Ur-Elohi charged into the Spear Warden 2, to secure the flank, and dealing 4 further wounds into them. Hoping I could break them and then allow me free movement into the enemy flanks.
My Cannon fired into the Witch Hunter doing only a single wound. Not a great result, but every wound helps.
My left flank MaA & Elohi did a measly 6 wounds into the Lionsnarl Cav. Not a great showing on that flank and I am starting to get worried.
Not a great result for some of my rolls, and some lucky nerves (the nerve of both the Warrior Horde and Spear Wardens only passed by 1).
Xirkaali Turn 4
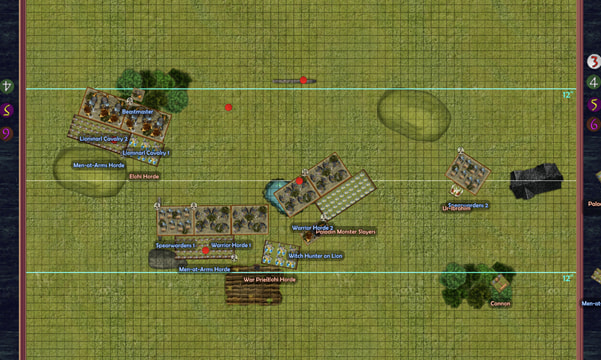
Healing commands were used on WH2 and Lionsnarl to give them more staying power.
Lionsnarl remained engaged with MaA and Elohi on the left flank, slowly grinding out wounds.
Spear Wardens into Ur-Elohi on the right flank, doing 5 wounds, holding and regaining 1 wound via Iron Resolve.
Warrior Horde into Paladins – doing 9 damage – They hold and regain 1 wound via Iron Resolve.
SW and WH1 into MaA in the centre – doing 22 wounds, unfortunately this killed the unit and I dropped a token. This essentially broke my army in the centre, causing me to try and get creative to survive the next few rounds.
Lionsnarl hit all their attacks into the MaA on the left killing them, dropping my second token, curses!
This allowed one Lionsnarl unit to prepare a flank charge into the remaining Elohi unit.
An effective round at wiping my army for the Xirkaali.
Basilea Turn 4
My counter turn, where again most of my army was engaged except for my central Elohi Unit. If I couldn’t rout some of the Xirkaali units this turn, I was doomed.
My Ur- Elohi struck into the Spear Wardens, doing 3 more wounds and routing them, securing my right flank. A relief, but now I need to figure out what to do next turn with him!
Monster Slayers into WH2, doing another 15 wounds – routing the enemy unit. Definitely a strong unit, I understand why they are a Unique unit, definitely going to keep these units in my army for next battle.
My left flank Elohi charged back into the Lionsnarl, and my central Elohi was able to use the Fly rule to charge the Beast Master, hoping for a yield and then another side charge into the Lion Snarl. The Elohi hit the Beast Master, routing him and allowing the flank charge into the Lionsnarl, the flank charge did 10 wounds, the front charge doing 7, routing one of the very scary Lionsnarl.
My opponent did mention at this point, he hadn’t realised this effect from Yielding, however we did re-measure and confirmed that the Elohi would have been able to flank charge the Lionsnarl anyway.
This did mean my War Priest was abandoned to be mowed down by the Witch Hunter but he had done his job to give off a lot of healing before he died.
A good round, but a difficult round to then position to get tokens on the side of the field I want.
Xirkaali Turn 5
The remaining Lionsnarl couldn’t see any of my Elohi this turn, which allowed me to turn and face the Spear Wardens, but did mean I left them free to maneuvre and threaten a rear/flank charge on the following turn.
Spear Wardens, turned to face the Elohi
Warrior Horde charged into the Monster Slayers, picking up the token on the way. Healing for 2 using a command. 19 hits, converting to 8 wounds. My Monster Hunters hold and heal 1 on Iron Resolve.
Witch Hunter on Lion charged the War Priest. All attacks landed, and all converted to wounds, he REALLY hates spellcasters. The Priest was able to hold thanks to Inspiring.
The Spear Wardens had a token and were firmly in the 2 VP area, a key target for me next turn.
Basilea Turn 5
My Ur-Elohi ran to the top of the board to secure the token, unfortunately he was just shy of his movement but would secure it next turn.
My Monster Slayers and Elohi (via a rear charge) was able to wipe the Warrior Horde, unfortunately I couldn’t secure the token this turn with my advance rolls, a next turn goal if required.
The other Elohi charge into the remaining Spearwardens. Routing them, and taking the token.
My miraculously surviving Priest hit into the Witch Hunter, missing his one attack.
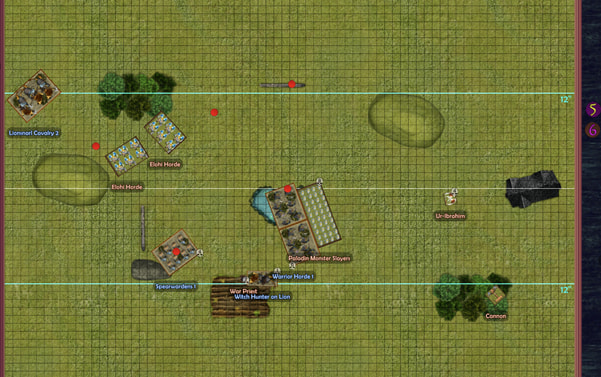
At this point we chose to wrap the game as the Lionsnarl and Witch Hunter couldn’t get more points than I would secure in the next turn, or a potential turn 7.
If played out it would be likely to be a 4- 2 or 0 points game in favour of Basilea (as an Ur-Elohi and an Elohi unit would secure the points whilst another Elohi and monster slayers hunt the enemy down).
Victory to Basilea, all glory to the Shining Ones.
Final Thoughts
Carrying objectives likely impacted to Xirkaali more due to their (generally) higher Speed stat than the Basilean army. This did highlight that perhaps the Xirkaali players, or players with faster armies may instead choose to abandon their own tokens and attack and take theother players as an alternative approach to this scenario.
Celestial Restoration had a good result this battle, keeping my front line standing a lot longer than expected. It, like artillery, thanks to its blast mechanic, either seems to hit very hard or not at all. In this battle, the healing was a lot more effective than my artillery, but every little bit helps!
Monster Slayers are a fantastic unit, punchy and with staying power, especially with support from a healer or support caster they will be a key component in future battles.
MaA Horde being used to shield Elohi was a great combo on my left flank, I will need to hope I can get lucky with positioning like this in future battles.
Cannon feels really good when it hits… but it doesn’t seem to hit often.
Yielding is a key stat to look out for in future, as it will allow an enemy unit to charge 2 of your unit in a turn if they can rout the Yielding unit. Clearly a new mechanic is being learned in each battle, previously it was Wrap-Around and this time it was Yielding. Eventually this will culminate in my fully understanding the rules and nuances of KoW 4th Edition!
Similar to my previous battle, Iron Resolve was a lot more effective than I expected, healing almost 10 points over the course of this battle across my units. With nerve checks this could be the difference between victory or defeat.
A very fun game, thanks to my Xirkaali opponent, looking forward to my next battle against the Empire of Dust!
P.S apologies for the reduced images used, I was 1) more lax on taking screenshots this battle and 2) have realised that new accounts can only post 5 images, so I needed to be tactical in my choices.