Exploring the Empire of Dust - AA's Slow-Grow League

A few friends and I decided to set up a slow-grow league this year to get to grips with 4th edition. The league is 9 rounds long, played over UB2, with the points value increasing by 250 each time (until we reach 2300).

This is the second round - it didn’t occur to me to do a report for the first one but I’ll try to do them from now on. The game was 1000pts Ambush, the scenario was Hold the Line with diagonal deployment style on a 4’ square board.

The Armies

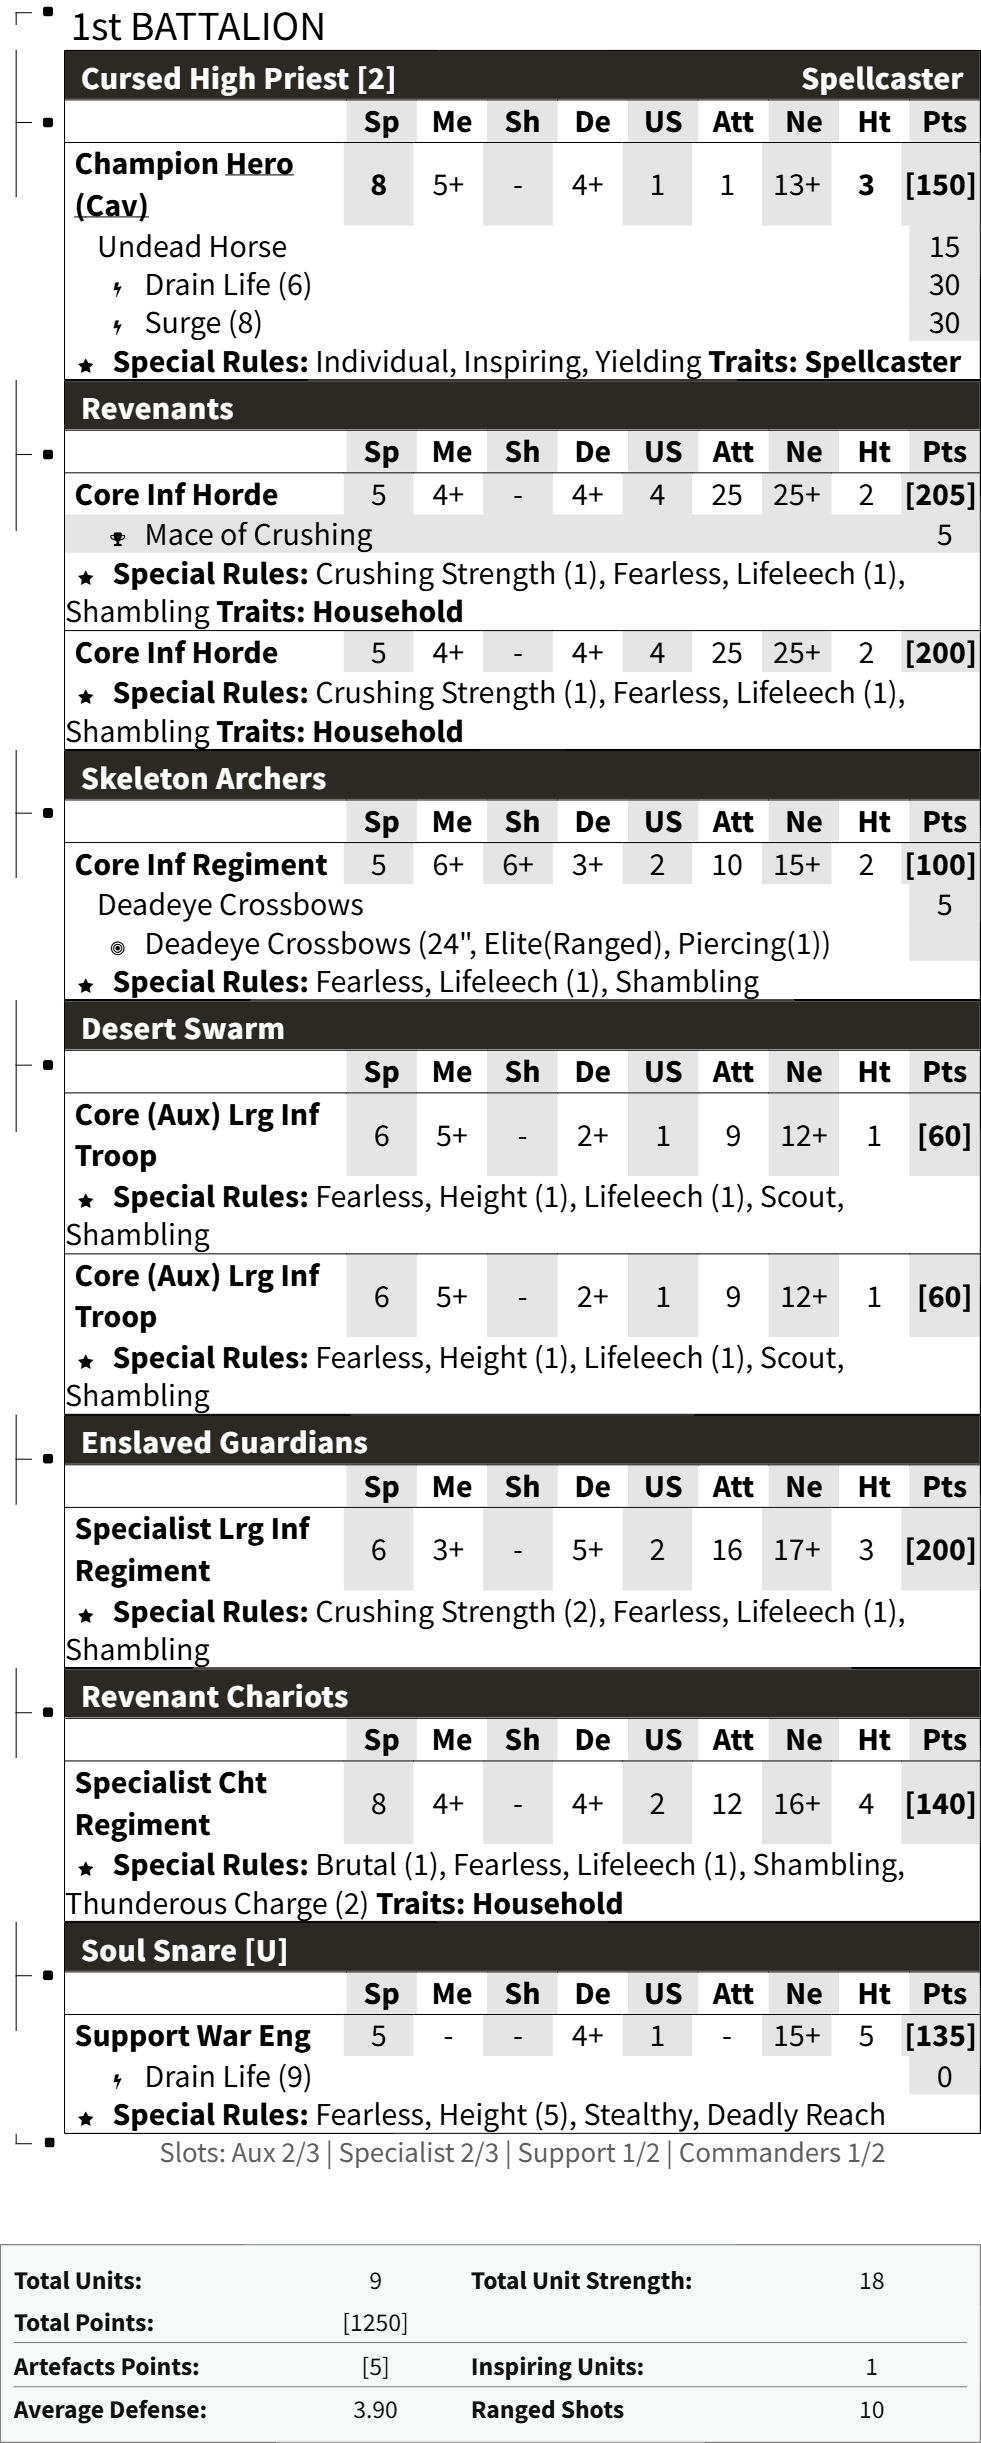
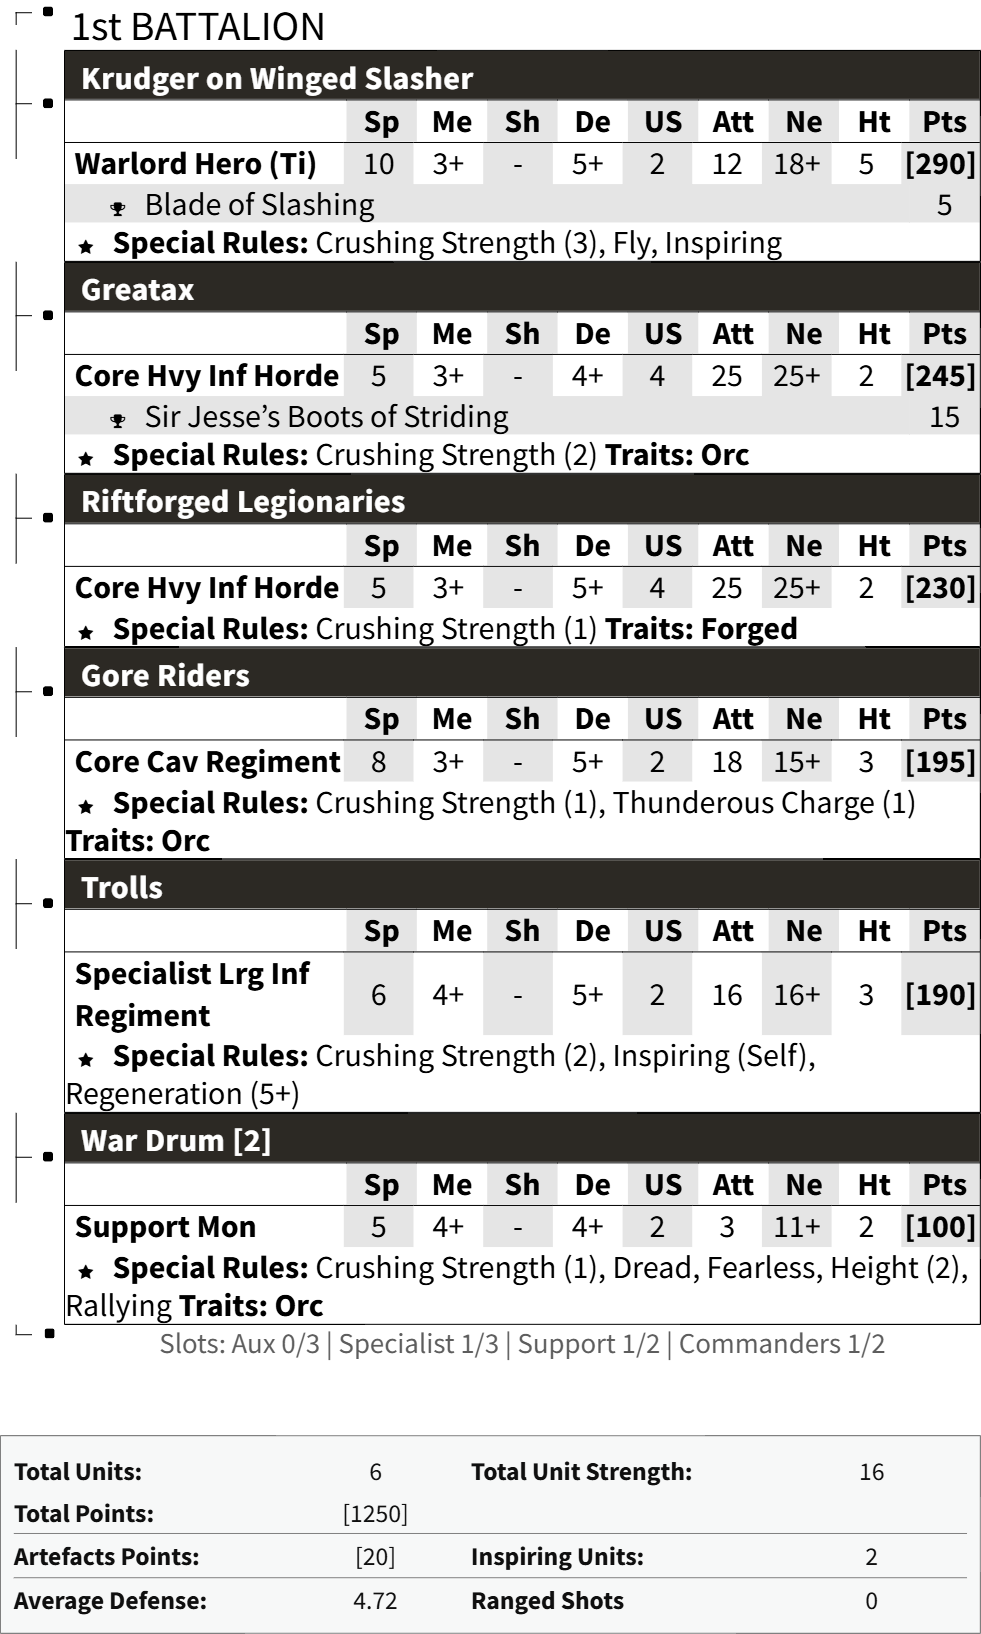
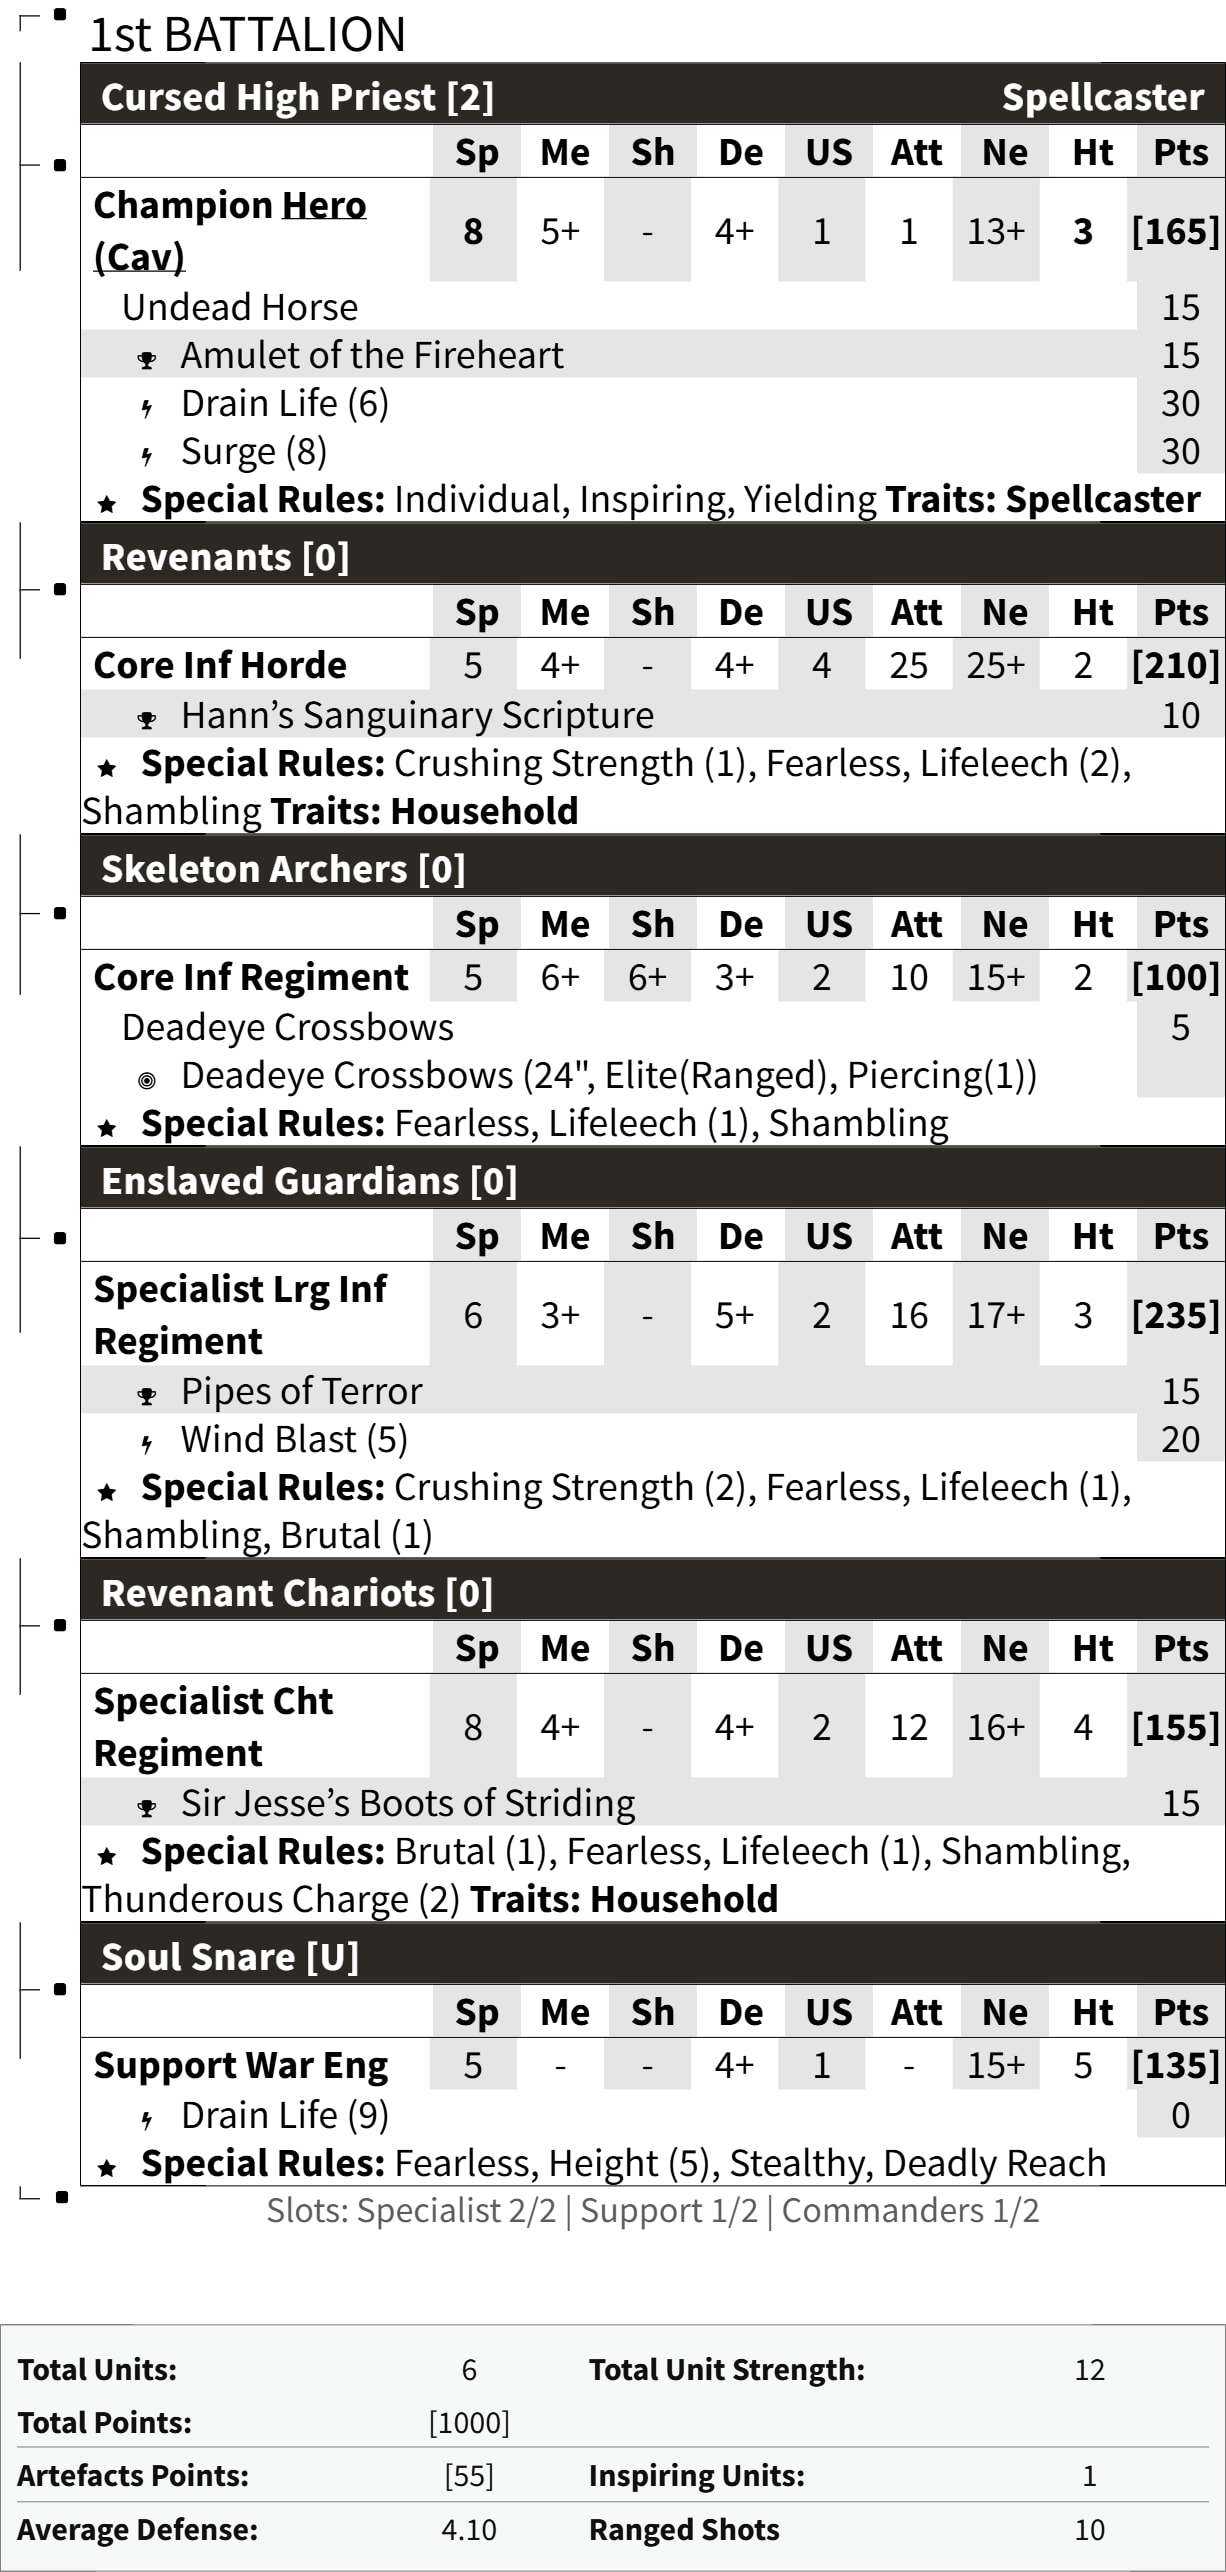
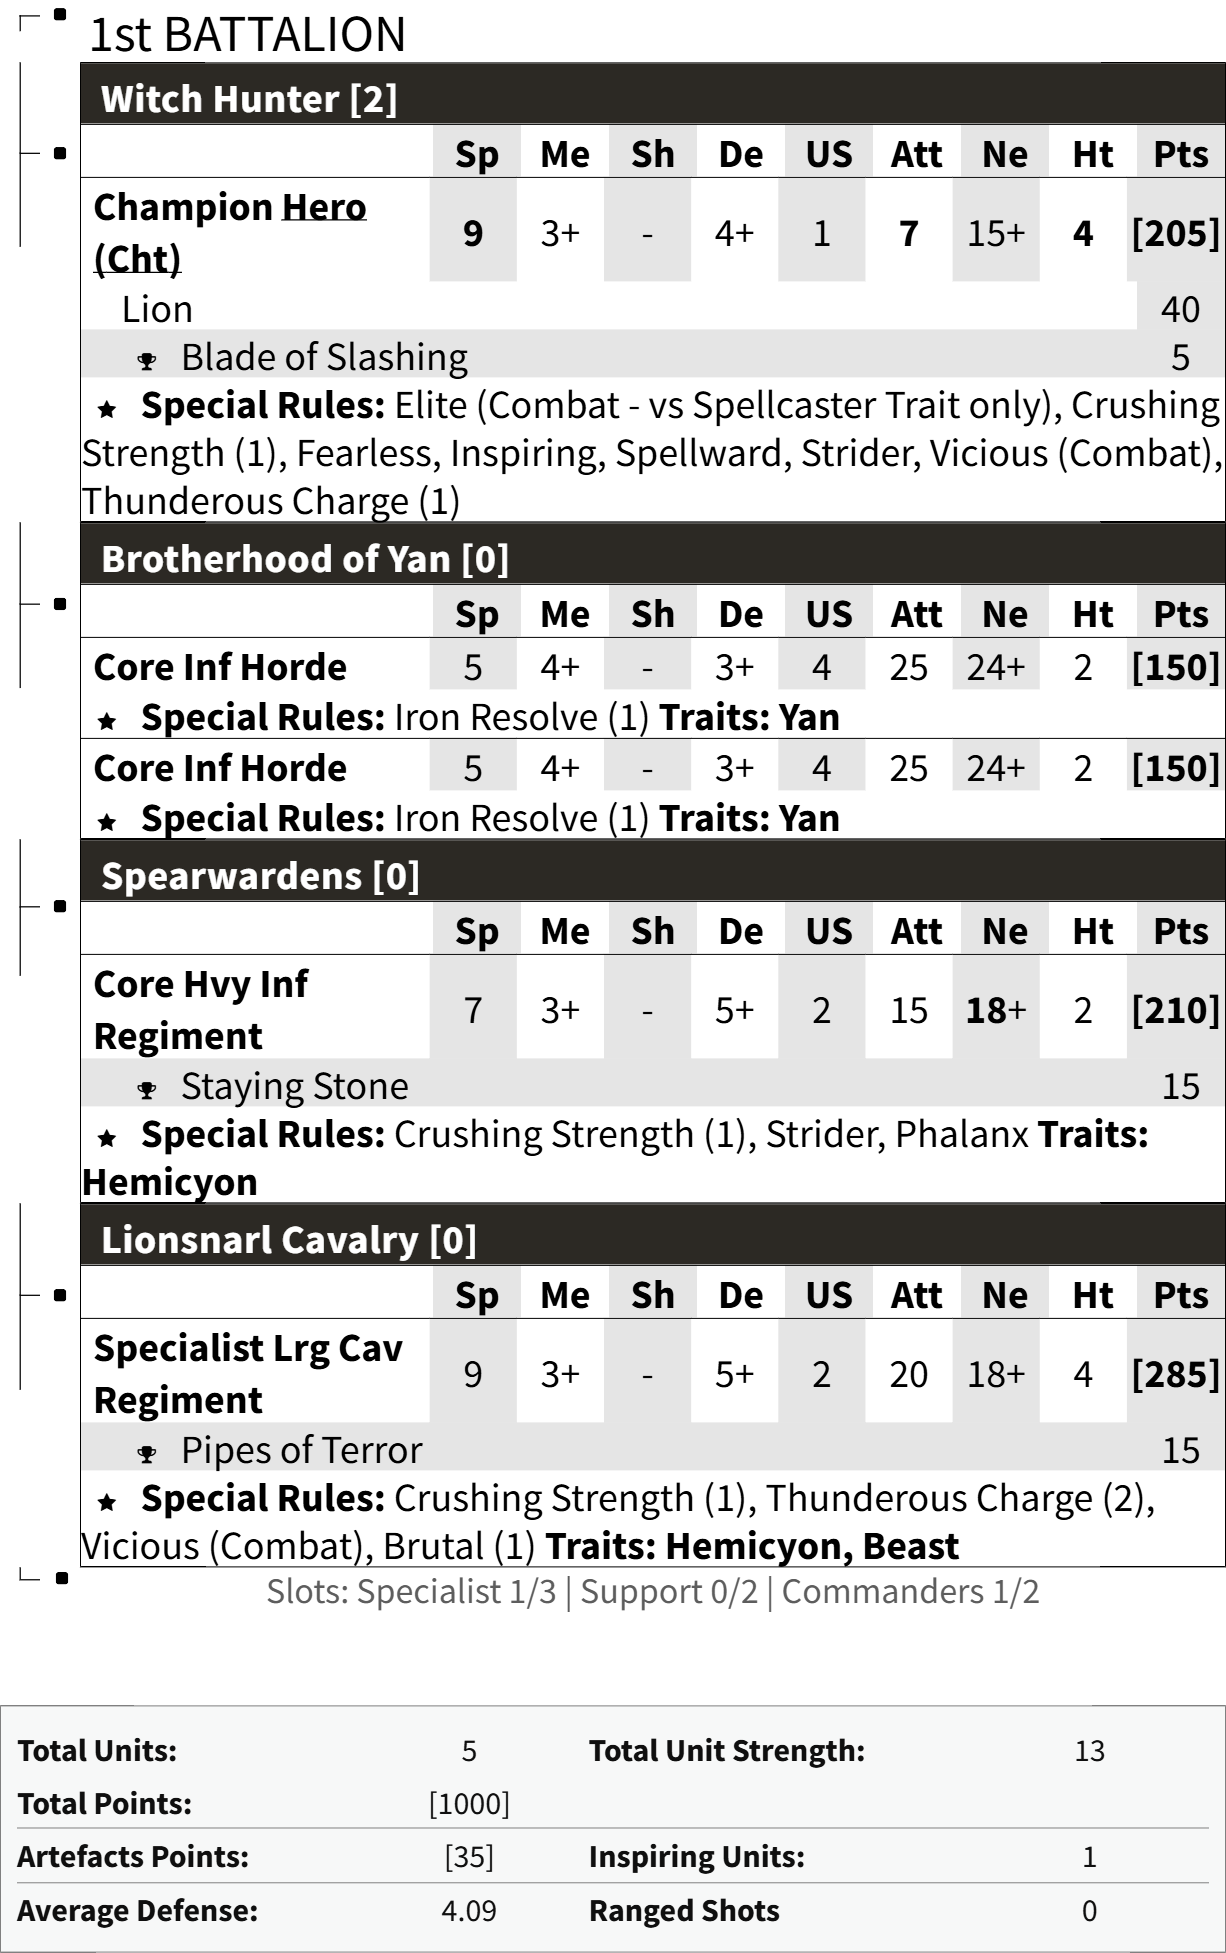
I’m playing as Empire of Dust, and my opponent for this round is using Xirkaali. Here are the two lists:

My plan when making this army was to lead with the revenants and hope to make initial contact with them. Then the spellcasters would keep the revenants alive while the chariots and enslaved guardians look for flanks or weak points. Before the lines made contact I planned to use the combination of Wind Blast from the guardians and the Sandstorm command on the archers to disrupt enemy lines and gum up their movement.
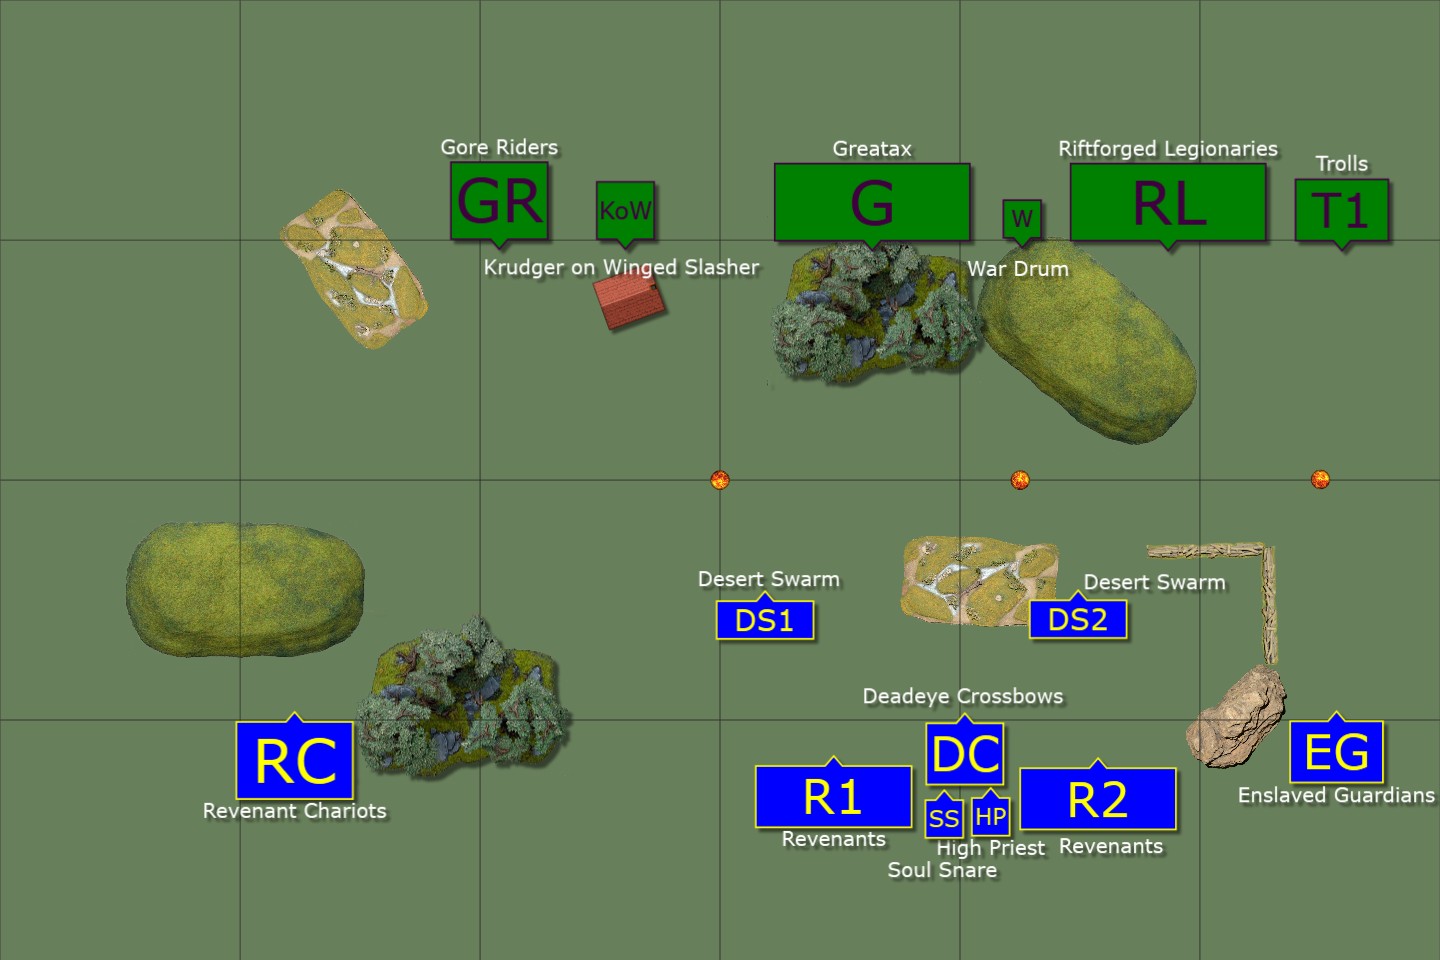
Deployment

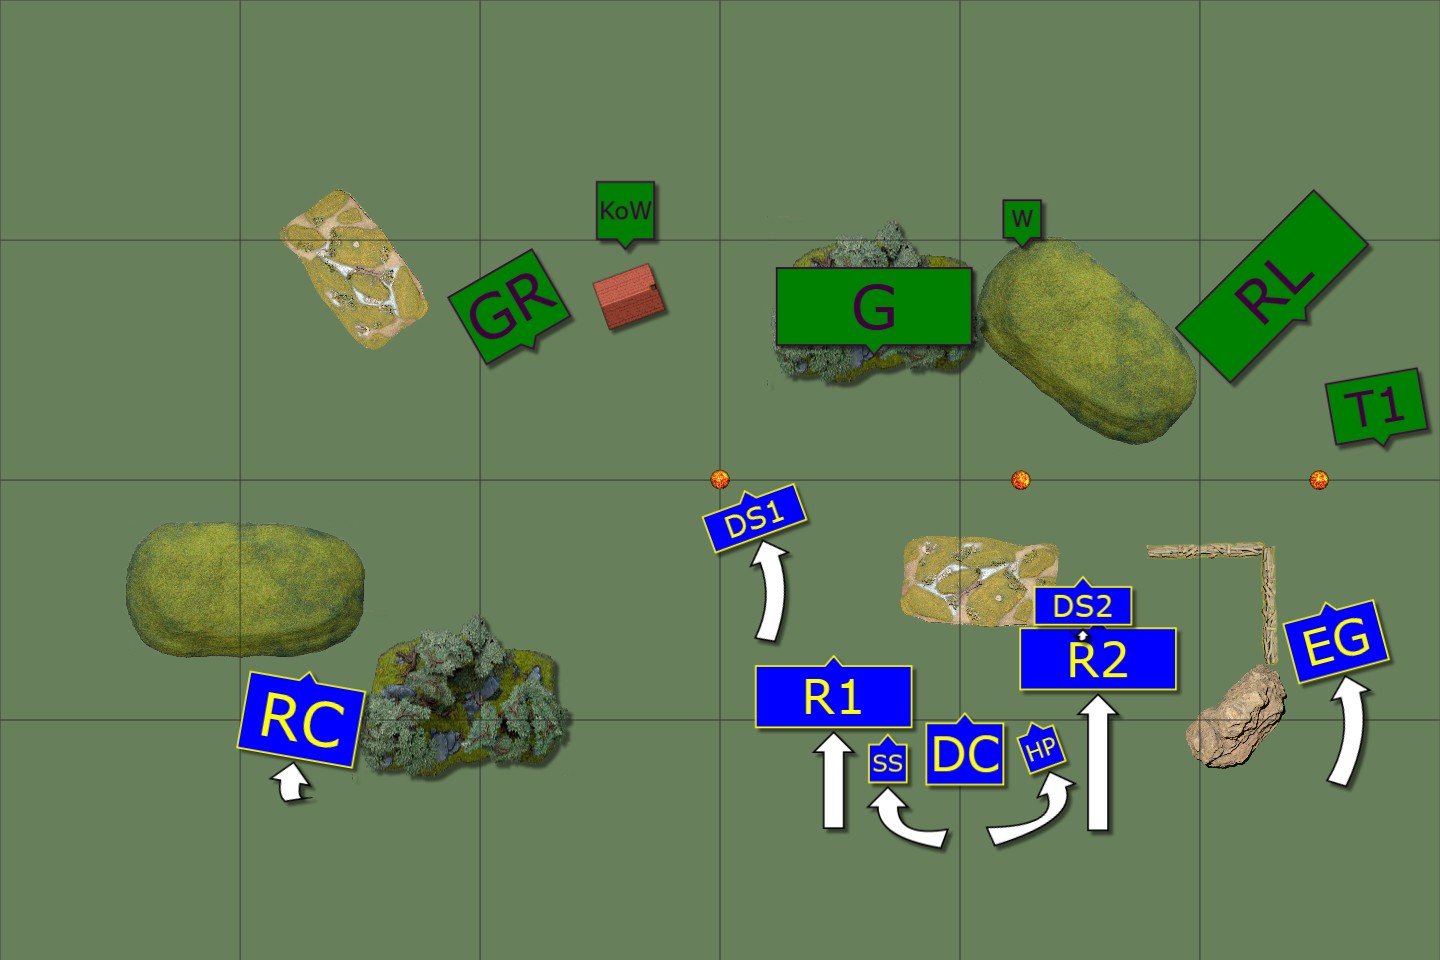
We both had some blocking terrain that we used to anchor a flank. Even though my opponent had fewer units, all of his were frontliners which meant he could deploy a lot more widely. As a result I started the game feeling very cagey and reluctant to advance into the open too much.

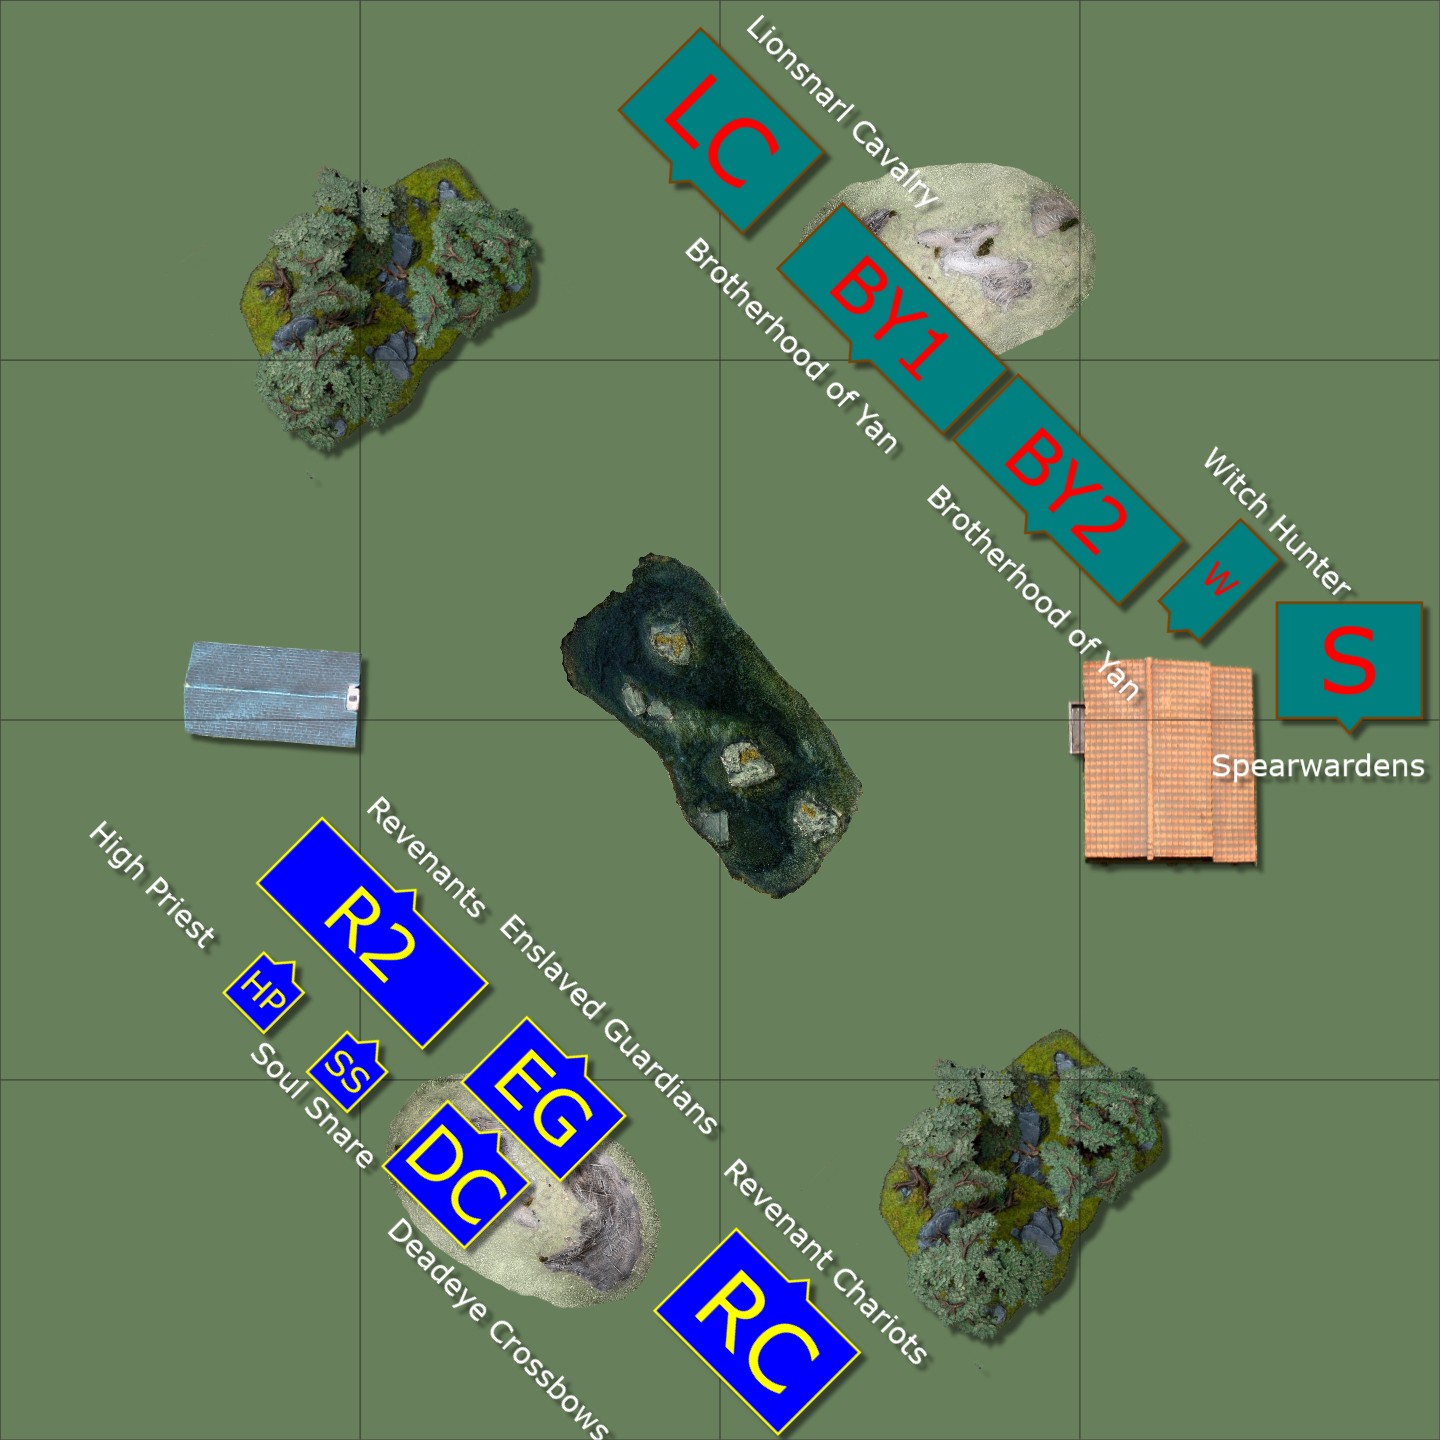
I won the roll-off, and chose to take the second turn.
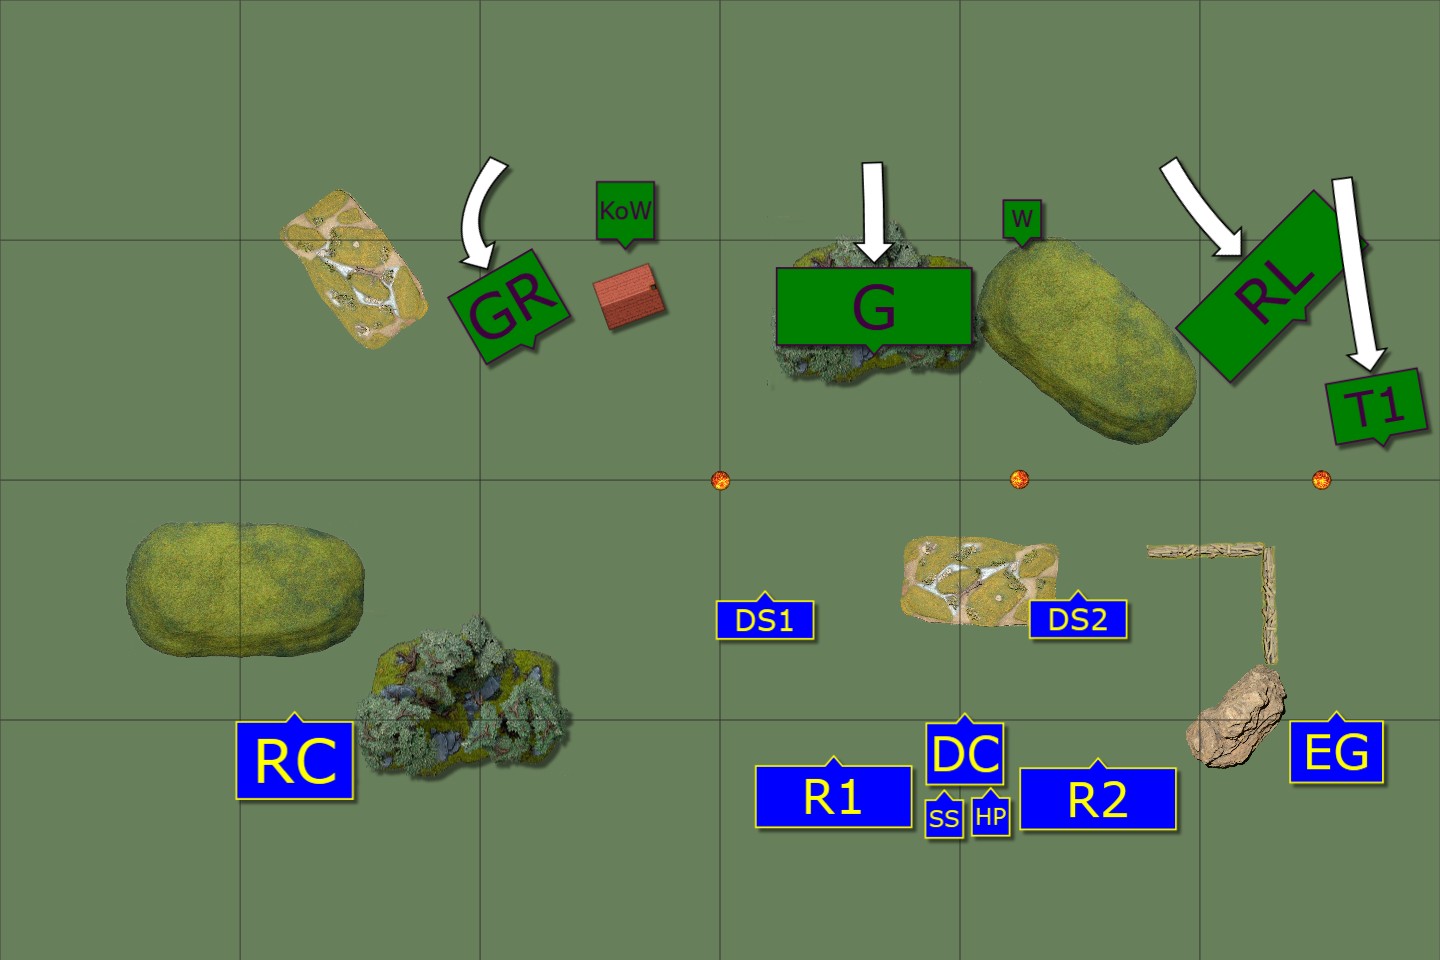
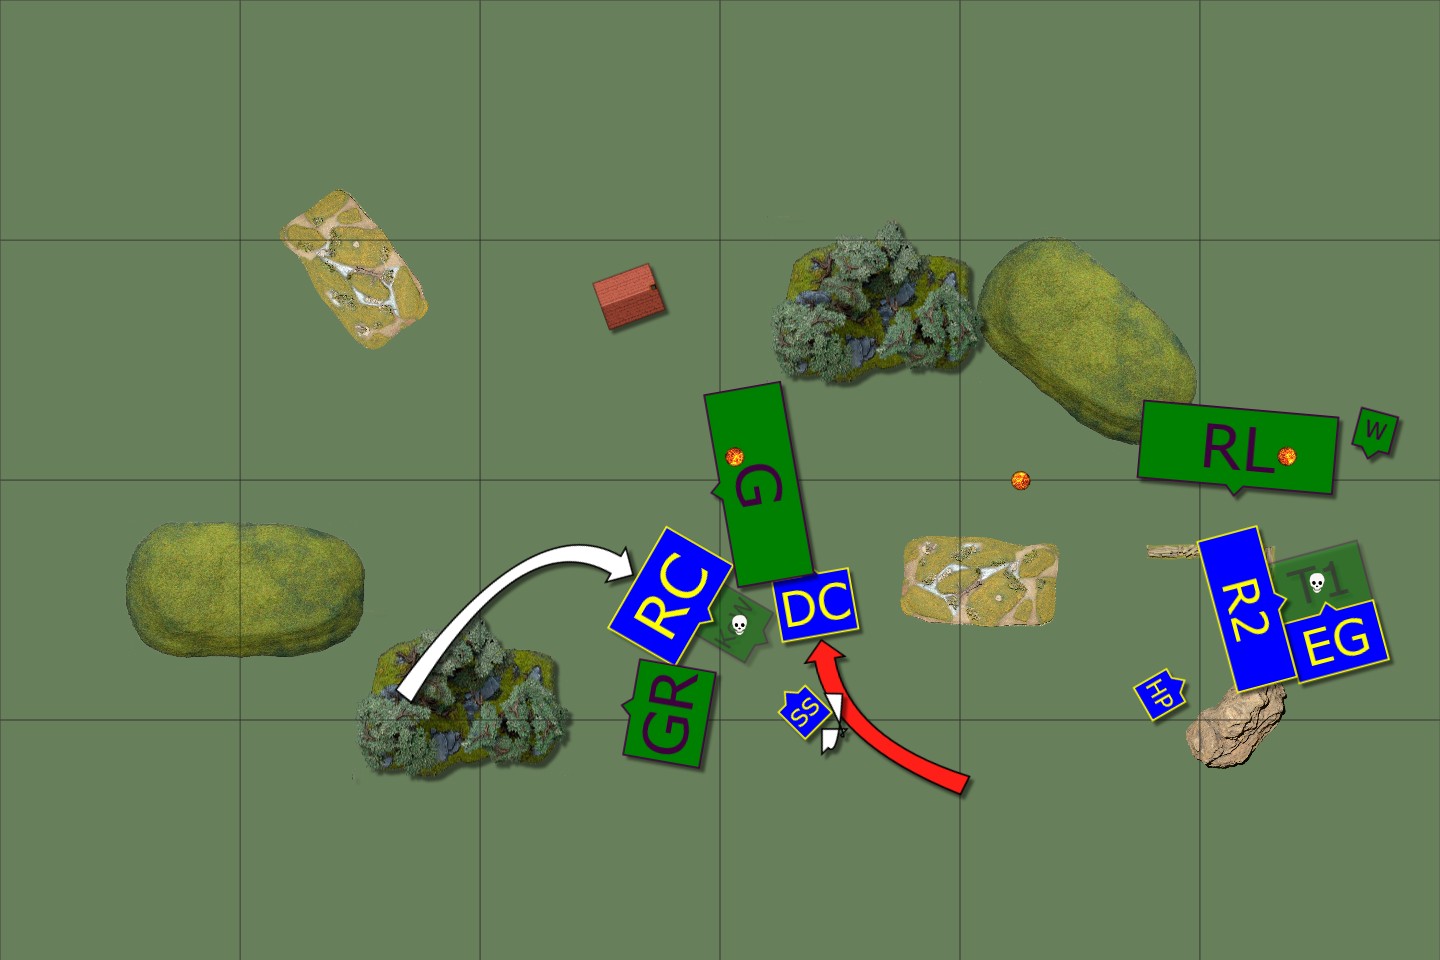
Turn 1

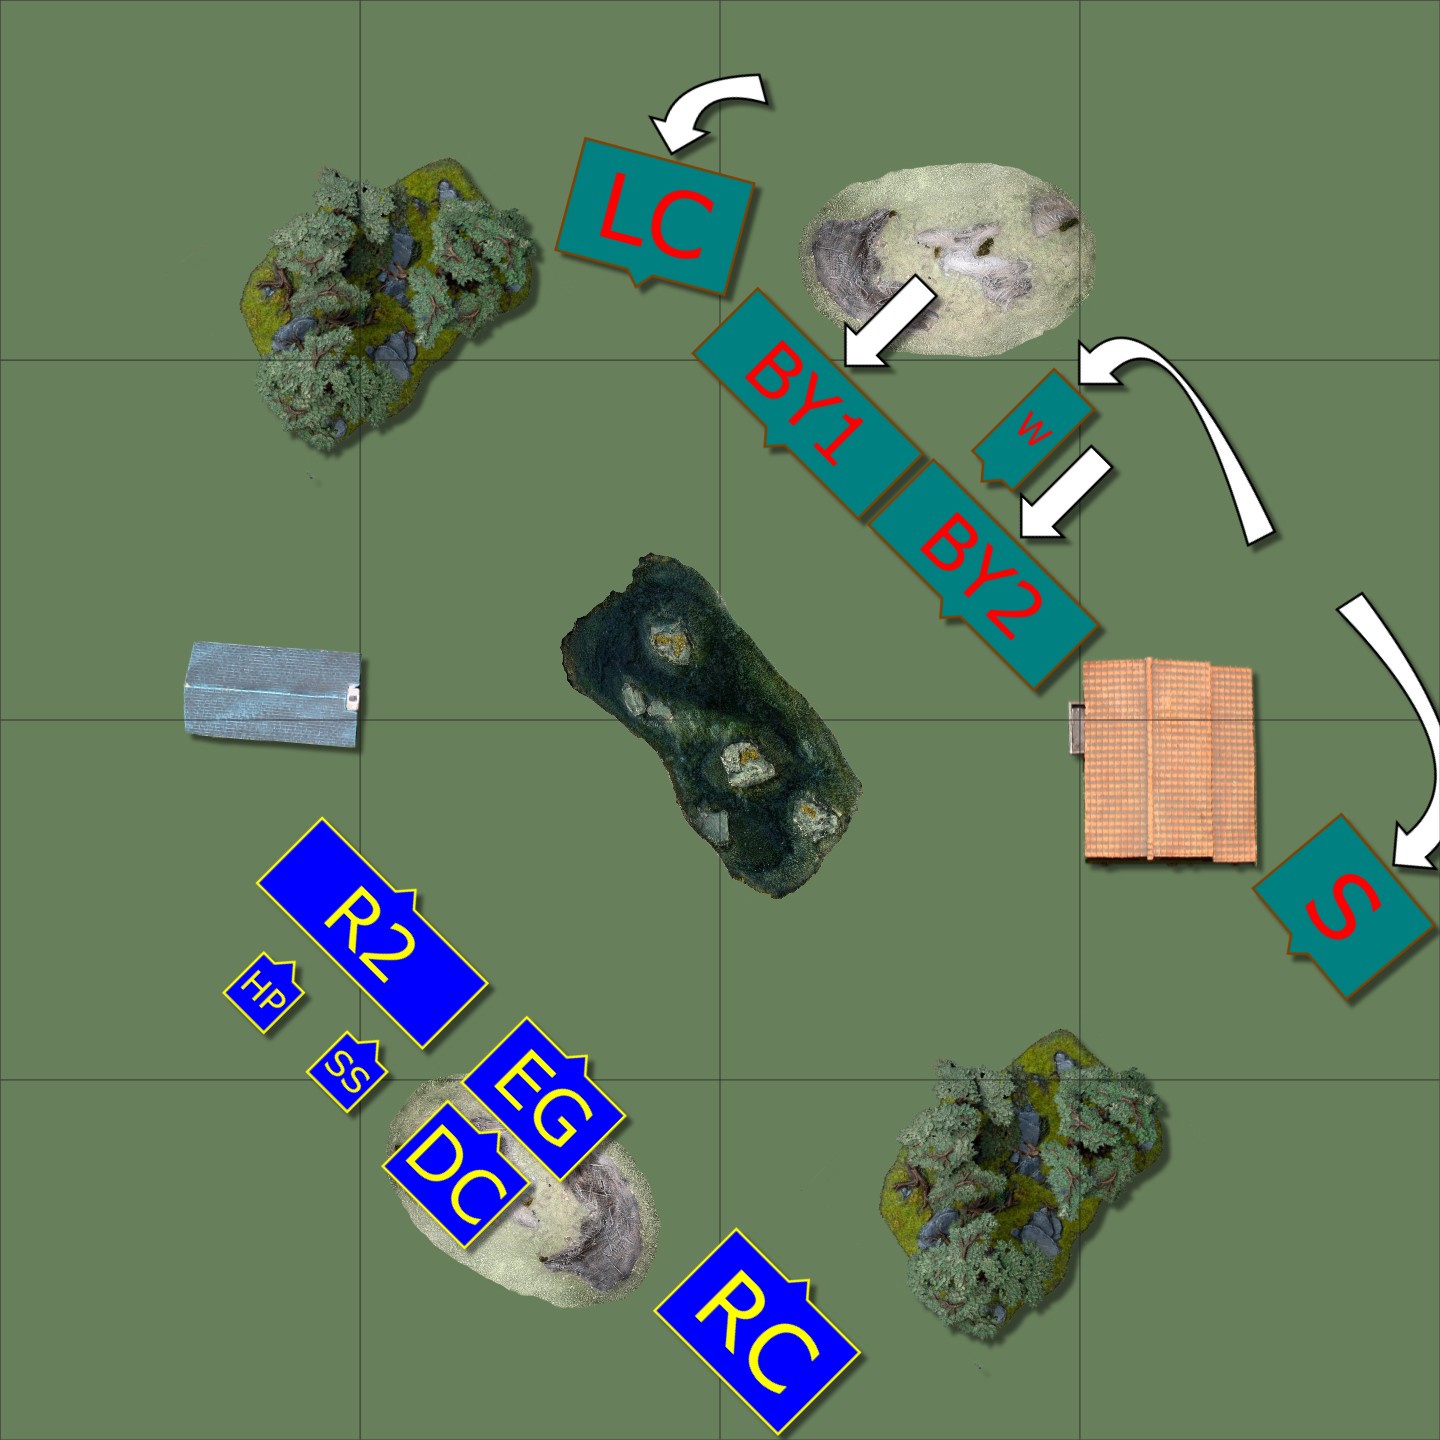
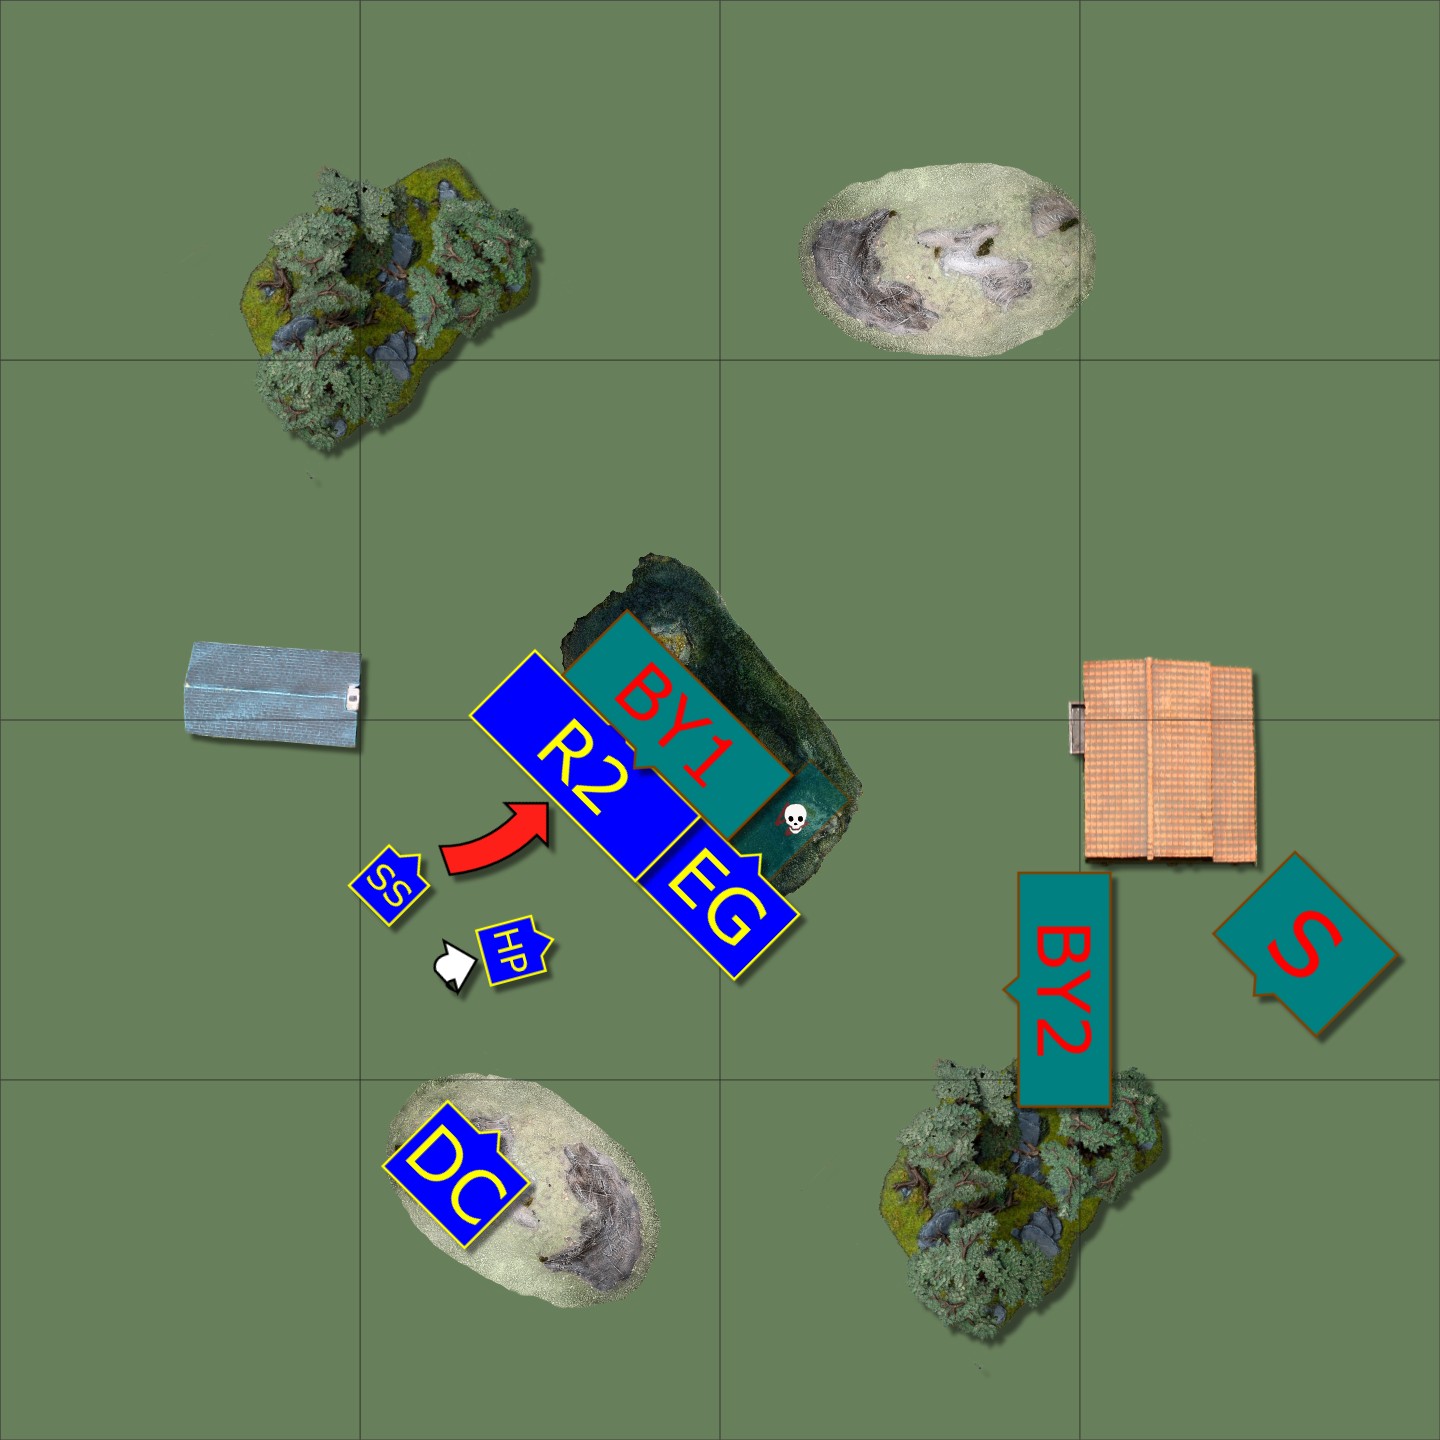
The Xirkaali all advance, threatening the centre and my right flank.

I advance with my revenants in the centre, and my chariots move to threaten the spearwardens from outside their range. The enslaved guardians veer slightly right, ready to support either front as necessary. The archers manage to damage a yan horde and freeze them. I had planned to then Wind Blast the same unit but, er… I forgot to.
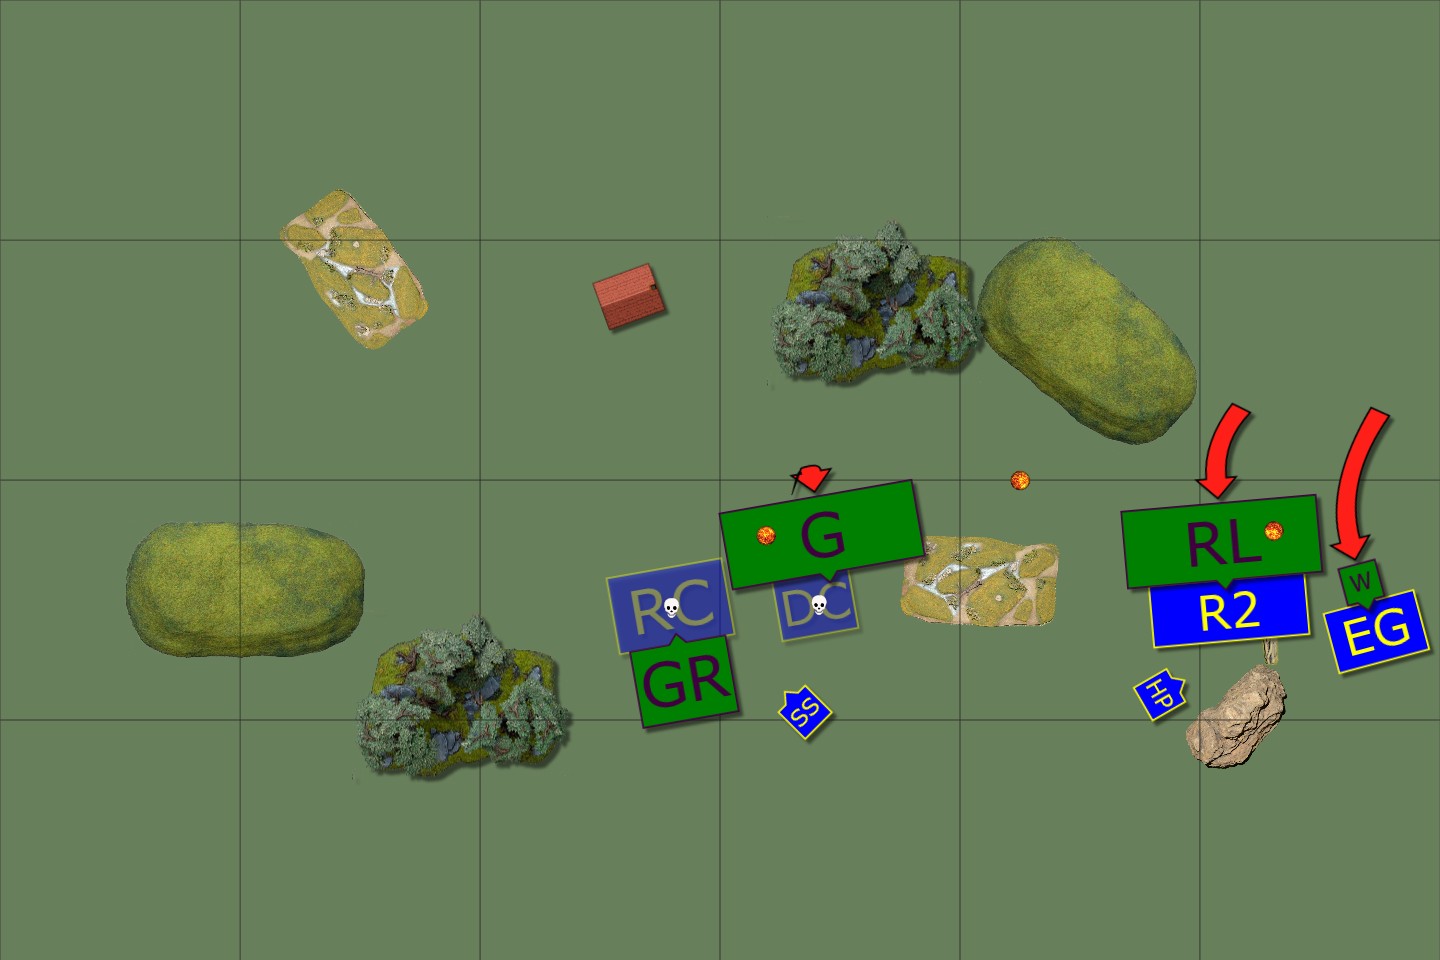
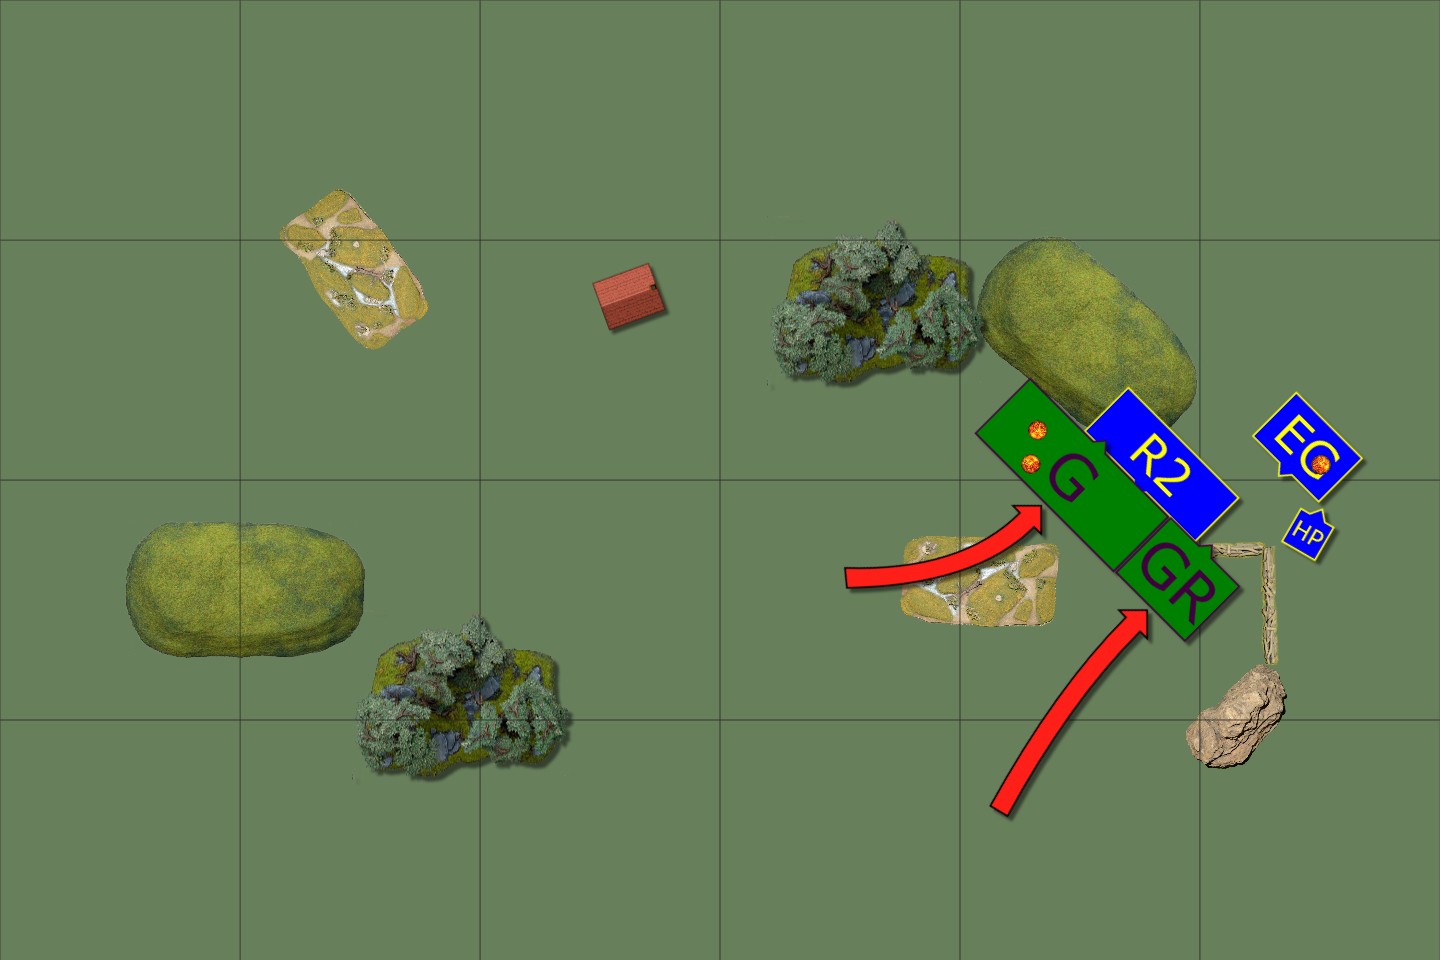
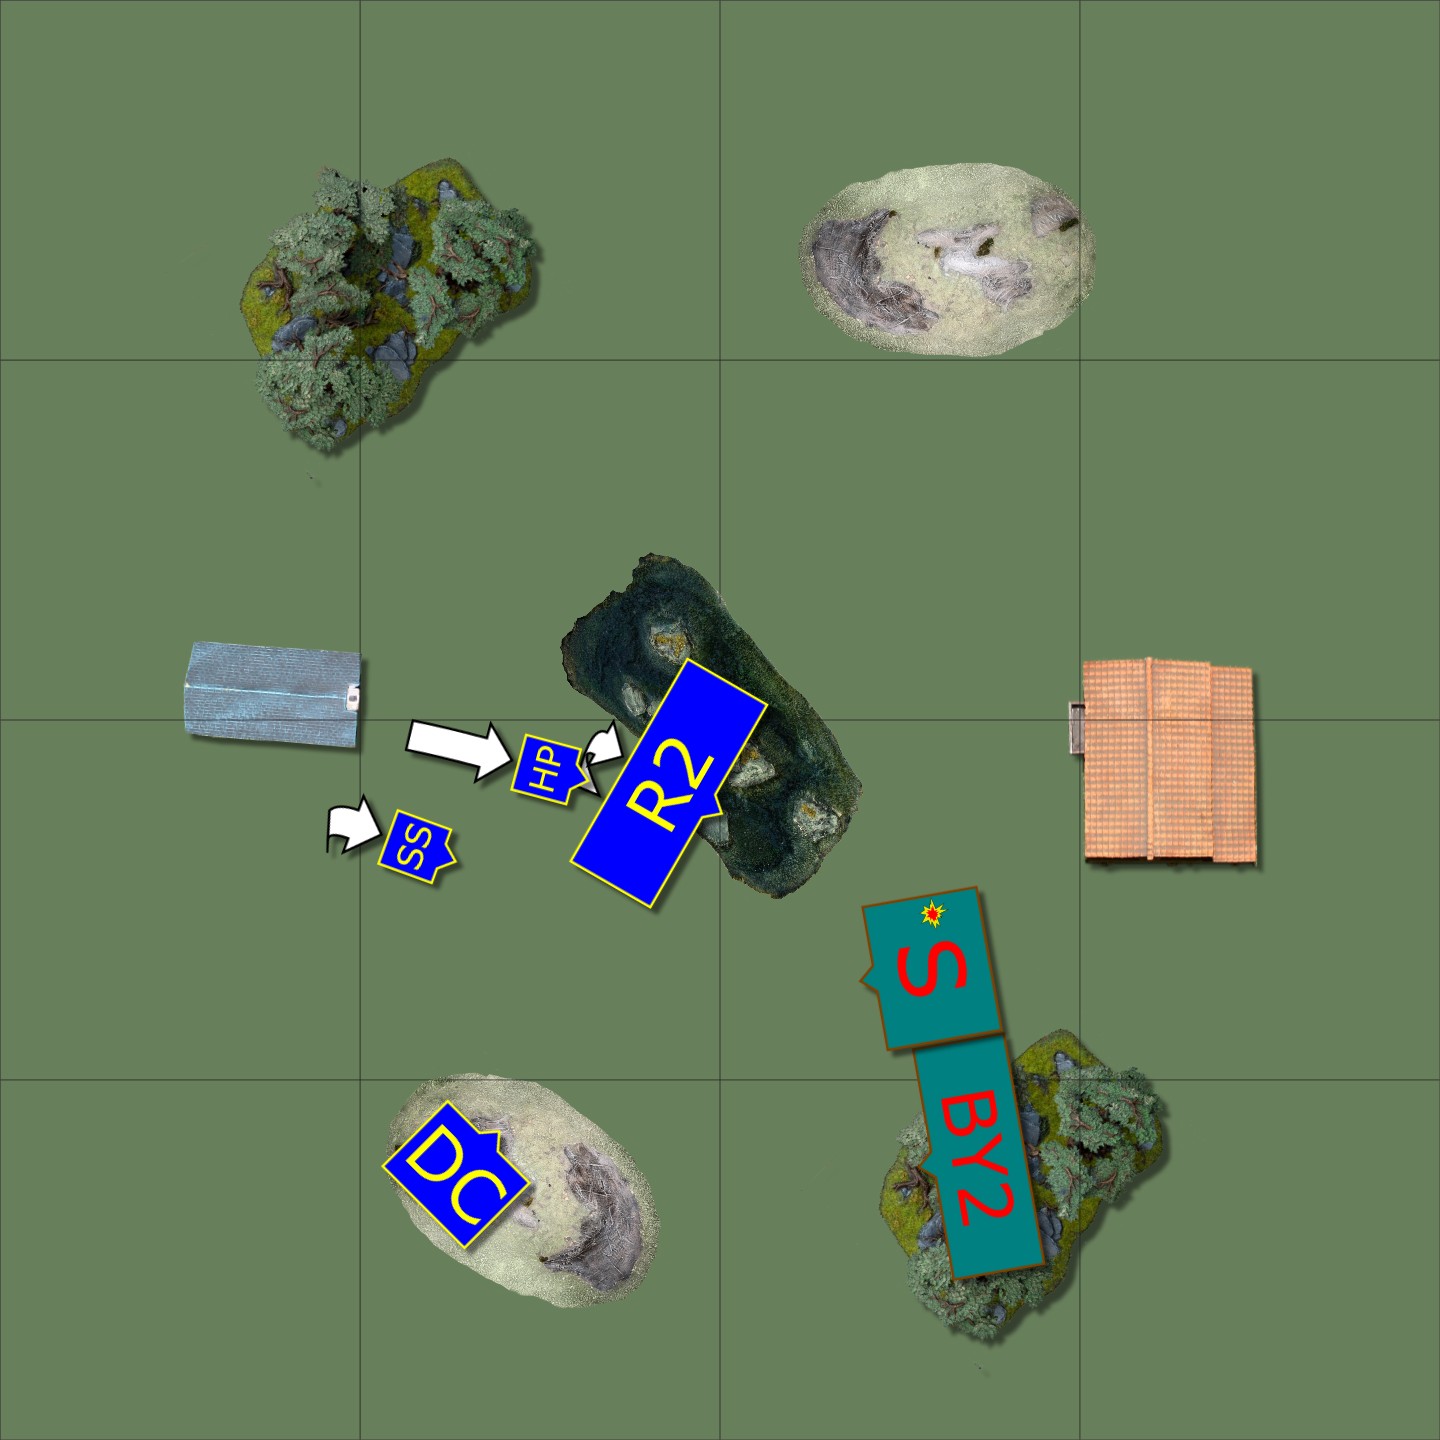
Turn 2

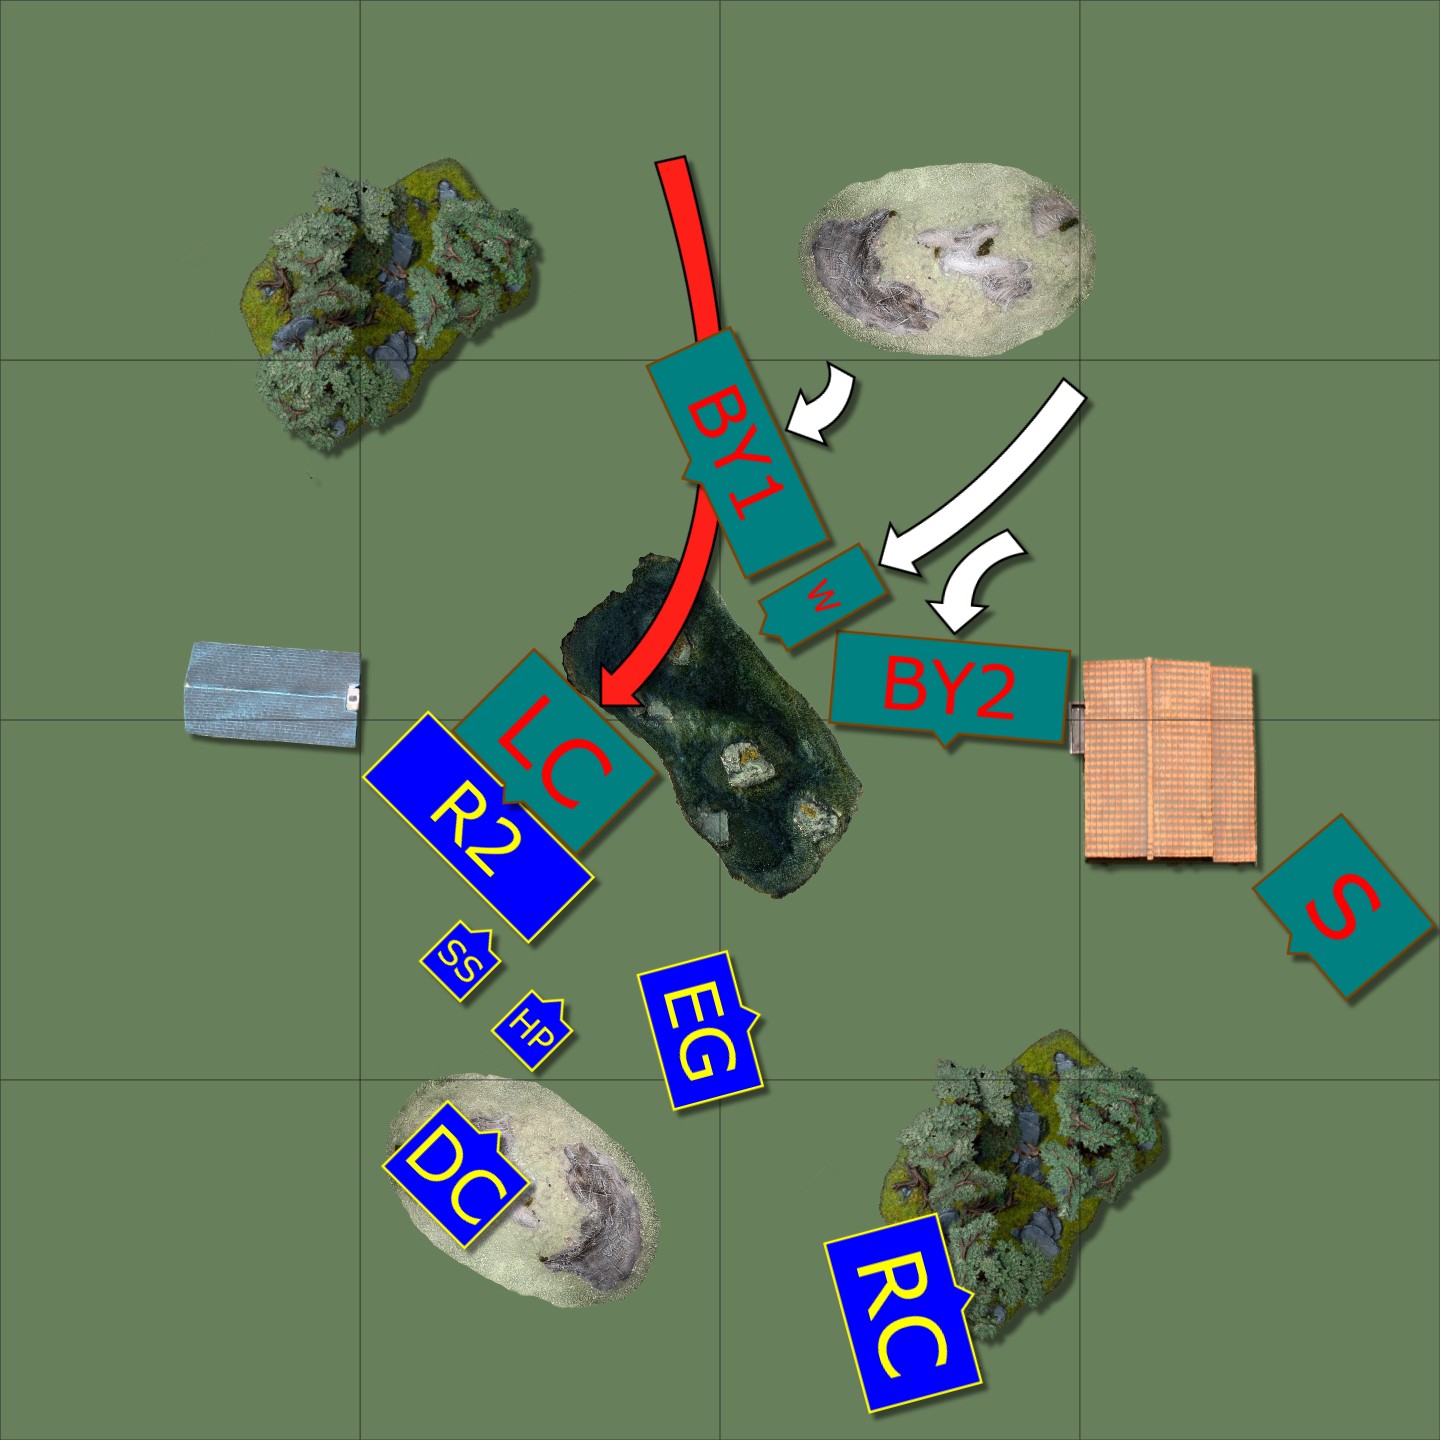
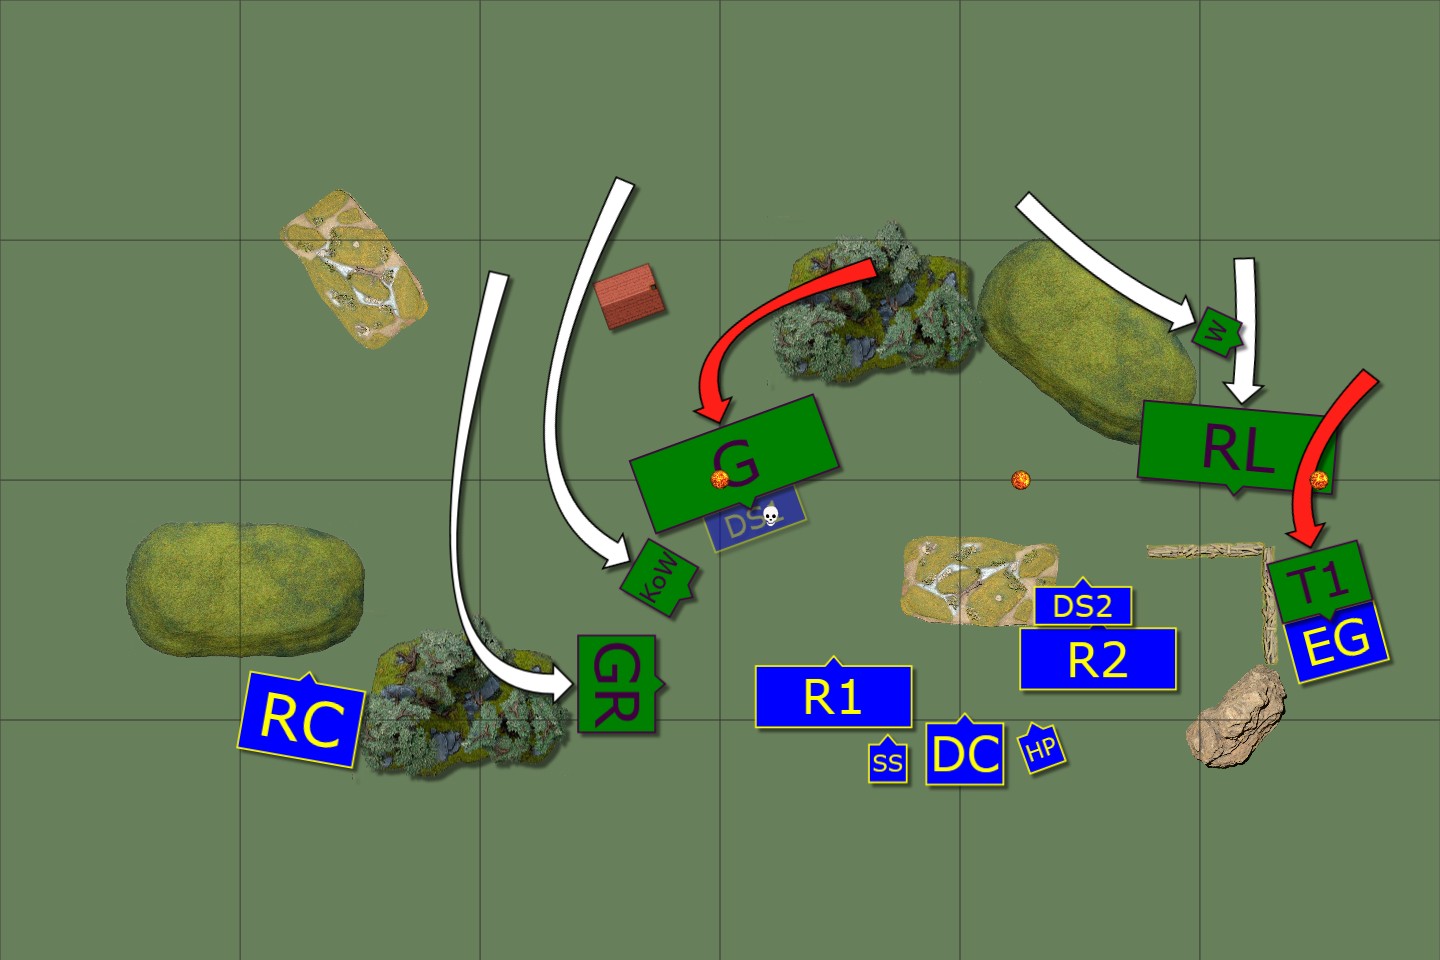
The lionsnarl cavalry charge into my revenants, hoping to punch a quick hole in my line, but just don’t quite manage it. The hordes move forward for backup.

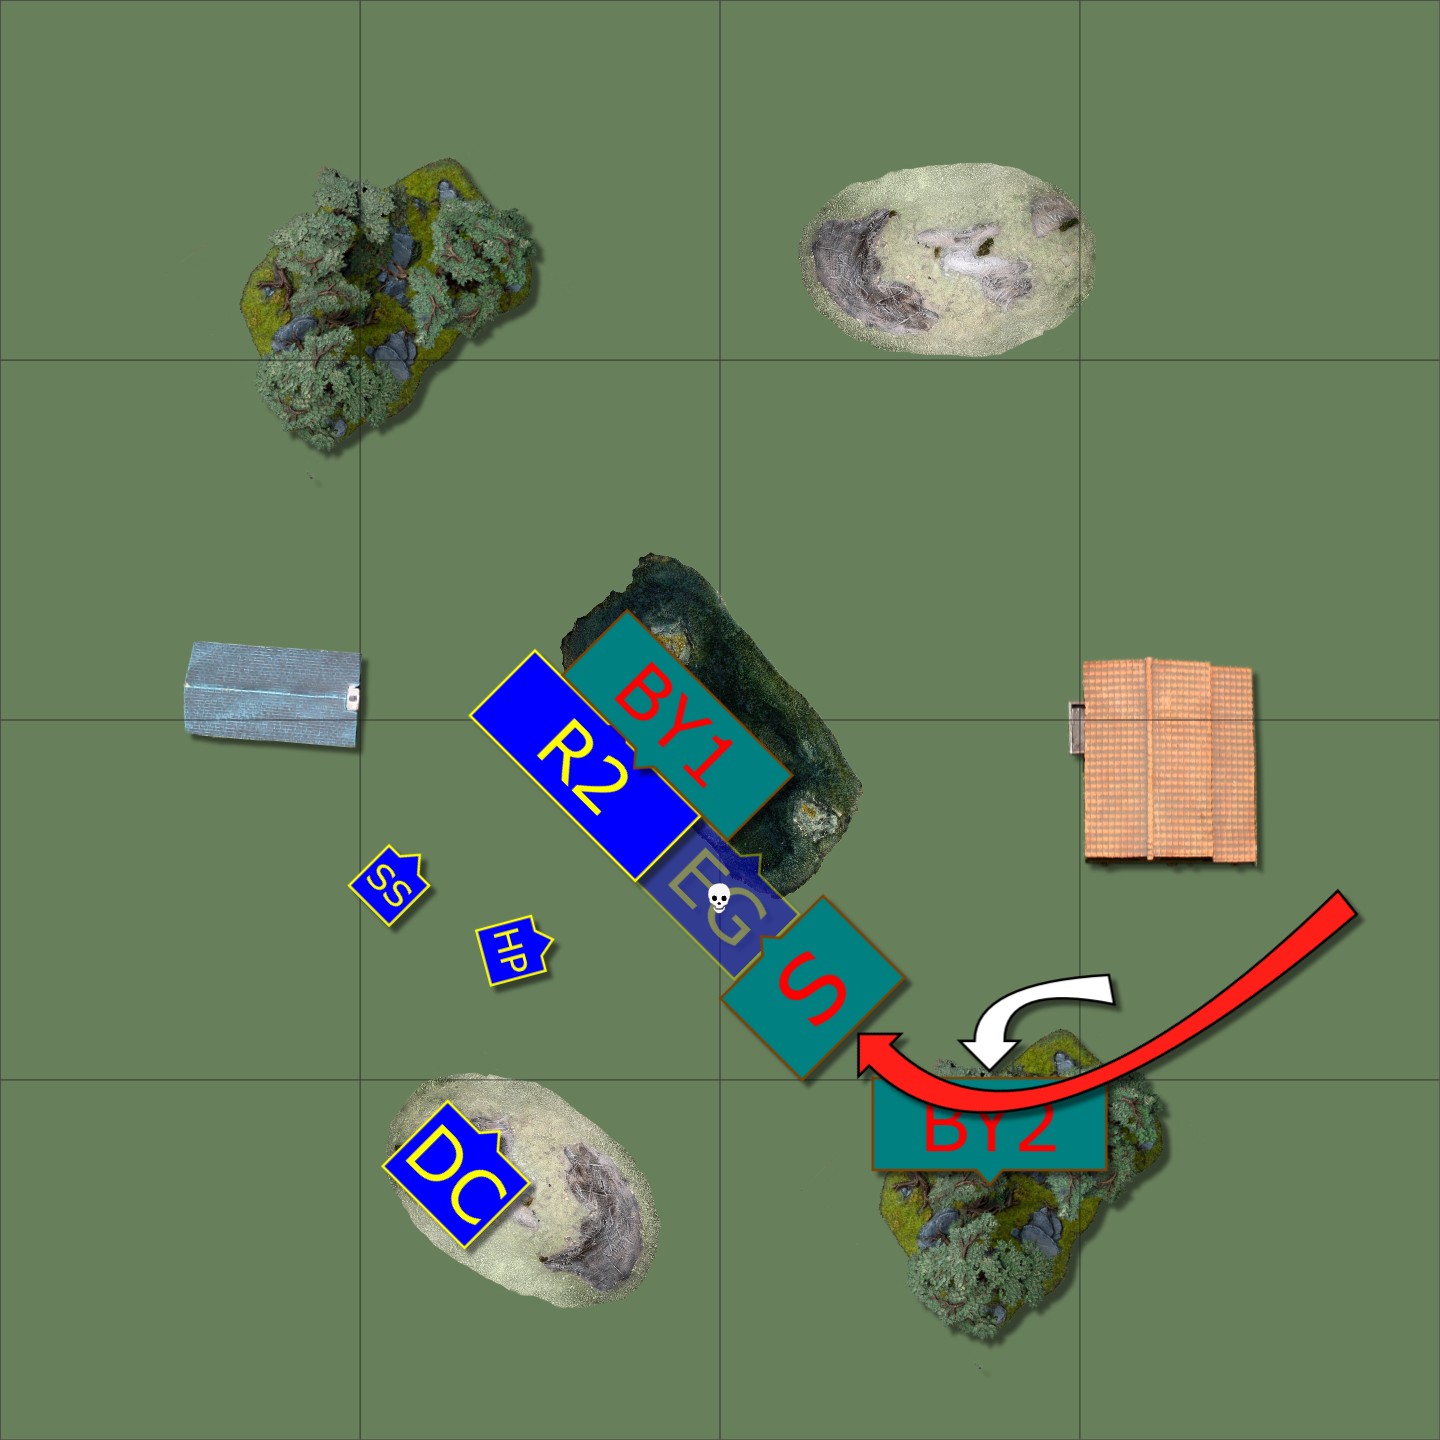
My priest uses the Fireheart Amulet, letting him Surge the enslaved guardians into the flank of the lionsnarls then join the soul snare to rack up some initial damage with Drain Life. The combination is enough to kill the lionsnarls in one turn. My chariots use their Boots to charge the spearwardens. I don’t expect to win there but I want to keep the spearwardens busy away from the main fight.
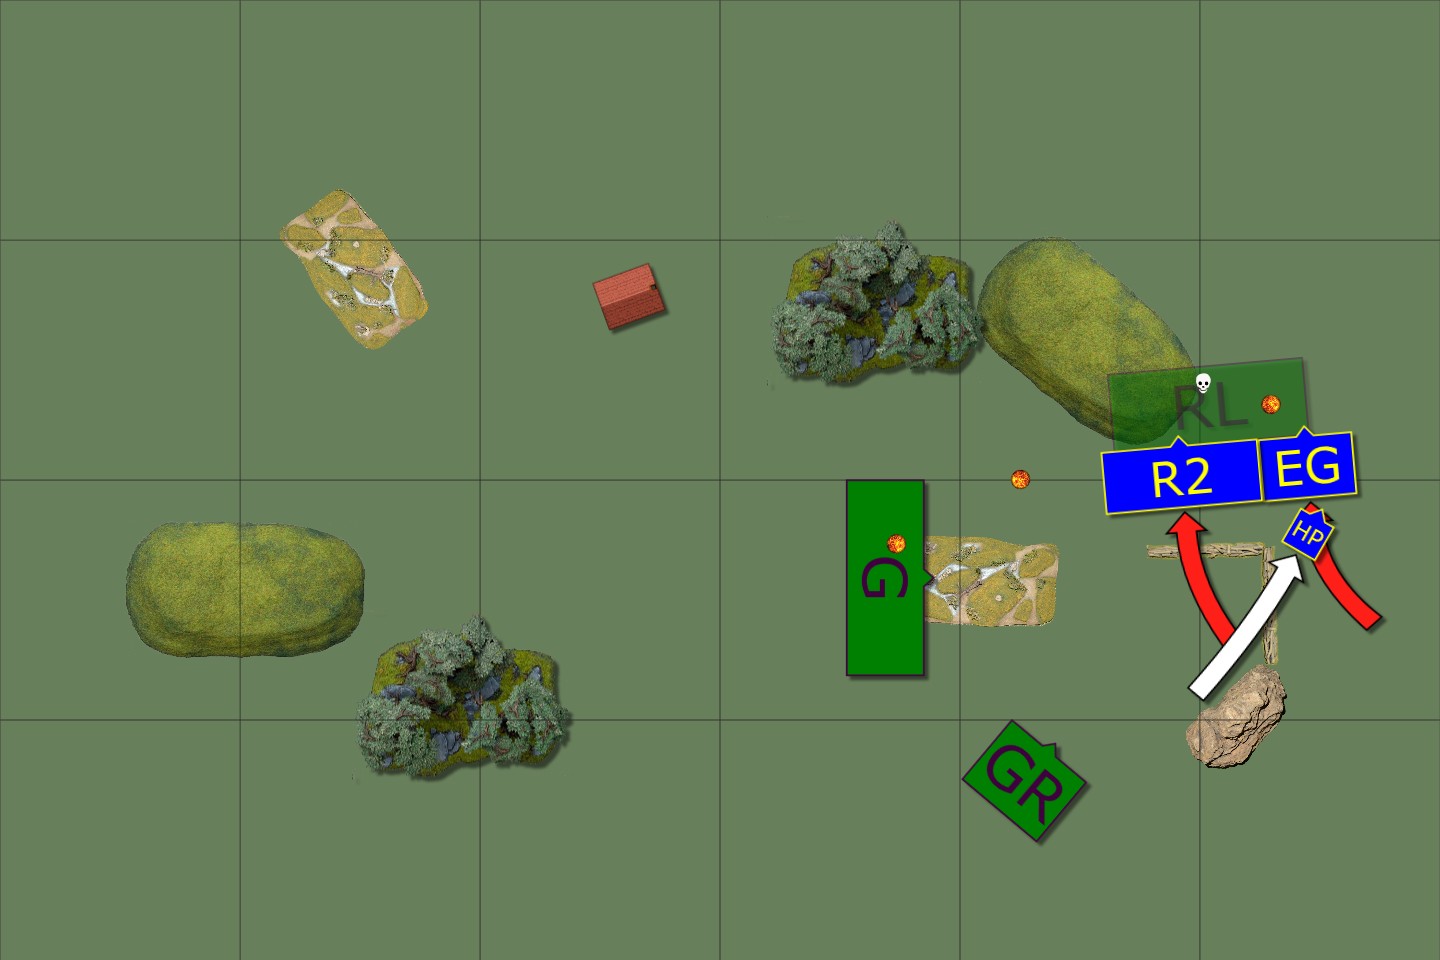
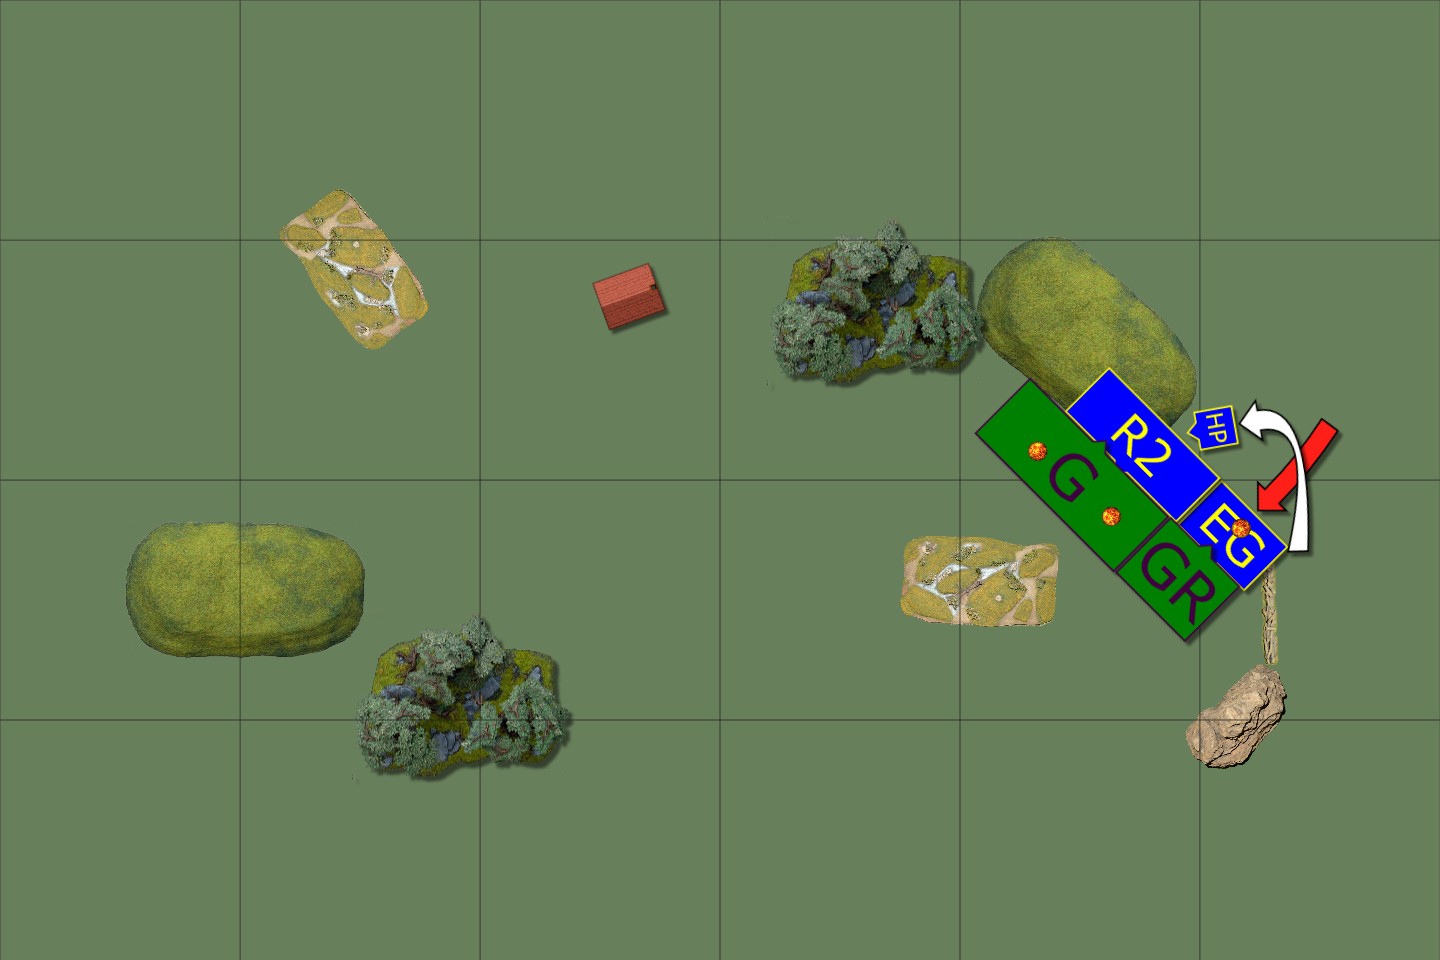
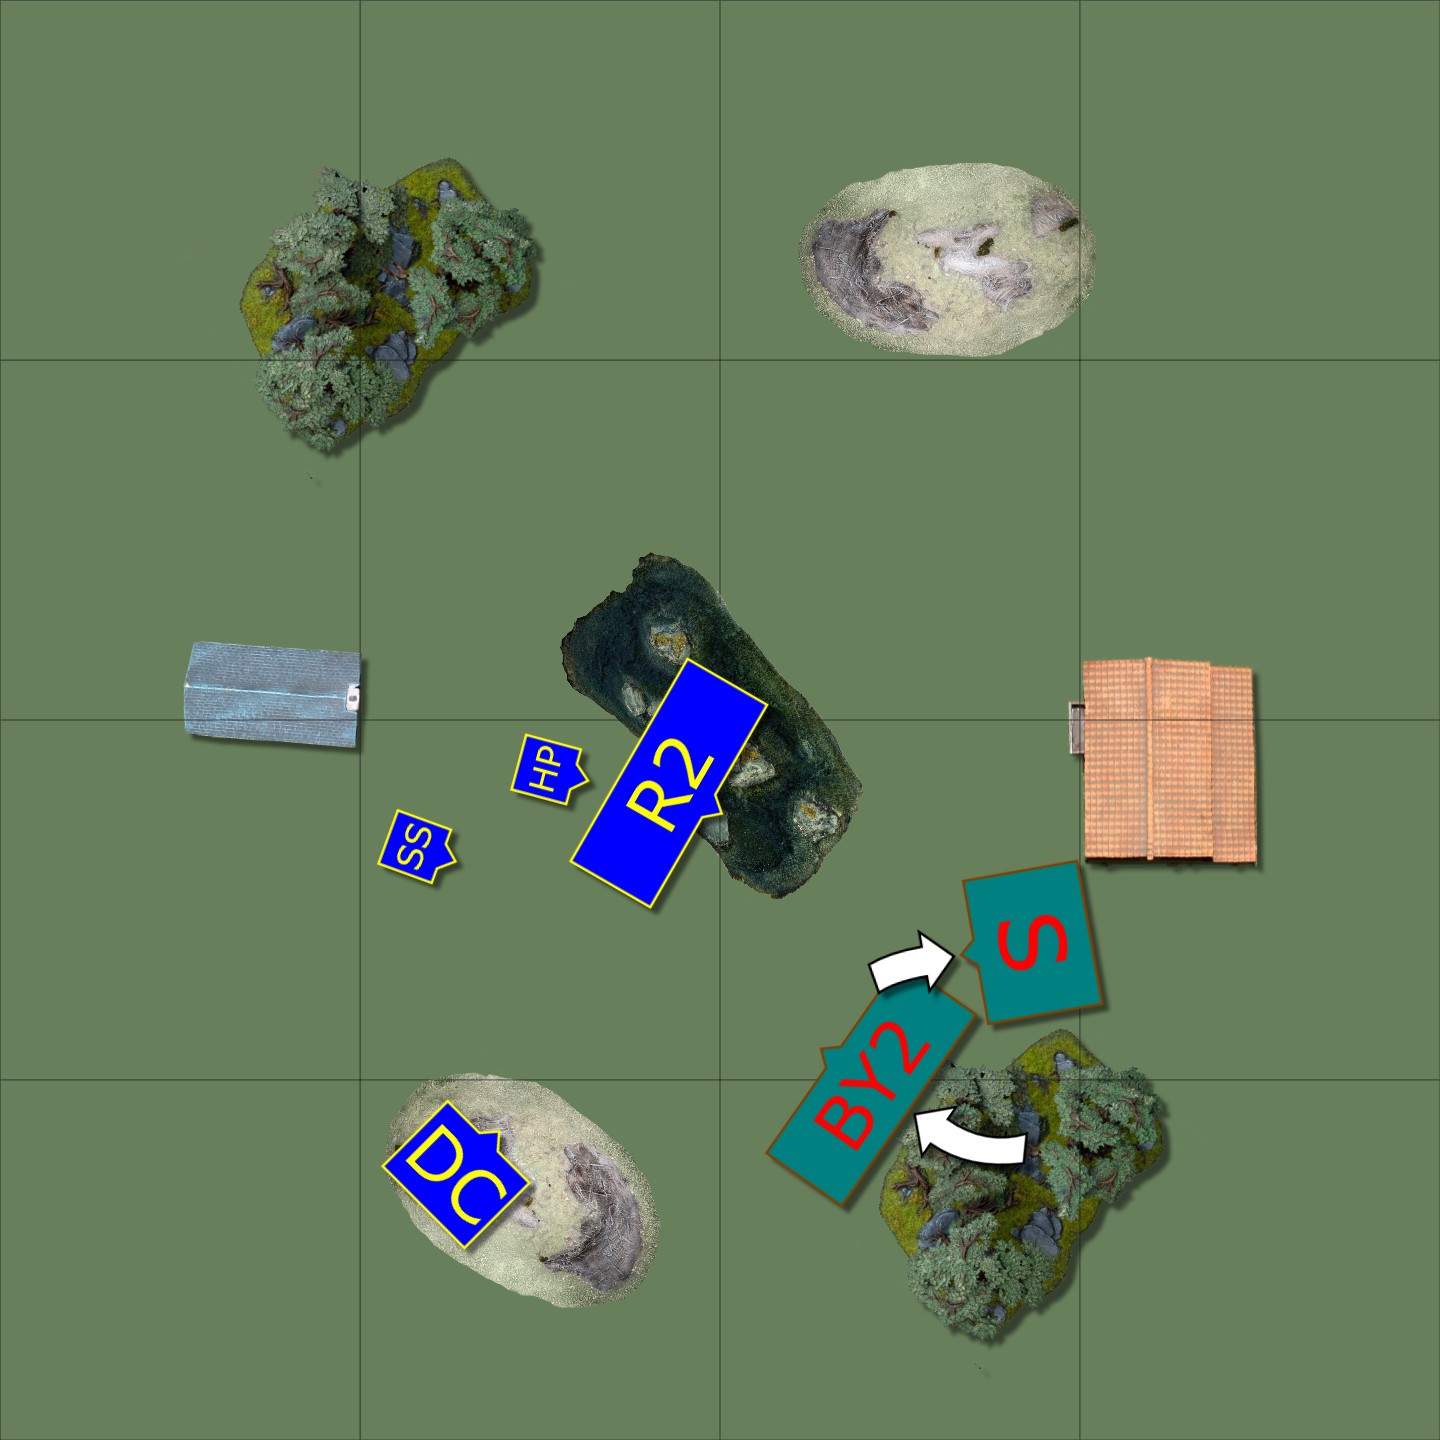
Turn 3

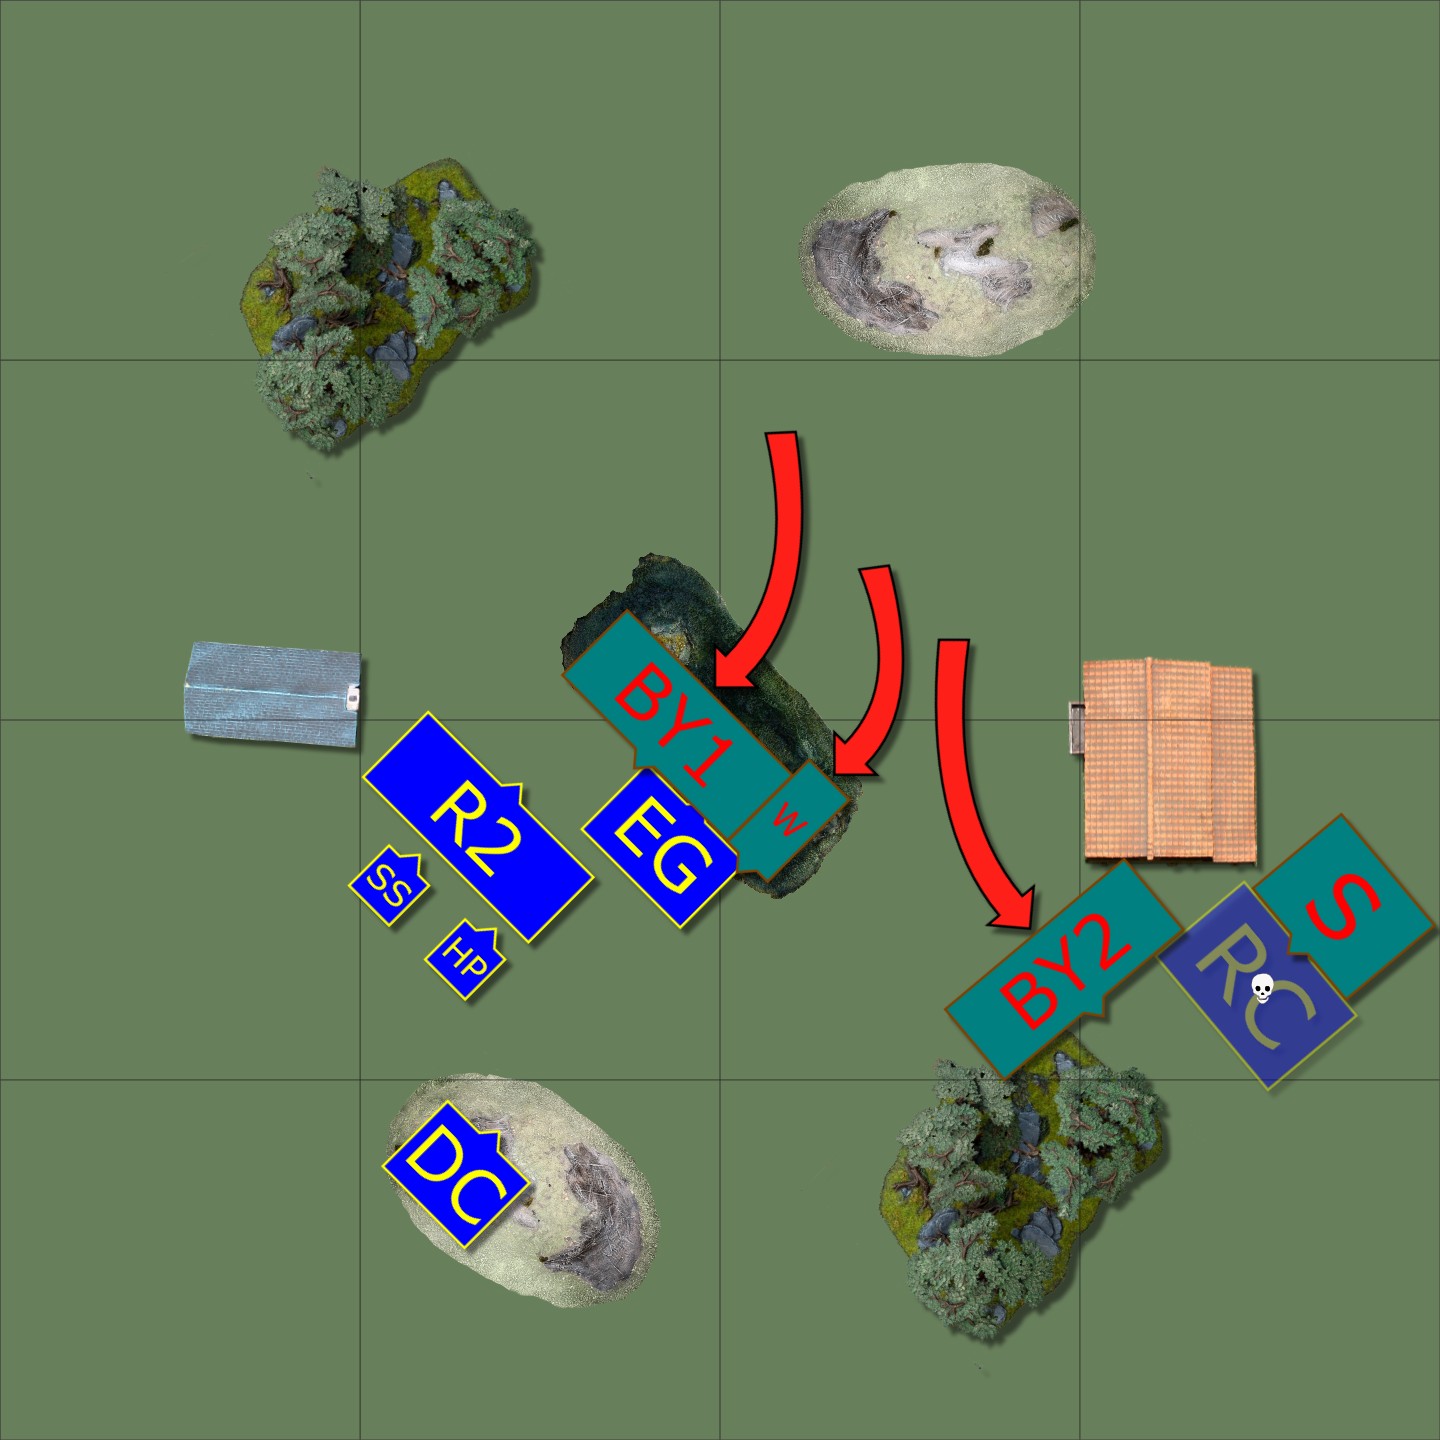
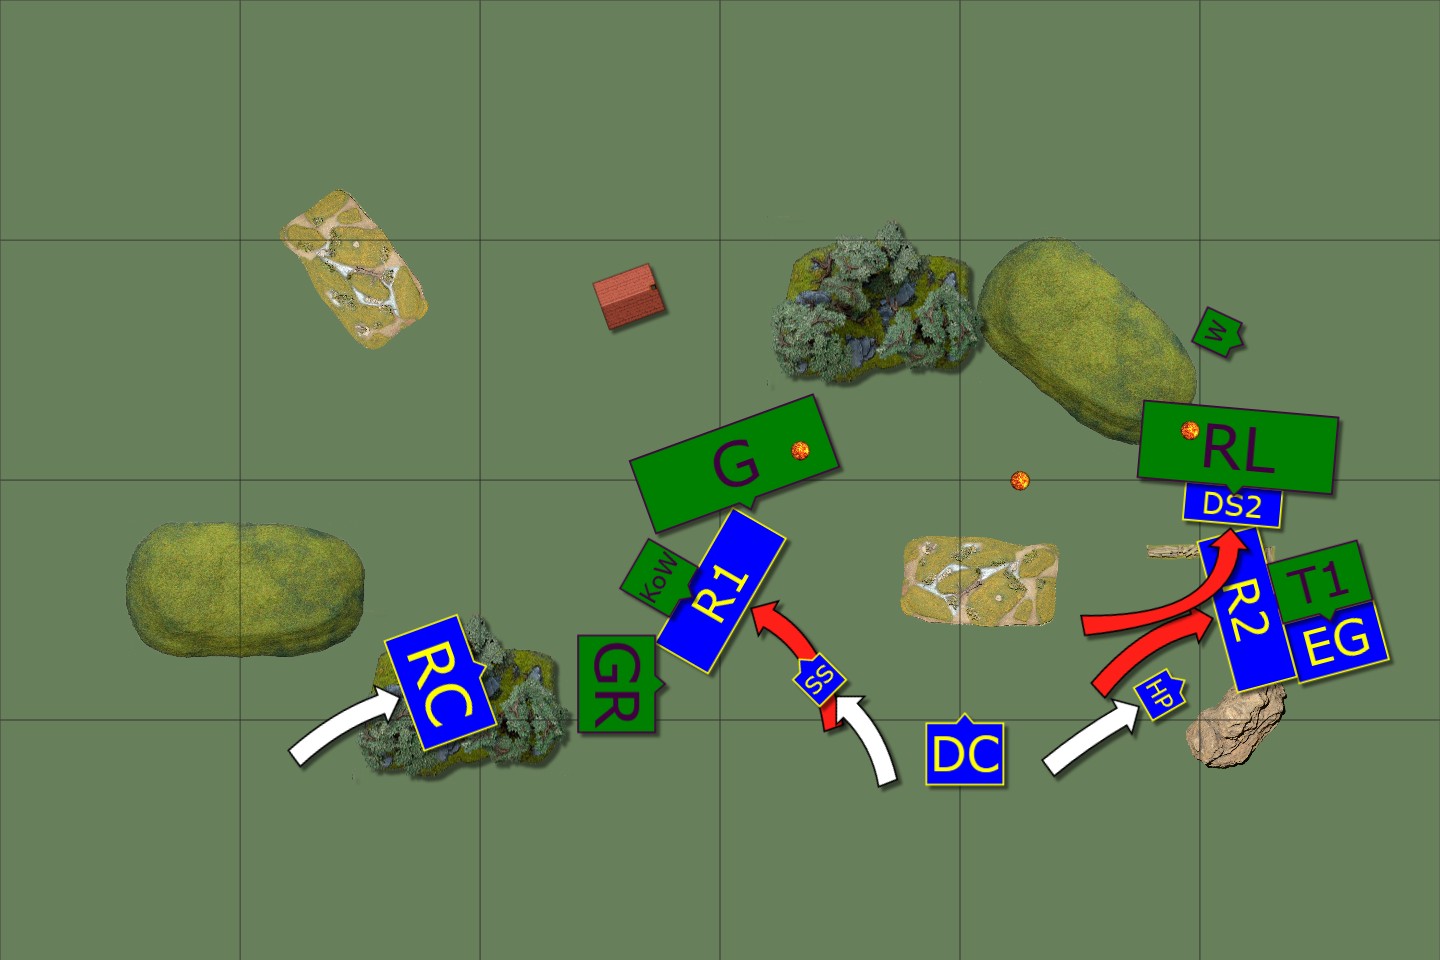
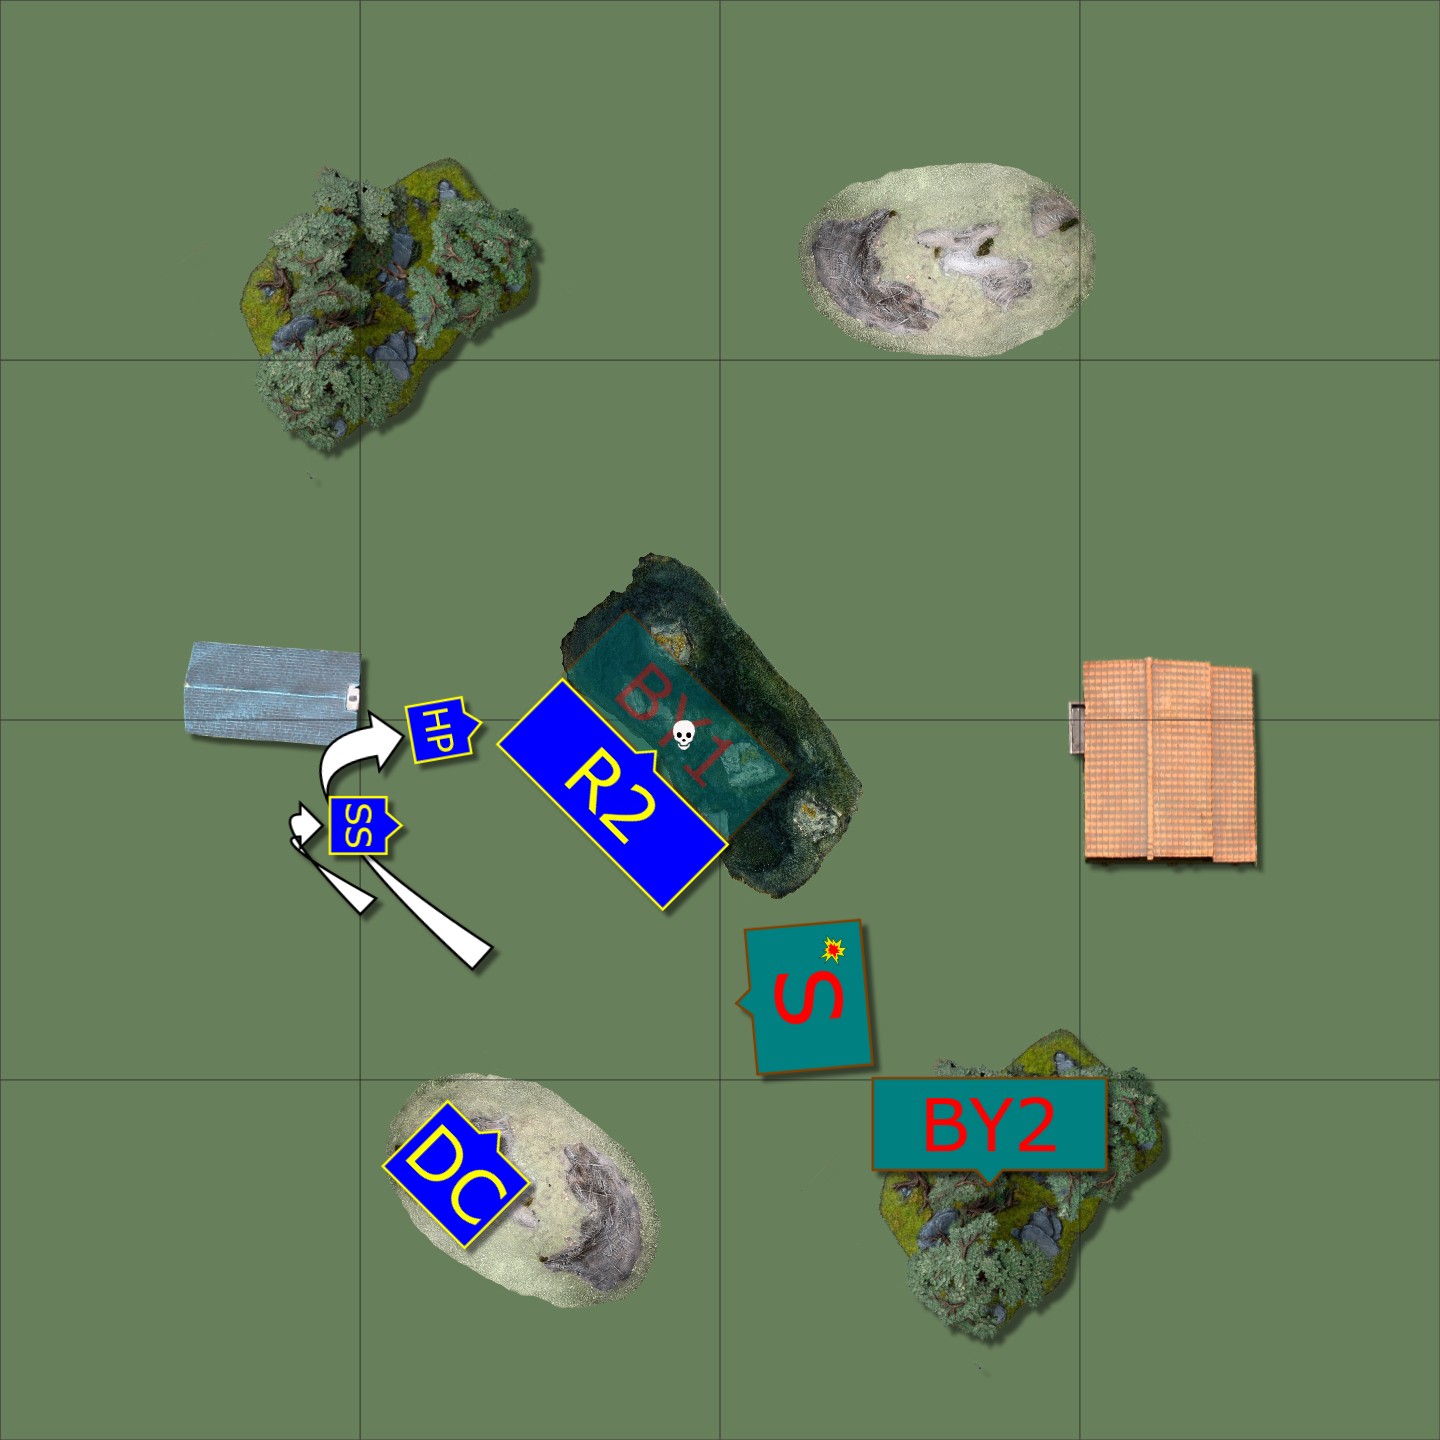
My opponent spots a cheeky charge with a yan horde around the terrain into my chariots’ flank, wiping them out and freeing the spearwardens. The other horde and the witch hunter charge my enslaved guardians, but it’s a hindered charge so the guardians survive.

My guardians reform and make room for the revenants to join in the fight. The priest and soul snare throw their Drain Life at the witch hunter, and the guardians finish him off. My archers are able to put some frostbite on the yan horde on the flank, which means they’re out of range to charge the guardians next turn.
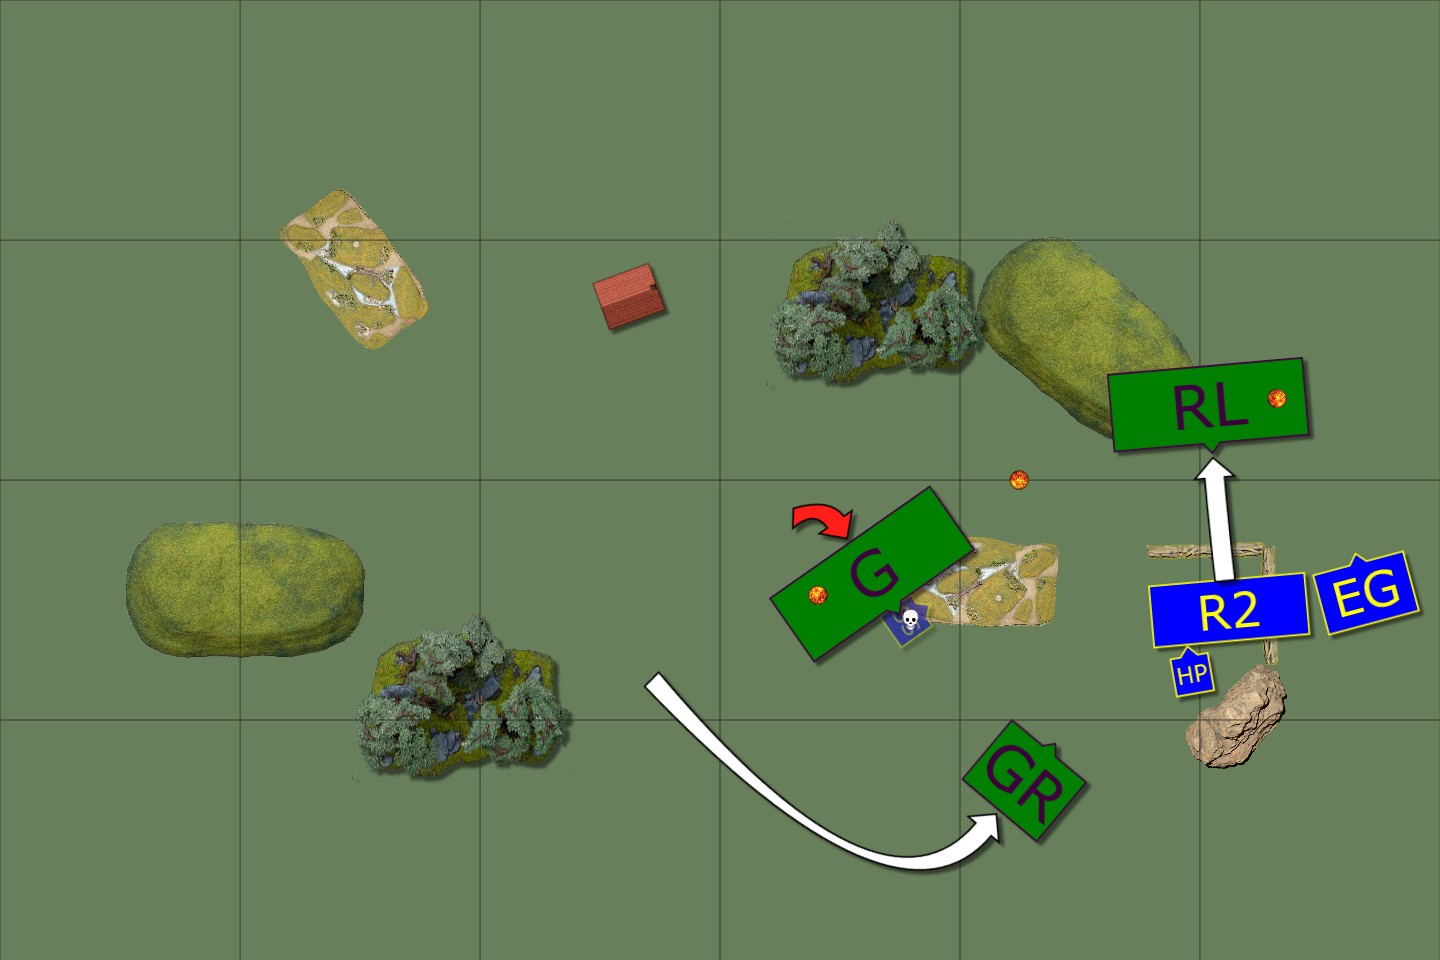
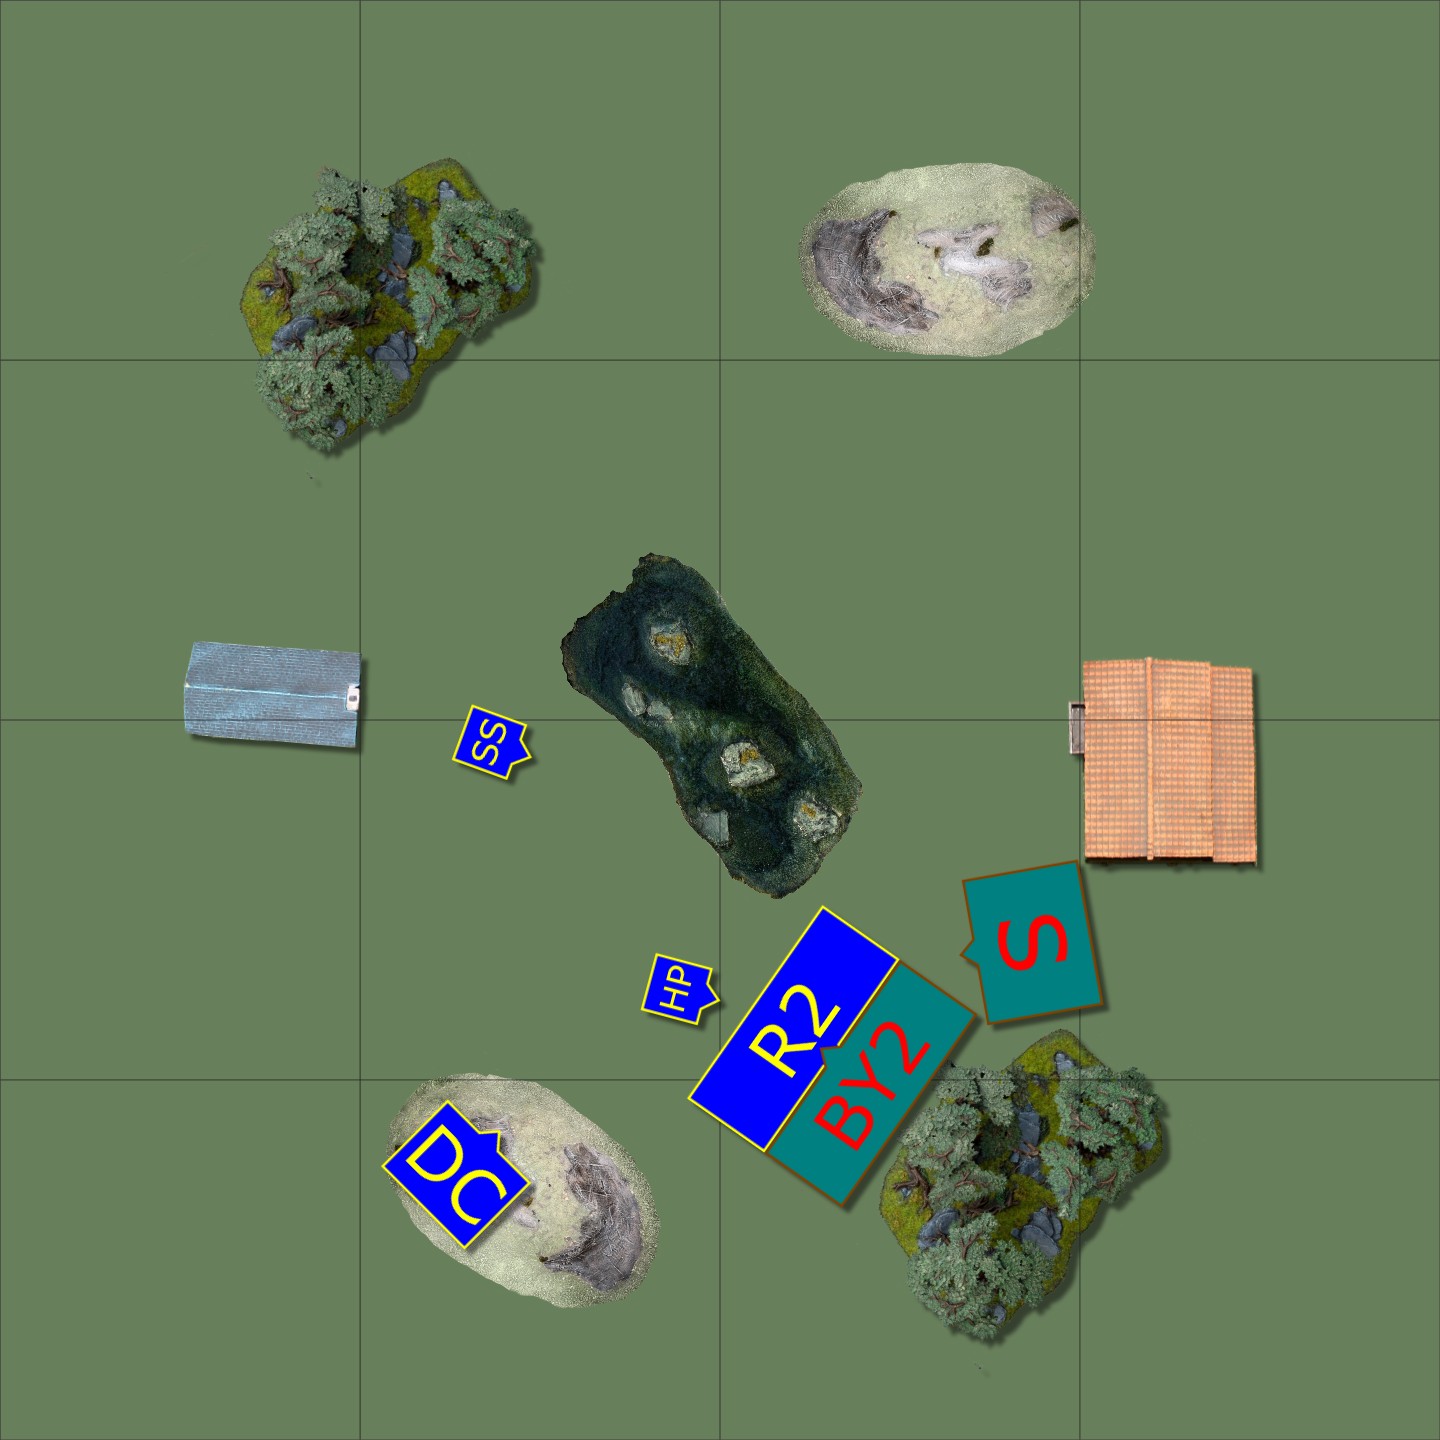
Turn 4

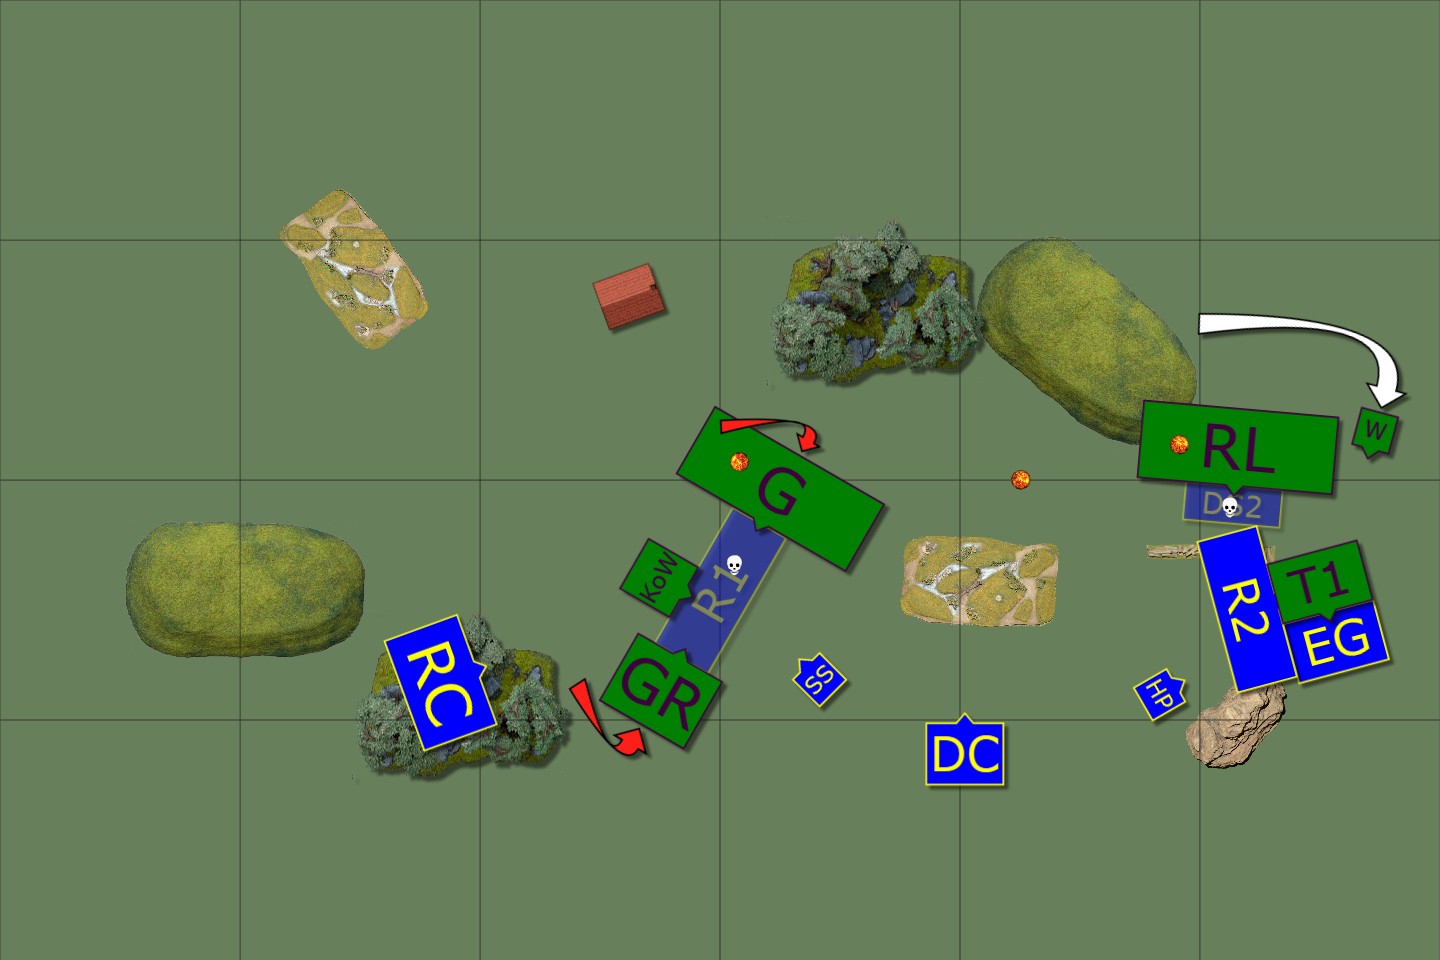
The yan horde get out of the way and the spearwardens charge my guardians in the flank. Between them and the horde in the middle, the guardians finally succumb to their wounds.

My revenants finish off the horde they’re fighting. Meanwhile my ranged units all pour their firepower at the spearwardens and waver them.

Turn 5

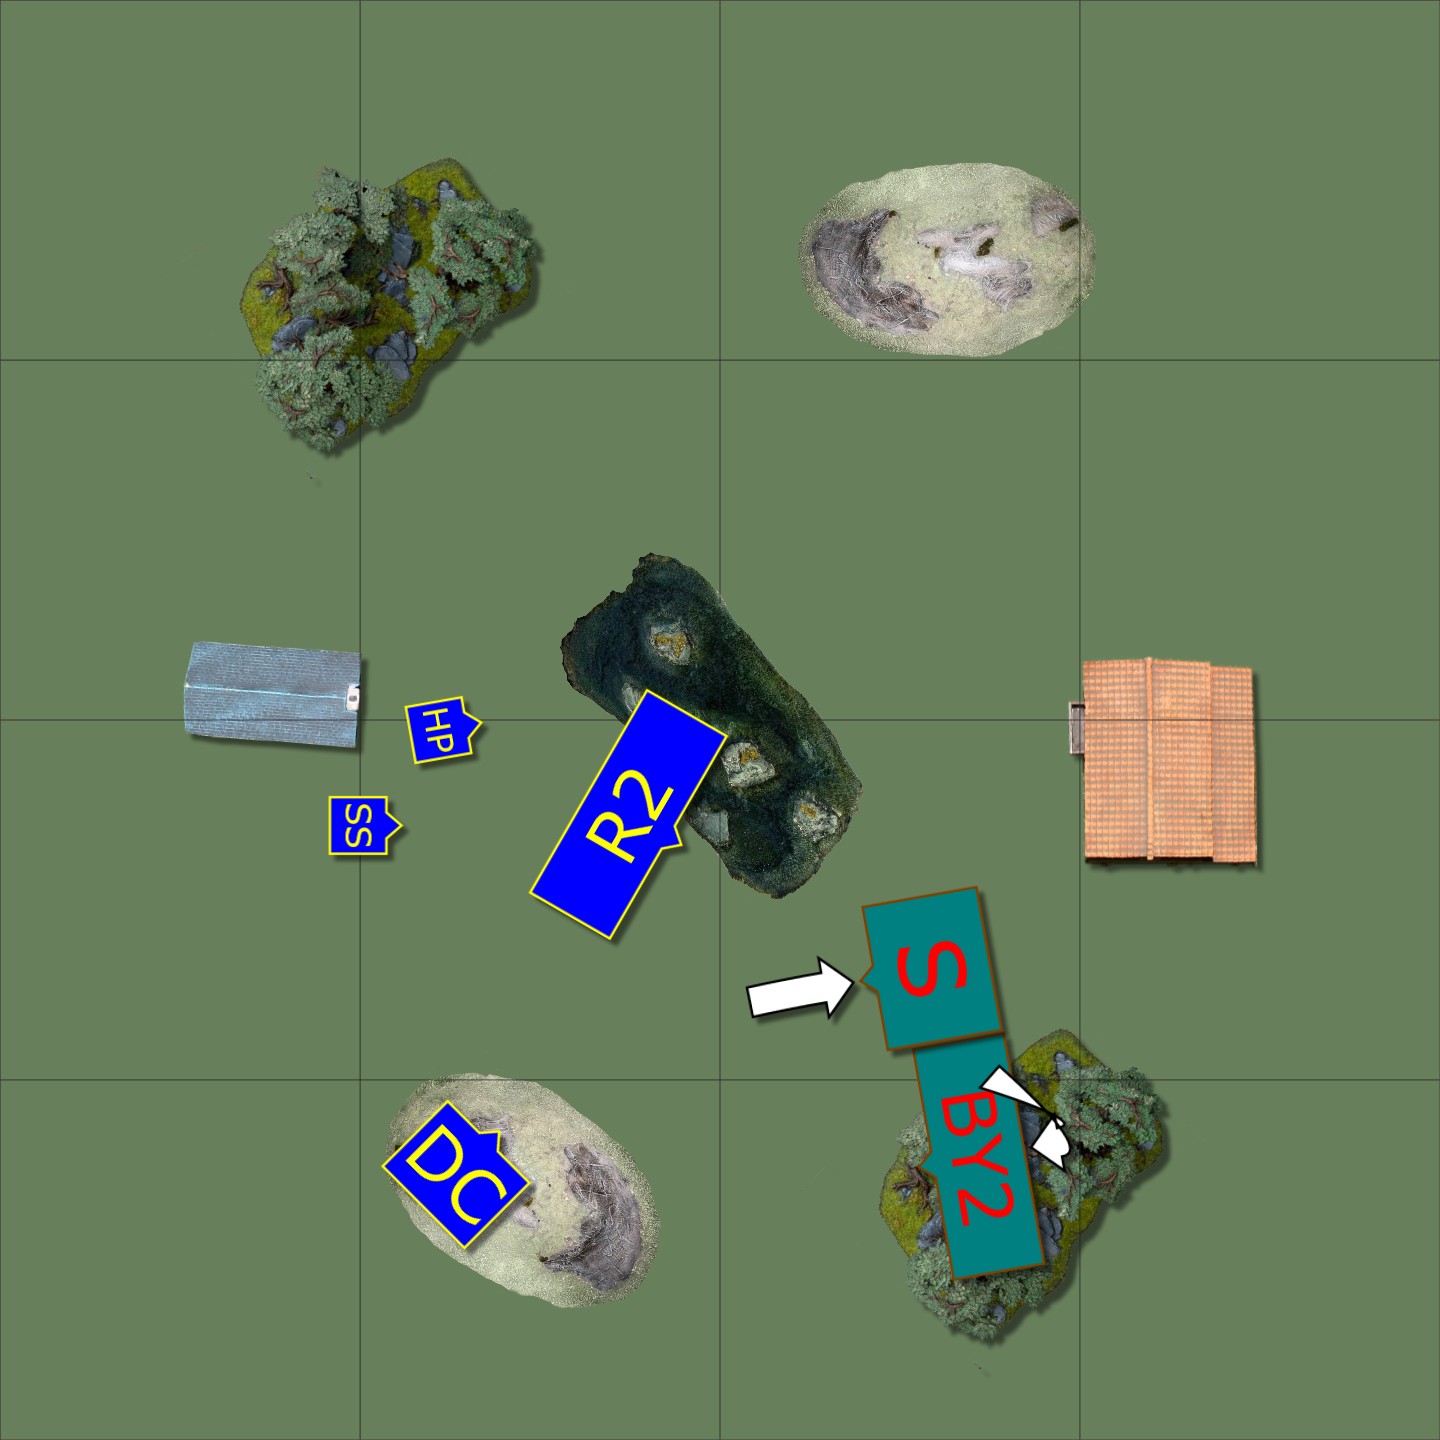
Thanks to that waver it’s a bit of a traffic jam for the Xirkaali. The spearwardens and yan horde reposition themselves to try to disentangle from each other.

I’m starting to think about objectives here. I keep my revenants in the central scoring area, safe in the lake in case of a future double charge. Once again I pour my ranged firepower at the spearwardens, and successfully waver them.

Turn 6

There’s still a big traffic jam, but my opponent is able to swap round the units and get the yan horde into the central scoring zone.

I’m feeling confident about being able to waver the spearwardens, so I decide to take a silly risk and charge at the yan horde with my revenants. I don’t rout them, but once again I waver the spearwardens to prevent any flank charges. In hindsight that should actually have been a rout and not a waver as I managed to devastate them, but we both forgot that rule in the heat of the moment.

Turn 7

The yan horde fail to rout my revenants. We end the game there, as I control the central objective giving me a 2-1 lead.

Result: victory (2-1)

Post-game thoughts:

  • I’m really starting to understand how vital it is to co-ordinate your units and apply your whole battleline at once. I think my opponent’s big error was committing the lionsnarl cavalry too early and allowing them to be dogpiled (pun intended) by all my units. From that point on he was fighting an uphill battle, and just wasn’t able to turn the tables back in his favour. If he’d been more cautious in the centre and more aggressive with the spearwardens at the start he could have enveloped my line and caused me a lot of problems.

  • Drain Life is great for a grindy army! Between the soul snare and the priest I was able to reliably contribute to combats, and the revenant horde even ended the battle on 0 damage. We’ll see how that scales to larger points values, especially with the soul snare being [U].

  • I didn’t use Wind Blast once. I’m not completely writing it off yet but it definitely didn’t earn its points cost this time around.

  • I bloody love the Sandstorm command. Being able to disrupt enemy movement with my archers is so fun, and it feels useful too.

  • On this table size, the diagonal deployment feels very constrained. That’s not a complaint, I like that we have to plan around that uncertainty when list-building, but it was definitely noticeable.

5 Likes

We’re aiming for 1 game a month (roughly) and this week saw me play round 3! This time I was up against orcs. My opponent and I were both coming into this with a 100% win streak so far so the pressure was on to fight for 1st place! The game was 1250 points, on a 6’ board deploying along the long edges, and the mission was Loot (3 loot counters placed along the centreline).

The Armies

Compared to last month I added a horde of revenants and two troops of desert swarm to try to screen my front line. I had to drop a lot of magic items and unit upgrades out of my list to make room for them, but I don’t mind that.

Our two armies are actually quite similar in style here: two hordes of infantry with a supporting unit behind them, and a unit each of cavalry and ogre-equivalents to act as hammers. The difference is that I had some archers and chaff, while my opponent brought along the first dragon we’ve seen so far this campaign!

Terrain and Set-up

The terrain was just example #2 from the rulebook. We ended up setting up the loot tokens close together, giving us one compact area of the board to scrap over.

Deployment

Both players deployed our infantry core in front of the objectives, as you’d expect. The trolls and enslaved guardians were staring at each other along one flank, and our fast units were out on the other wing. I knew my chariots would be no match for the gor riders or the krudger so I deployed a little wider than them, to threaten flanks and try to force them to advance more cautiously.

My desert swarms used their scout move to just zip forward.

Turn 1

The orcs took first turn. Predictably, both sides rushed their infantry forward towards the loot counters. The cavalry advanced slightly, waiting for their moment. My archers put a bit of damage on the greatax horde and froze them thanks to the “sandstorm” command.

Turn 2

The gors and the krudger both rushed forward to put pressure on my left flank. The riftforged orcs grabbed one loot token while the trolls charged my enslaved guardians. They did a scary amount of damage but fortunately failed to rout them. The greatax horde charged my desert swarm and pummeled them, grabbing the other token in the process. I’m a bit annoyed that I could have avoided that if I had left my swarm even half an inch further back, as the orcs were slowed down by that frostbite command on my archers. Alas, I was so caught up trying to get out of the gors’ front arc that I forgot to consider that.

I sent my remaining desert swarm to valiantly stall the riftforged horde, while my priest surged the revenants into the trolls. The graphics I’ve used here make it look like the revenants don’t fit but they did in the game itself! I was really hoping for a one-round rout against those trolls, but they held. The other revenants horde attacked the krudger, but a rout was always pretty unlikely and it didn’t happen for me. The archers shot the greataxes and the soul snare attacked the krudger, but it was just plink damage really.

Turn 3

Over on my left my revenants got very much sandwiched between 3 enemy units. Suffice to say, they didn’t last very long! Over on the other side my desert swarm were likewise crushed underfoot in short order.

On my turn the revenants and guardians finished off the trolls, with the priest’s help. The chariots charged into the krudger’s rear and managed to rout it - a bit of a cheeky result from a hindered charge but I’m not complaining! The archers charged the greataxe horde. No dramatic results, but it locked them down for a turn.

Turn 4

The greatax horde reformed onto the archers, and the gor riders charged the chariots. Both routed their target with ease. The riftforged horde charged my revenants while the war drum made a sacrificial charge to delay my guardians.

My guardians dismantled the drum and rolled forward while the two infantry hordes swung at each other. The soul snare moved up to get in the way of the greataxes and gor riders, and chucked another couple of damage onto the riftforged in the process.

Turn 5

The riftforged horde withdrew from the revenants, to avoid getting flanked by the enslaved guardians next turn. The gor riders zipped round to threaten my rear while the greataxes chopped the soul snare into firewood.

I charged basically everything I had left at the retreating riftforged orcs and managed to rout them. The guardians claimed that loot token, and we turned to face the remaining orc units.

Turn 6

Both orc units charged my revenants but were unable to rout them. In the process the greatax horde picked up the remaining loot token, putting the orcs 2-1 ahead.

I didn’t have space to get my enslaved guardians into combat with the greataxes, so the revenants reformed up the line and the guardians attacked the gor riders instead. The priest and revenants focused their attacks on the greataxes but didn’t manage to shift them.

The game ended after turn 6, resulting in a 2-1 victory to the orcs and putting my opponent at the top of the league scoreboard.

Final Thoughts

  • This felt very close throughout! I feel like if luck had been a little more on my side (especially if I’d managed to shift those trolls one turn faster) then I could have swung it my way. Still I can’t complain, my opponent played well and definitely earned the win.

  • Drain Life is still helping but it’s definitely not as impactful as it was in previous rounds. That makes sense, but going forward I’ll need to get used to it being more of a nice bonus than being a game-winner by itself.

  • I think if I’d remembered to account for Sandstorm when positioning my swarm back in turn 1, that would have made a big difference to the shape of the board. Denying the greatax horde that charge opportunity might have slowed down my opponent’s advance on that flank and given my right more time to work. EoD don’t have many commands, so I need to remember the ones I do have!

  • Going forward I’m likely to take another hero, as one inspiring source isn’t a lot to cover a battleline this size. I’m also tempted to upgrade my chariots, to help them keep up at higher points values and of course to reward them for slaying a dragon in this game! The obvious route is to replace them with some sandbourne wyrm riders, but I suspect support slots will be in high demand in future rounds. If I have the points I might also add some skeleton spearmen to deal with cavalry/flyers, but I’m not sure if it’s more cost-effective to just have more desert swarms instead. I’ll have a play on the companion and see what I come up with.

  • I’ve now played everyone in our league once, so I’ve seen their armies and their style of list-building and playing. And of course, they’ve all seen my army now too! There’s still 2 games to go against each opponent, so plenty of time for the scoreboard to change.

Next time I’ll be battling the Basileans at 1500 points. The game will be Compass Points, deploying from the short edges of the board.

2 Likes