Opening
Hello everyone
Here is a battle report from Swalton501 which was a part of the SlowGrow League organised by Albatross Albert.
This was a showdown between Basilea and the Orcs at 1750pts fighting the Wrack and Ruin scenario.
The Basileans and Orcs have faced off before in the Slow-Grow league with a victory going to the Orcs thanks to masterful positioning of the Orc Great Ax horde. I was determined this time to not have my army cracked open by them, hopefully by threatening the flanks or a double charge with my floating Elohi units.
Below are the army lists for each force, the Orcs held the superior ranged ability and would be able to churn through enemy units thanks to almost all of the army having Crushing Strength 1 or greater, whilst the Basileans had a mixture of fast moving heavy hitters, and slow attrition troops (with some screening troops to increase their survivability as a force)
Using the new Basilean list, I was also able to take the Paladin Monster Slayers which I was excited to see get into battle:
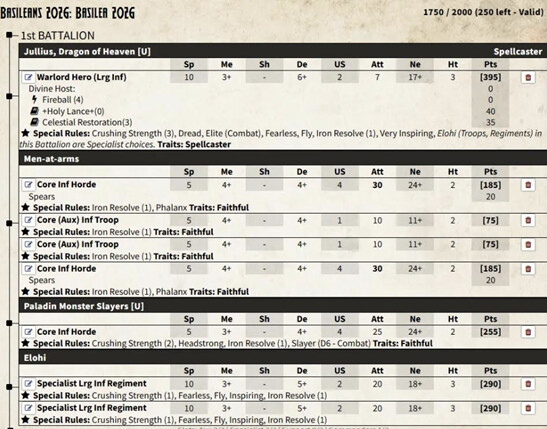
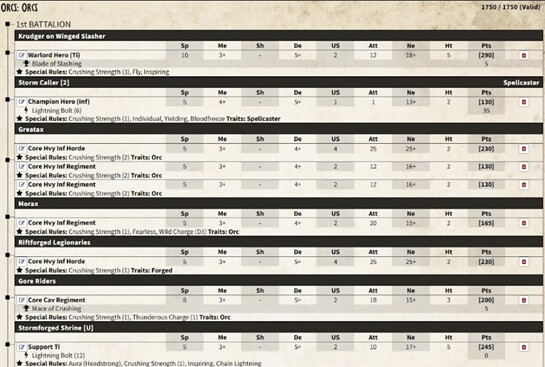
Deployment
My initial plan was to have my hordes of MaA move into one flank and hold out, whilst my monster slayers and an Elohi unit threatened the other from the centre (hopefully guaranteeing me the final round point whilst I contested the others), with some MaA screening troops used to limit the effectiveness of any charges from the Orcs. I had also held an Elohi unit in the centre to allow me flexibility to charge into either flank depending on opportunities that presented.
My opponent intended to move onto the scoring areas early and churn through my army, using the central hill to avoid receiving early charges, which worked well to his benefit.
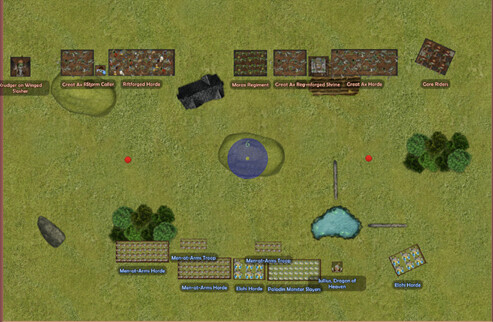
Basilea Turn 1
Not a lot happened this turn, mostly a slow advance trying to keep my force together in the centre before splitting off onto the flanks to contest the scoring areas later. I attempted to cast cleanse on my Elohi to soften the blow of an incoming lightning bolt from the Stormforged Shrine, which worked well.
In my shooting phase I attempted to use the new spell of Holy Lance, which did 0 damage to the Morax unit, the gods have abandoned Julius this round it seems!
Orcs Turn 1
Similarly the orcs moved up their force, maintaining a good line, with the exception of an At the Double! Order for the Krudger on my left flank to threatean the left flank movers. Thanks to the forest my MaA was in, and their Phalanx trait from the spears, I wasn’t too concerned.
The Stormforged Shrine also moved up to be able to shoot at any unit in my army. The Orcs were well positioned to be just outside of my charge range this round.
This shooting round, the lighting bolts did some great work at disrupting my lines.
The Storm Caller successfully got off frostbite on a screening unit of MaA troops on the left flank, slowing their advance, whilst the Stormforged Shrine lightning bolted into the other MoH troop, wavering my troop.
Basilea Turn 2
This turn, I had to maneuvre around my troop on the right flank, electing to slow my advance instead of breaking up my line. I’ve been punished before for letting my faster movers, and heavy hitters, get out of position and suffer flanks/being outnumbered so I was determined this battle to not have this happen.
With cagey movement forward, wavered MoH made them an ineffective screening unit so I did have my Paladins move in front of them, accepting this likely meant they would receive a massive hit from the Great Ax Horde in a coming turn.
My MaA troops in the forest rotated to ensure a front facing to the Krudger whilst keeping the Legionnaires and Great Ax Regiment in their sights. My other MaA troop and Horde also turned to head to the left flank. My Elohi and Paladins moved up slightly alongside Julius.
My only shooting was the Holy Lance did more this turn, putting 3 wounds into the Morax regiment. Elohi and Gore riders continue to dance around each other.
At this point in the battle I somewhat regretted having both of my MaA hordes on the left flank, as they would have been very helpful to have against the Great Ax horde, but alas, the die was cast!
Orcs Turn 2
A great turn for the Orcs this round.
The order Up and At Em successfully went off on the Great Ax regiment, allowing them to charge into my forested MaA horde, they were joined by the Krudger, who whilst both were hindered did successfully land 10 wounds on my horde, a notable chunk of their wounds.
The Stormforged Shrine really shone this round, as it put 6 damage into the paladins and bounced into to the Elohi. The Elohi’s were unharmed, however on a roll of double 6s for nerve my paladins were wavered, absolute catastrophe for my plans to advance!
The remaining orcs repositioned, including the Gore Riders on my right flank, however they were now somewhat hemmed in by the Great Ax horde and the forest, meaning any charge they would attempt would now be hampered, unless also targeting the same target as the Great Ax Horde.
The Orcs were putting on the pressure on the left, hopefully my MaA would hold!
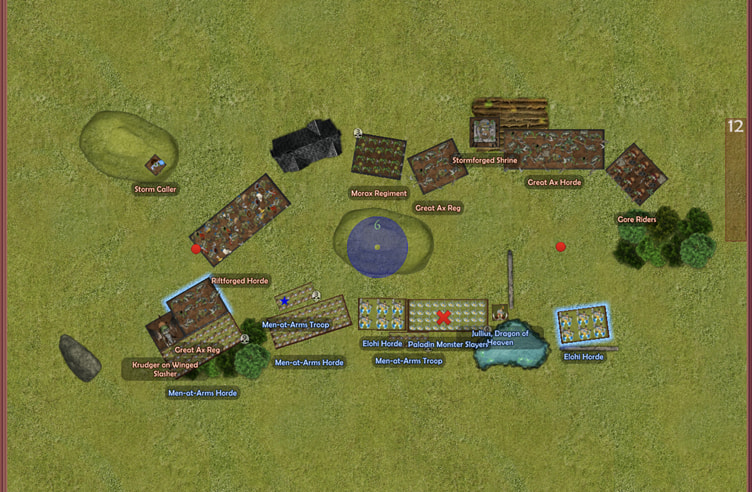
Basilea Turn 3
This was the start of the scoring turns and I was quite far out of position due to the wavering of my troops earlier. It was now that I had to engage hard on at least one flank. I had my forested MaA horde engage the Krudger and Great Ax Regiment, my MaA troop on the left flank lead a suicide charge into the Legionnaries on the left flank, whilst my second MaA horde was able to side flank the Great Ax regiment, sending 60 wounds from them alone into the Great Axes.
The Great Ax regiment was flanked (only just due to my lower than average damage roll) and the Krudger held. My MaA troop did a surprising amount of damage to the legionnaires, but it was clear they were doomed from the start. This was starting to give me hope for the left flank.
Not wanting to leave myself exposed to multiple deadly charges on the right I was slow on the advance, but was able to get my MaA troop back in position to be a good screening force, whilst my central Elohi retained the option to threaten either flank (this was mirrored by the Morax unit held by the Orcs on the other side of the central hill).
I also used Celestial Restoration on my paladins from Julius. Whilst this spell feels great on paper, it did not serve me particularly well this battle, especially due to my poor rolls.
Orcs Turn 3
Perhaps a slight misplay by the Orcs this round, but they were able to maintain their overall unit strength on the left flank so it doesn’t matter too much.
The Great Ax Horde struck back into my MaA troop, joined by the Morax regiment hitting their flank, further cementing their door. Overall the MaA troop suffered 38 wounds, which for a unit with Nerve 11 was a lot of damage.
Stormforged Shrine continued to rain down damage against my army, this time against the MaA Horde. Krudger into MaA Horde and the lightning into the MaA and Paladins (both luckily passing their nerve check), with the Krudger dealing serious damage for a single entity unit.
Selling my Screening Unit MaA to get a regiment and Horde distracted was a good trade, however they did suffer 38 wounds into a troop with Nerve 11.
Morax and Riftforged then repositioned after destroying the MaA troops to face my MaA horde, leaving the flank of the Moraxes open to my central Elohi unit.
Orcs secure 2 VPs at the end of this round, controlling both halves of the board.
Basilea Turn 4
This round felt like a strong turn for me on the left flank, but unfortunately due to my lack of knowledge of wrap-around mechanics it would lead to the demise of my MaA horde, crumpling my left flank.
My central Elohi unit flanked into the Moraxes, MaA Horde into the Riftforged, the Elohi were able to successfully rout the Moraxes, MaA did a lot of damage to the Riftforged and Krudger, but did not rout them. The Orcs were determined and holding strong!
Apologies for the lack of image for the end of this round, due to the battle raging around me I forgot to grab a screenshot!
Orcs Turn 4
The game securing turn for the Orcs!
Due to the wraparound rule (which I wasn’t aware of) the Riftforged were able to flank charge the MaA horde they were previously fighting. Earning a total of 50 attacks into their flank, routing them.
The right flank now committed!
The Great Ax Regiment charged the screening MaA – which should have routed but on double 1s, they survive by the will of the gods! Finally some good luck for my dice!
Gore riders charged the Elohi on the right flank and the Great Ax Horde move up alongside the shrine. The Elohi survive the Gore Riders charge, and were then locked in mortal combat for the remainder of the battle.
On the left fank the Krudger gives orders to give rerolls to the Riftforged, further dooming the MaA.
Stormcaller also shot into the Elohi on the left flank – however this was immediately healed by Iron resolve.
Shrine into the Paladins again, bouncing to Julius but no damage
Krudgers on the left cracked the MaA unit he was fighting. Thus threatening the flank of my Elohi.
Riftforged got 42 hits to land on the MaA – converting to 26 wounds which had my other horde rout.
A very good turn for the Orcs, securing 2 more VP for the Orcs, sealing their victory for the game.
Basilea Turn 5
Whilst we acknowledged it wasn’t likely for Basilea to win the game, we elected to play a final round and then talk through the ending at this point.
I attempted order on Elohi to give them Elite (for the Hegemon) but failed.
Battle was joined on the right, Elohi horde into the Gore Riders only doing 3 damage – the dice were not kind
Julius into the Shrine, knowing he will die to the Great-Ax Horde next turn. He only did 2 wounds, the gods did not shine on Julius this battle
Men-at-Arms & Paladins into Great Ax Regiment giving them 17 wounds combined – routing them, and opening the field.
Elohi on the left flank into the Riftforged. Routing them. And then turning to face the Krudger.
Unfortunately this turn did highlight that it was mechanically impossible for me to win the game at this point.
Orcs Turn 5
Krudger into the Elohi on the left, which held
Shrine falling back to allow space for the Great Axes – Greataxes into Julius doing only 9 wounds which allowed Julius to remain in battle (the gods are mocking him!)
Gore Riders back into Elohi, which hold as well.
Stormcaller shot once into the MaA troop. Devastating them
The Orcs held the left objective, a draw on the right flank.
Totalling a 5 – 0 score to the Orcs

We ended the game here, with a 5-1 discussed ending as I would have held the central position, but with no further way to gain points before the game would end, it was a sound victory for the Orcs.
Overall
- Whilst it is a poor wargamer that blames his dice, I do believe my dice were rolling below average for my side, whereas there was some great luck for the Orc player. However, the Orc player also used the terrain and LOS to his advantage to mitigate my ability to see and strike at his forces.
- Iron Resolve, a trait I didn’t put a lot of stock in, actually performed incredibly well. Weakening the impact of the shooting and giving a lot more staying power than I expected.
- The Wraparound effect was something I hadn’t kept in mind, which I feel cost me the left flank. This is a learning point for me as a player!
- Screening troops, something I haven’t used before, had a far greater impact than I expected, thank you to Albatross Albert for highlighting this in our games. Even with Basilea being a relatively elite army, the few troops I had seemed to punch above their weight. Even greater than just blunting the charges of my opponents units, but dealing damage if not dealt with, and even just breaking up my front lines
Final Thoughts
A very fun game played out between Basilea and Orcs, I am jealous of the Orcs Crushing Strength stats but I am quite attached to my Elohi. Well played on the positioning of the Orc forces throughout the game.
Now, onto my next game where I can hopefully learn from this and apply a more refined approach!