2 → Duncan Shabb’s Order of the Green Lady
Scenario: Control
2300 points
Mimir had researched what the nightstalkers might be doing. Based on stories from The Brothermark she had heard, regarding the exploits of someone called Dillen Genemer and the artefact The Fools did recover in the last battle; the the nightstalkers could be making something to keep them in the area permanently.
Rangers reported that there was a hill that disquieted beast and dwarf; getting close inflicted a sense of dread and even the most jovial dwarfs mentioned dark thoughts when there.
It was, however, near the forest protected by the Green Lady’s Knights. The Fools did not want to trespass again, the the last time showed how hostile the Knights in the Forest were. That’s why The Fools have plantations for their lumber in the first place.
When the dwarfs arrived, the Order of the Green Lady had been lured to the same place.
Lists:
The Order of the Green Lady [2300 / 2300]
Order of the Thorn (Infantry) Regiment (20) [175] - Vial of Sacred Water [5]
Order of the Thorn (Infantry) Regiment (20) [175] - Vial of Sacred Water [5]
Order of the Brotherhood (Cavalry) Regiment (10) [215] - Vial of Sacred Water [5] - Sir Jesse’s Boots of Striding [15]
Order of the Brotherhood (Cavalry) Regiment (10) [215] - Vial of Sacred Water [5] - Banner of the Green Lady [15]
Order of the Brotherhood (Cavalry) Regiment (10) [200] - Vial of Sacred Water [5]
Order of the Brotherhood (Cavalry) Regiment (10) [200] - Vial of Sacred Water [5]
Order of the Brotherhood (Cavalry) Regiment (10) [200] - Vial of Sacred Water [5]
Woodland Critters* (Swarm) Regiment (3) [80]
Greater Water Elemental (Monster) 1 [195] - Radiance of Life (Sacred Water only) [15]
Pegasus (Monster) 1 [80]
Pegasus (Monster) 1 [80]
Druid (Hero (Infantry)) 1 [85] - Heal (2) [0] - Bane Chant (2) [20]
Druid (Hero (Infantry)) 1 [95] - Heal (2) [0] - Bane Chant (2) [20] - Conjurer’s Staff [10]
Avatar of the Green Lady [1] (Hero (Infantry)) 1 [150] - Heal (6) [0]
Unicorn (Hero (Cavalry)) 1 [155] - Heal (5) [0] - Lightning Bolt (5) [35]
That’s a lot of cavalry. Combined with great support, mobile US1 units and solid infantry.
Nothing stands out as a particularly dangerous threat on it’s own, but there are a lot of things to deal with.
My usual tools and tactics to deal with hammers are only meant to deal with one or two.
An approach of “more good enough than you can deal with” is not unlike my list design.
With two pathfinder units, my rangers are not safe in the woods. Indeed, woods are an attack vector with cover.
Fool’s Hold [2300 / 2300]
Ironclad (Infantry) Regiment (20) [125] - Throwing Mastiff [15]
Ironclad (Infantry) Regiment (20) [125] - Throwing Mastiff [15]
Ironclad (Infantry) Regiment (20) [125] - Throwing Mastiff [15]
Shieldbreakers (Infantry) Regiment (20) [125]
Rangers* (Infantry) Regiment (20) [190] - Fire-Oil [5]
Rangers* (Infantry) Regiment (20) [185]
Sharpshooters (Heavy Infantry) Troop (5) [100]
Sharpshooters (Heavy Infantry) Troop (5) [100]
Sharpshooters (Heavy Infantry) Troop (5) [100]
Berserker Brock Riders (Cavalry) Troop (5) [125]
Berserker Brock Riders (Cavalry) Troop (5) [125]
Berserker Brock Riders (Cavalry) Regiment (10) [205] - Mead of Madness [10]
Ironbelcher Organ Gun (War Engine) 1 [90]
Steel Behemoth (Monster (Chariot)) 1 [245]
Dwarf Army Standard Bearer (Hero (Infantry)) 1 [65] - Talisman of Silence [15] - Mind Fog (2)
Berserker Lord (Hero (Cavalry)) 1 [150] - Brock Mount [30] - Gnome-Glass Shield [10]
[Mendeleev] Flame Priest (Hero (Infantry)) 1 [120] - Fireball (10) [15] - Bane Chant (2) [20] - Inspiring Talisman [20]
The “standard list” above, but the first time I’m using this combination of artefacts.
I really enjoy lobbing fireballs, but the Diadem of Dragonkind is expensive. The idea is to take a budget version in the Talisman of Silence (i.e. swapping 30 point fireball (8) for 15 point mindfog (2)) and spread out the buffs.
The extra 15 points paid for Fire Oil on the rangers (regeneration can be a problem for The Fool’s list design) and mead of madness on the brock riders regiment (it seems appropriate and gives them an edge).
I considered Jesse’s Boots, but with two regiments of rangers and strider on the steel behemoth I already have terrain troops. I also see brock riders as more of a bark than a bite.
Ocloch does not consider himself a remarkable dwarf.
He’s brave enough and competent in a shield wall, but not a great warrior. He can do what he needs to at a forge or with a chisel, but he has made nothing splendid. He can’t lift the most weight, drink the most ale or tell the best story; he can do each of those well enough, just not the best.
Ocloch makes sure that he does what needs doing though. It might not be done perfectly, with a flourish or a fuss; but he makeaa sure things got done well enough.
Mimir valued this because it meant Ocloch would keep things running while she was distracted or Mendeleev was being hot headed. It’s why he carried the battle standard.
It’s also why she trusts him test her inventions, especially on the battlefield.
The most recent one being a “directed sound amplifier” or, as she preferred to call it, “nerve tester”.
The idea was that instead of lugging a load of bombs to the battlefield [Diadem of Dragonkind to you, dear reader] only this device and some powder was needed.
It would amplify and direct the sound of either a small bit of powder placed into the device or nearby firearms; making the target hear guns being fired in their direction, thereby testing their nerve! [Mindfog from Talisman of Silence]
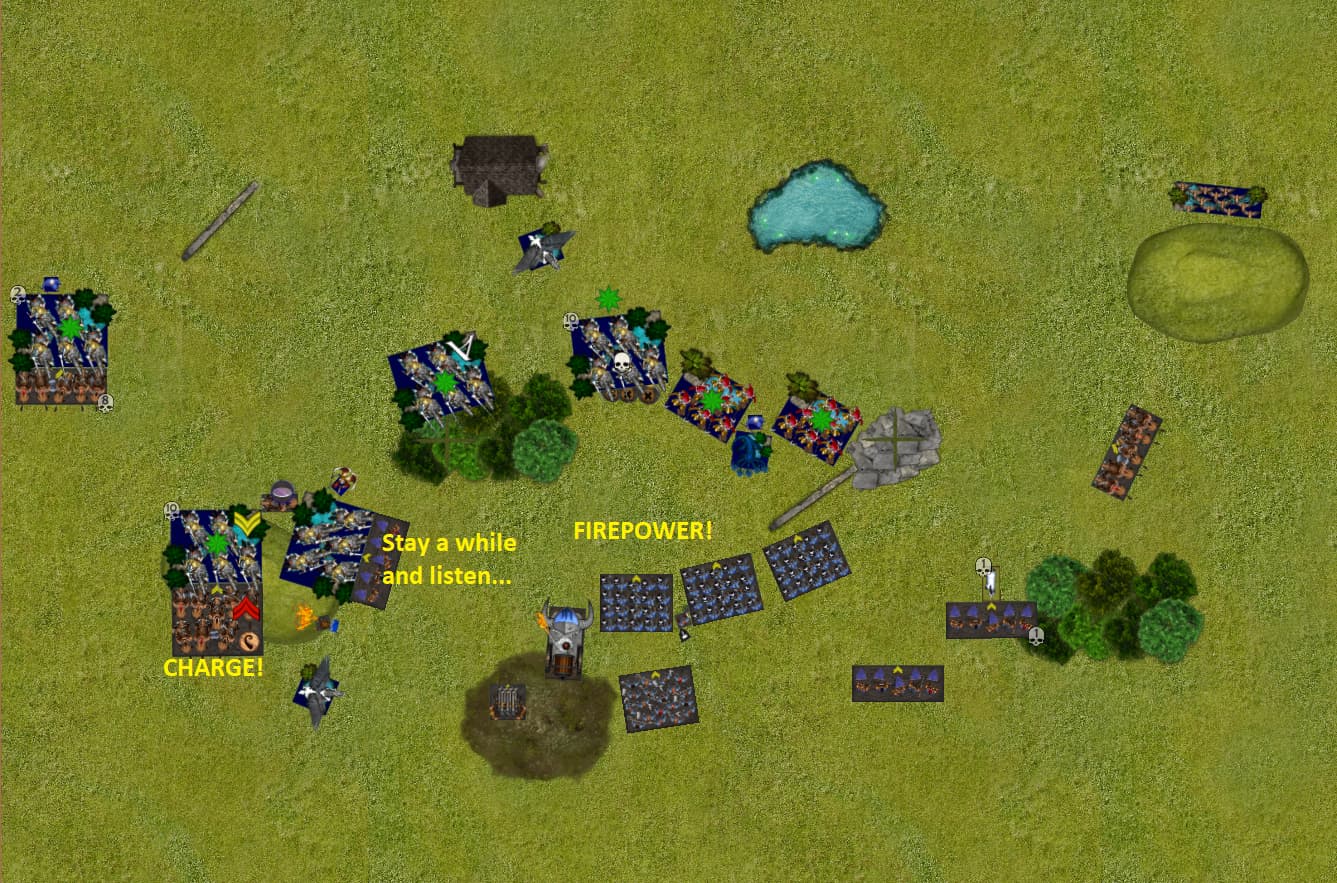
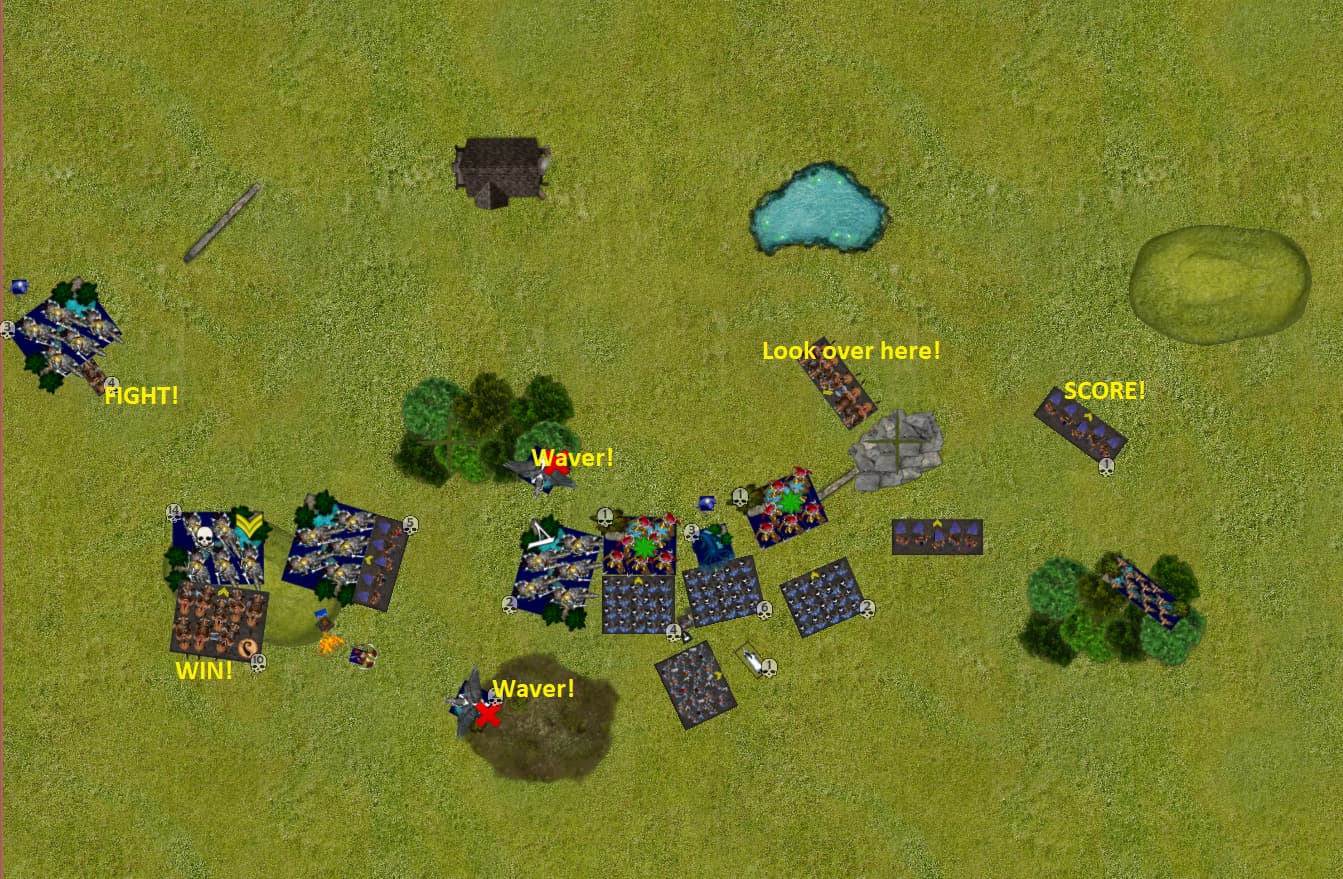
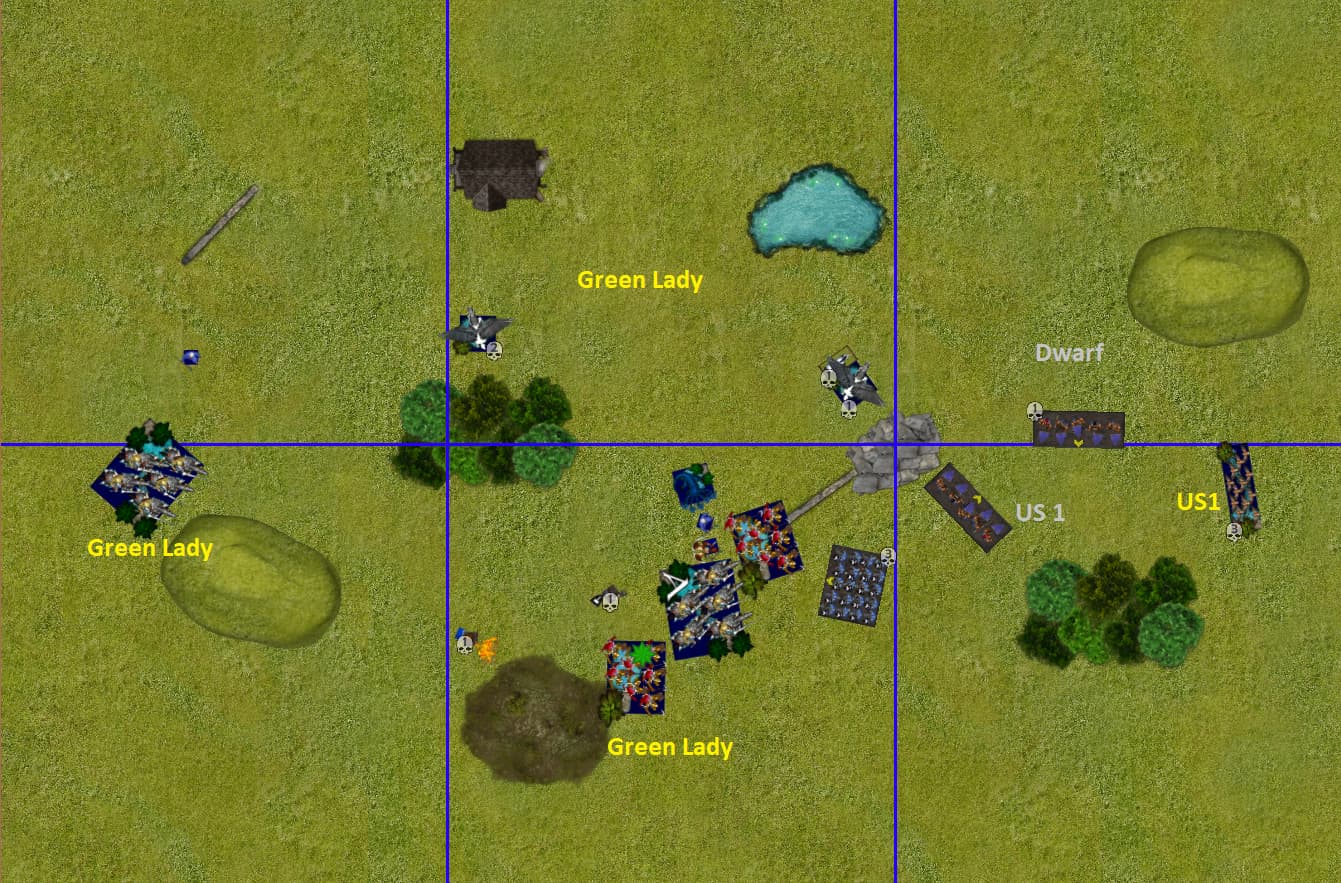
Deployment:
I chose the bottom because blocking terrain in a deployment zone is not nice. I was also concerned with terrain capable knights using the woods for cover; the left wood is harder to get to from the top and the right wood is on my side. I’m hoping that the the obstacles will trip up an enemy advance on the left and help my ironclad tank charges in the middle.
The initial plan is to grind with the ironclad and second line in the centre while brocks with ranger support (scouting onto the hill) push up the left.
An attack from my opponent on the right will have to go around the rock and through the wood, so hopefully can be significantly delayed.
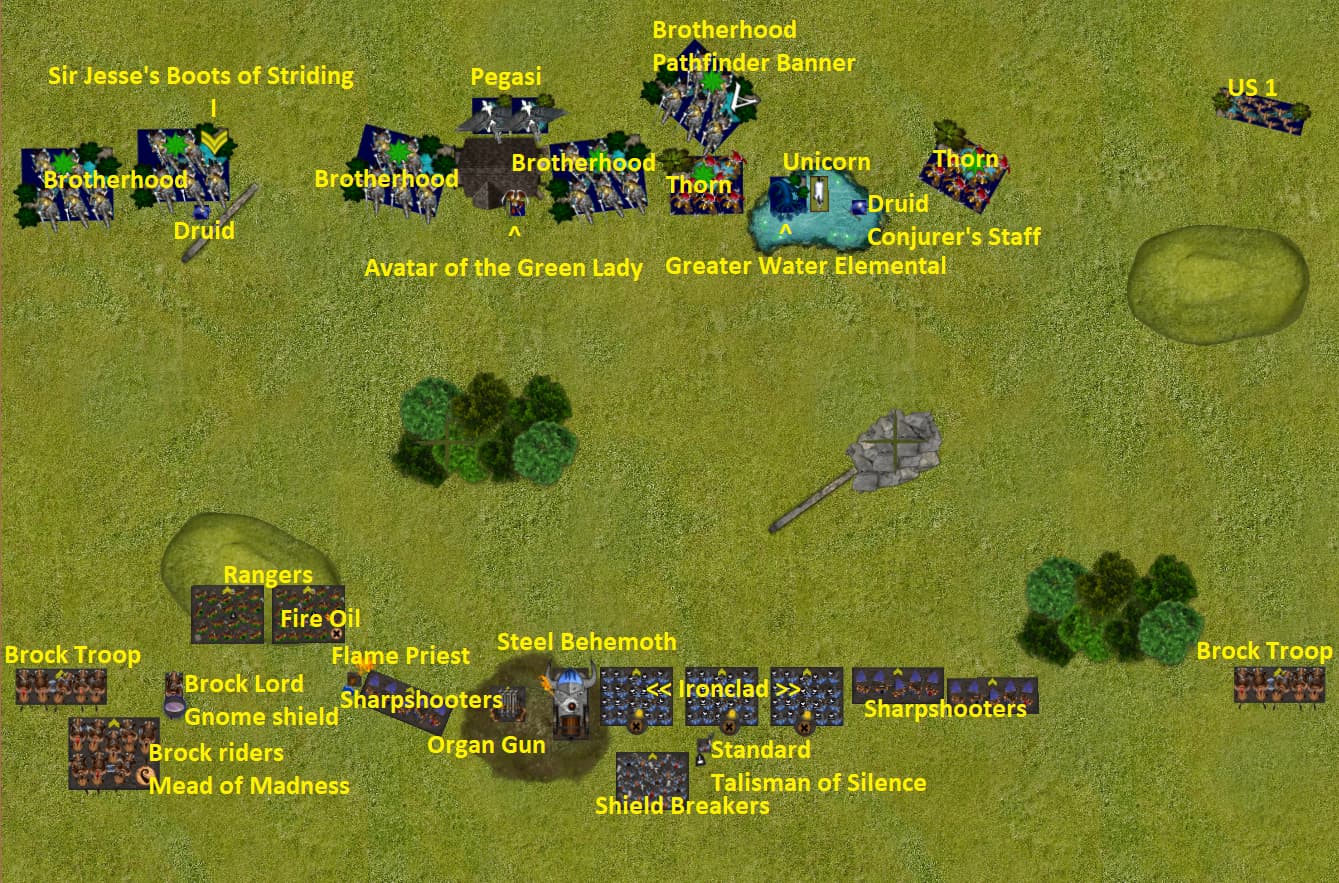
No knights on the right, so we’re in for a fight on the left.
I scout up the rangers so that I can concentrate fire on one of the regiments of knights.
The Order of the Green Lady Turn 1
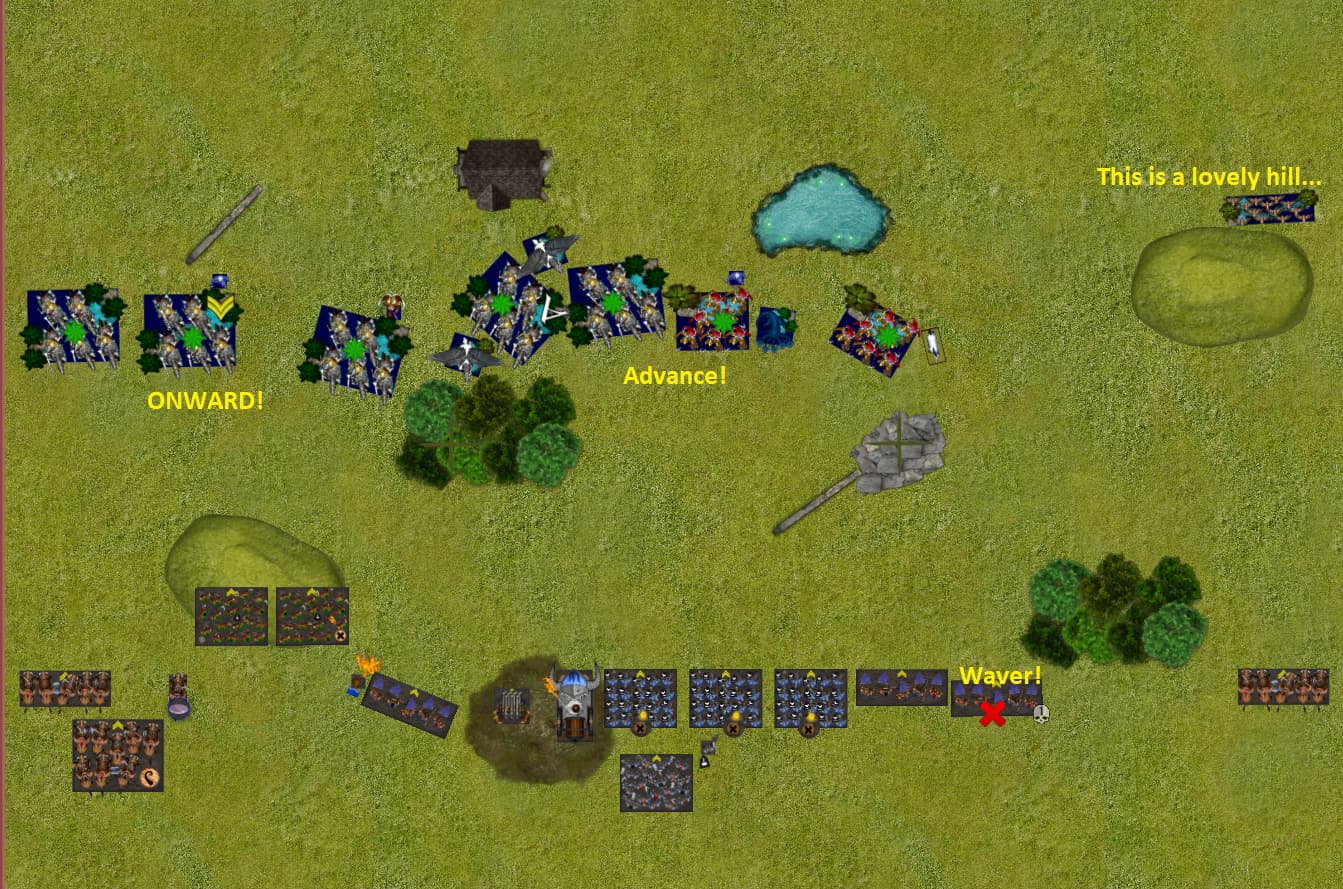
I lose the roll for first turn, which makes scouting up more risky.
Knights on the left flank move to charge next turn.
Centre shuffles up to move into position next turn.
The right most sharpshooters are so busy staring in wonder at the sight of a unicorn that they waver when it suddenly attacks them with lightning.
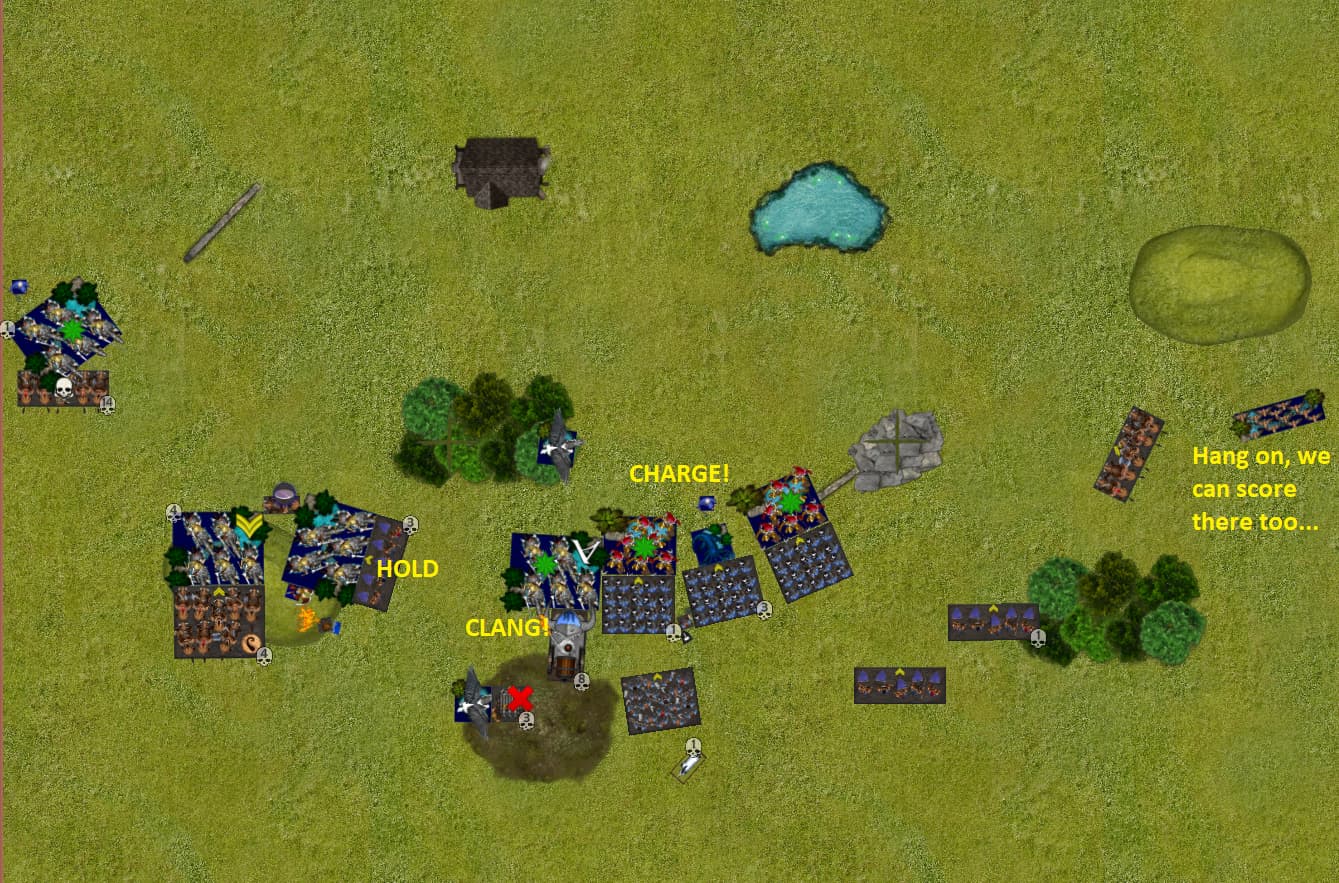
Dwarfs Turn 1
The wavered sharpshooters get their headstrong and move up.
I need to stop the knights from simply running over the rangers.
The brock troop blocks one.
The brock lord moves to prevent a double charge on either ranger regiment. Which is silly in hindsight, a double charge would have been better for me because it guarantees one unit of rangers survives.
A ranger regiment should get wavered on average dice (i.e. 50:50 odds) from a regiment of knights, so I set up counter charges to punish charging in.
Hopefully one of the rangers survives and it’s opponent pays for it.
I have enough shooting to waver the third knight regiment from the left (on average dice), which means it will charge without TC if it passes headstrong. Into a position where the steel behemoth can flank if.
Shooting is a little below average, but enough that a double 6 for nerve is a rout.
The reroll is less than a waver. Not ideal.
The Talisman of Silence gets a waver on a pegasus though. Good to see it come in handy already.
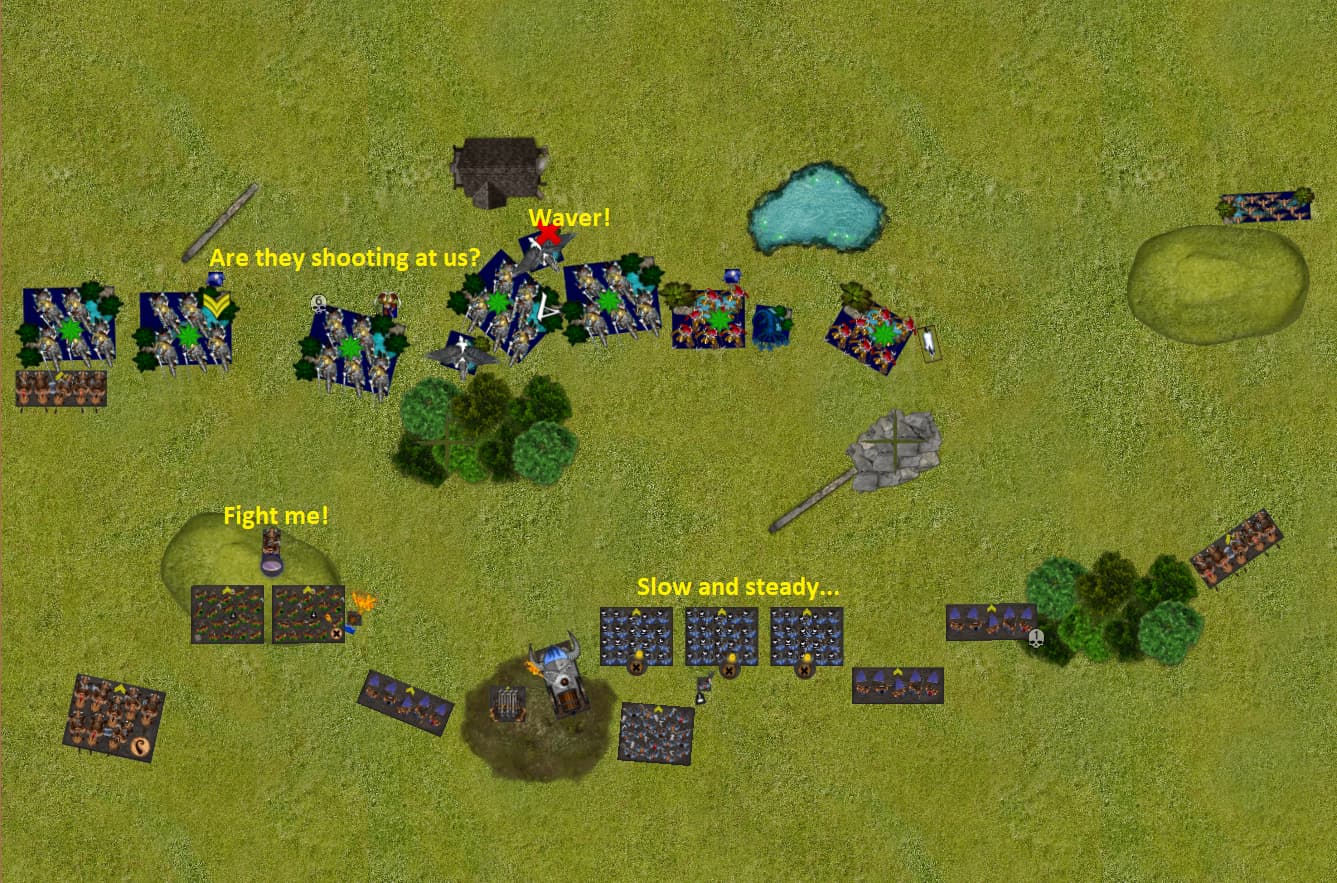
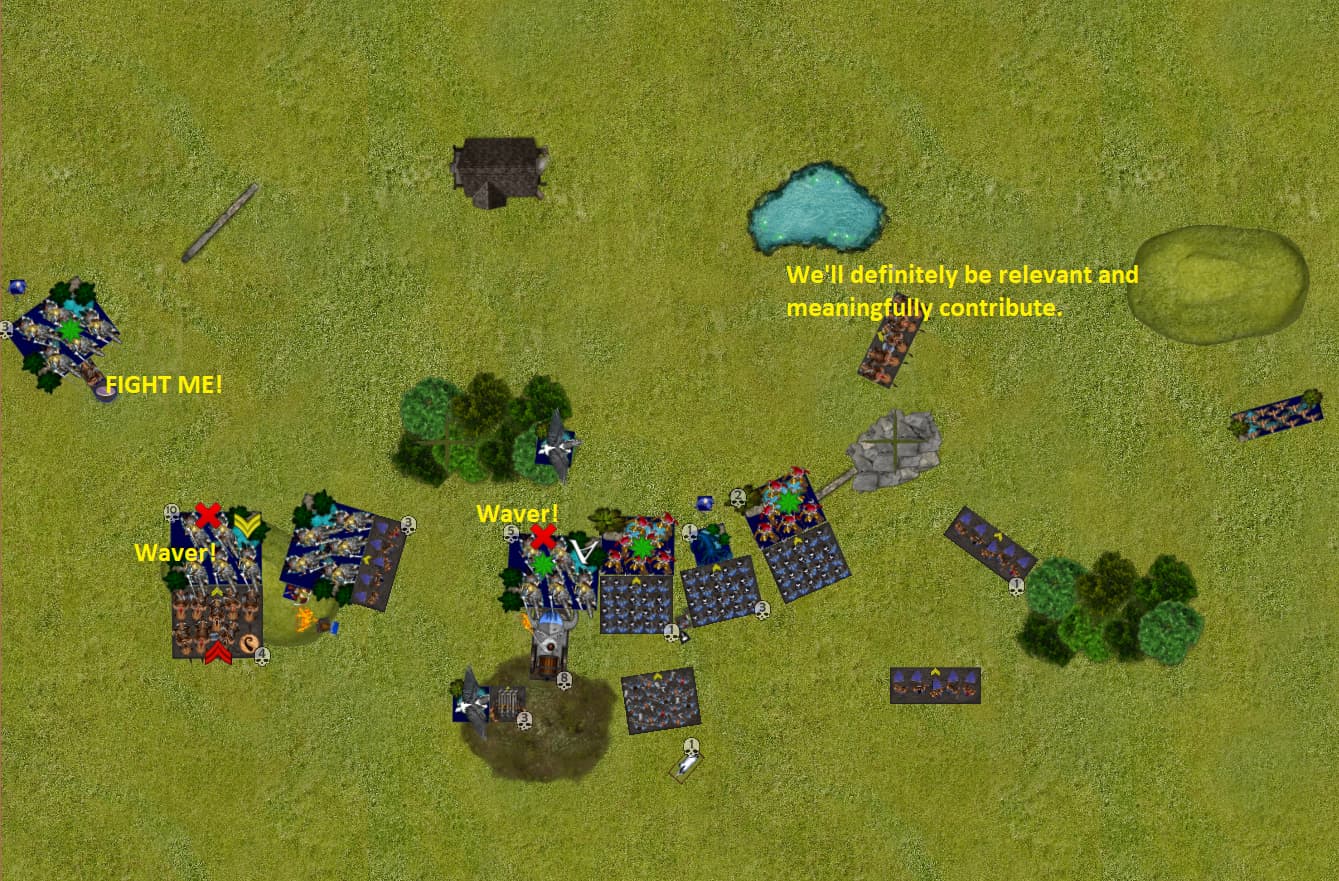
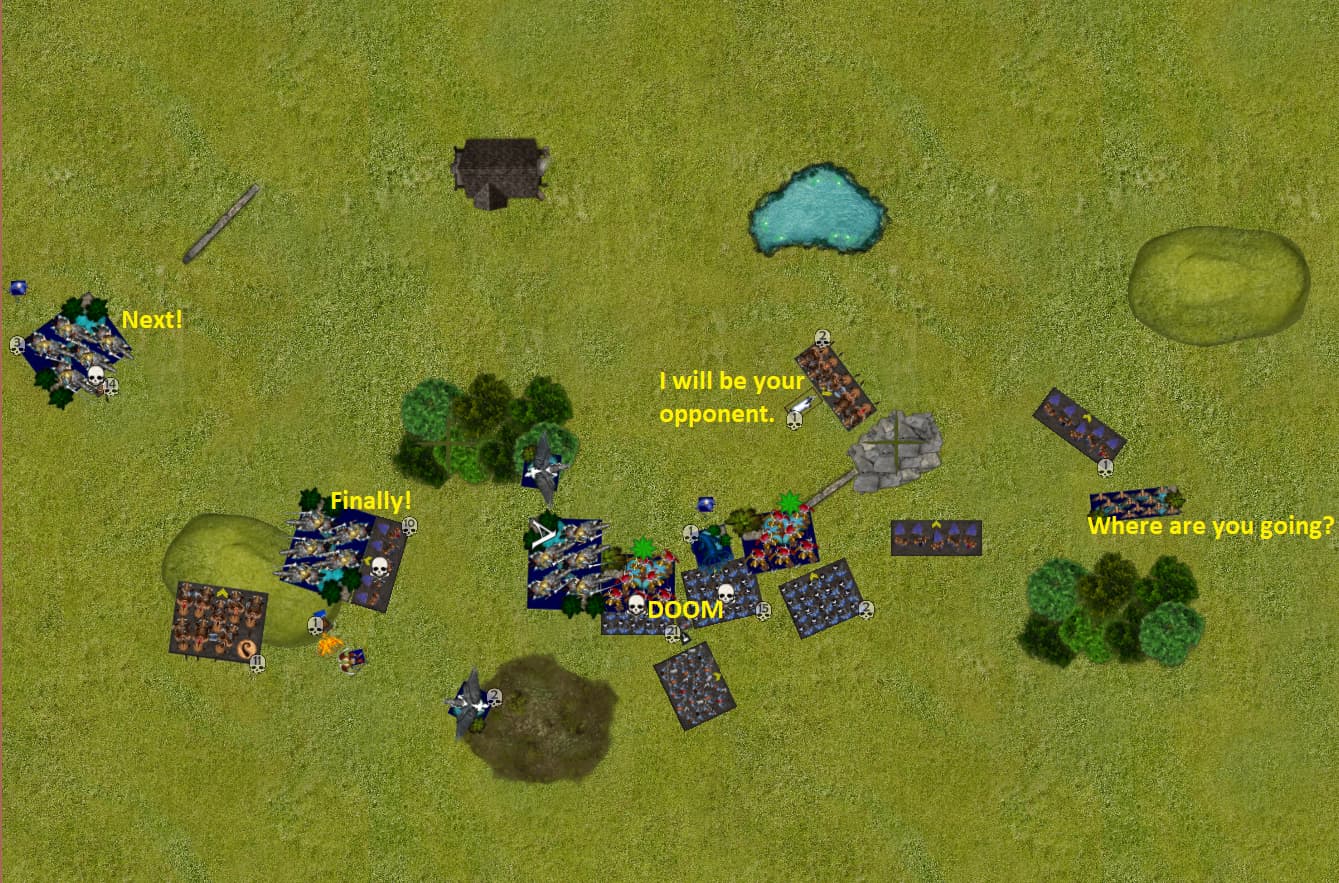
The Order of the Green Lady Turn 2
Two regiments of knights proceed to charge up the hill and simply run over the rangers.
Which is not good. Extra sad because I come from historical wargaming and hills are supposed to be defensible.
The knights that got shot at also recover all their damage…
The brock troop holds though.
The centre moves up to get the fight on my side of the map and the unicorn charges in.
A pegasus jumps my lines and I don’t feel very threatened to be honest.
Rangers came to investigate Dread Hill and immediately set about doing so.
Before they found anything though, The Green Lady’s knights began their attack.
Halfhearted shooting didn’t slow them down and the rangers retreated, their minds dark and mission impossible.
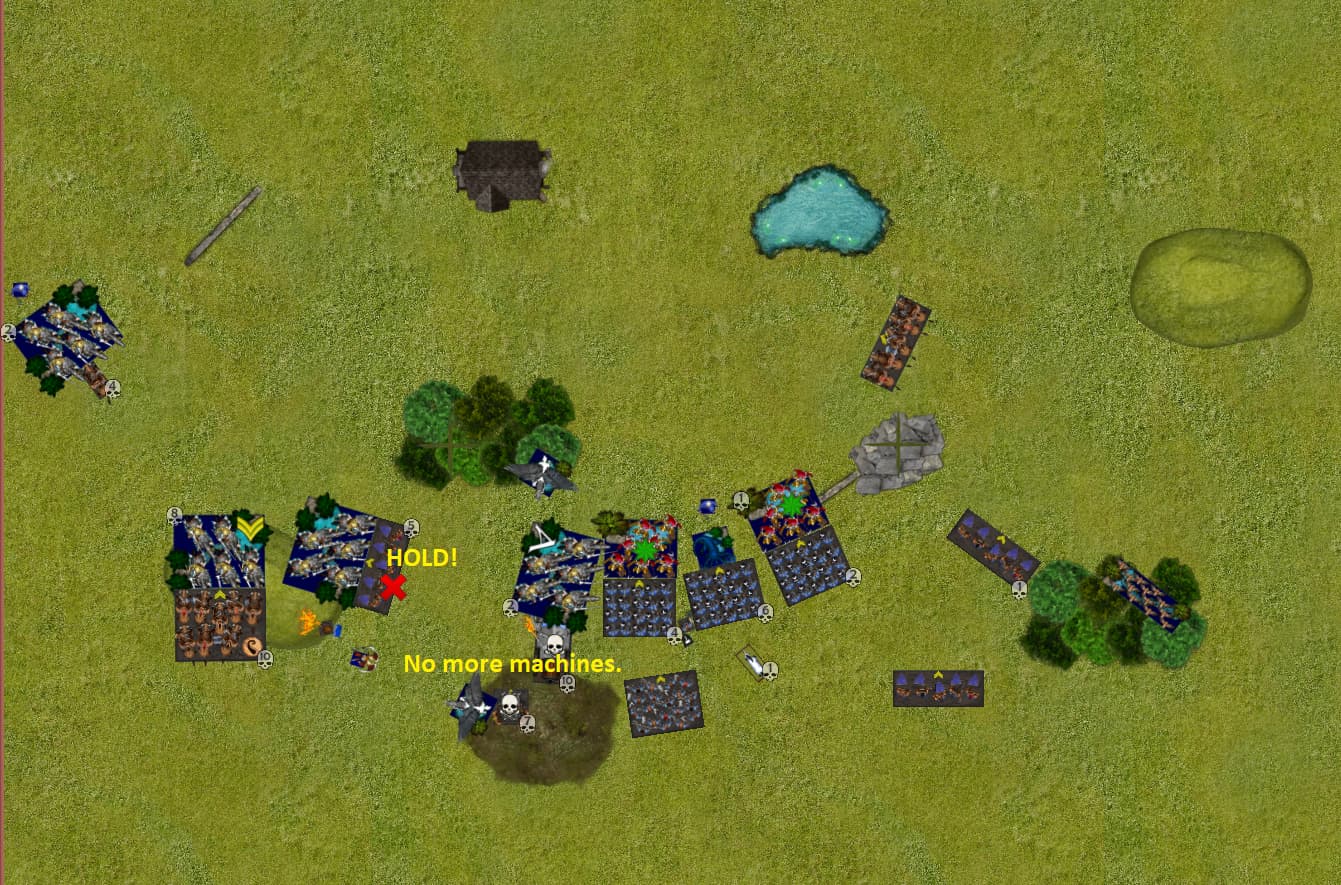
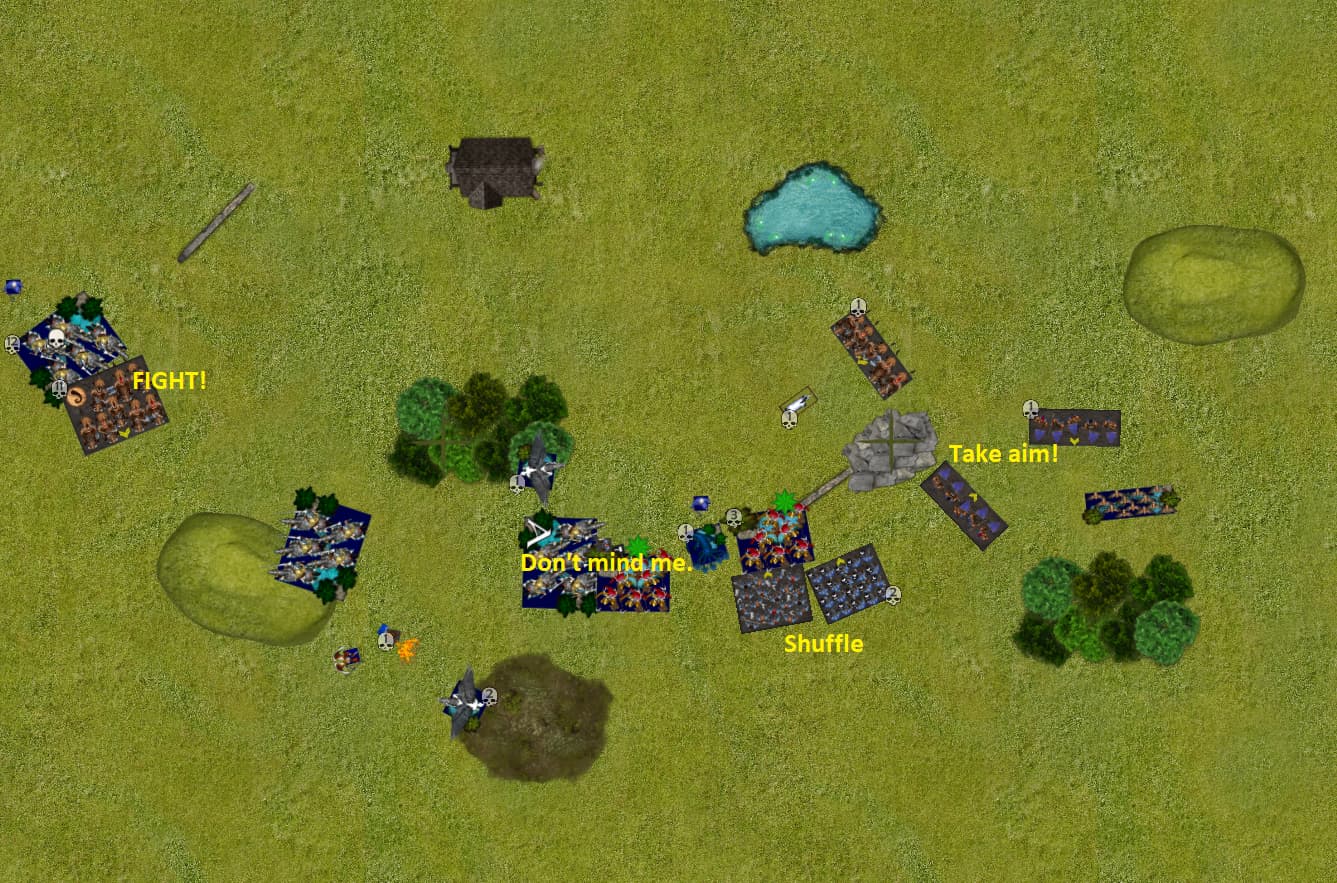
Dwarfs Turn 2
The brock regiment and lord go for revenge on one regiment of knights, but roll a 3 for nerve.
I am desperate enough the throw sharpshooters forward to stall the other regiment of knights on the hill.
They turn out to be significantly tougher than rangers.
The other sharpshooters put one damage on the unicorn.
The brock troops counter charge and the other tries to get somewhere useful.
As my list does; all the mastiffs and shooting from a few other units takes down a regiment of knights. Excellent.
It’s worth noting that The Diadem of Dragonkind would not have been in range to contribute (and would be 8 dice on 5’ and 5’s if it did), but the Talisman of Silence adds shattering.
Seeing the hill lost and the end of the line exposed, sharpshooters moved up and planted their shields at the foot of the hill. After a volley to draw attention; they used the cover from the smoke to dump their remaining black power and light it for more smoke.
Then they left. The knights would waste time tripping over their shields and looking for dwarfs in the smoke.
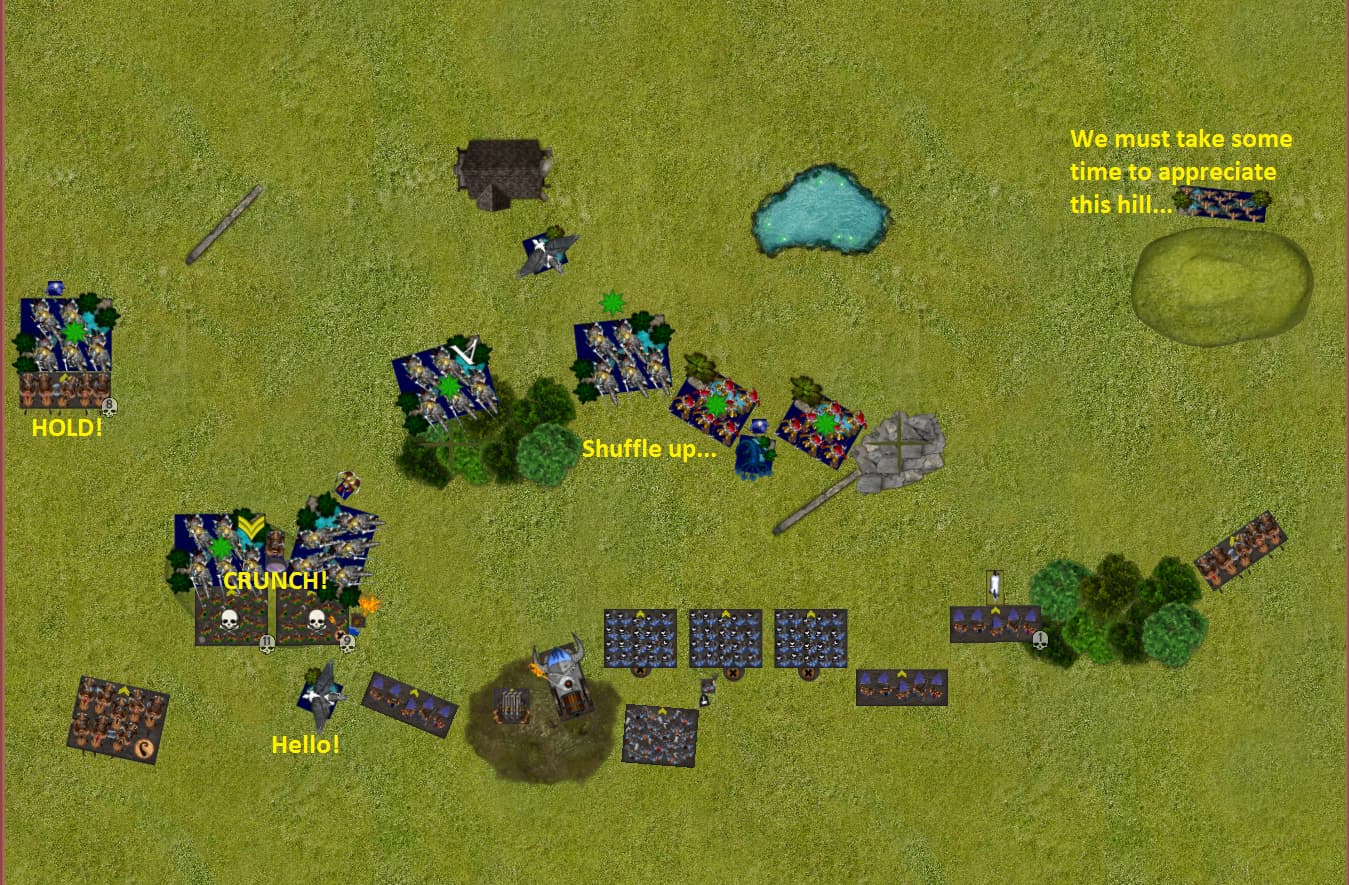
The Order of the Green Lady Turn 3
Almost everything charges! Almost all the dwarfs hold.
The left brock troop has done it’s duty though.
The left sharpshooters stand like champs.
The knights with the Green Lady’s Banner (pathfinder) get bane chanted and puts an alarming 8 damage on the steel behemoth.
Not sure what the unicorn hopes to achieve behind my lines, but I can’t do much about it.
Dwarfs Turn 3
The remaining brock troop continues their journey to hopefully helping eventually.
The brock lord puts his Gnome Glass Shield to use. Which is good, because the brock regiment doesn’t get the knighs that they’re fighting again (only back to the same damage as last turn). The damage recovery in the Order of the Green Lady list is making a real difference. It’s making more knights than I can really deal with harder to deal with.
Both wavers are irrelevant because of headstrong, which matters because…
The Order of the Green Lady Turn 4
The Knights with the Banner of the Green Lady pass their headstrong, get bane chanted, put two damage on the steel behemoth and roll 9 for nerve, twice.
Which puts me in a very bad situation.
The organ gun also routs.
The sharpshooters still hold!
As does everything else. The brock regiment can’t take another charge though.
The old behemoth turned to face the finest knights, carrying their Lady’s banner, but more slowly than usual.
The charged was not fully met with the frontal armour and lances found their way between moving parts.
The lances exposed a dark substance clinging to parts of the trusty old machine.
It was a warsmith’s nightmare; hiding, clogging and corroding.
A “gift” from the last battle, before the machine was recovered.
With behemoth disabled, the knights could simply bypass it on their way to flank the infantry line while the crew limped it back to the Mimir’s workshop.
Dwarfs Turn 4
With my sharpshooters spread out on the right and brock troop the only thing in my opponent’s central zone I’m actually ahead on the scenario.
So let’s see if I can hang on.
I start trying to extract or protect US in the centre and pulling it right but sending the shield breakers to the right (the fight they were planning to help with is lost) and pulling a regiment of ironclad out.
Hopefully the brock regiment behind them distracts my opponent’s line.
I start getting fireballs into the pegasus on my side (rather than bane chant into the brock regiment) and manage to waver both. Which is nice, but not being able to help the flame priest shoot is not ideal (fireball already has shattering, so mindfog doesn’t add anything). Being able to target one and take it down would have helped more.
The brock regiment wins their fight.
After the brock riders had fared better than the rangers and driven the knights off the Dread Hill (either because they were less troubled by dark thoughts or the mead they had been drinking) Mendeleev had a moment to investigate the hill.
It was gone.
The determined courage of the knights and the presence of the Green Lady’s avatar must have dispelled whatever the nightstalkers had done.
Or it’s purpose of fueling battle and hatred has been served.
Either way, the dwarfs don’t need to be here.
The Order of the Green Lady Turn 5
The Banner of the Green Lady starts to chew up my line.
The brock lord and sharpshooters on the left finally go down (well done to both of them though).
Duncan keeps playing aggressive, taking the hindered flank with the Thorn regiment and relying on the hindered unicorn charge to keep the brock troop behind them. Both pay off.
Dwarfs Turn 5
I use the shieldbreakers to hold things up and shuffle the ironclad closer to the right sector (Giving up on my central sector).
I try to disorder the knights with my banner, worth a shot, right?
In hindsight, I could hae stopped the left Thorn regiment from advancing, meaning that the Banner knights could only turn up to their own central sector, rather then getting a charge on the shieldbreakers.
The brock regiment takes down more knights!
Turn 6
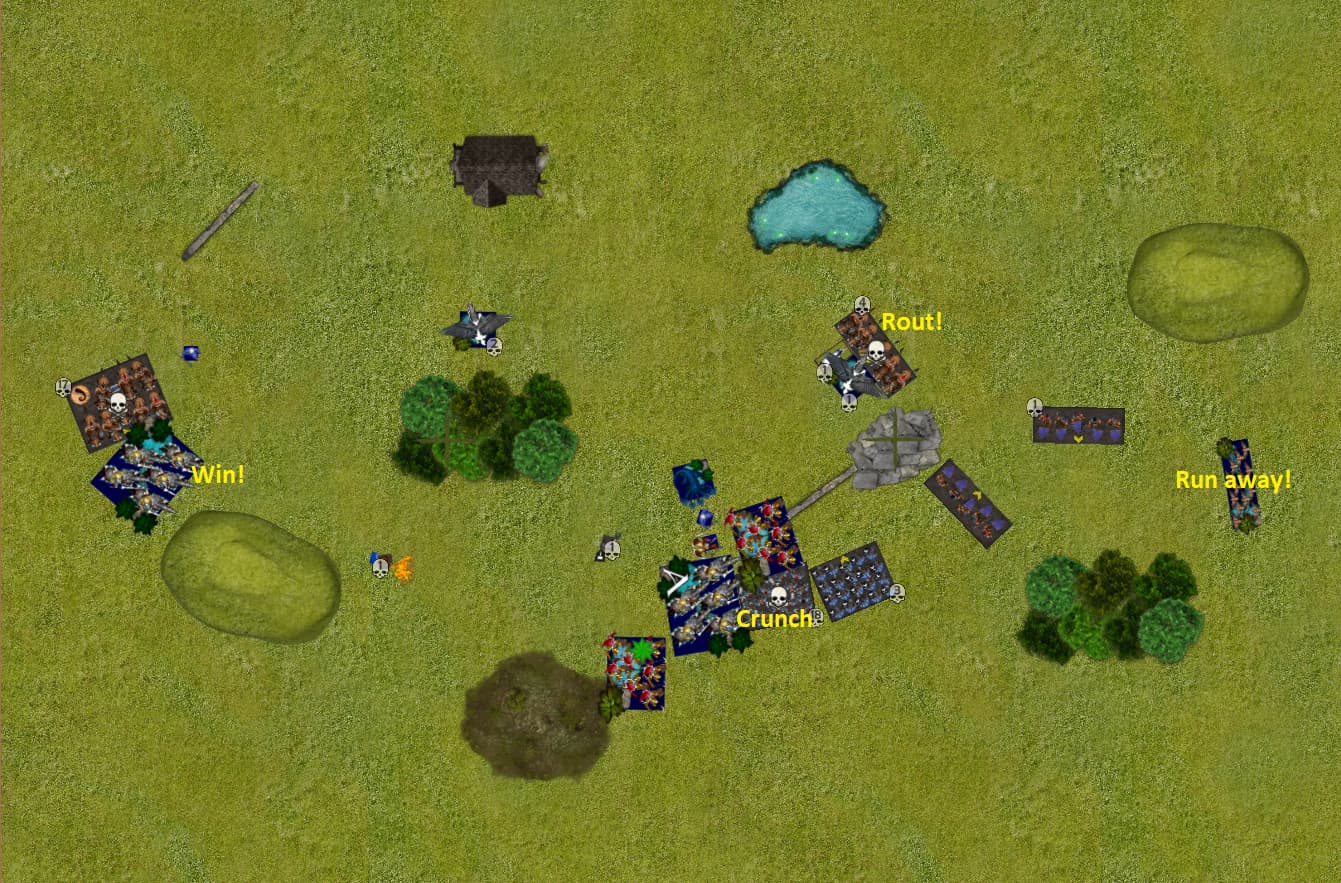
The unicorn routs the brock troop, the hard to shoot knights send the brock regiment home and the Banner Knights run over the shieldbreakers.
I don’t have the units left to try anything clever, so forgo rolling for turn 7 and the game ends like this:
After game thoughts:
That didn’t go well at all.
It’s an aggressive list and I’m still not sure how I should deal with it.
I took more of a risk with the rangers than I realized and didn’t need to shoot to get the knights moving, they were going to be aggressive anyway. I’ll definitely avoid putting my rangers in a position to get charged on turn 2.
Avoiding LoS and getting into combat along with the brocks may have been a better plan.
There were a series of 50/50 rolls that didn’t go my way and any of them would have made a difference, but blaming that doesn’t help anything. The steel behemoth going down really didn’t help though.
That makes two games in a row that I lost the behemoth too. It’s a powerful unit, so leaving it to take charges in the front line was not ideal, despite how tough it is.
It is tempting to immediately change my list and add things that would have helped in this game.
A steel juggernaut would have been handy near the end (replacing the banner and organ gun) and a Dragonshard Shield on the rangers would have been useful.
Those are both defensive picks though, and I have been trying to squeeze more damage into the list design.
I also think that it’s a mistake to try a version of a list against only one opponent; in this case a game where most of the new artefacts barely mattered.
The knights were too aggressive for Mead of Madness to matter and the rangers didn’t achieve anything at all.
I definitely missed the Diadem of Dragonkind though; being able to threaten small units in my back line would have helped and possibly dealt with a pegasus or that pesky unicorn.
The lucky wavers from Mind Fog were nice, but unreliable. There was a lot of damage recovery going on though, so the late game with damaged units around didn’t happen.
I’ll try this list a few more times; if nothing else I like the lore I came up with for the Talisman of Silence and want to get a little more mileage out of it.
The Green Lady’s Knights let the dwarfs go, but followed them to a ridge near the lumber plantations.
There a druid shouted “HEED POLLUTERS” and drew a line in the dirt with their staff.
Then everything the dwarfs left on the battlefield was thrown over the ridge; littering it with broken shields and iron. A grim reminder of where the new boundary lies.