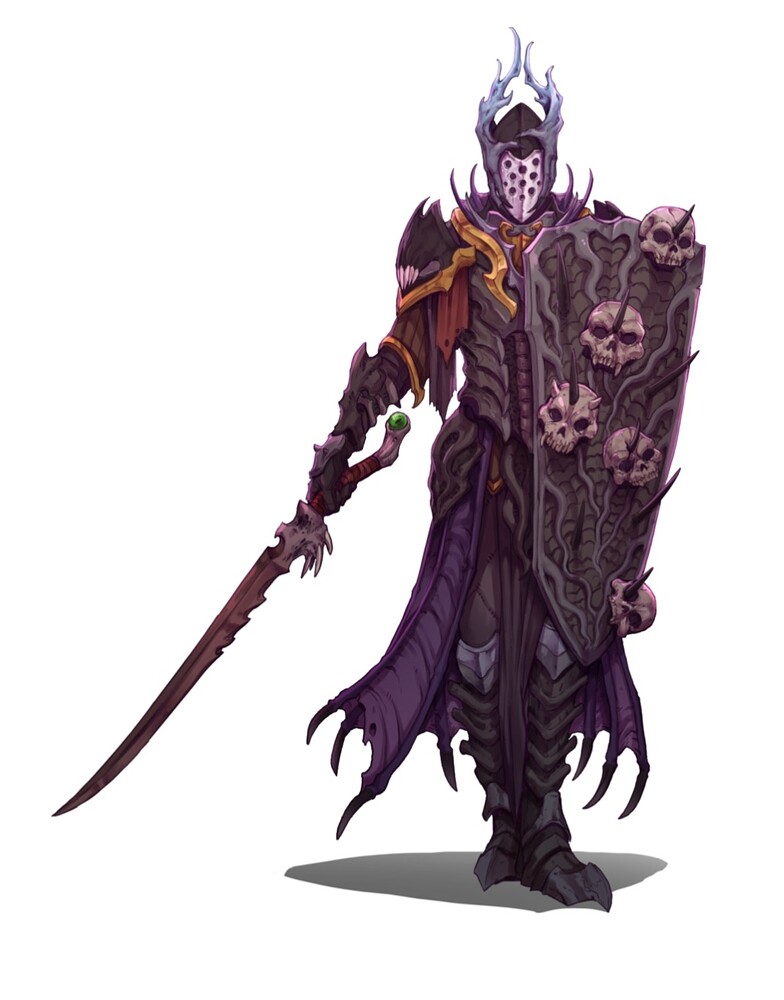
4→ Thomas Aleksandersen’s Nightstalkers
Scenario: Invade
2300 points
With the global Shadowed Horizons going on I signed up as evil, because my nightstalkers seem fitting.
I then found an opponent with the same idea!
So I brought out The Fools to oppose them.
There is a grim determination in The Fool’s Hold.
Something was not quite right.
Shadows seemed darker and like they moved in the corner of one’s eye. Everyone had nightmares. The wind carried faint screams.
Enough to put everyone on edge, but not to spook the dwarfs; not again.
The Fools had done this before and knew that they were not imagining things, there was indeed something stalking them in the night and the dark stories told by villagers and children were not only true, but a warning to be heeded.
Nighstalkers were coming.
A threat that had to be met with valour, least it fester.
From the ranger’s reports there were lots of them and the reapers were faster than before.
Thankfully; these seemed intent on challenging the dwarf hold and the villages had been spared, for the most part.
Perhaps the Dwarf’s protection has given the local humans courage since the Varangur incursion?
Nightstalkers prefer their victims afraid and a dwarf defeat would give them plenty of woe.
The traders tell of armies on the move though, perhaps this is part of something bigger.
Lists:
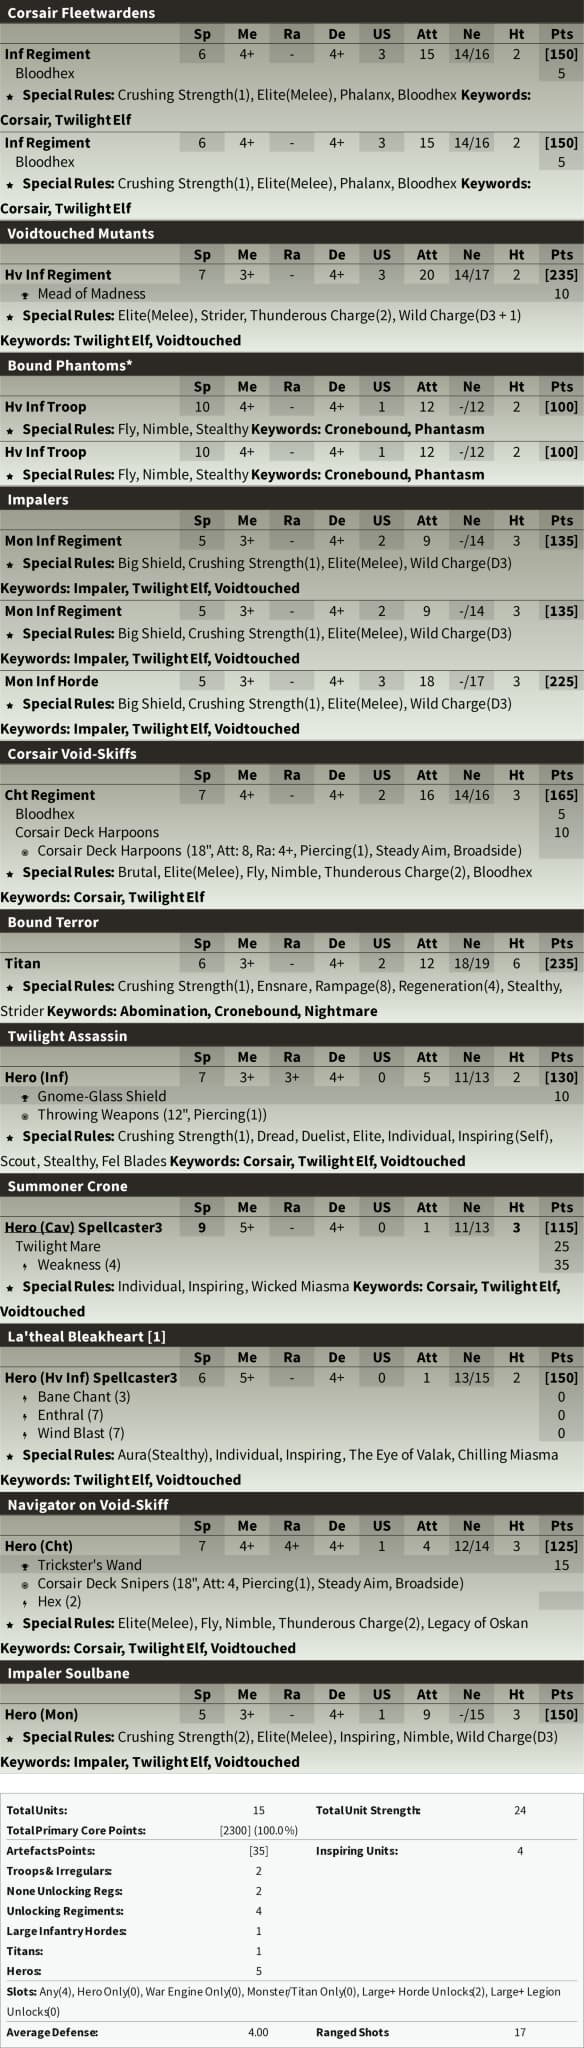
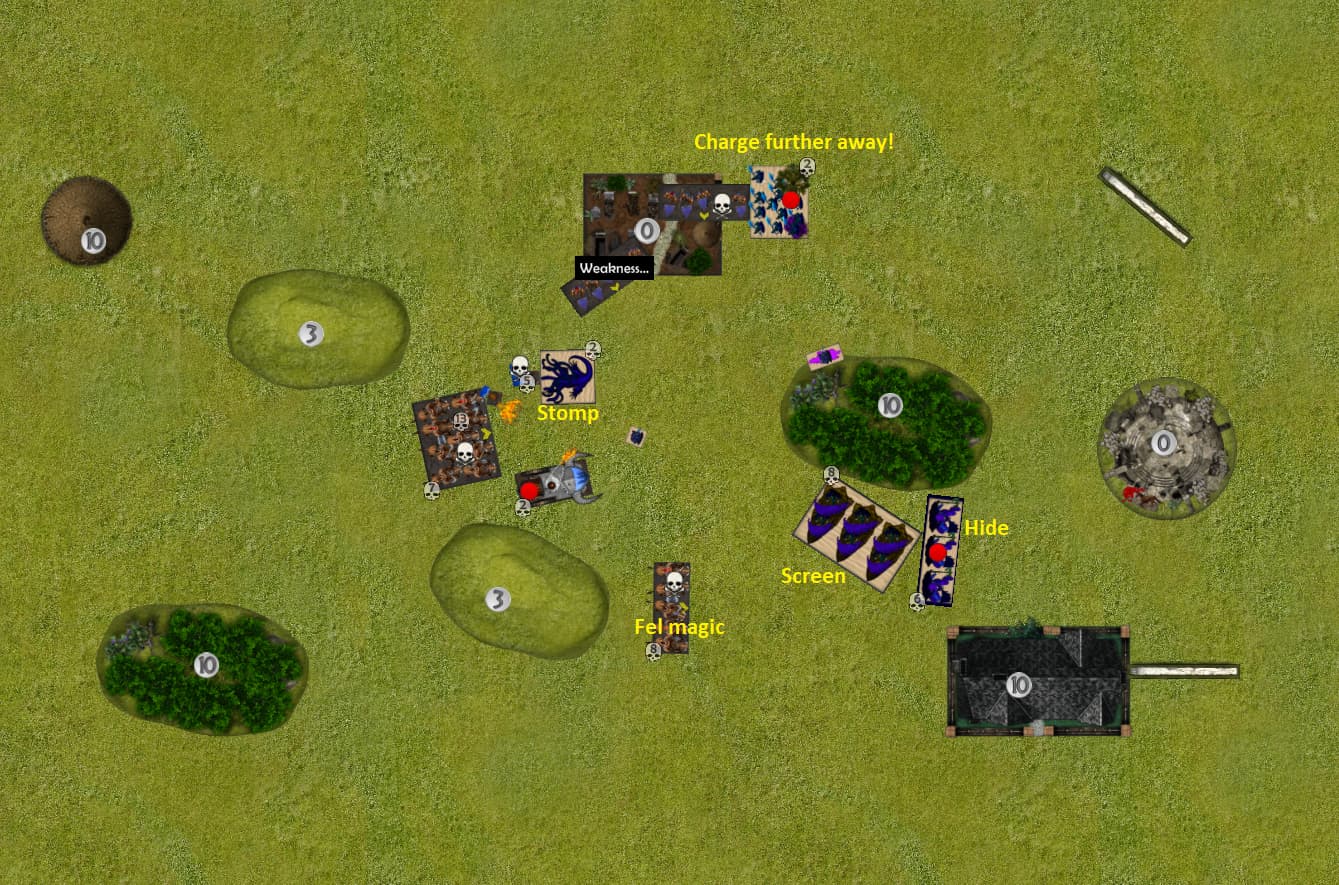
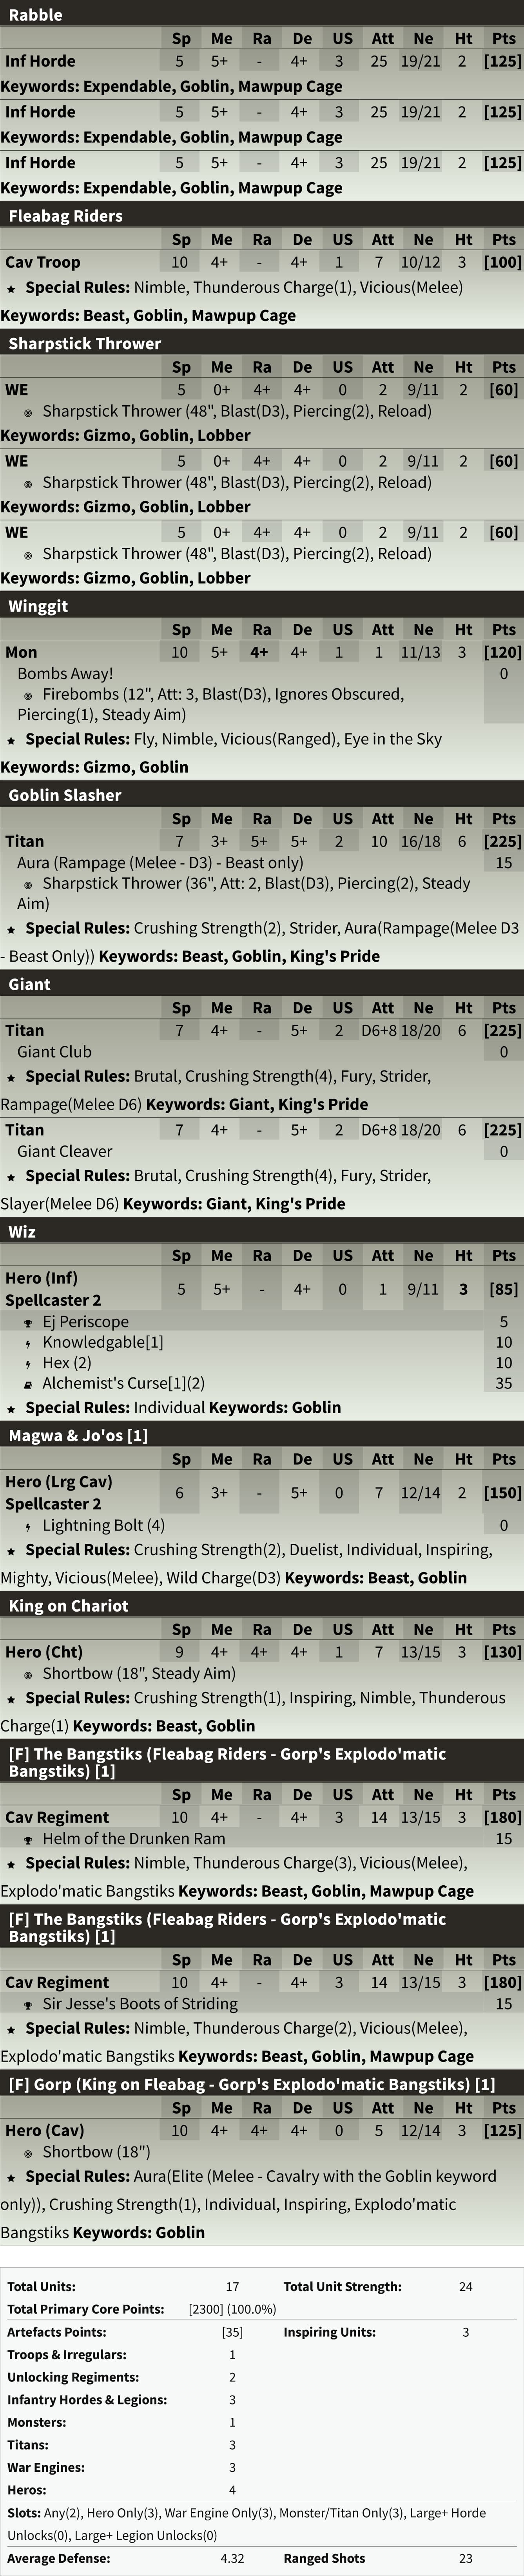
Nightstalkers 2023 [2300]
Scarecrows (Infantry) Horde (40) [125]
Scarecrows (Infantry) Horde (40) [125]
Scarecrows (Infantry) Horde (40) [125]
Scarecrows (Infantry) Legion (60) [180]
Tormentors (Infantry) Troop (10) [140]
Tormentors (Infantry) Troop (10) [140]
Tormentors (Infantry) Troop (10) [140]
Tormentors (Infantry) Troop (10) [140]
Mind-screech (Monster) 1 [150]
-Lightning Bolt (6)
-Mind Fog (6)
-Wind Blast (6)
Horror Riftweavers (Monster) 1 [110]
Terror (Titan) 1 [240]
Portal of Despair [1] (Titan) 1 [90]
The Dream Hunter [1] (Hero (Heavy Infantry)) 1 [185]
Dread-fiend (Hero (Large Cavalry)) 1 [135]
Void Lurker (Hero (Titan)) 1 [275]
-Staying Stone [5]
Scarecrows to gum up enemy units and give the tormentors opportunities to um… torment flanks and second line units.
While thats going on there are two nerve 18/19 titans stomping about.
Plus some support monsters to hand out inspiring, dread or lighting damage while being US1.
The terror is… um terrifying for a mostly infantry army with some cavalry. Just the steel behemoth wants to fight that thing and even then not really.
The void lurker is trouble as always, but dragon type units can be handled.
Tormentors are interesting, but very fragile and only do 4 damage to De 5+ on average dice.
As long as I can keep my line straight/flanks covered they shouldn’t do too much damage and with De 3+ my ironclad can take them on in a fight. Also doing an average of 4 damage, but with 4 more nerve.
The scarecrows are loads of US and De 3+.
Which makes them a priority to remove and a great target for brocks, rangers and even ironclad.
This is not a great match up for my opponent.
Their US is vulnerable to most of my list, while my scoring units are only really a good target for the two titans. I can also present a line of dwarfs, denying the tormentors the flanks that they are looking for.
As scary as the monsters are, The Fools have a lot of units and US for them to deal with.
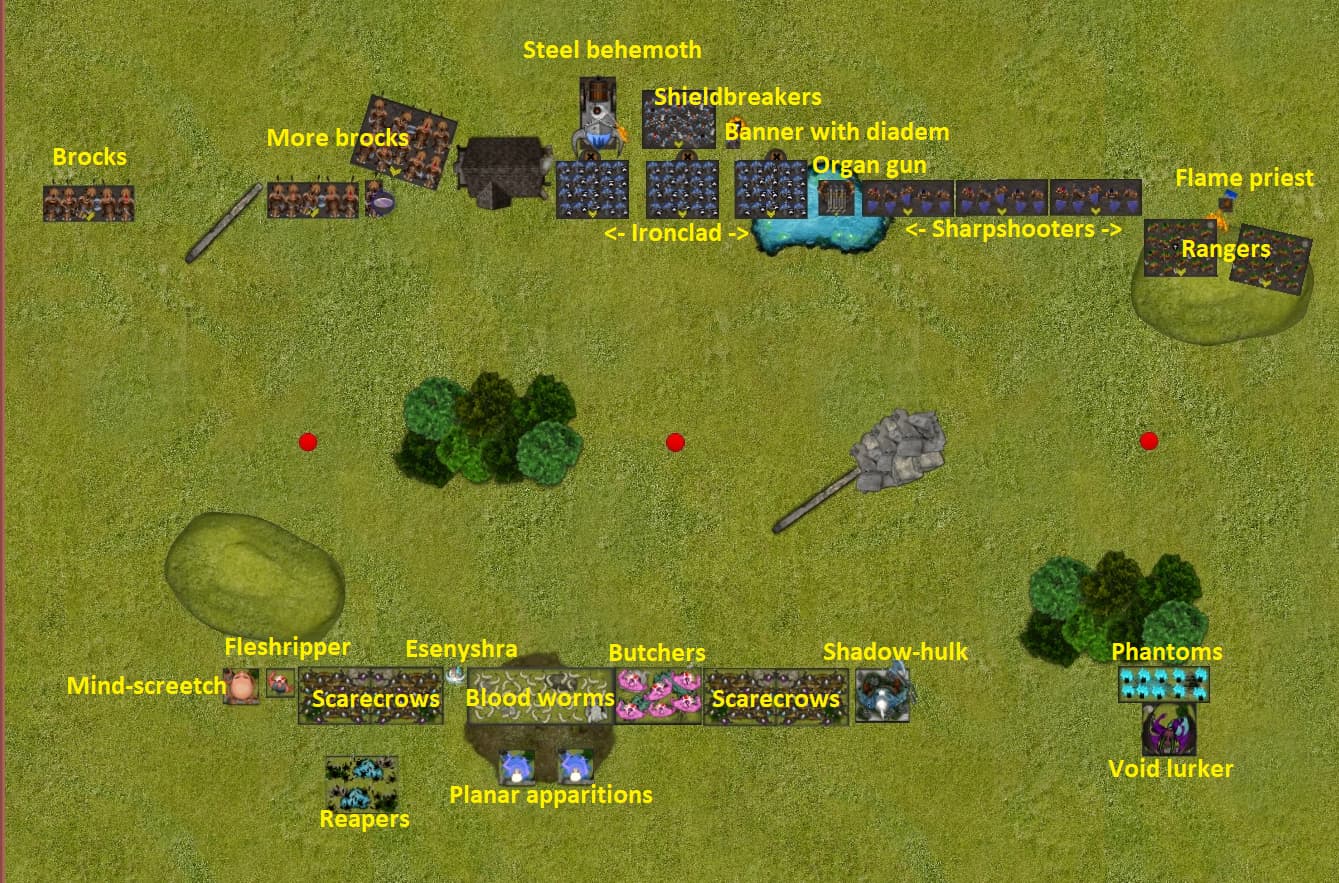
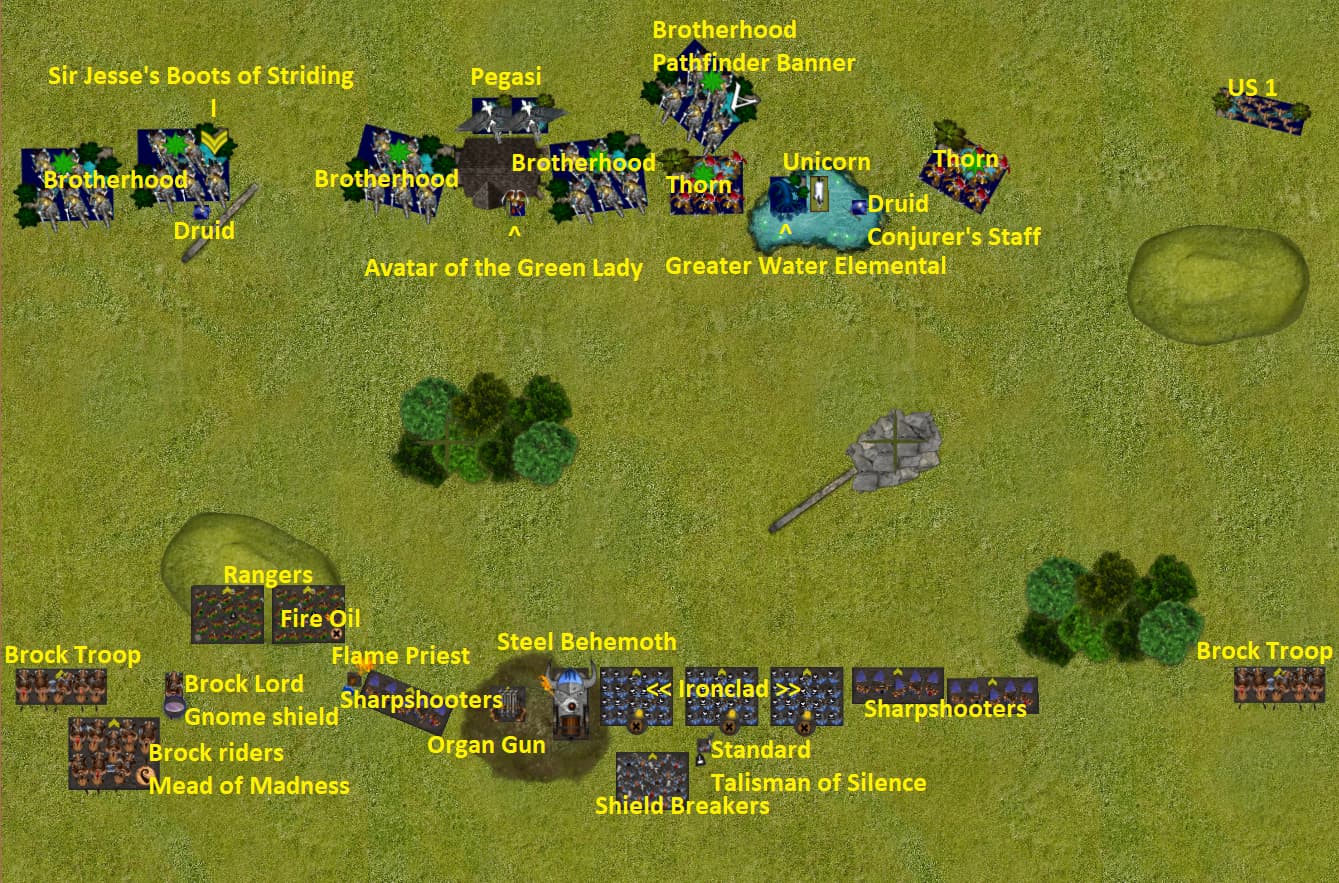
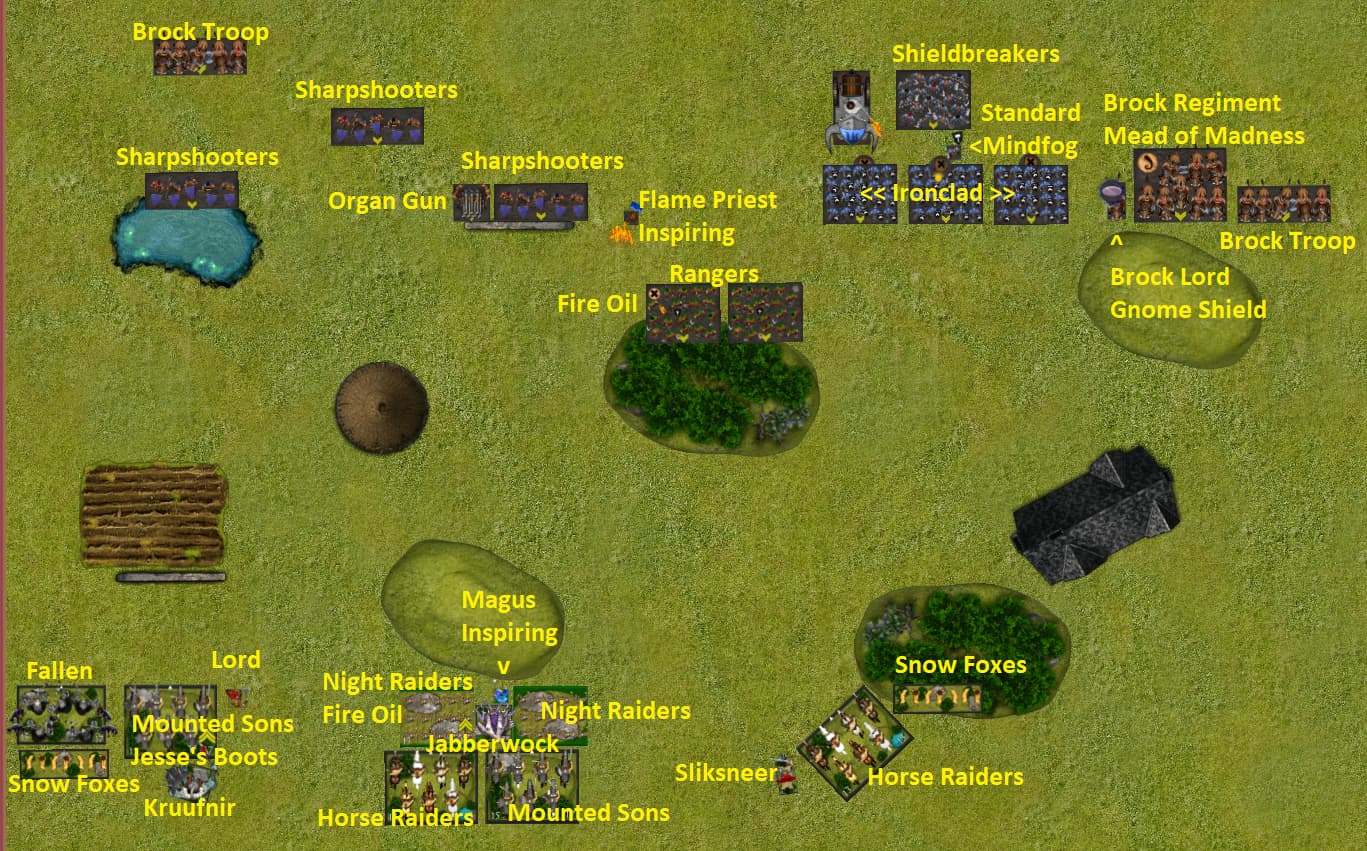
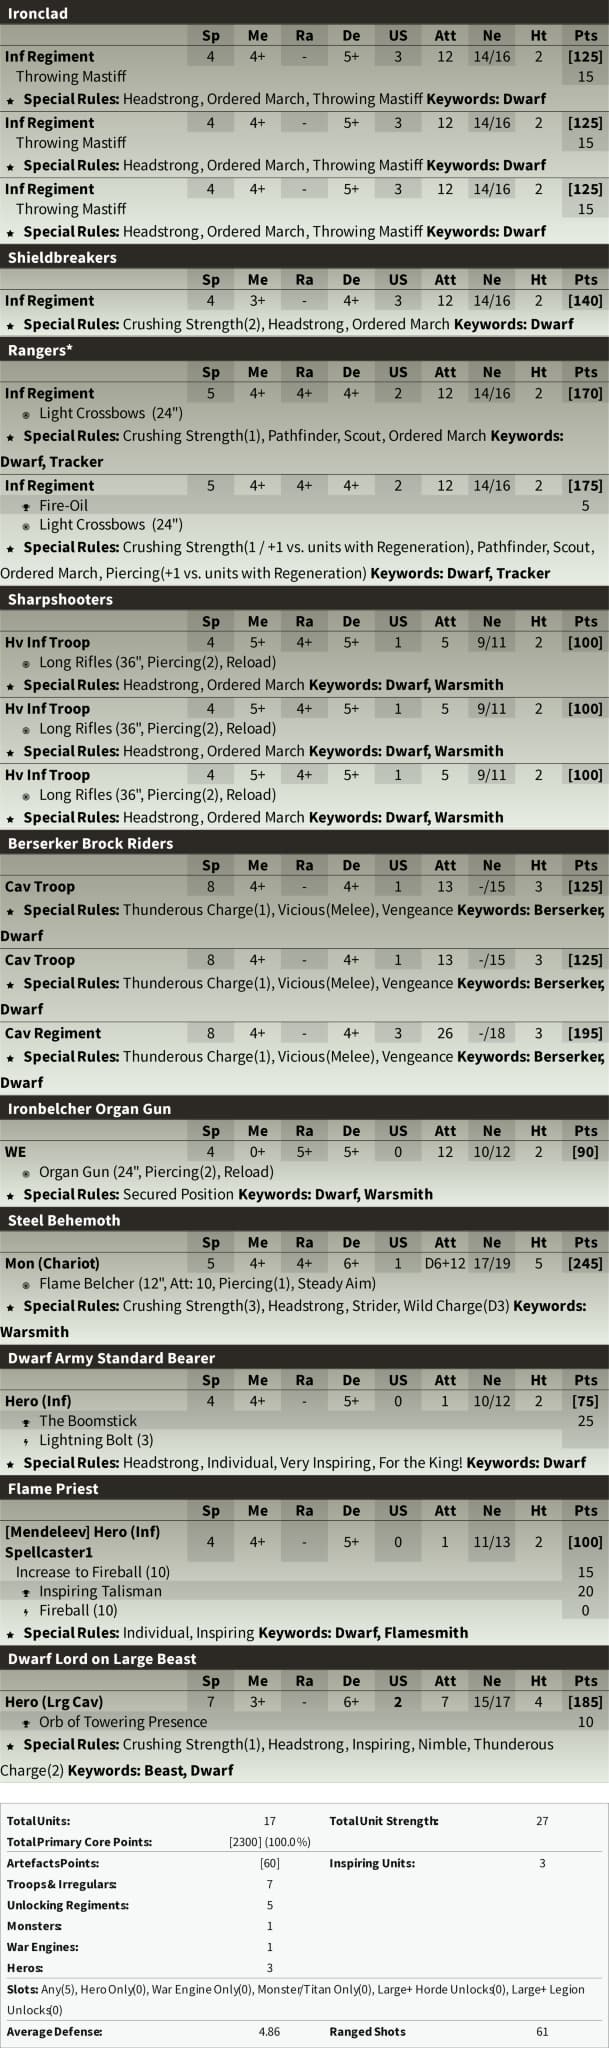
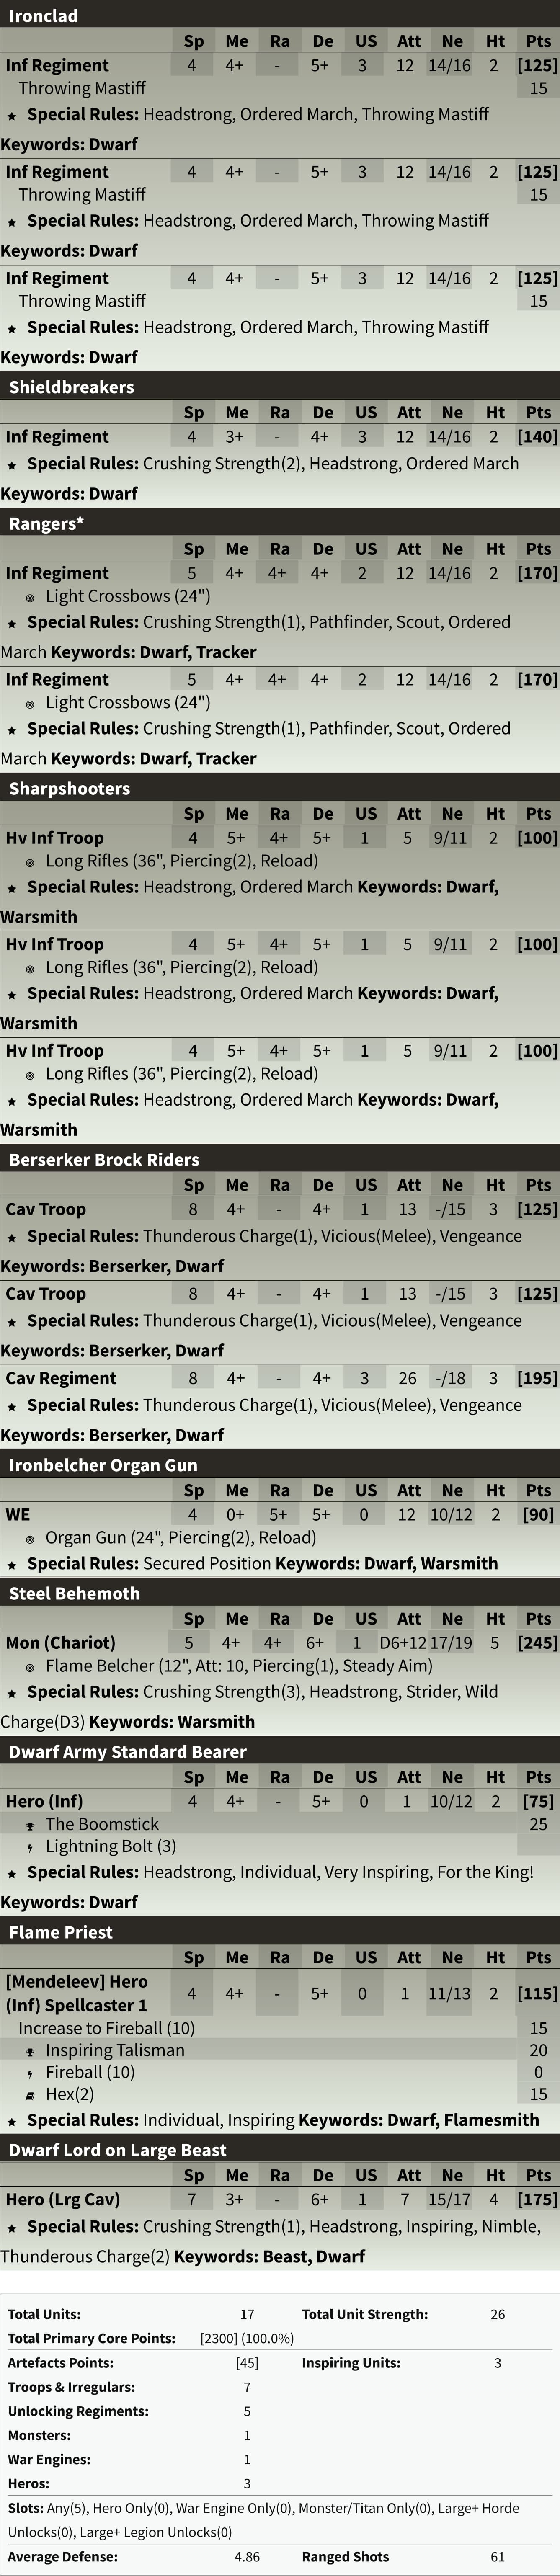
Fool’s Hold [2300 / 2300]
Ironclad (Infantry) Regiment (20) [125]
-Throwing Mastiff [15]
Ironclad (Infantry) Regiment (20) [125]
-Throwing Mastiff [15]
Ironclad (Infantry) Regiment (20) [125]
-Throwing Mastiff [15]
Shieldbreakers (Infantry) Regiment (20) [125]
Rangers* (Infantry) Regiment (20) [190]
-Fire-Oil [5]
Rangers* (Infantry) Regiment (20) [185]
Sharpshooters (Heavy Infantry) Troop (5) [100]
Sharpshooters (Heavy Infantry) Troop (5) [100]
Sharpshooters (Heavy Infantry) Troop (5) [100]
Berserker Brock Riders (Cavalry) Troop (5) [125]
Berserker Brock Riders (Cavalry) Troop (5) [125]
Berserker Brock Riders (Cavalry) Regiment (10) [205]
Ironbelcher Organ Gun (War Engine) 1 [90]
Steel Behemoth (Monster (Chariot)) 1 [245]
Dwarf Army Standard Bearer (Hero (Infantry)) 1 [65]
-The Boomstick [25] - Lightning Bolt(3)
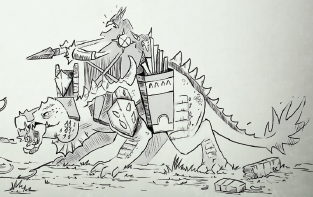
Berserker Lord (Hero (Cavalry)) 1 [150]
-Brock Mount [30] -Gnome-Glass Shield [10]
[Mendeleev] Flame Priest (Hero (Infantry)) 1 [120]
-Fireball (10) [15]
-Bane Chant (2) [20]
-Inspiring Talisman [20]
My list only has a minor artefact change.
I’ve dropped the mead of madness to updgrade the Banner’s Talisman of Silence to The Boomstick.
I really liked the extra range of mindfog, but missed being able to focus fire from my individuals on damaged or low nerve enemies (fireball also has shattering, so mindfog can’t help).
The best of both is lightning! Good range plus actual damage.
It has been the the obvious answer all along, to be honest.
Ocloch marched into Mimir’s workshop and dumped the remains of her last complicated invention that didn’t survive the battlefield onto a workbench.
Without a word the banner bearer marched off to the armoury and came back with a rifle.
He gave Mimir a stern look and marched out again.
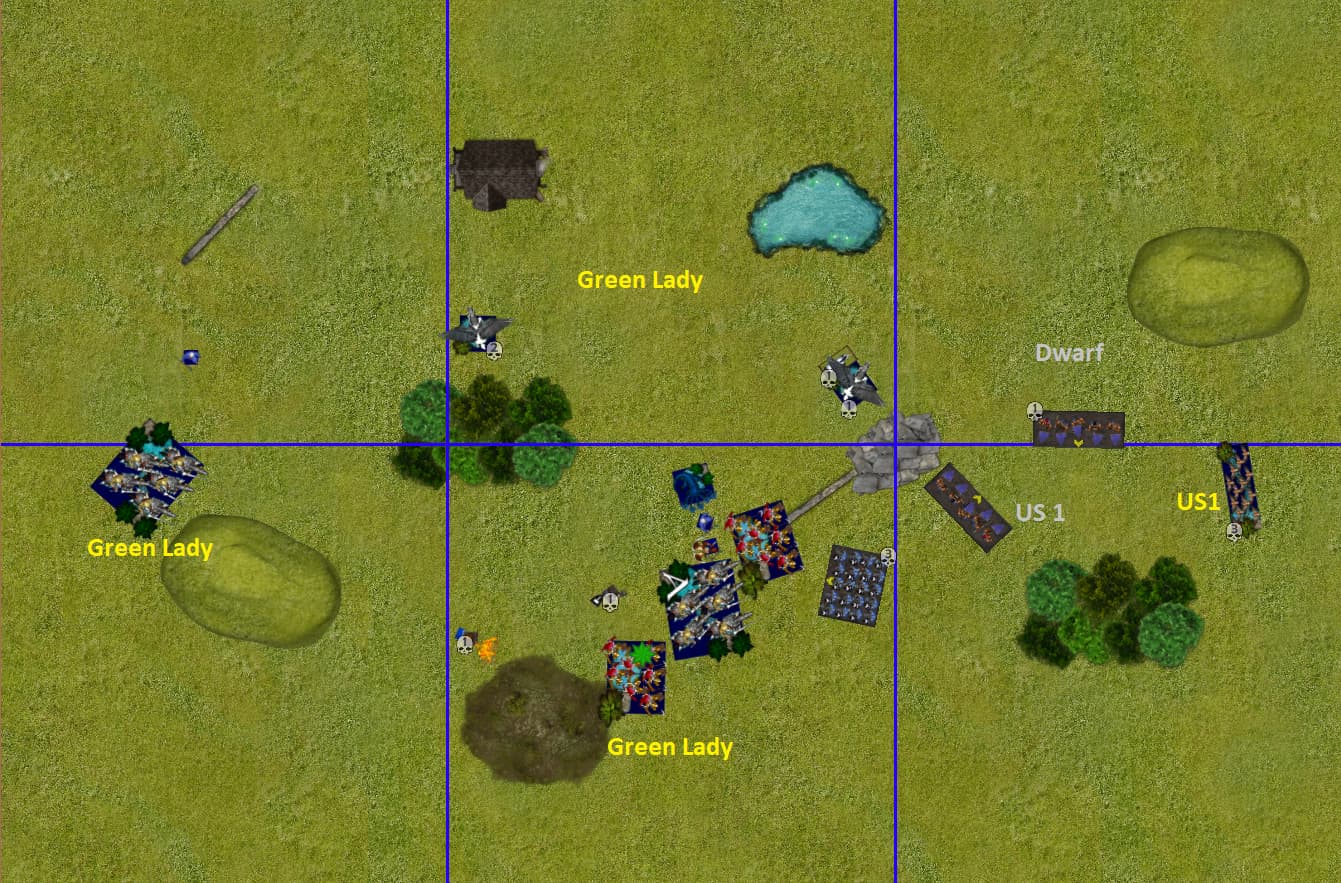
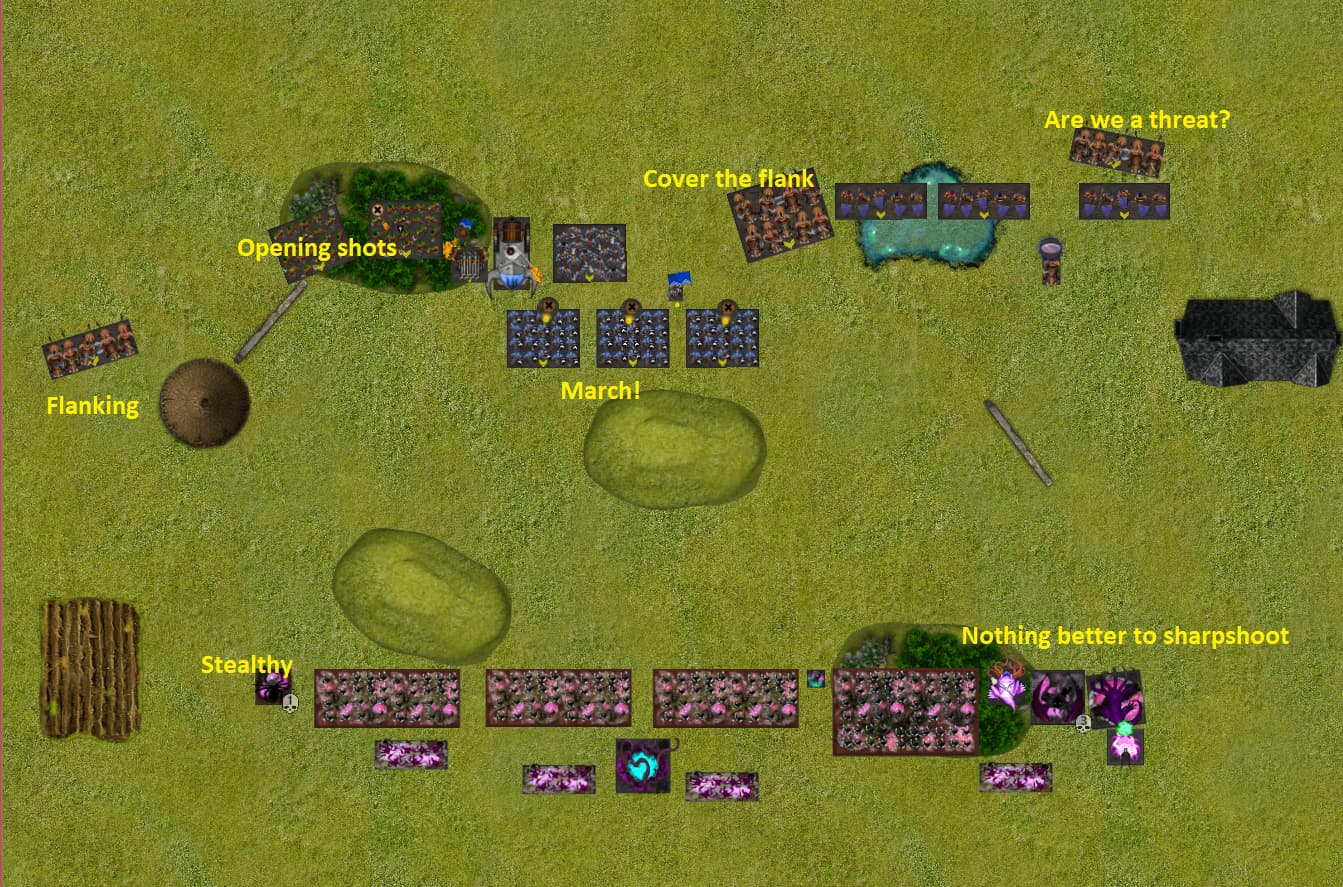
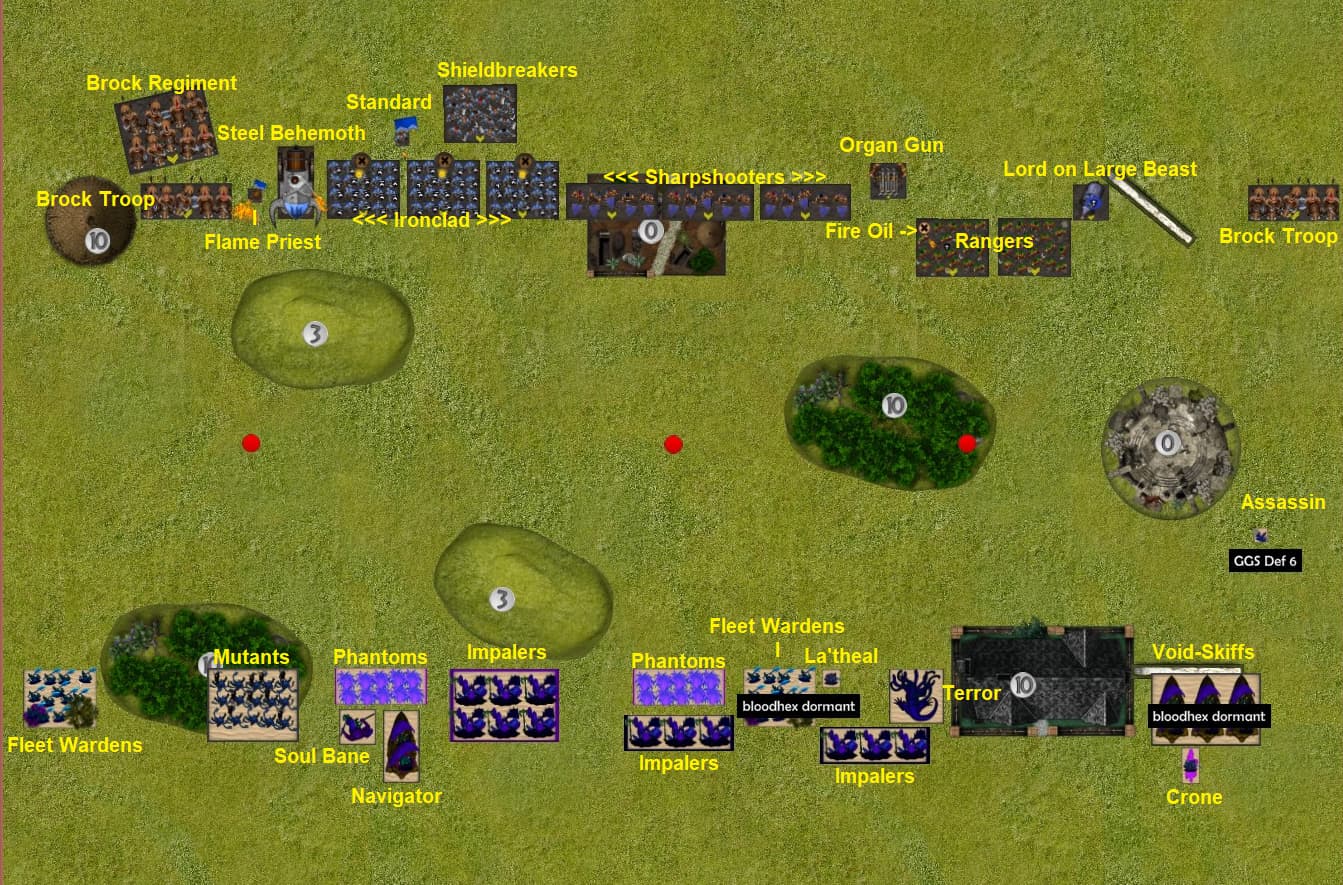
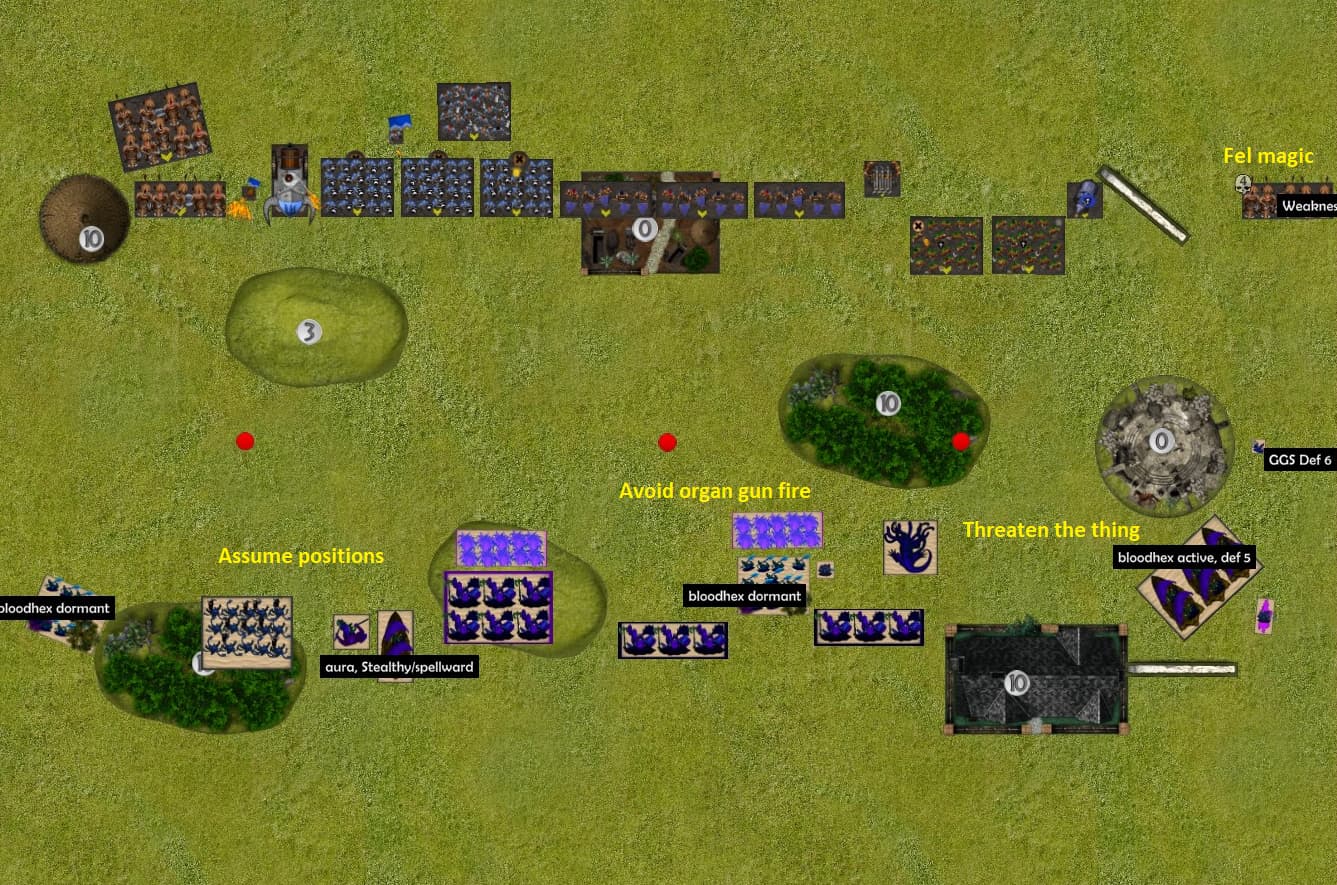
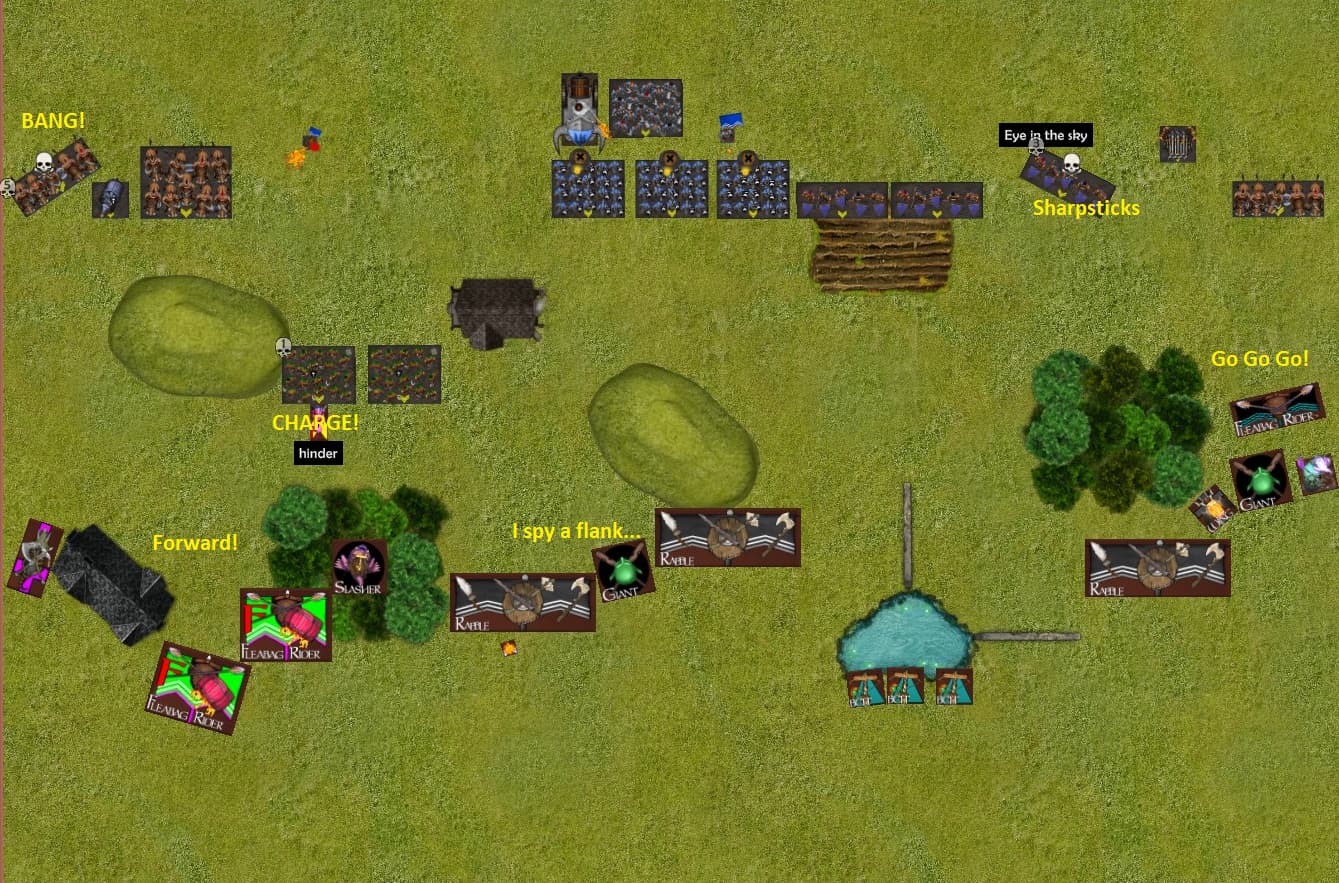
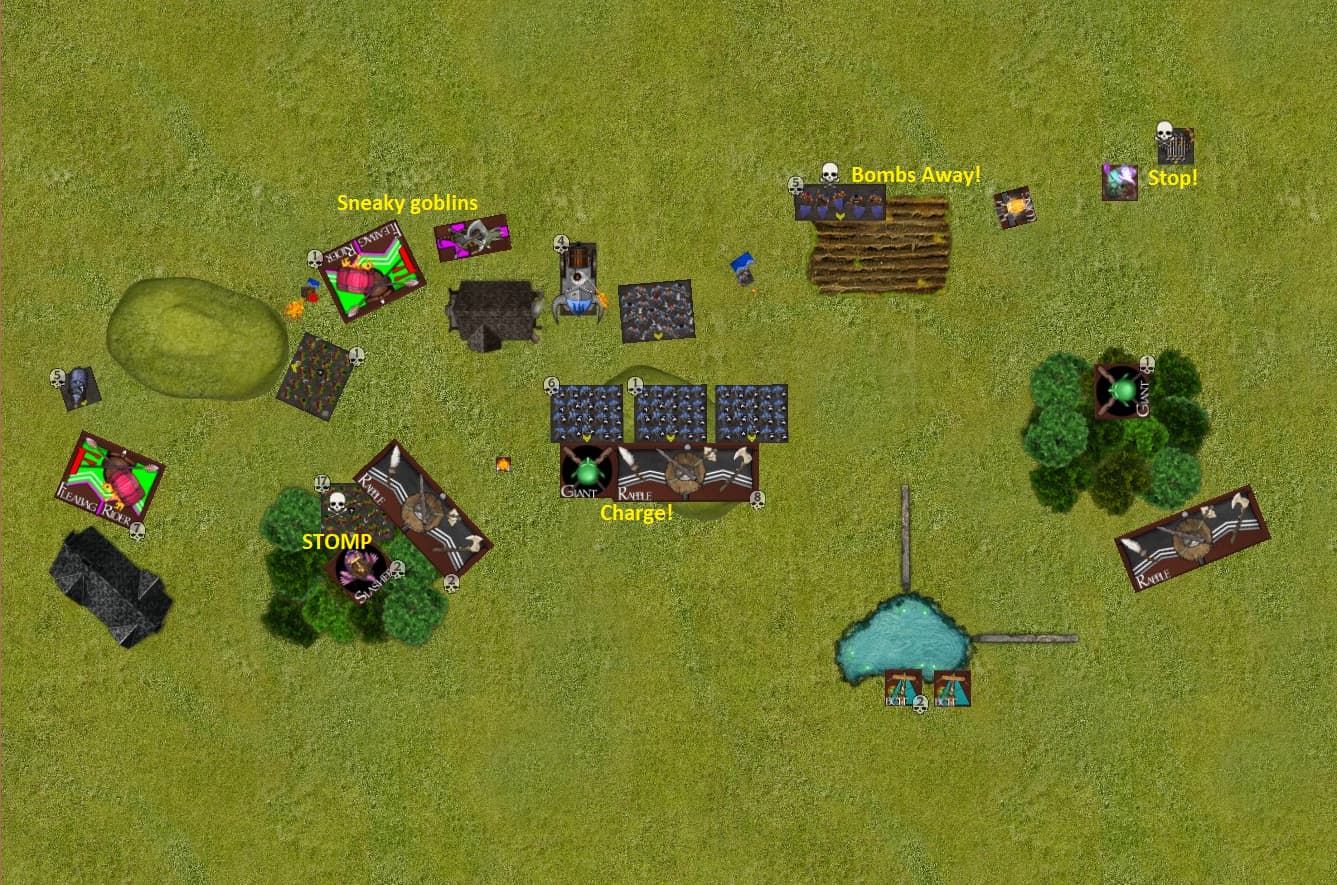
Deployment:
It’s invade again and, as with the last game, my list is good at invade (perhaps unexpectedly for dwarfs).
I have a lot of US with decent durability, typically more drops than my opponent and can push a load of US up any part of the table.
The plan is not complicated.
Fight through the De 3+ units with my infantry to go score while delaying the titans and monsters on the right.
Using rangers and mastiffs to do the damage and a combination of threats from the brocks and distraction from the sharpshooters to delay.
The shieldbreakers and behemoth take their usual second line role, hopefully getting in the fight and scoring, but shoring up the flank if need be.
A note on the scout moves: not ideal, the rangers are scouting into a defensive position to shoot from before moving. They don’t need cover though, the mindscreetch is on the other side of the table.
I should have avoided the obstacle.
That said, forming habits that are good most of the time is a good thing with this army.
When I get to play this army in person I often struggle with the clock as I don’t play often and this list has a good number of units that need to coordinate well and most of them contribute (i.e. roll dice) almost every turn as they have both ranged and combat capability.
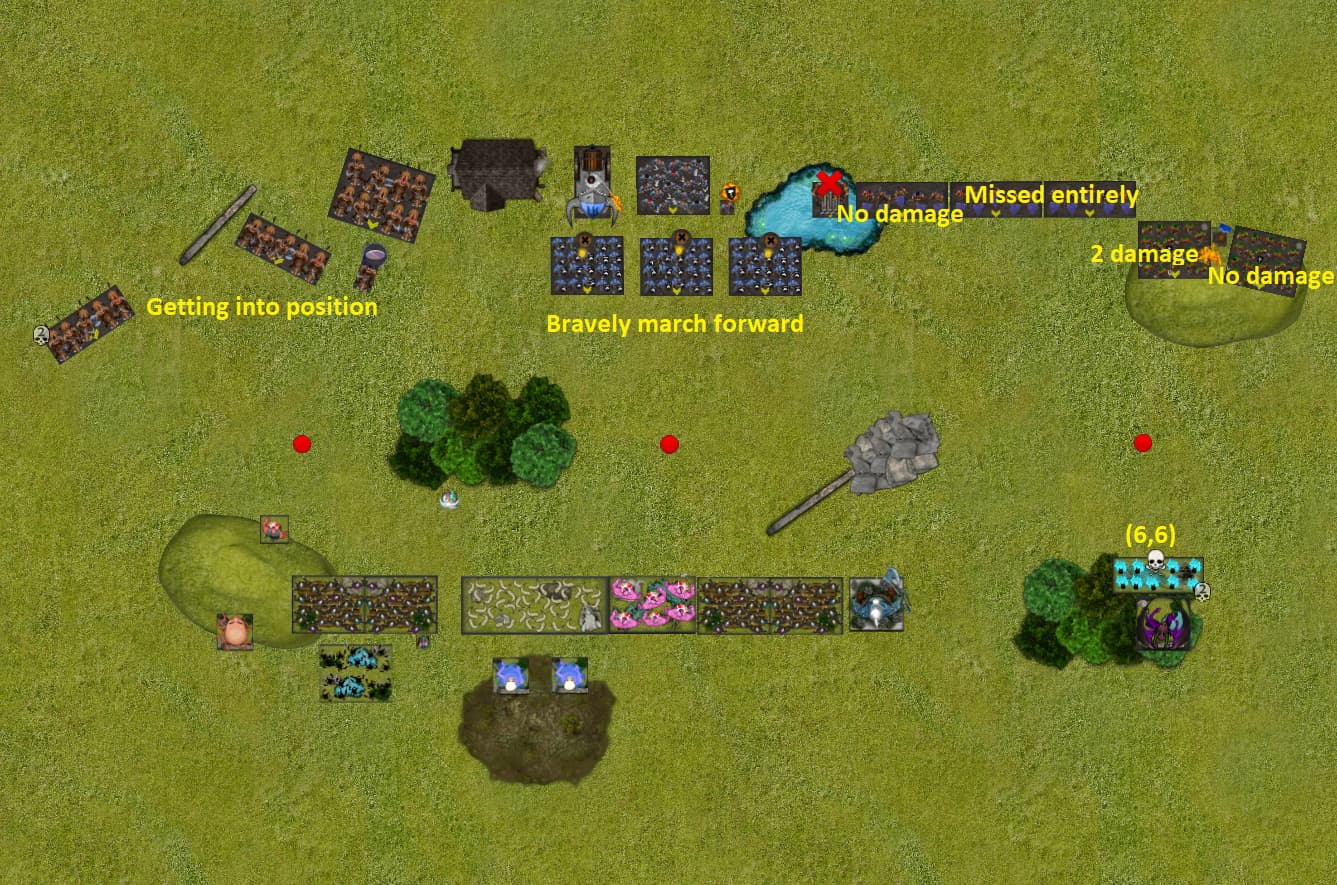
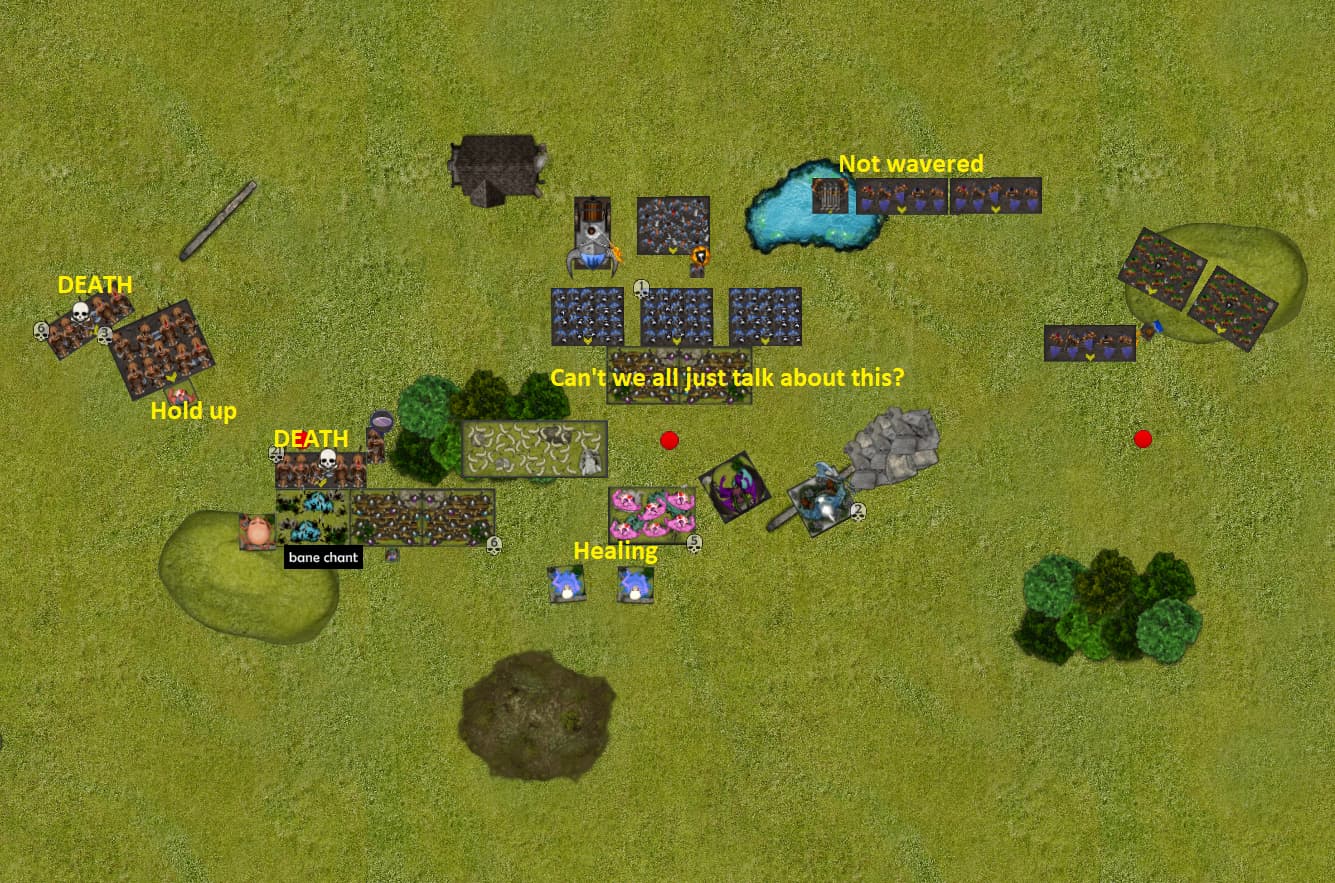
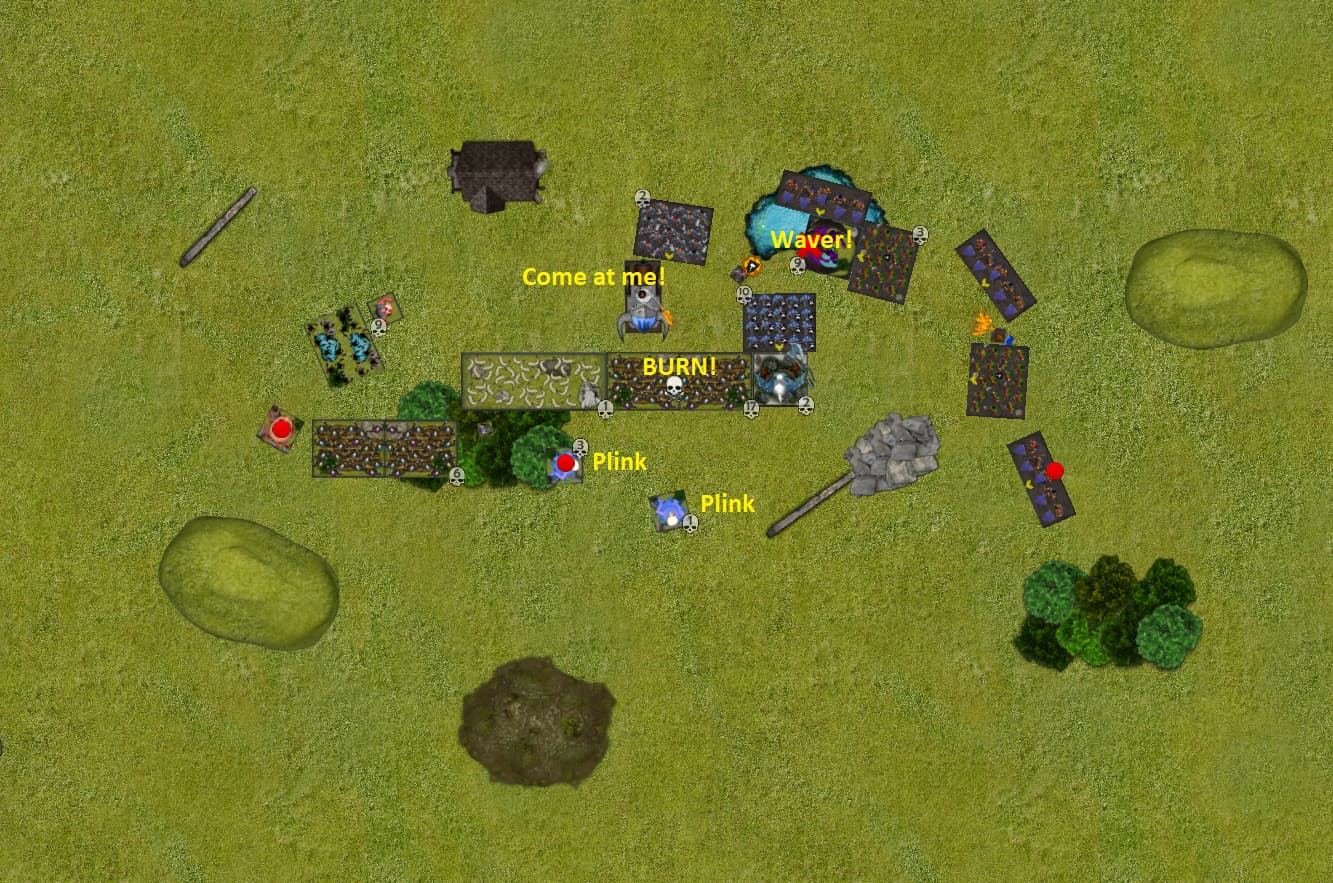
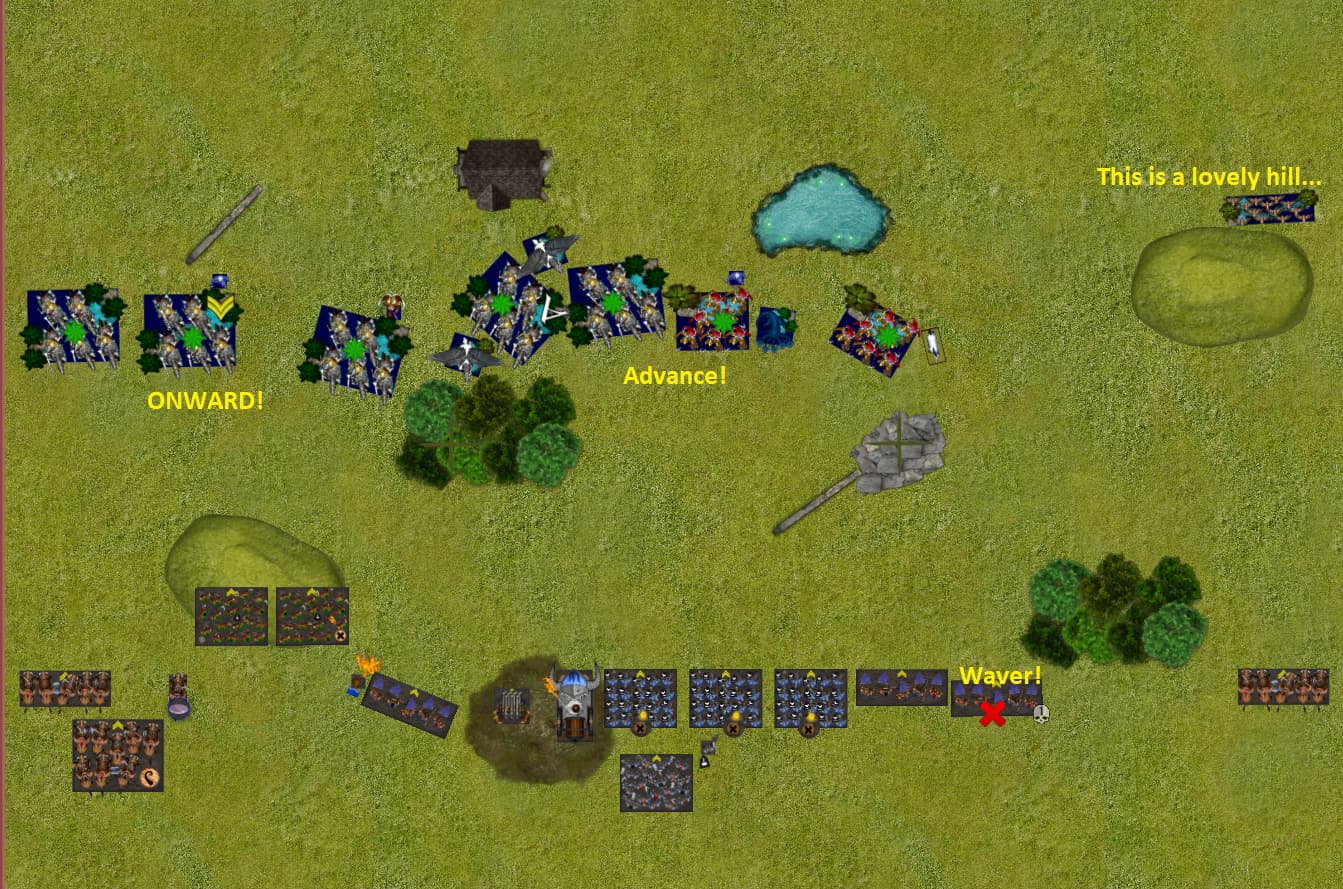
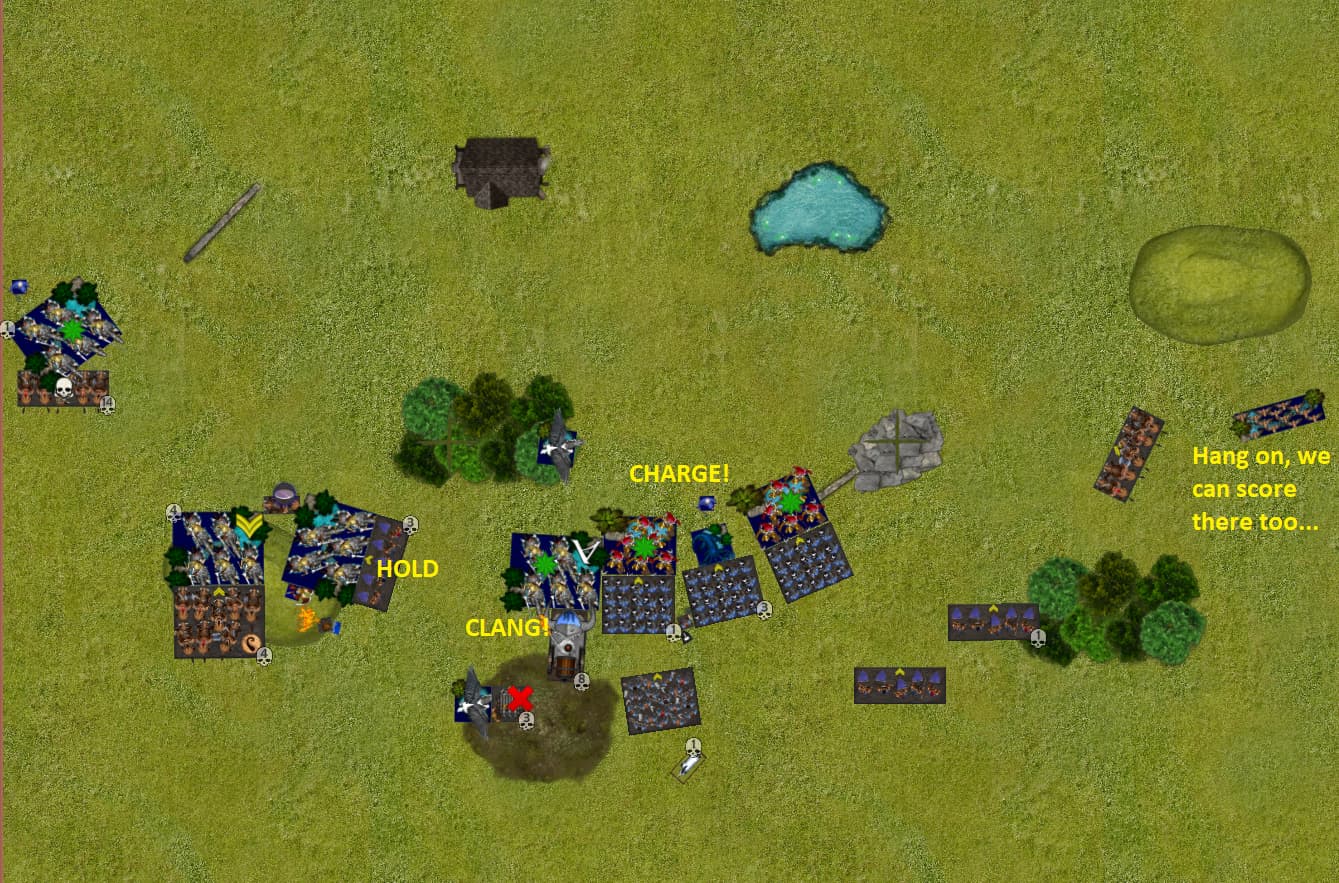
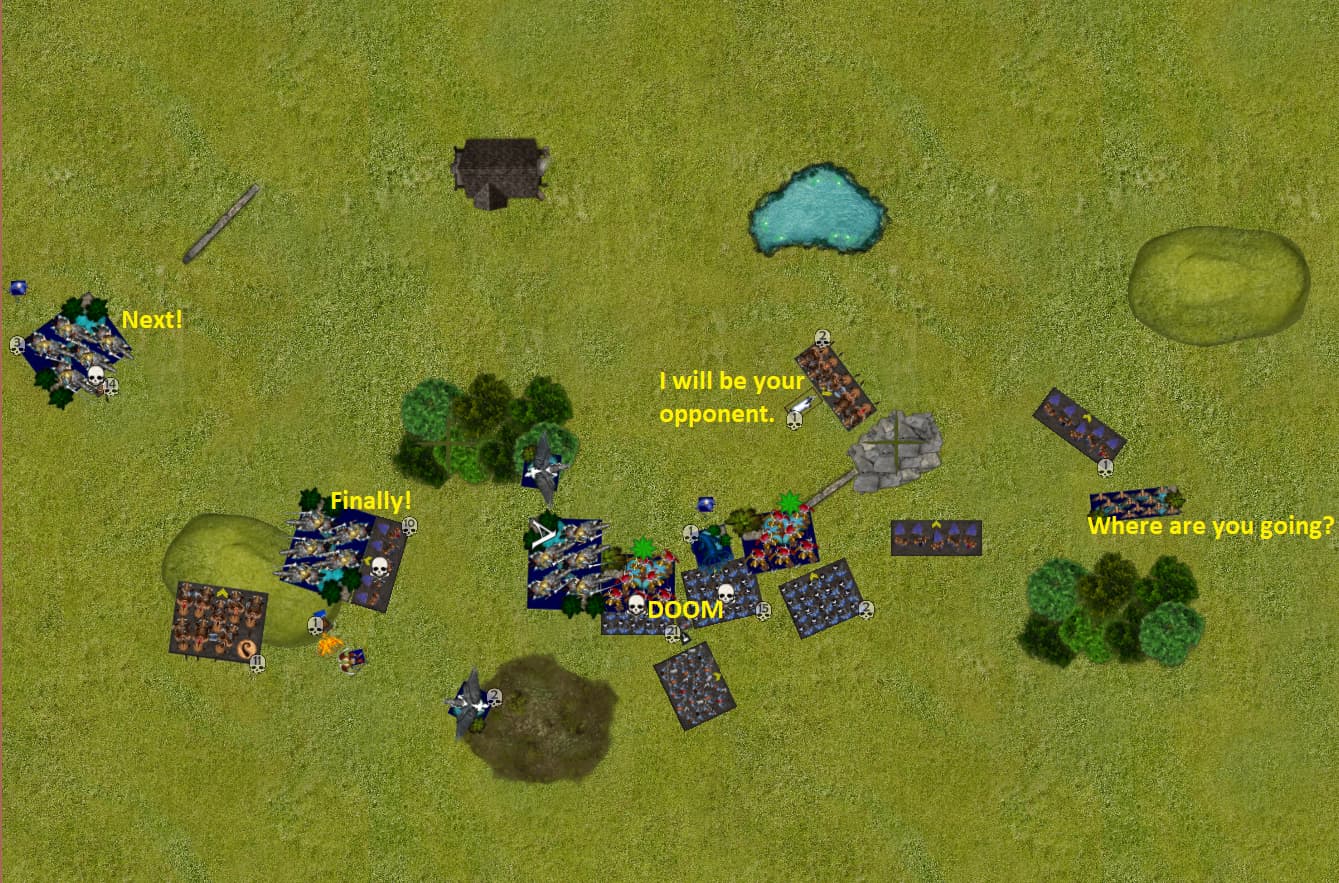
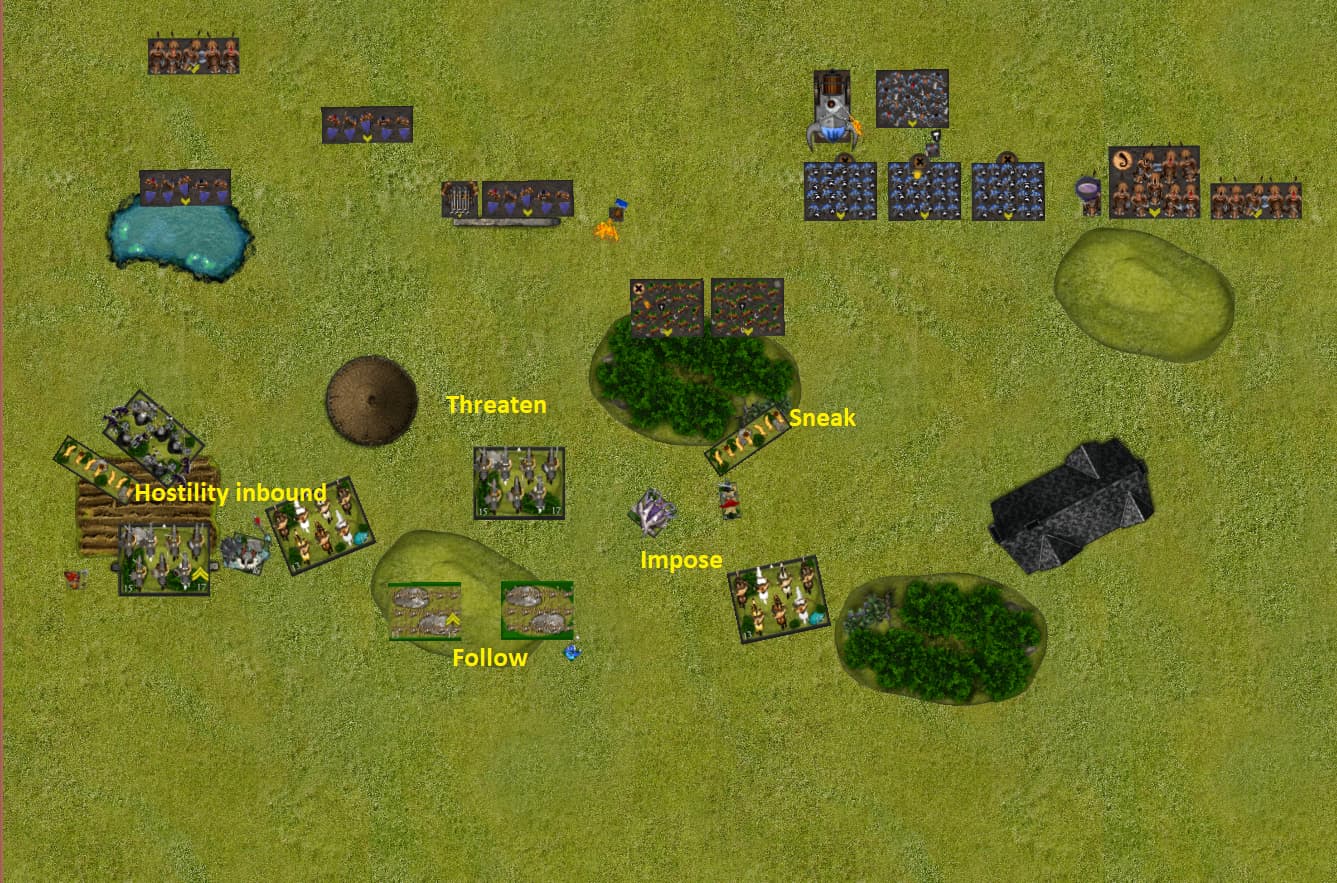
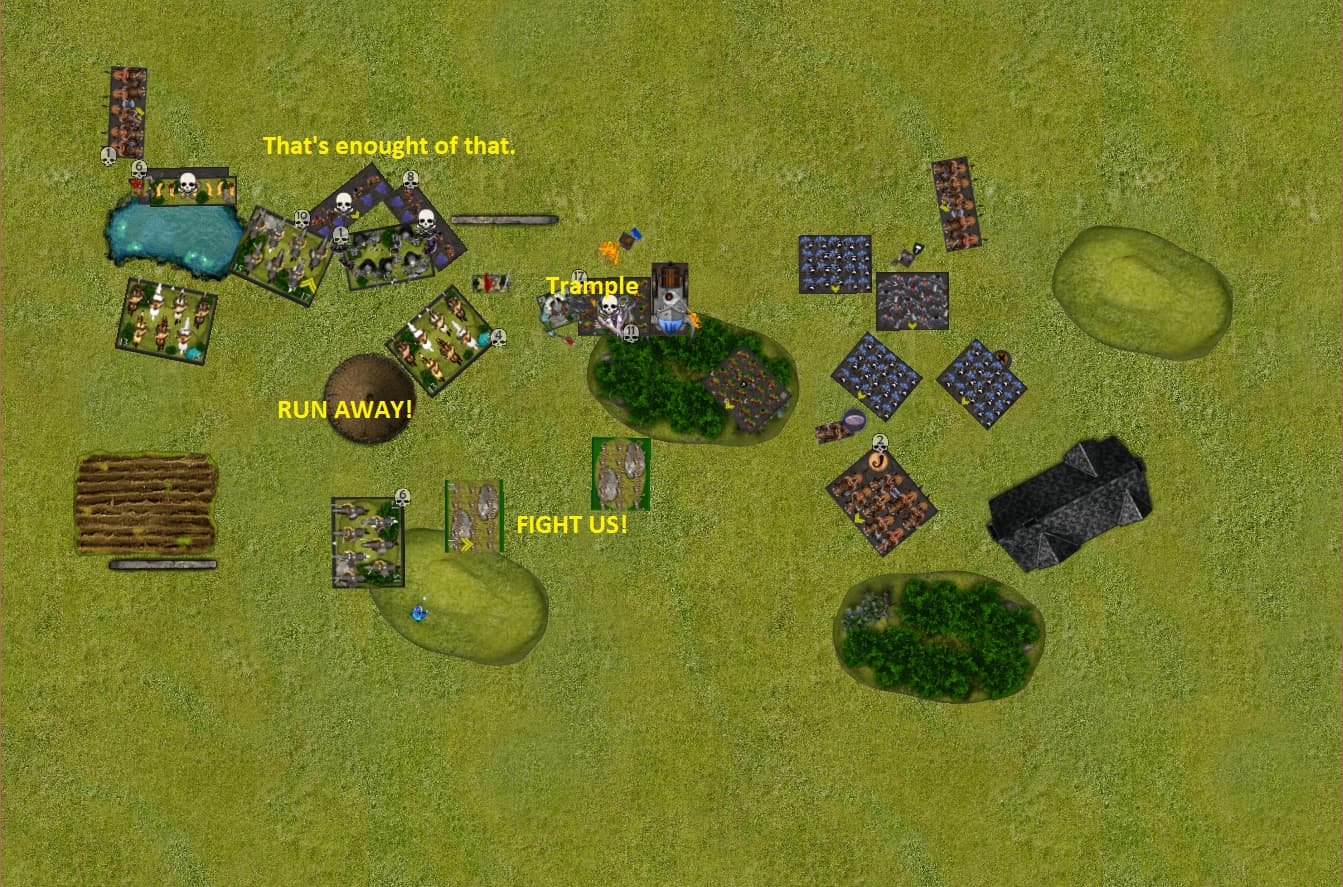
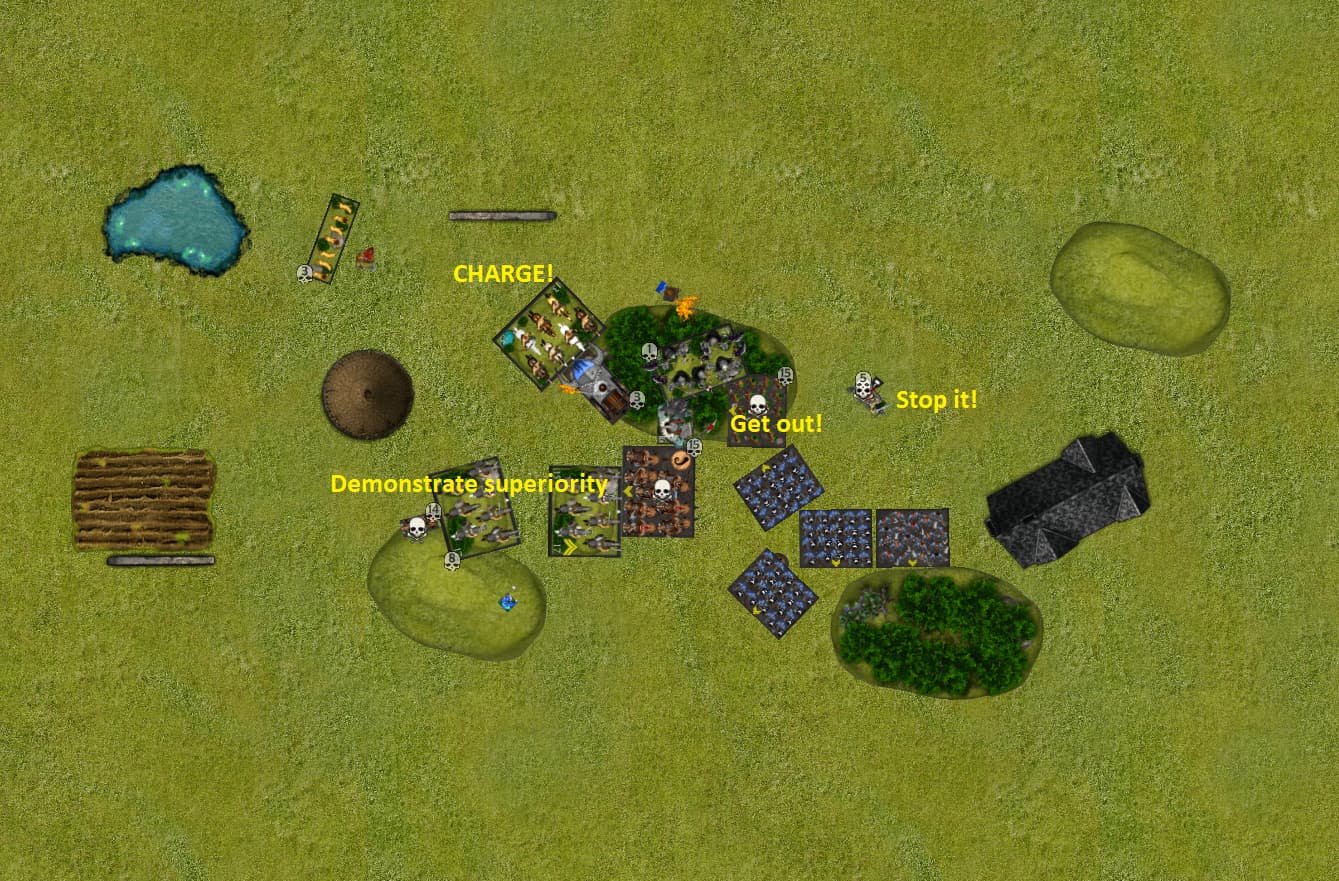
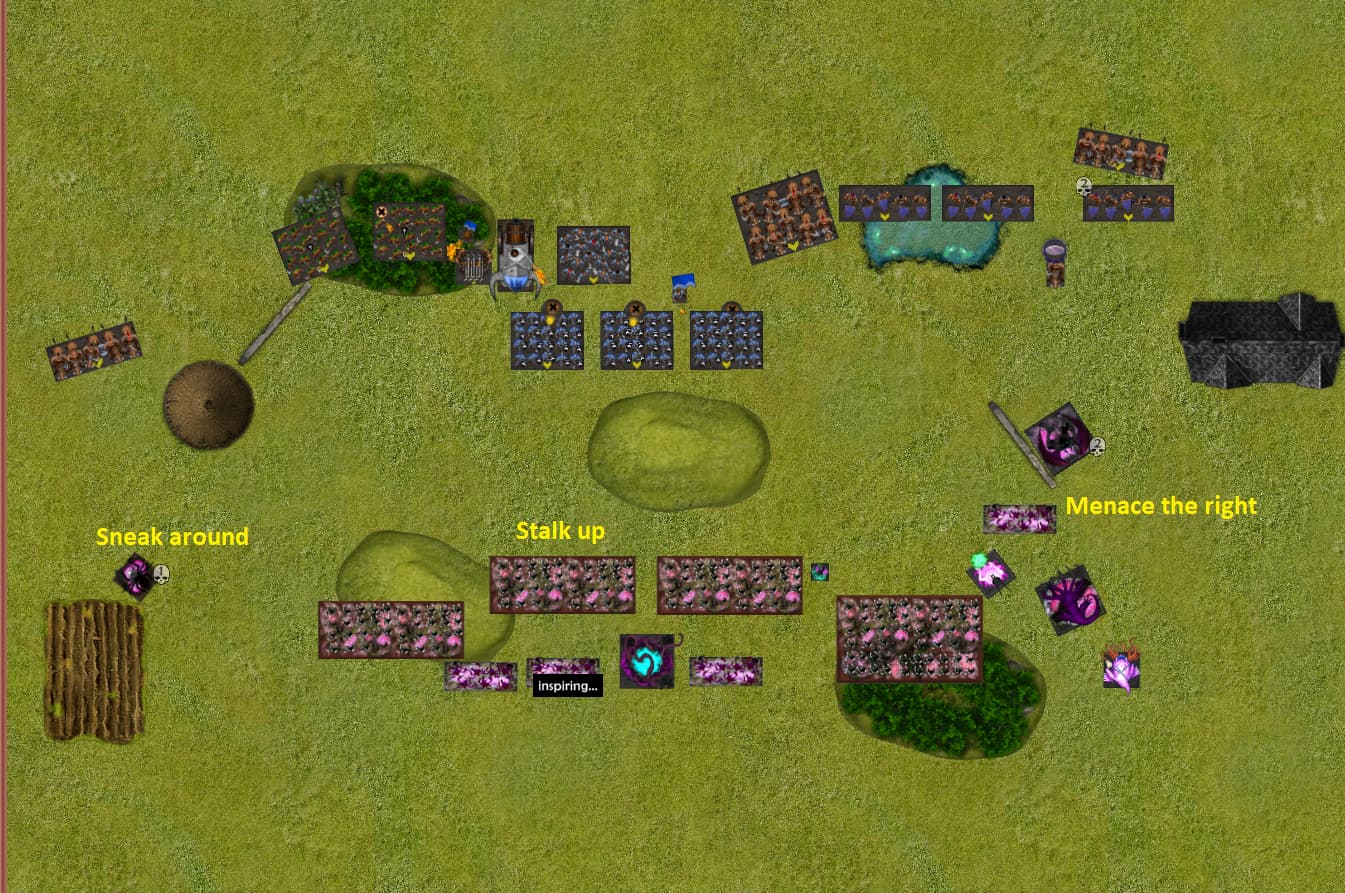
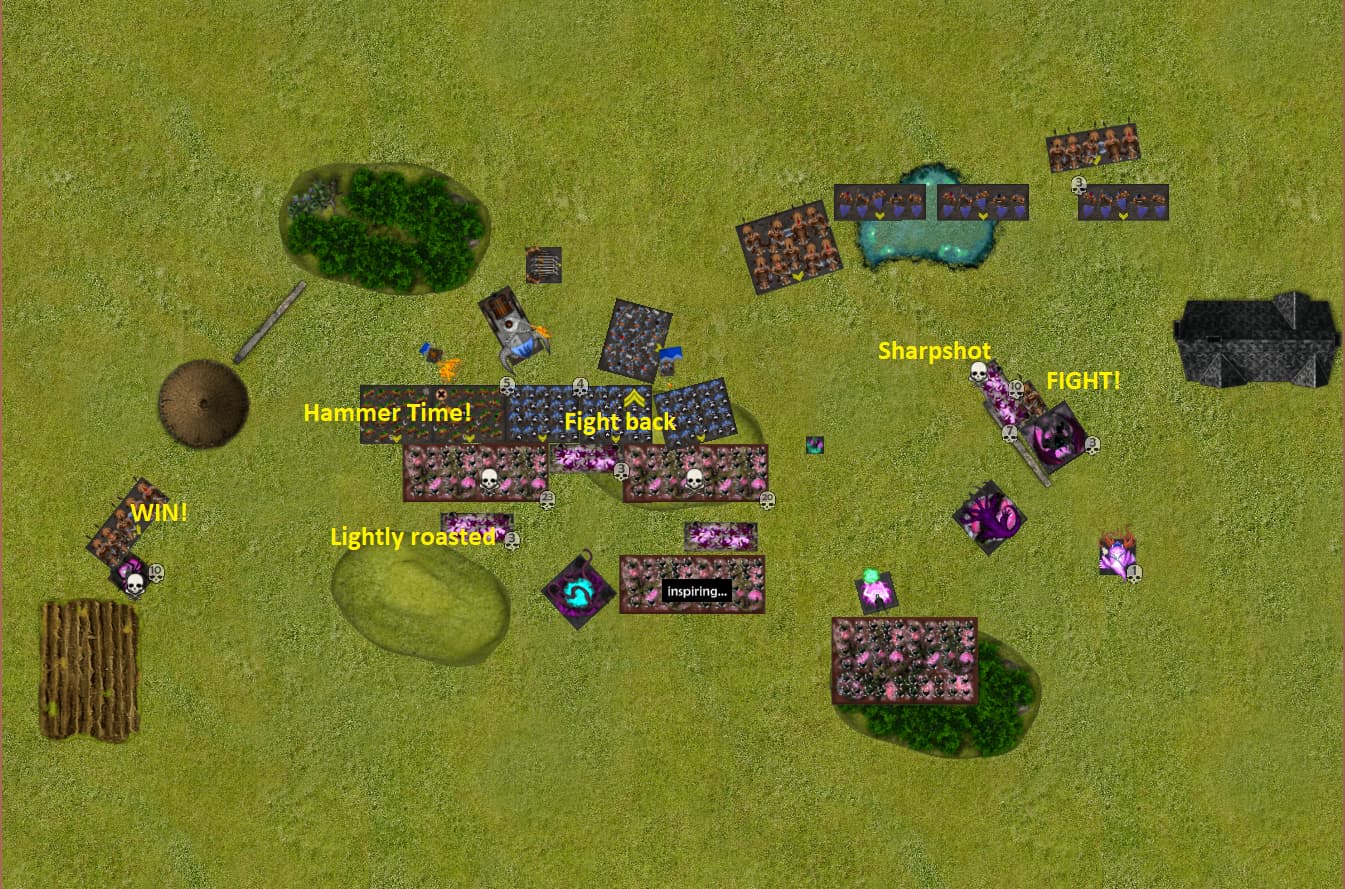
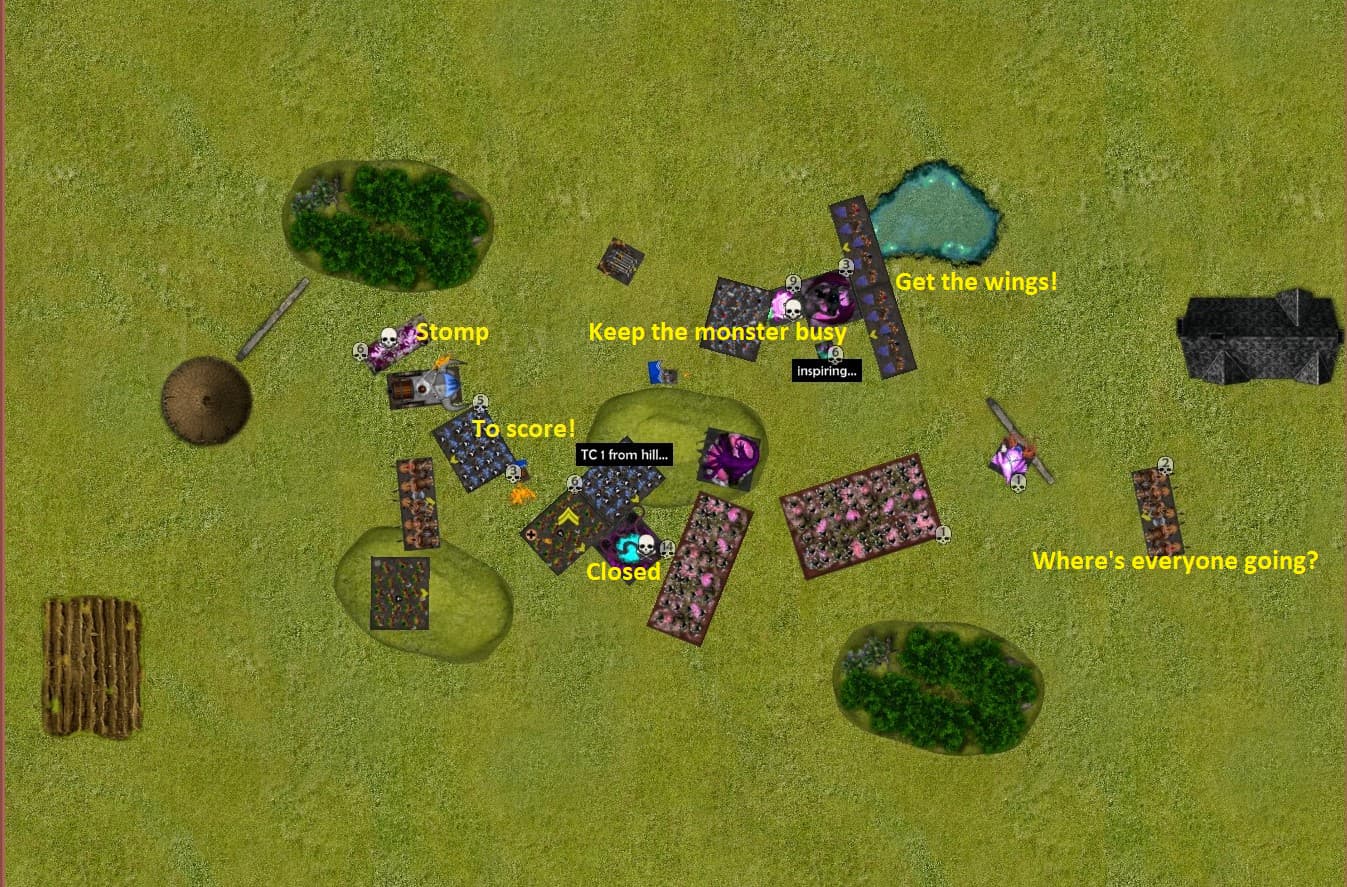
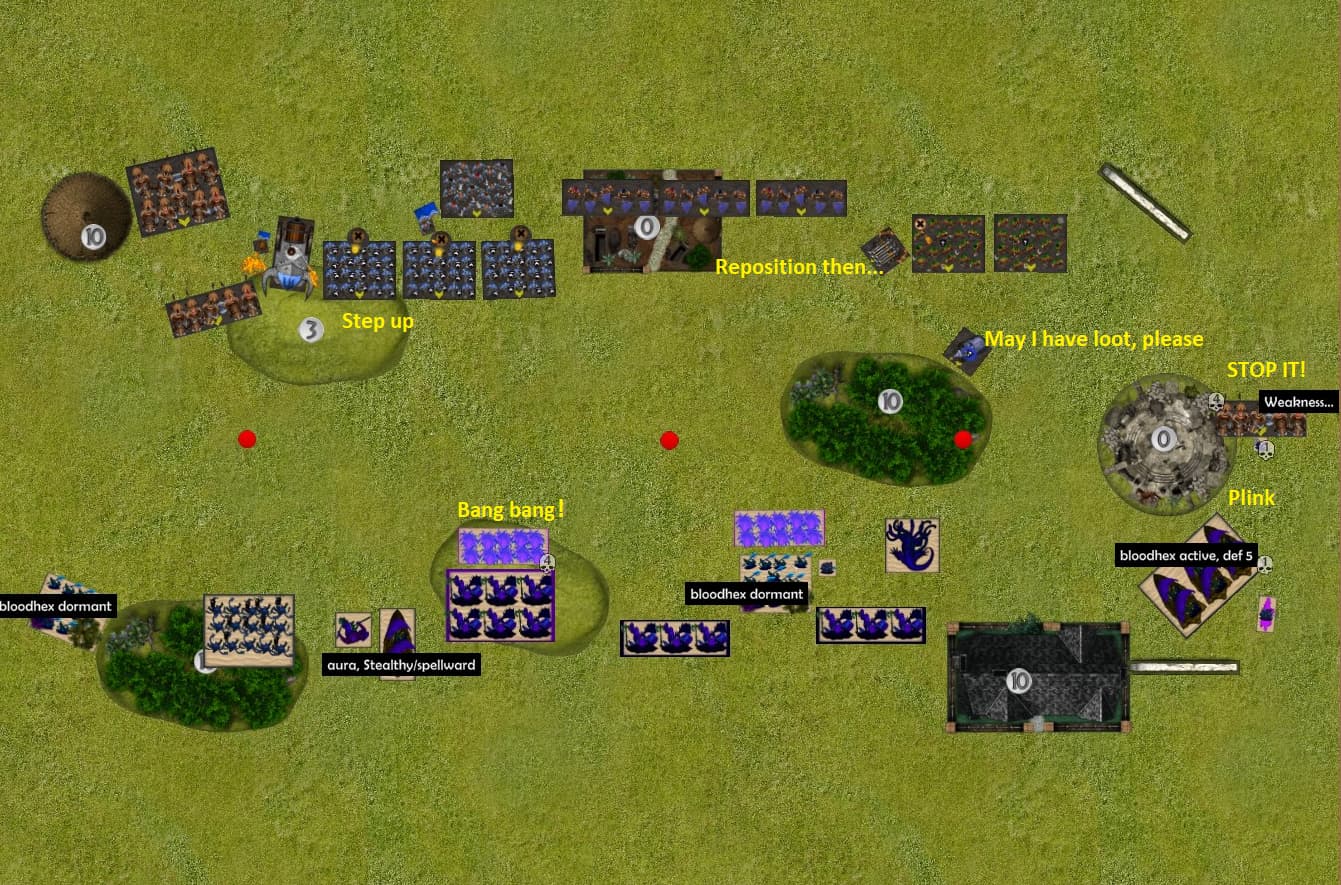
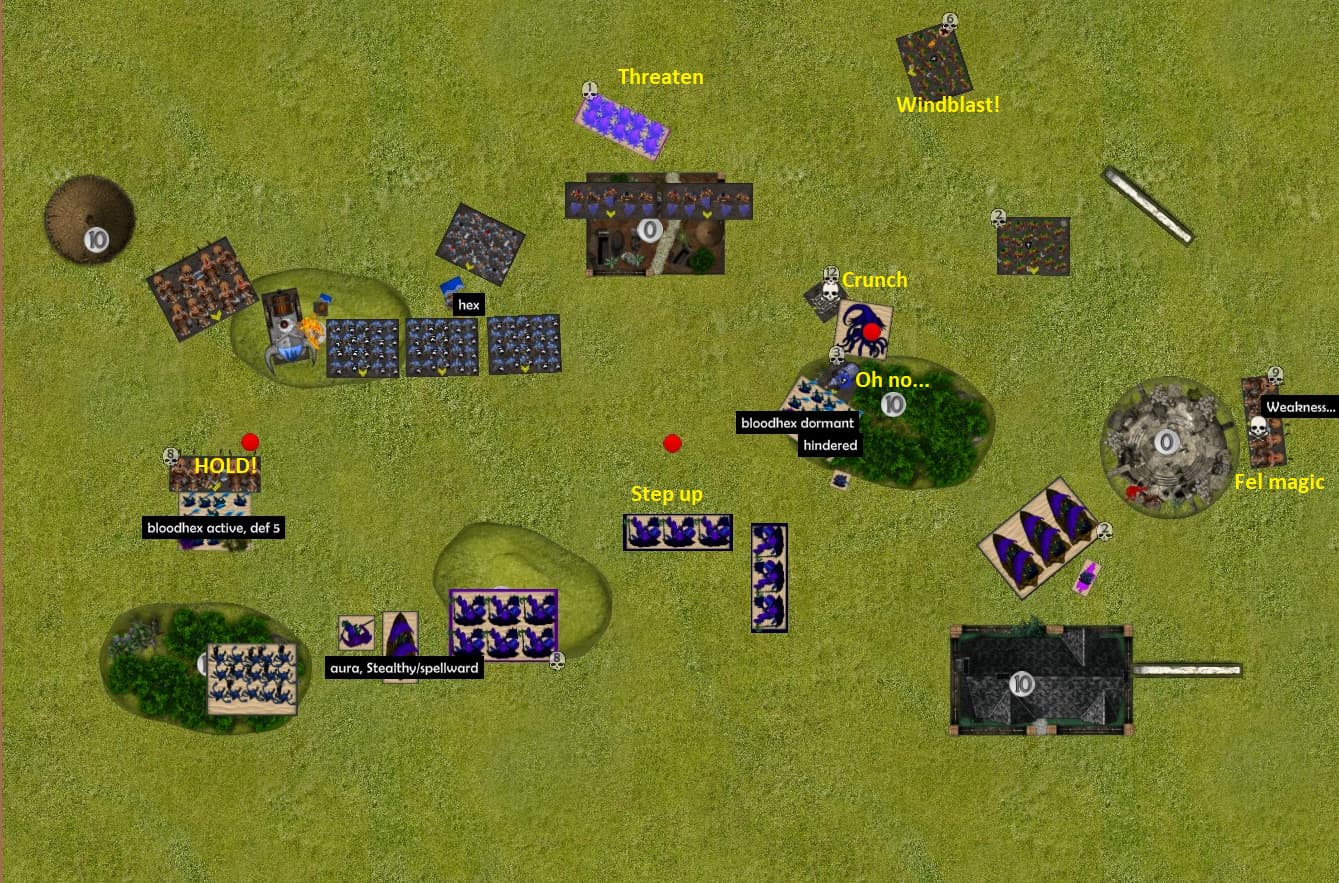
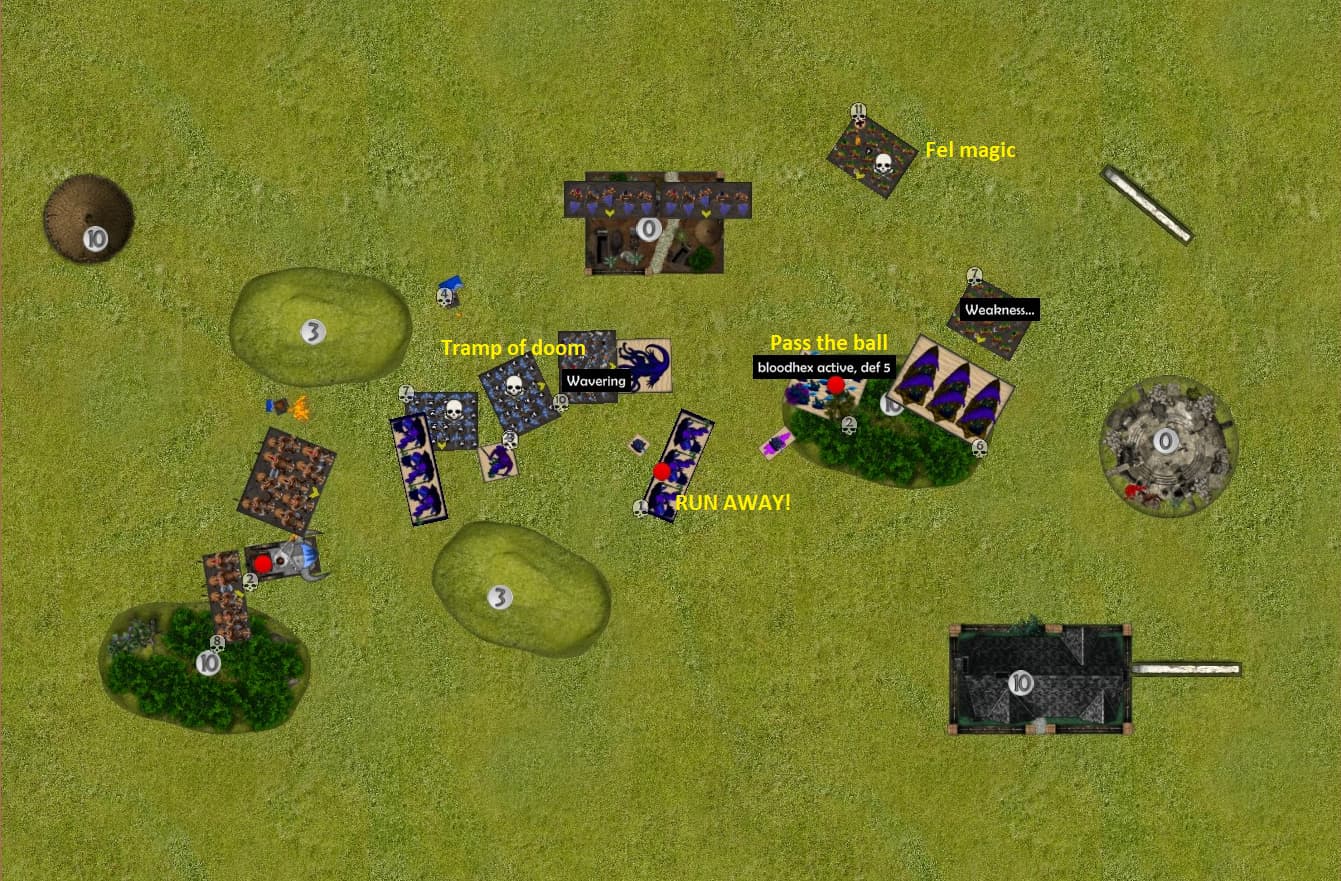
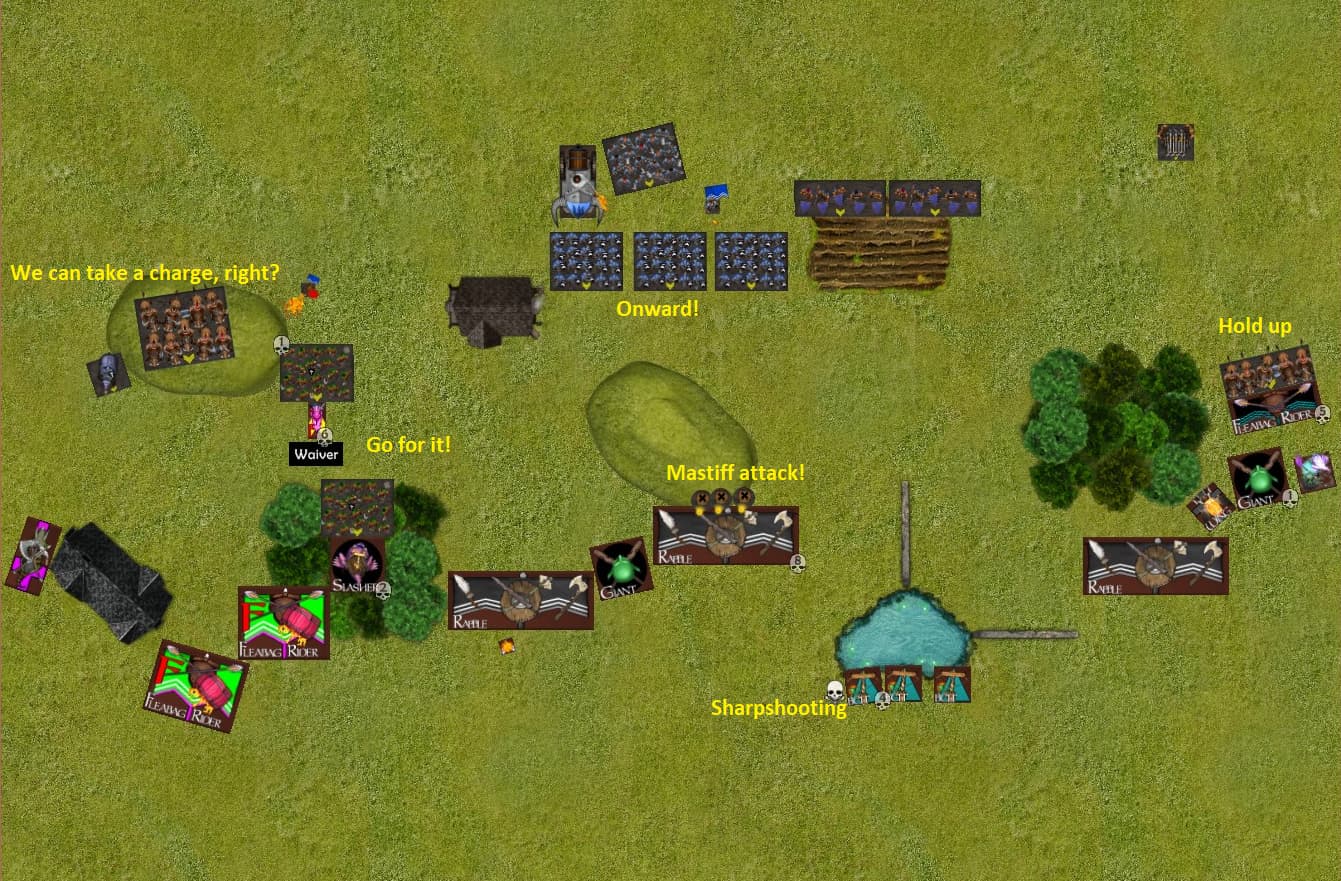
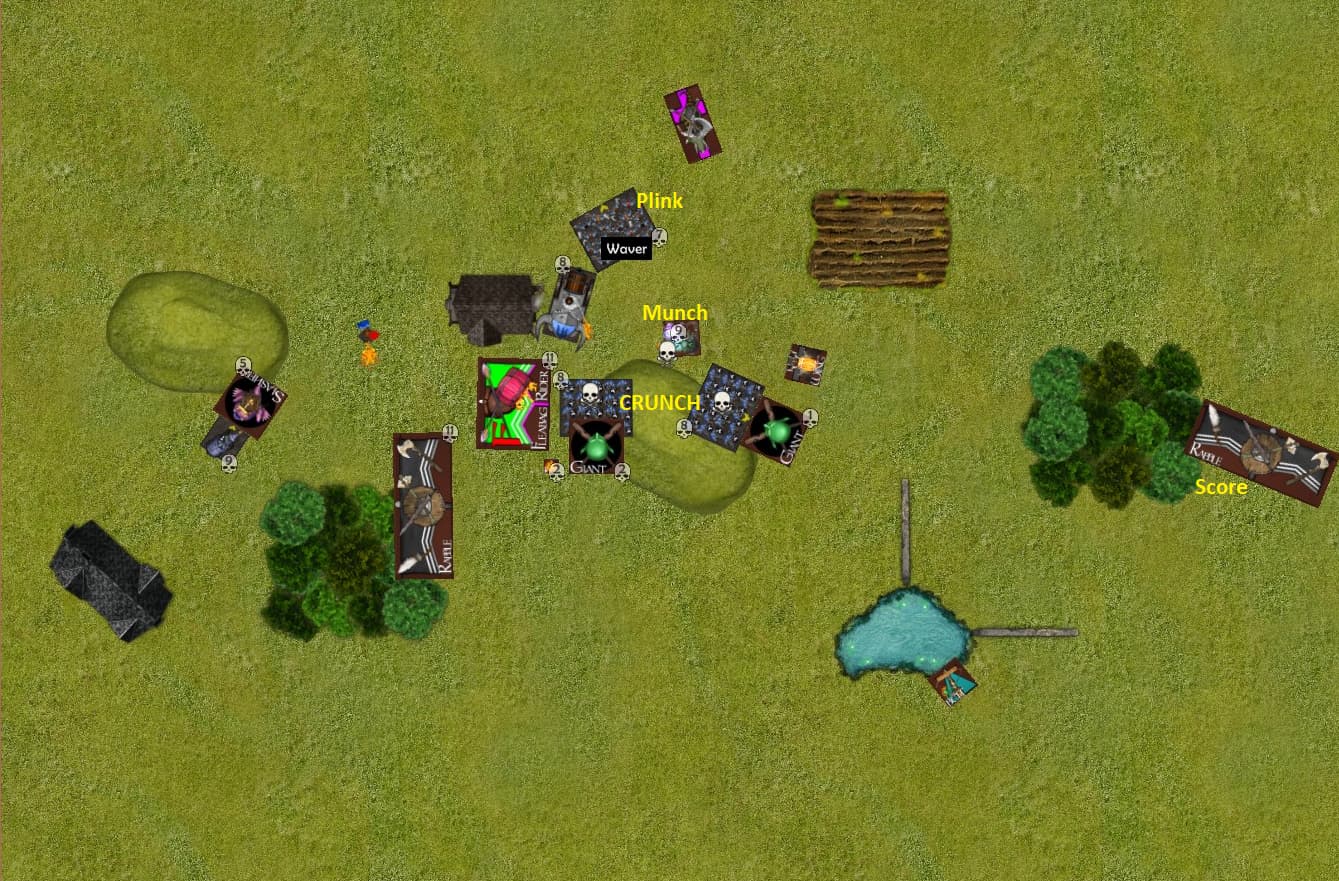
Dwarf Turn 1:
The Fools get first turn!
The ironclad move up as much as they can, I want to fight as close to scoring as possible.
The dwarfs on the left (right flank from the dwarf point of view) get to dealing with the dread fiend; those things have the potential to make trouble.
The dwarfs on the right fire annoying shots while making it dangerous to rush in.
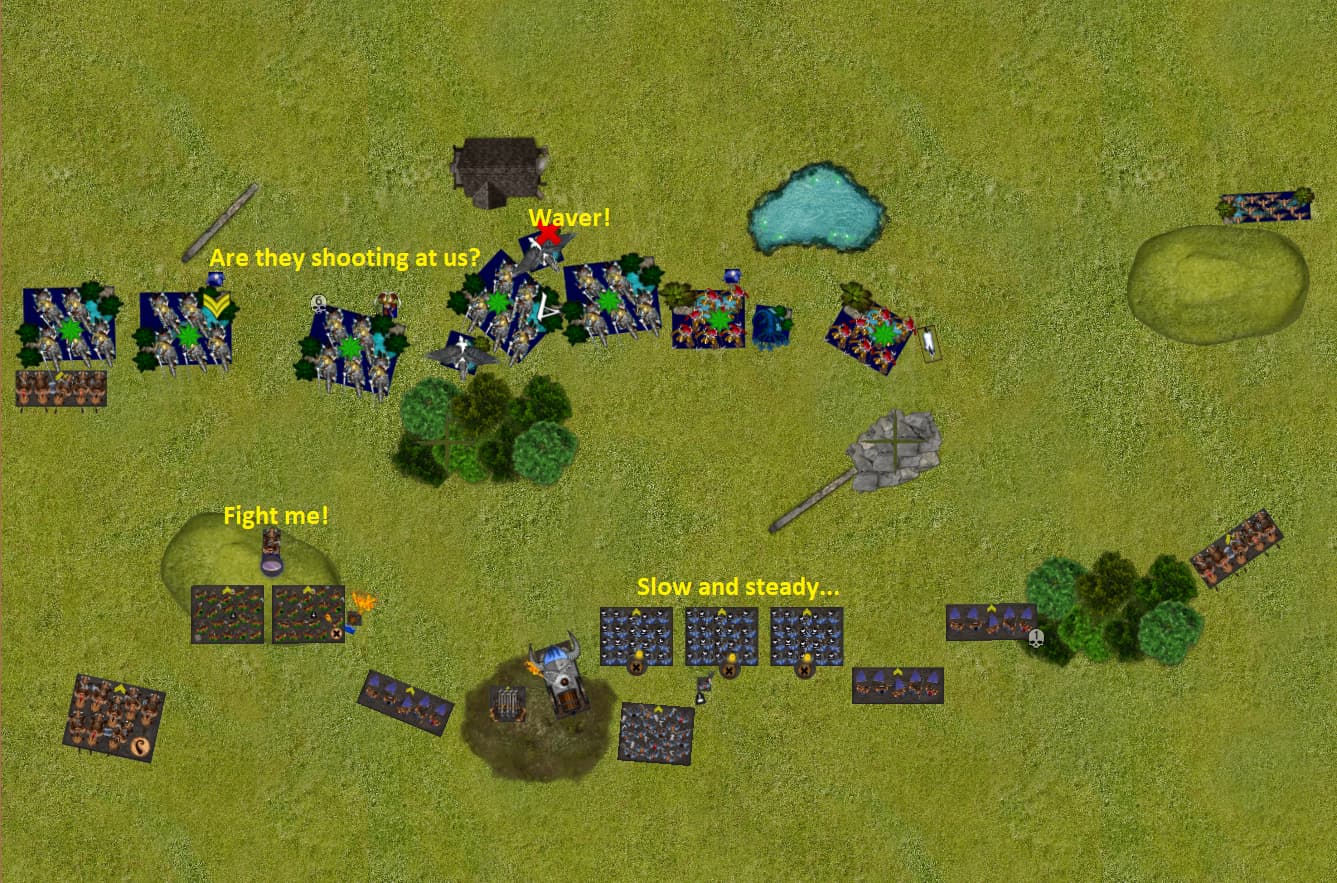
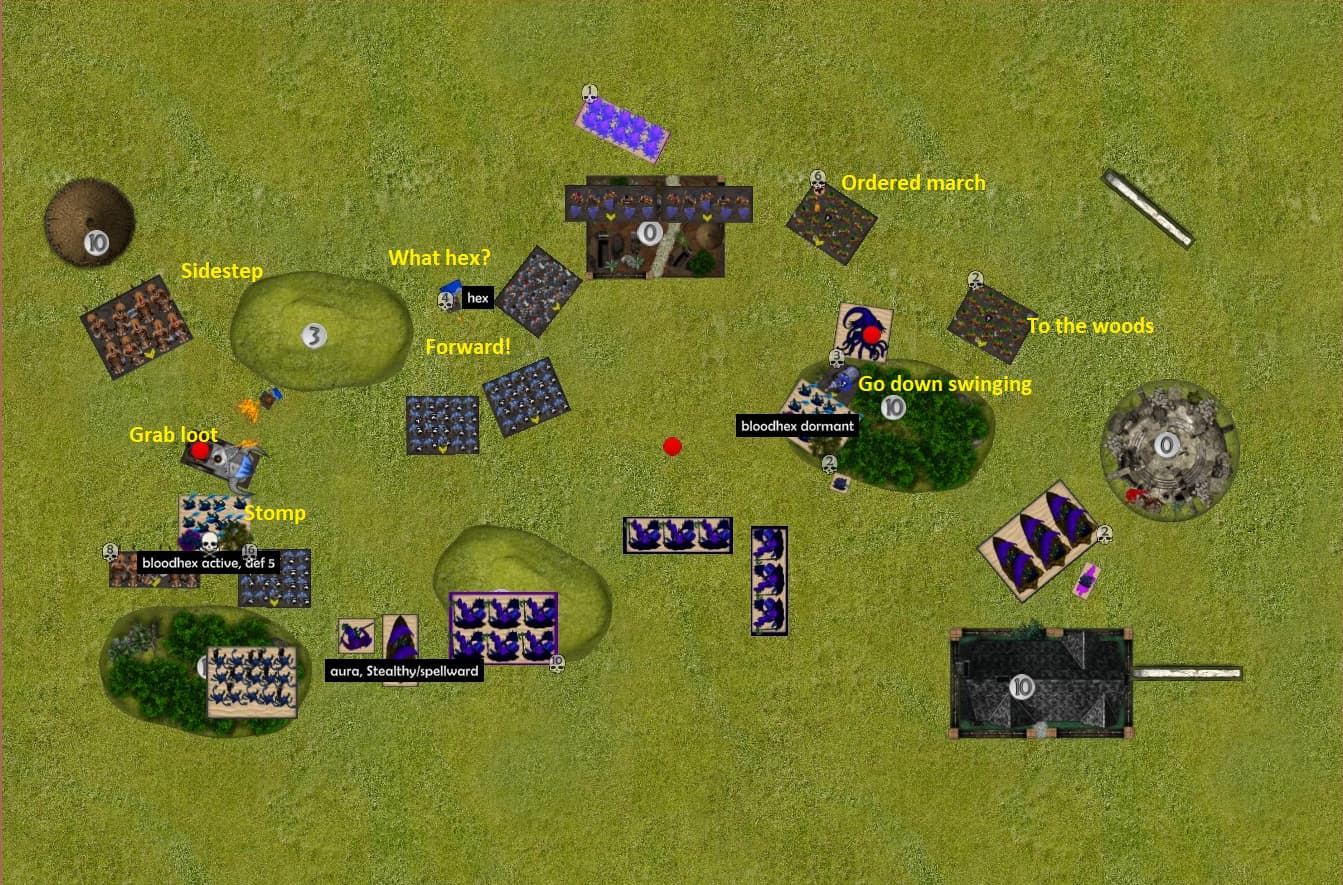
Nightstalker Turn 1:
The nightstalkers move up.
Starting to apply pressure on the right.
The dread fiend doesn’t have a obvious sneaky play, so angles itself so that the brock troop will be hindered if they charge.
The mindscreetch starts a shooting duel with a troop of sharpshooters.
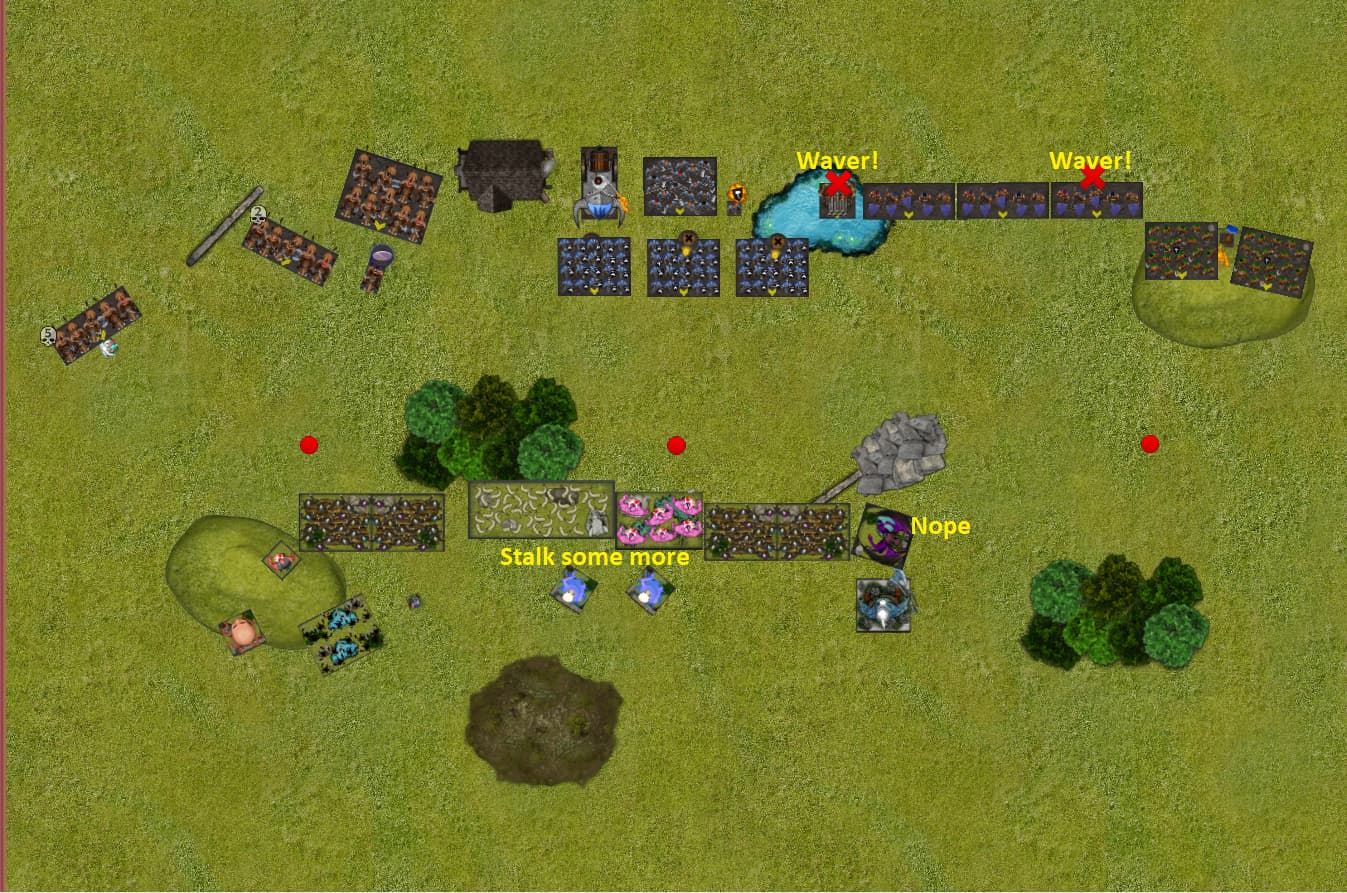
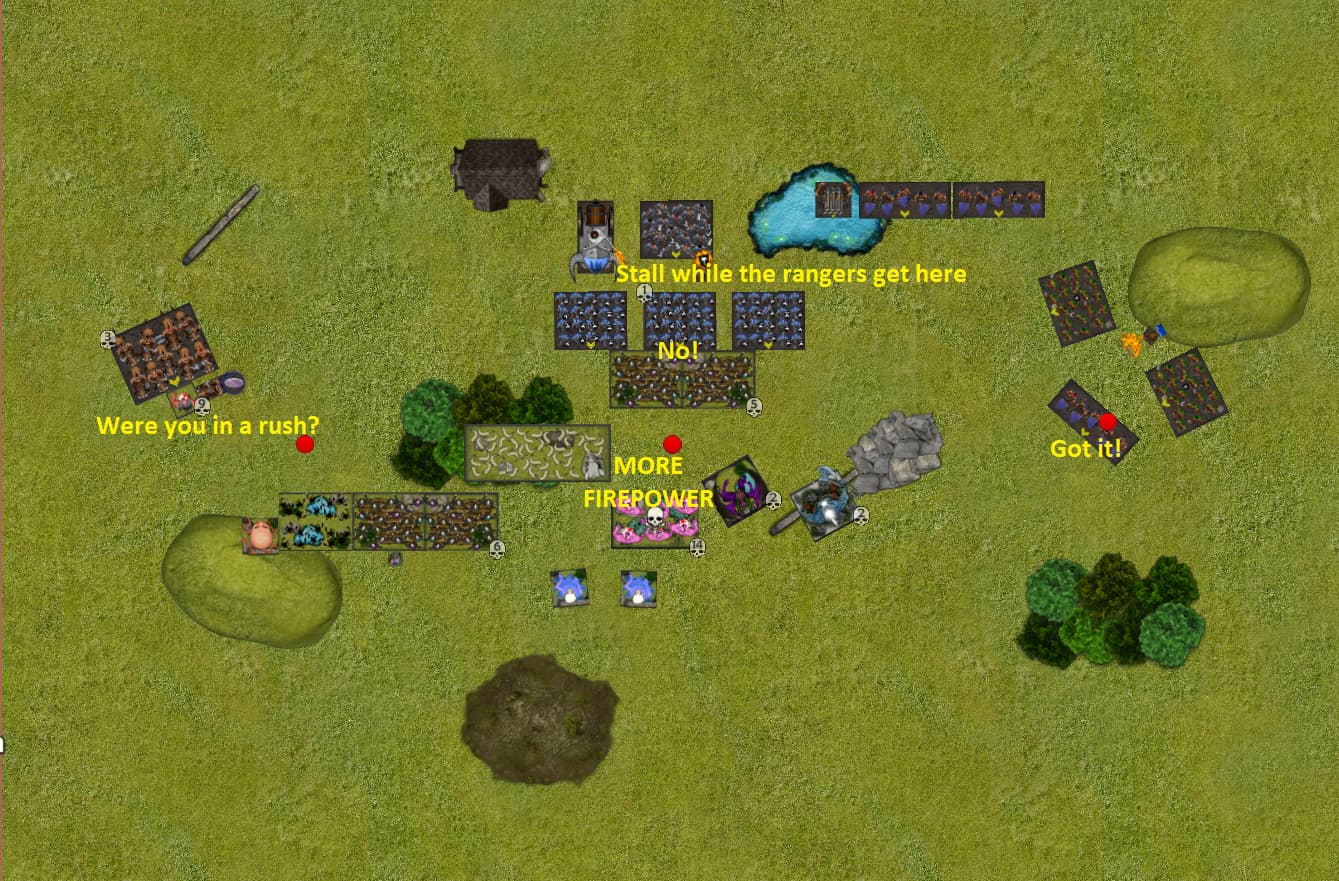
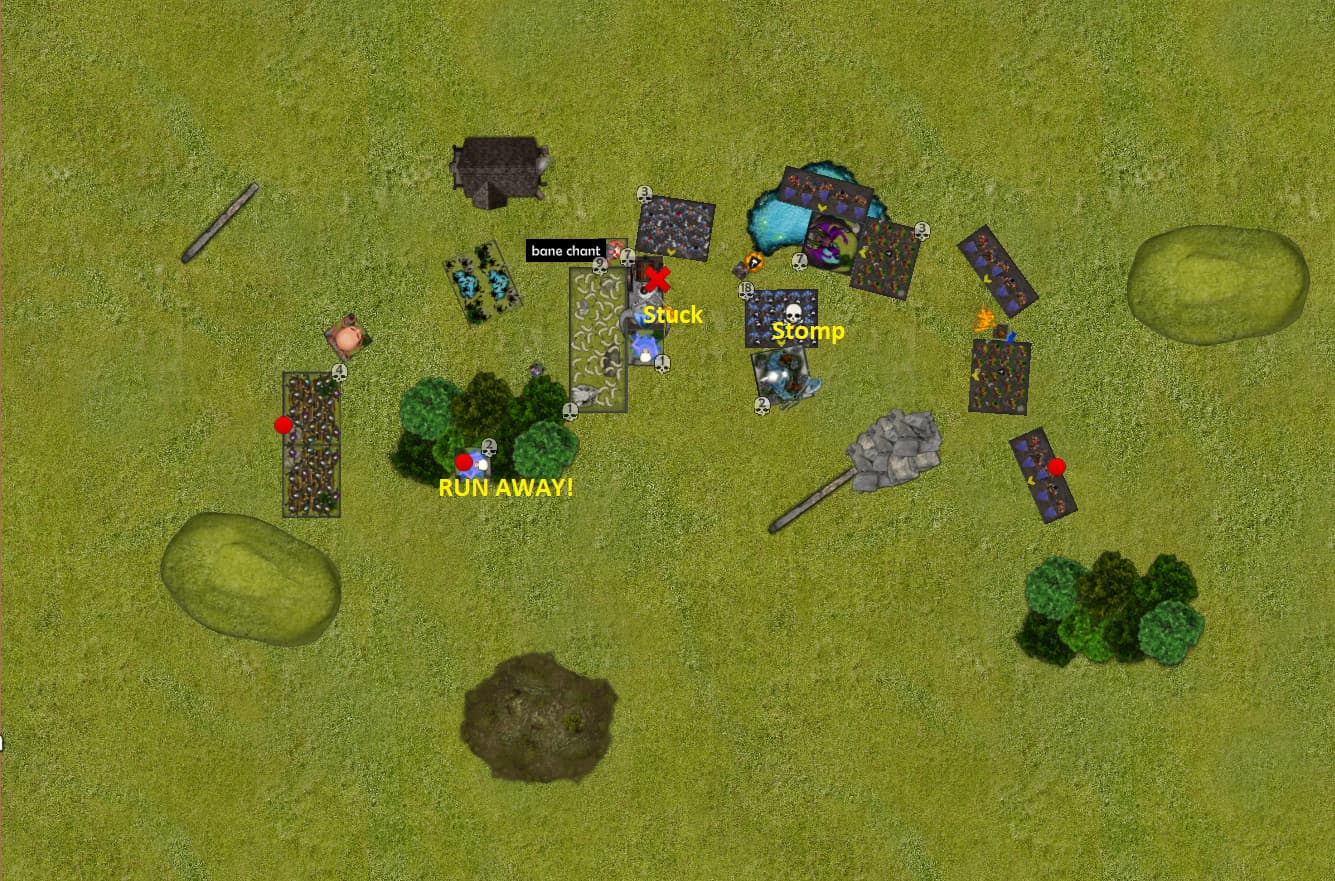
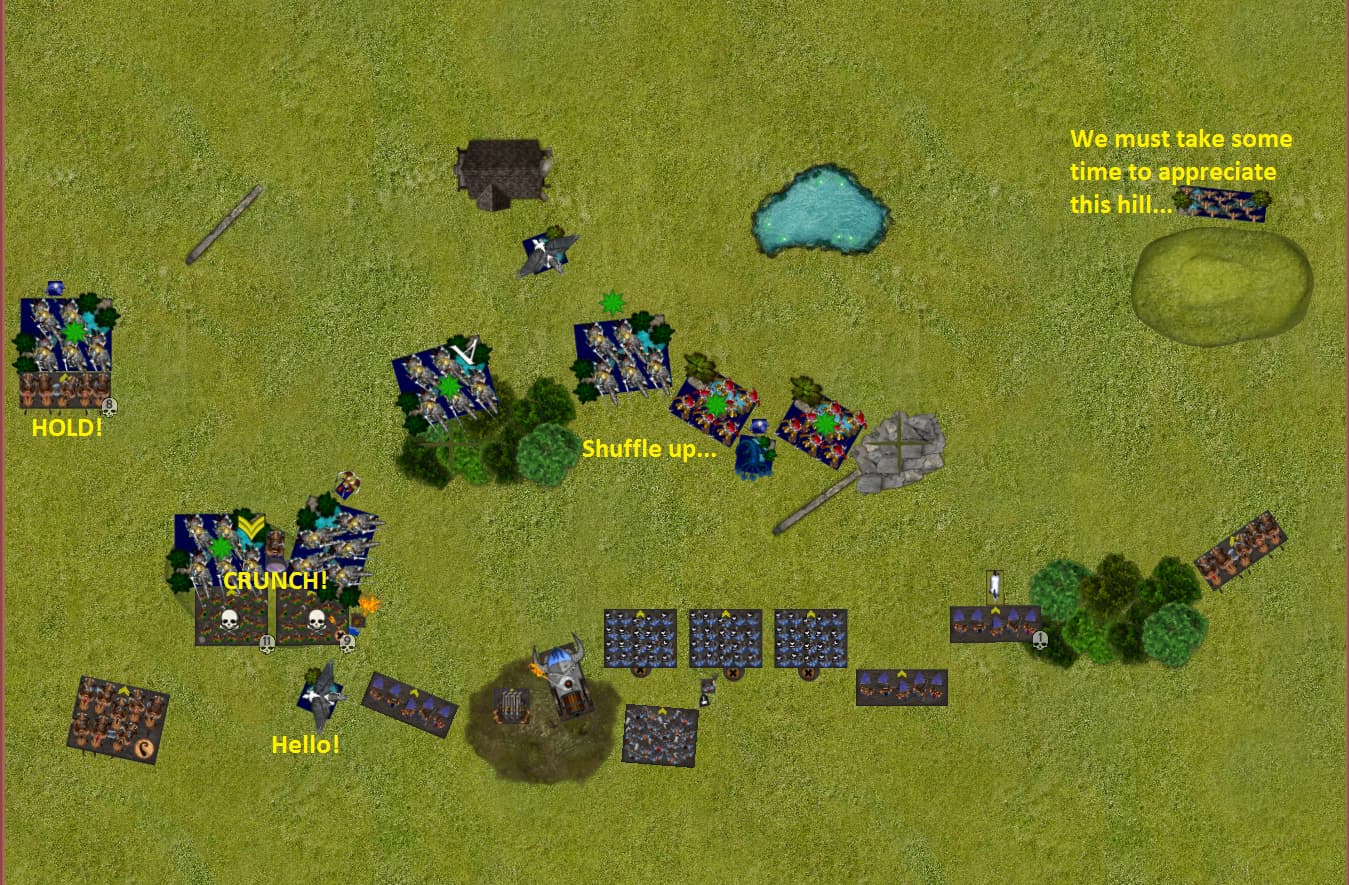
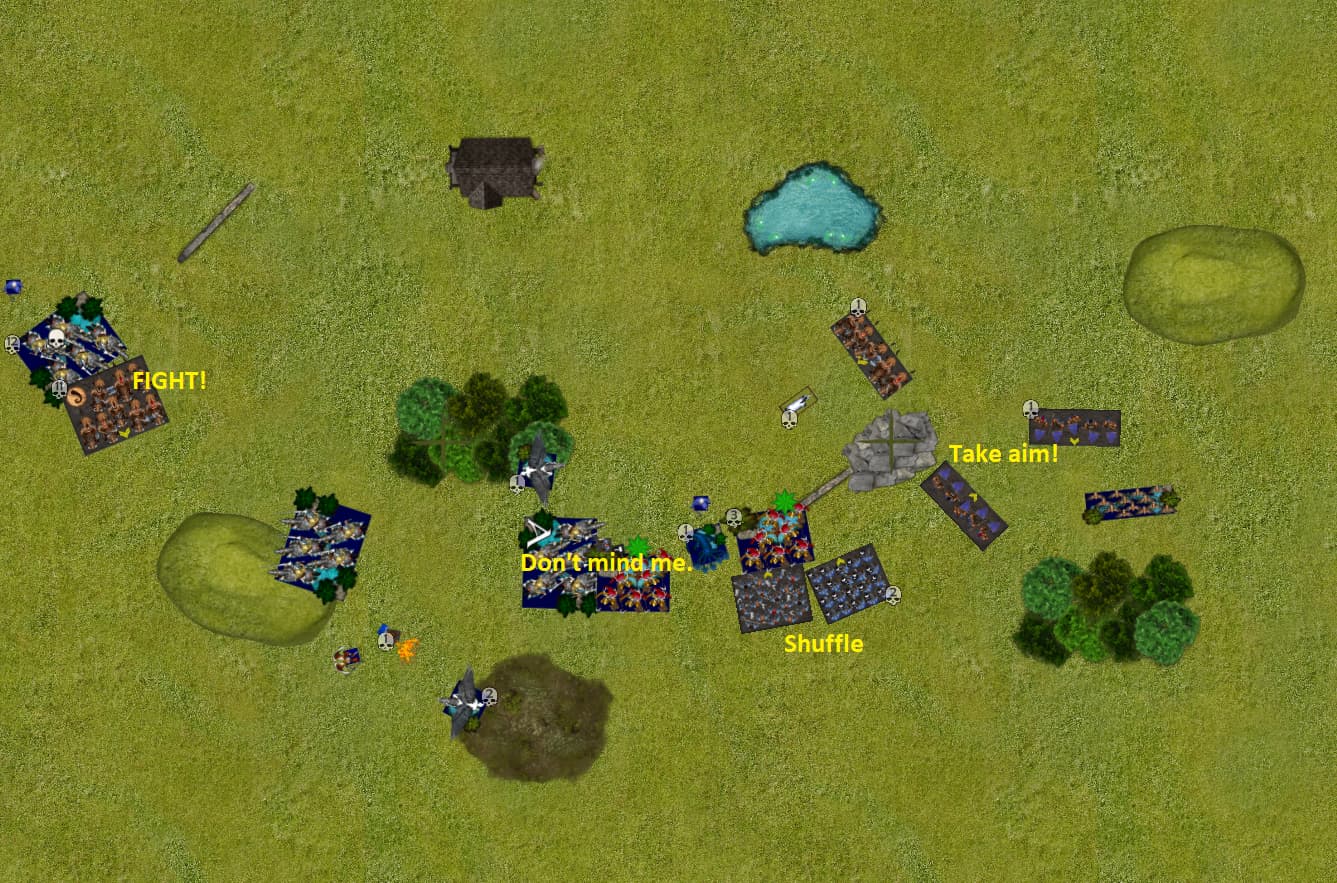
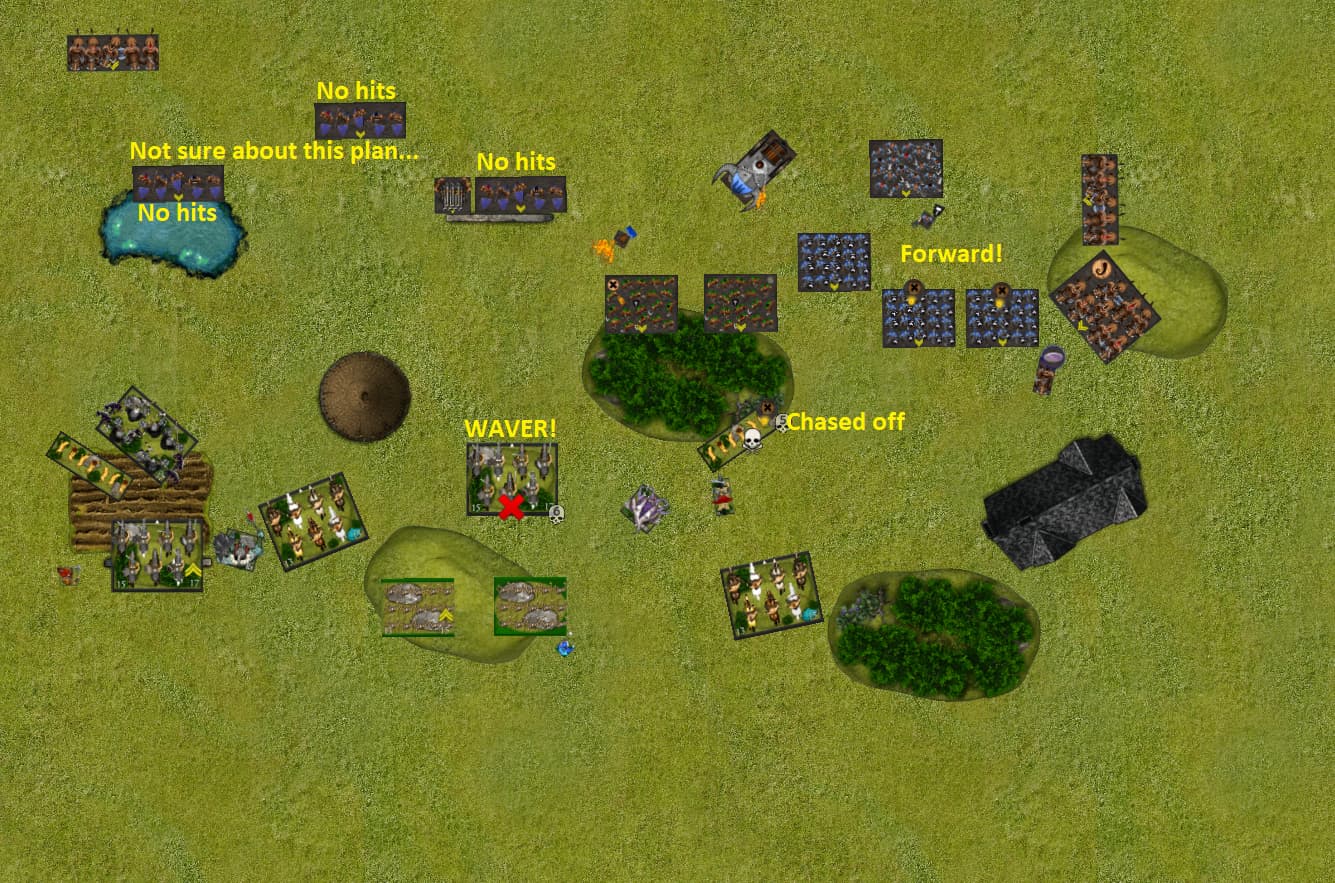
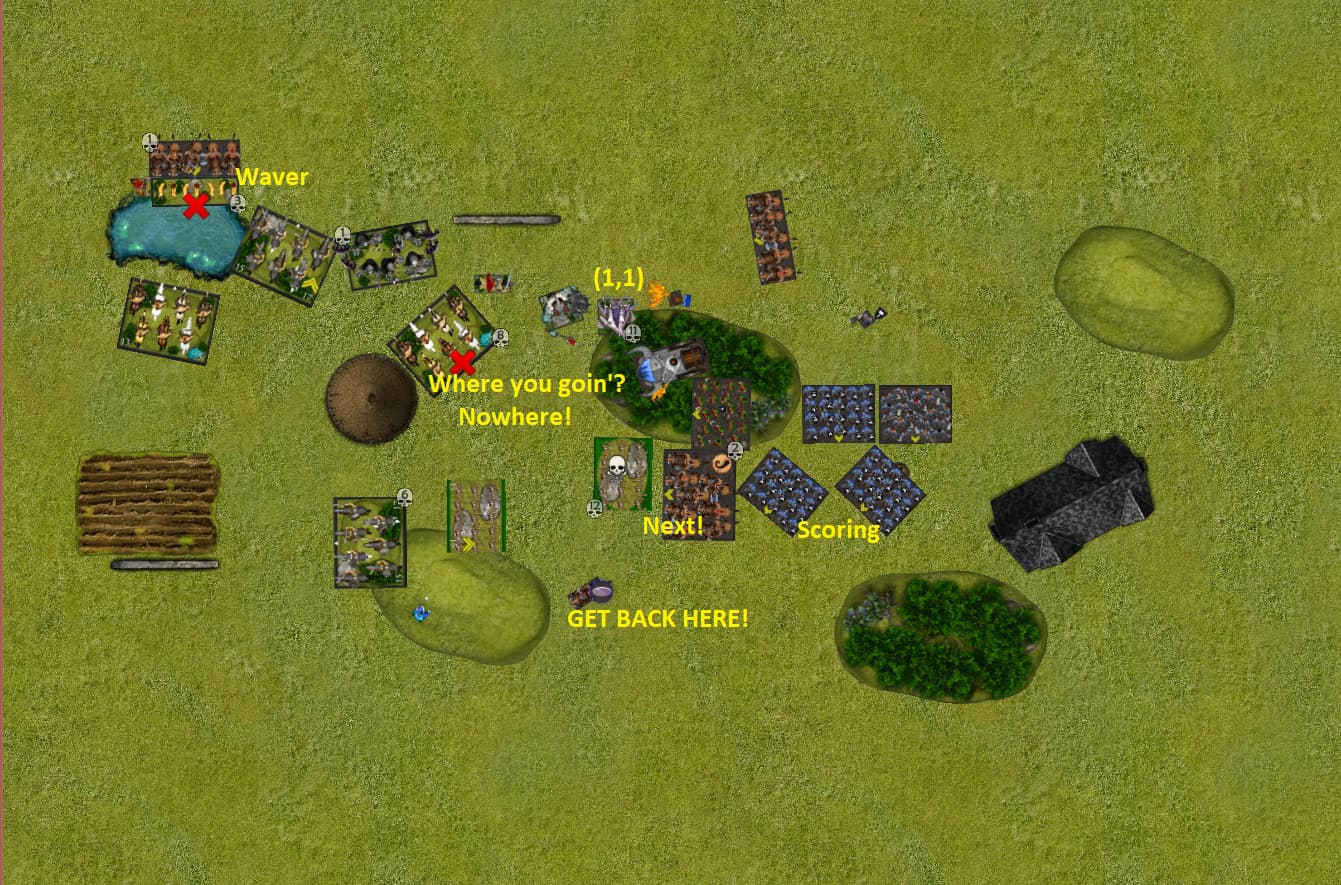
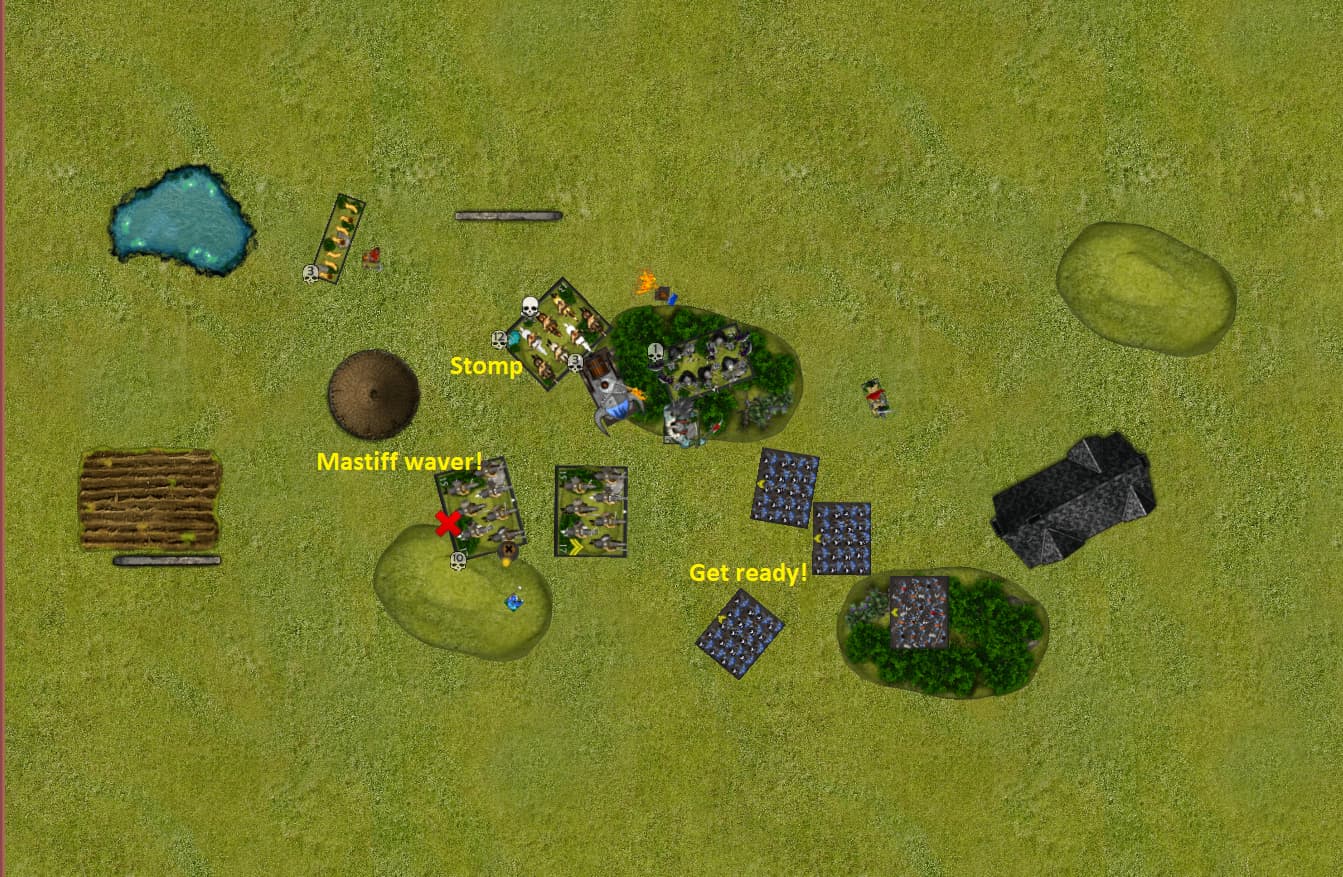
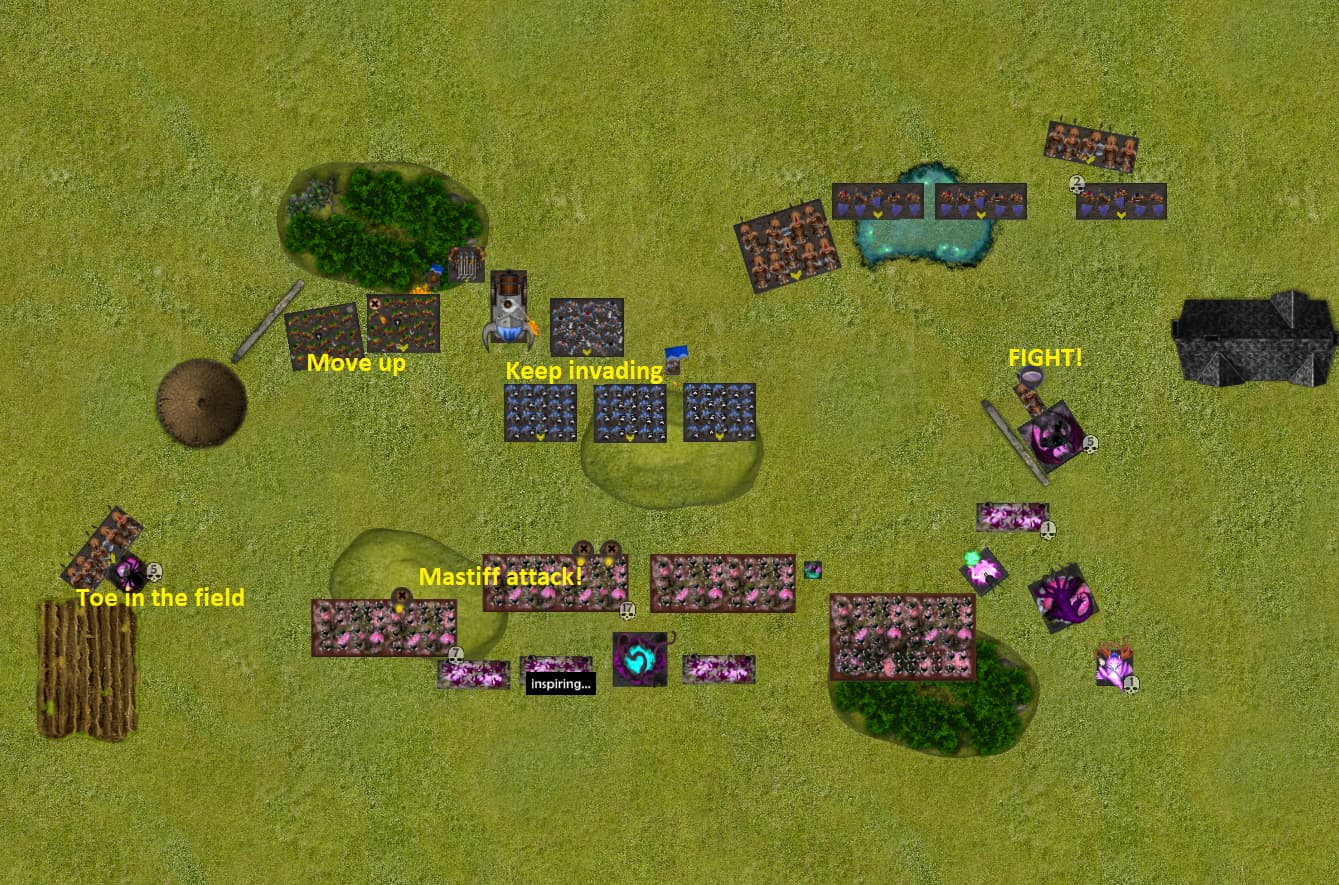
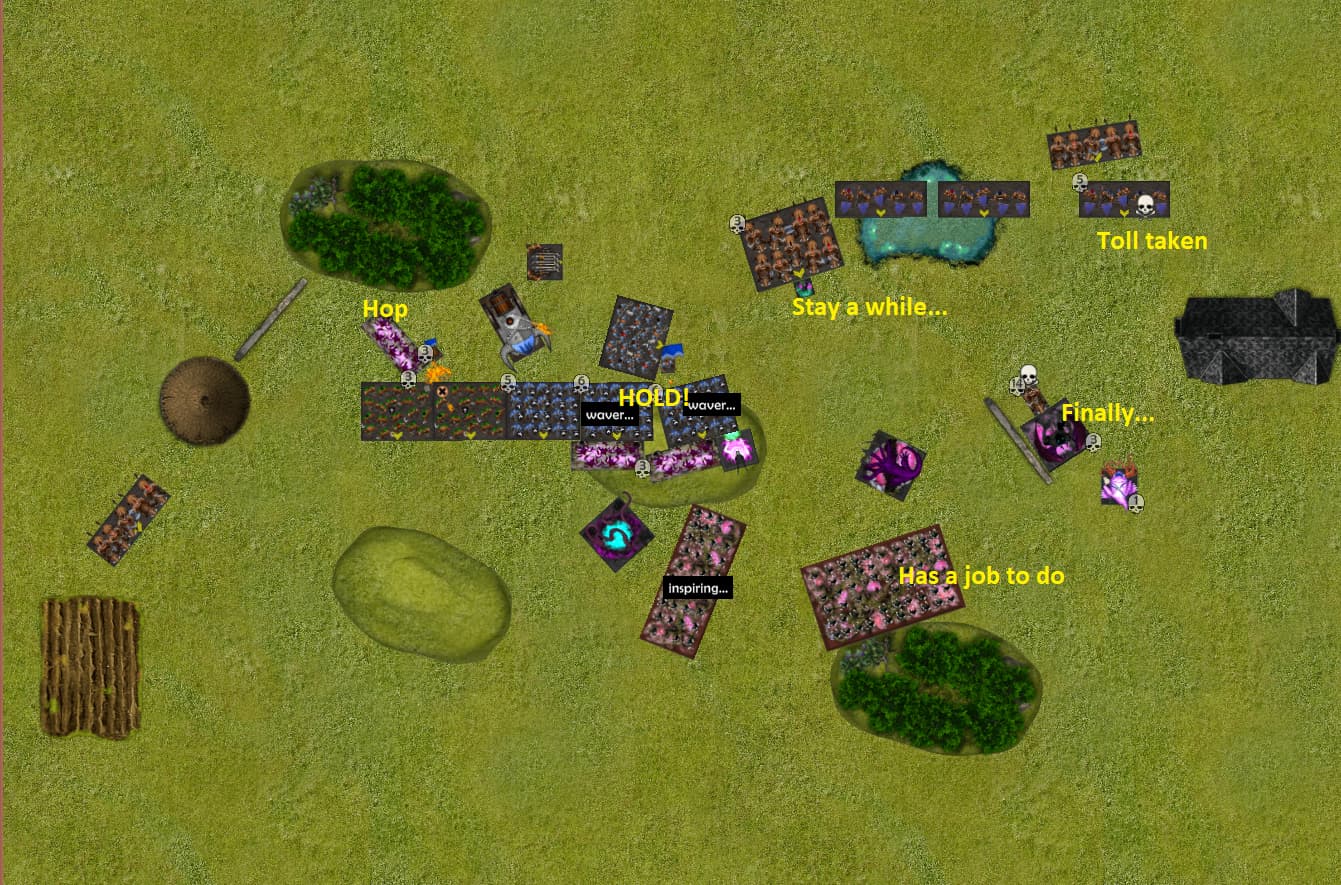
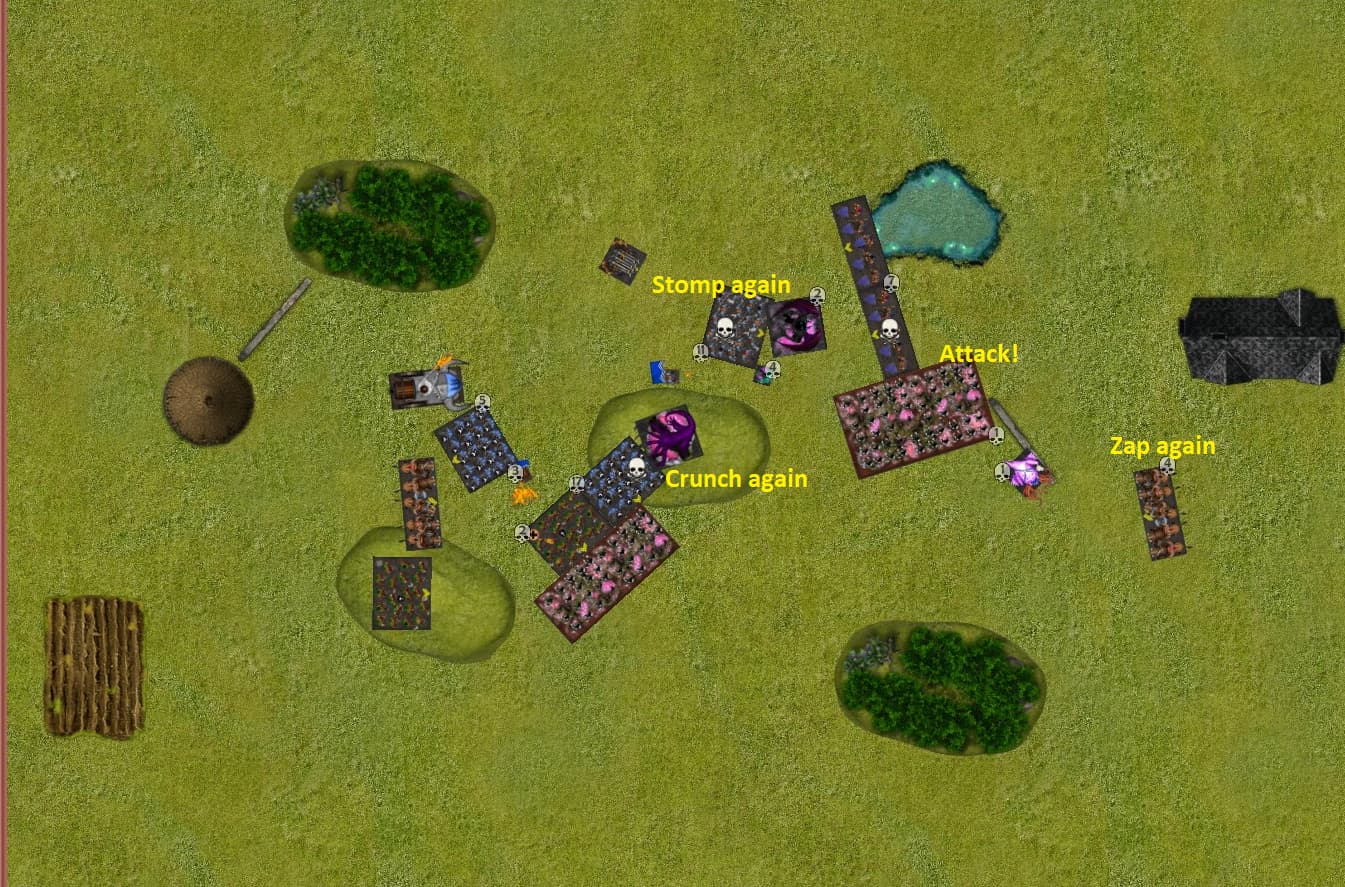
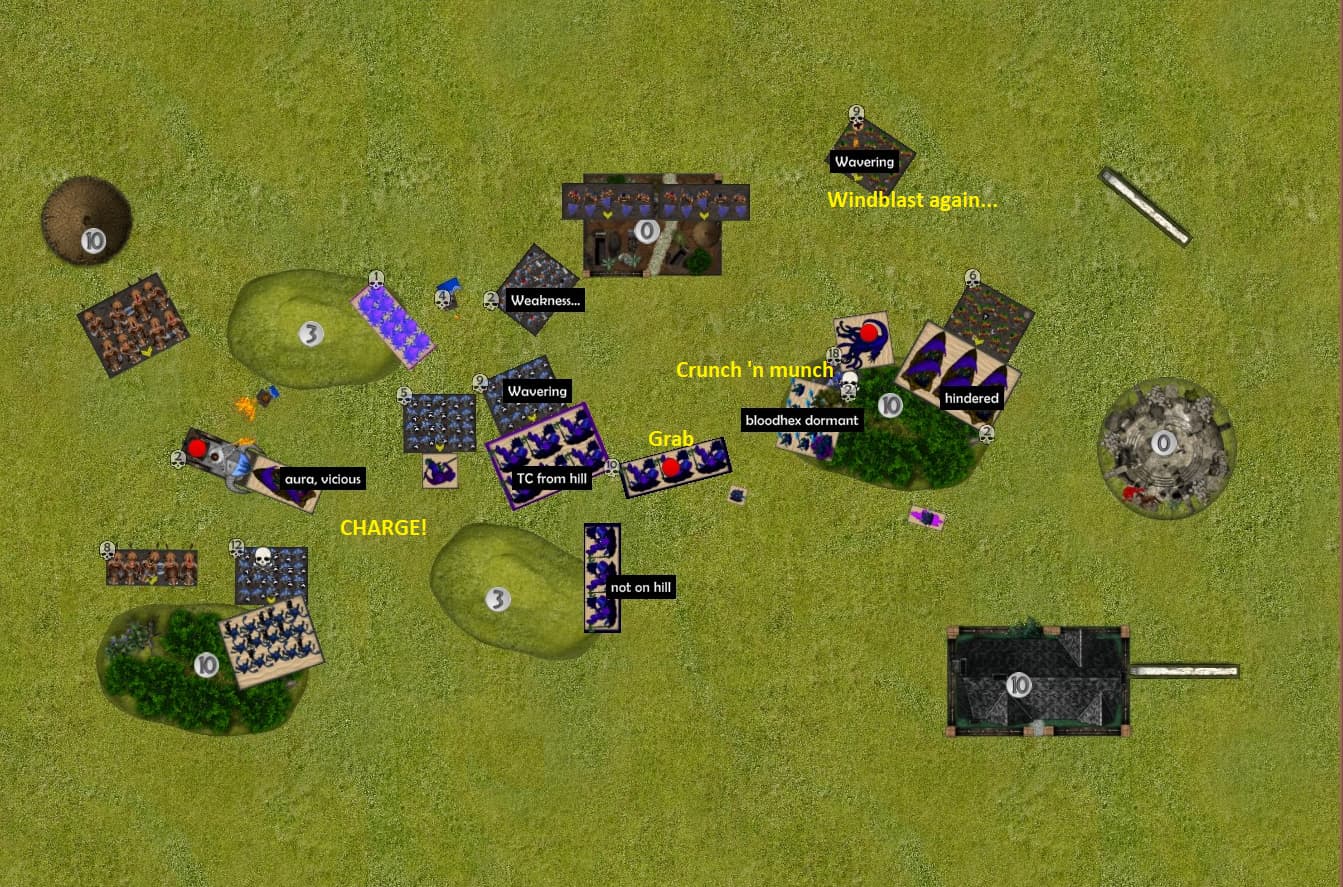
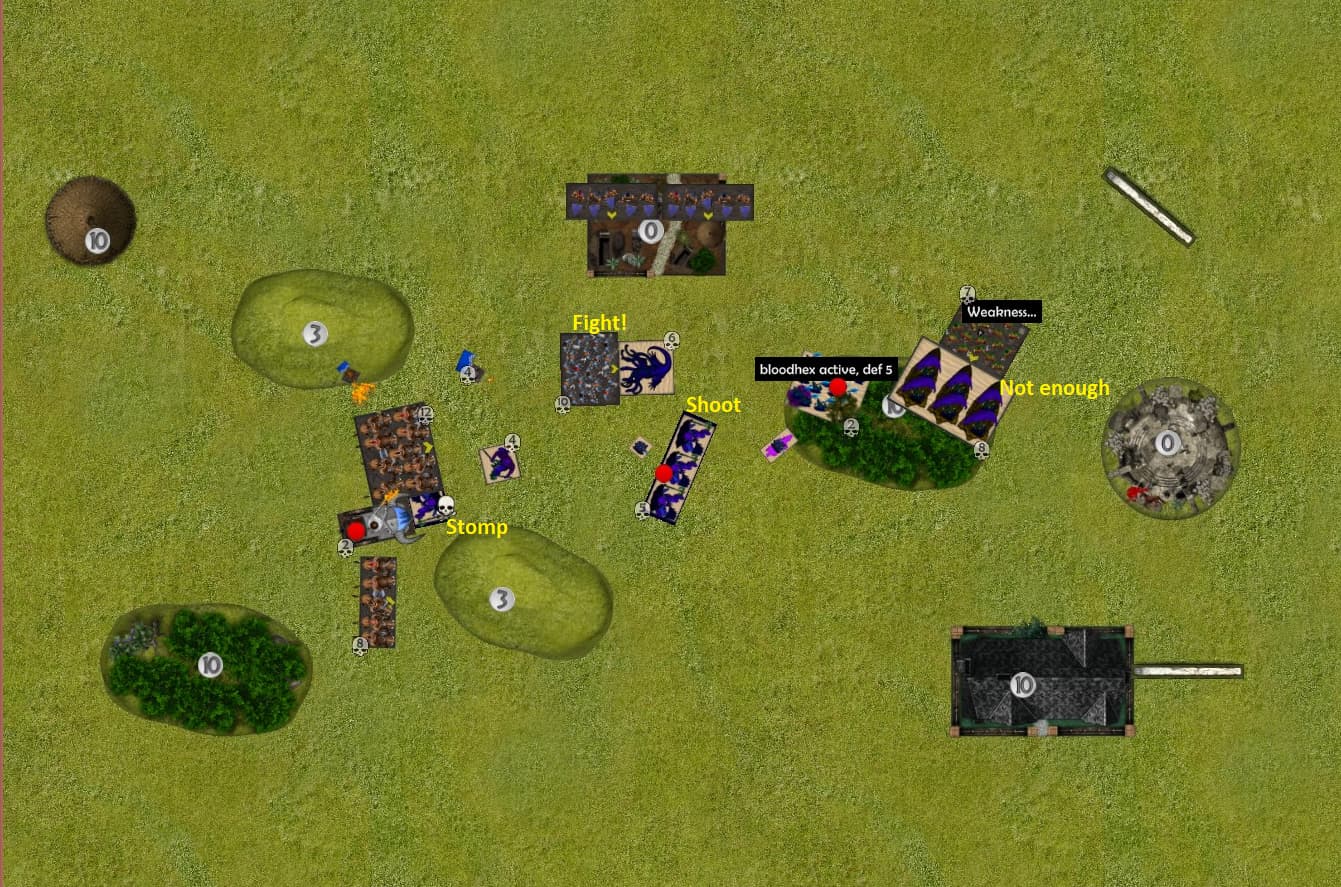
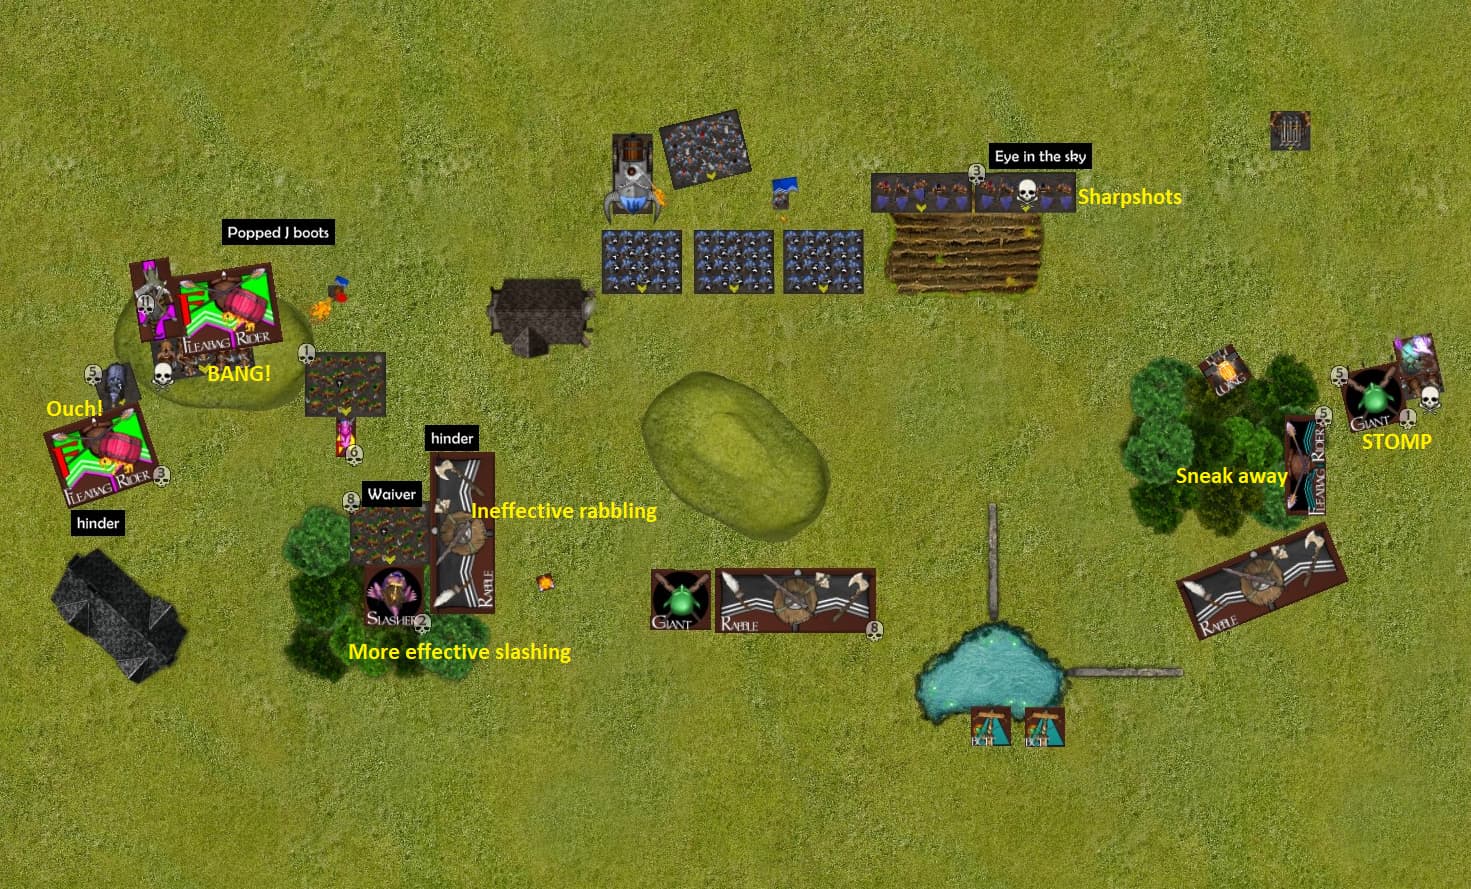
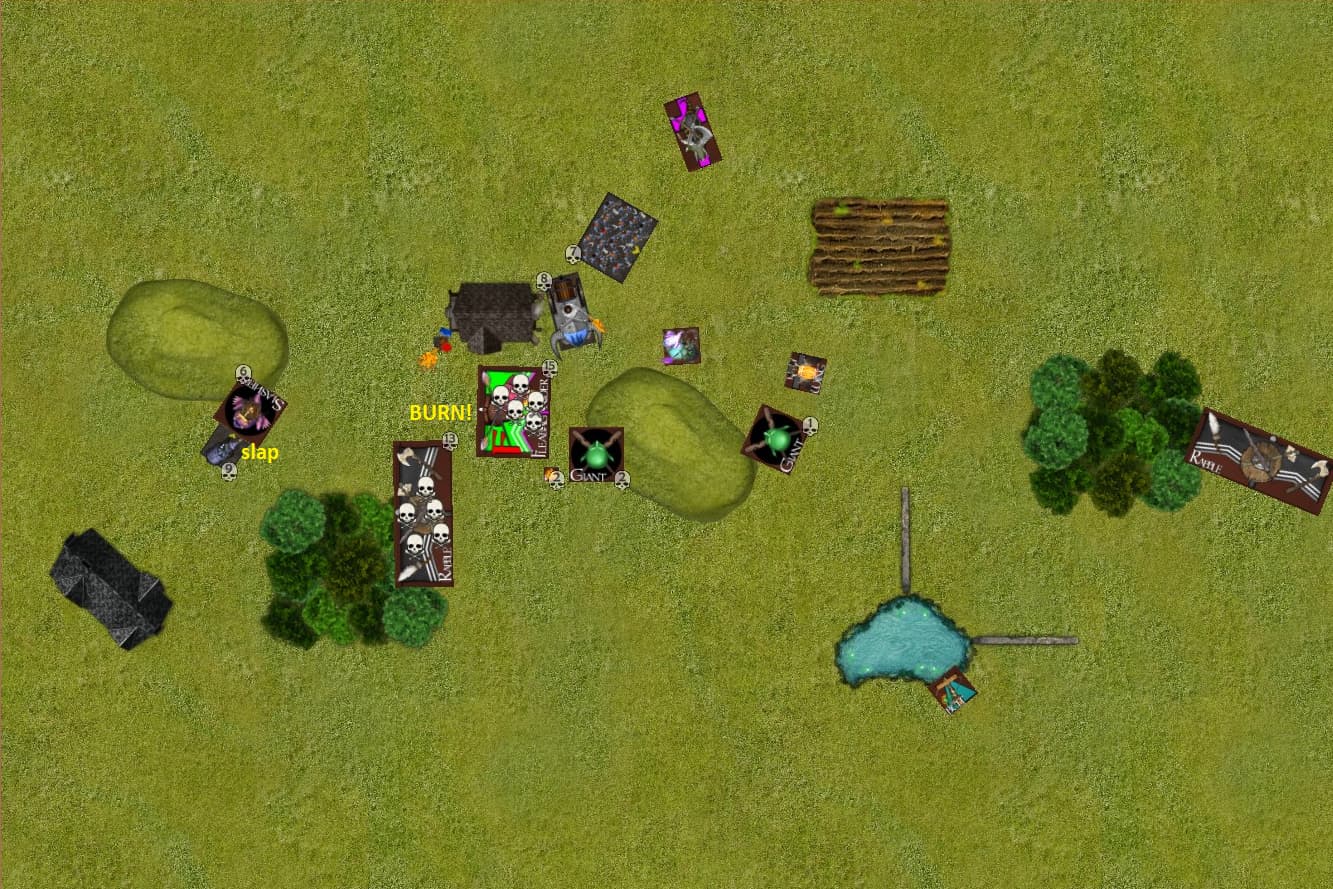
Dwarf Turn 2:
The ironclad move up to the centre line and unleash thier mastiffs.
It feels like a waste to use the mastiffs on scarecrows, but scarecrows are to main target. The scarecrow hordes are both what’s in the way for me scoring and the bulk of the nightstalker US.
Along with the steel behemoth shooting over the infantry and rolling hot, shooting does a lot of damage to the scarecrow hordes.
The middle horde that need a 4 on nerve to rout gets a 3.
The rangers realise that combat is the way to go in this fight and move up too.
The brock troop on the left takes the charge. Hindered is better than no damage before getting charged.
Brocks on the right shuffle a bit. Their job is to deter the titans.
The void lurker moved up too far, so the brock lord goes for GLORY!
The shooting duel continues.
The scarecrows could sense the stilfing aroma of courage and the grating sense of determination from the dwarf line that had crested the hill.
Also, delightfully, the creeping dread of anticipation before the horrors of battle.
As lips were being licked, the dwarfs released something…
Small creatures on four legs, each a beacon of courage, came bounding toward the mass of scarecrows.
Before scythes and sickles swept at the creatures a burst of positive emotion threw the horde off balance.
A strange feeling of… joy. Joy at pleasing another.
A concept, utterly strange and incomprehensible, befuddling to nightstalkers. All that is clear is that these creatures know that they are each “a good boy”.
The onslaught of positive emotion left the scarecrows effectivly defensless to being mauled by these ridiculous creatures.
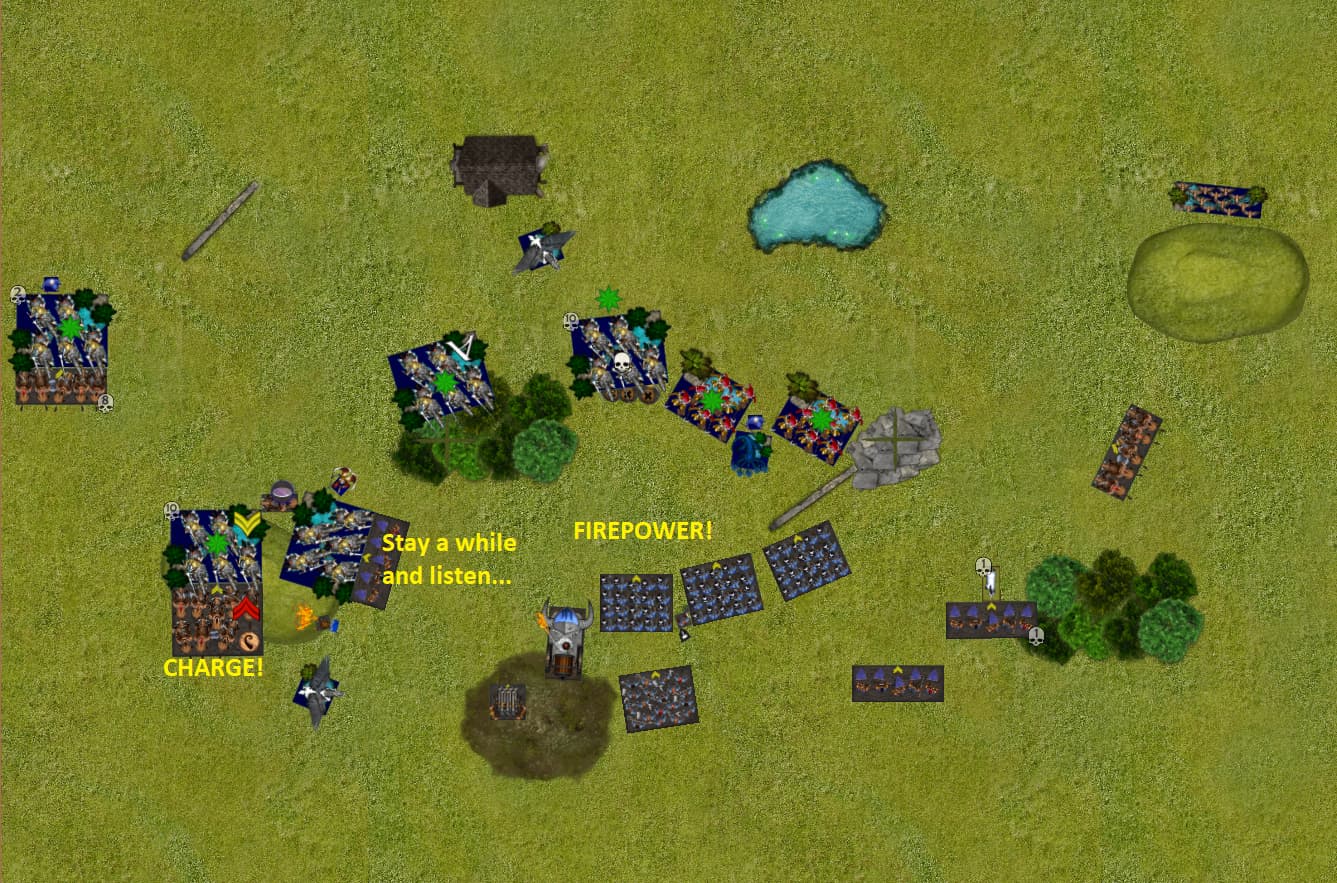
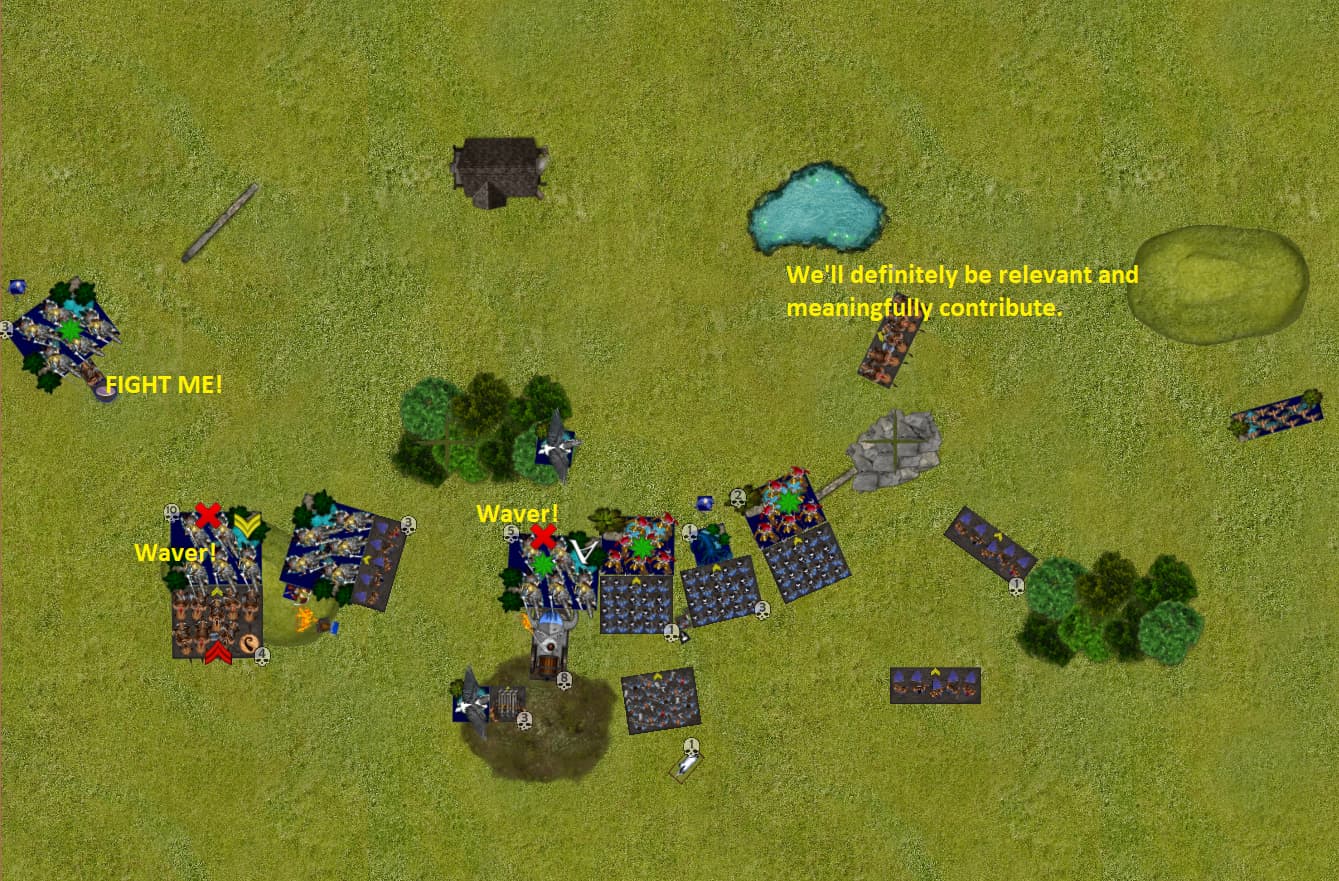
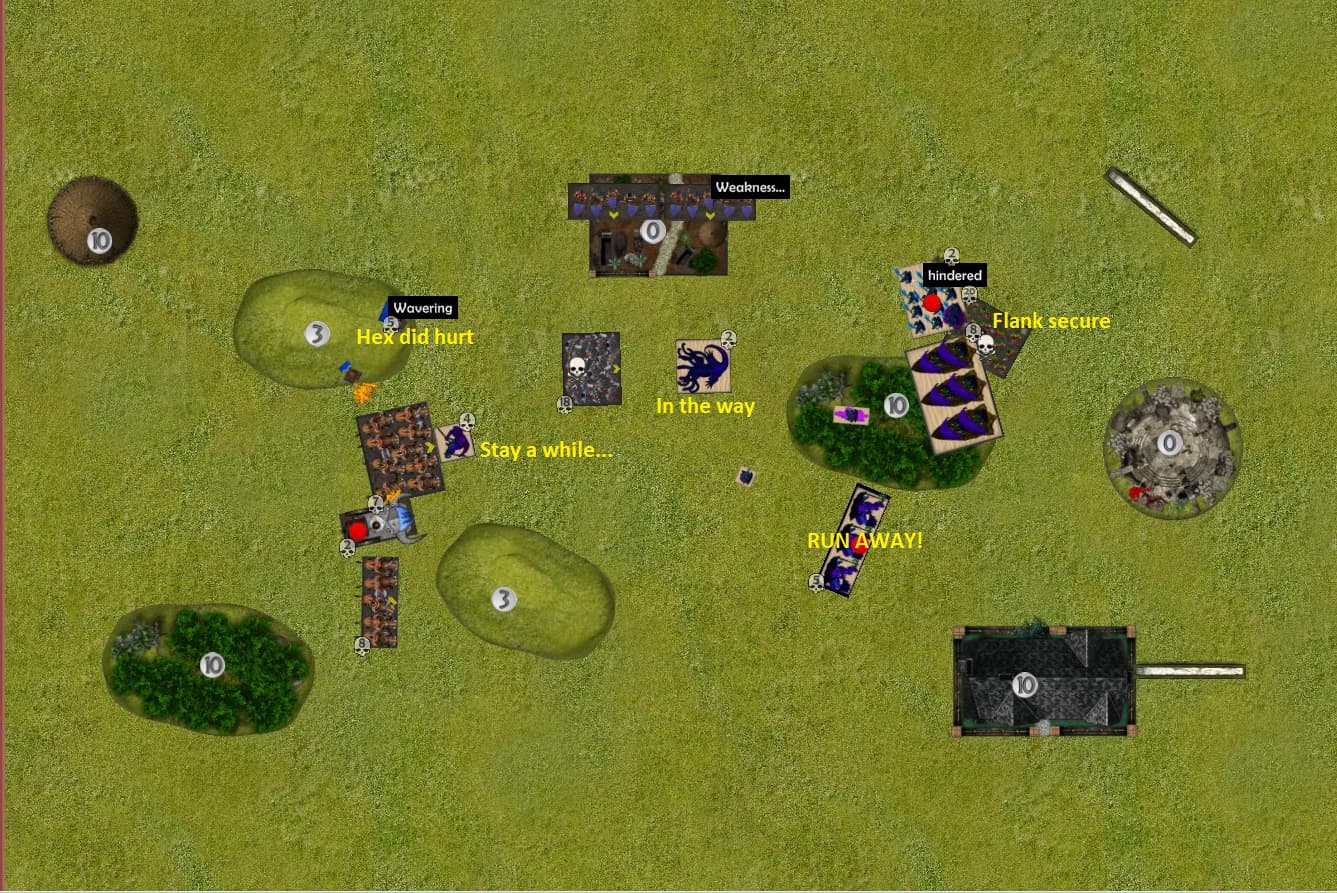
Nightstalker Turn 2:
The nightstalkers charge!
The scarecrows and tormentors are not expectingto do a lot of damage and roll low.
Which feels bad for my opponent, but they actually do what they need to. The terror does slightly less than 7 damage to De 5+ infantry on average dice, so ironclad can probably take a charge from it, but if ironclad already have 4 or 5 damage then the terror probably routs them (spoilers).
One scarecrow horde gets left behind, with no easy way to get past it’s own lines and the dwarfs.
The dread fiend fails entirely and the brock lords gets a frustrating nerve check (not a double 1, but might as well be). Which is horribly unlucky.
The dream hunter moves up to pose a problem.
It can now charge the brock regiment to hold them up.
It’s too tough to rout in one go and charging it just puts the brocks in charge range of the titans.
The brock regiment is effectively a sitting duck now.
I will opt to make my opponent spend turns charging and distance from where I want to score to come get them.
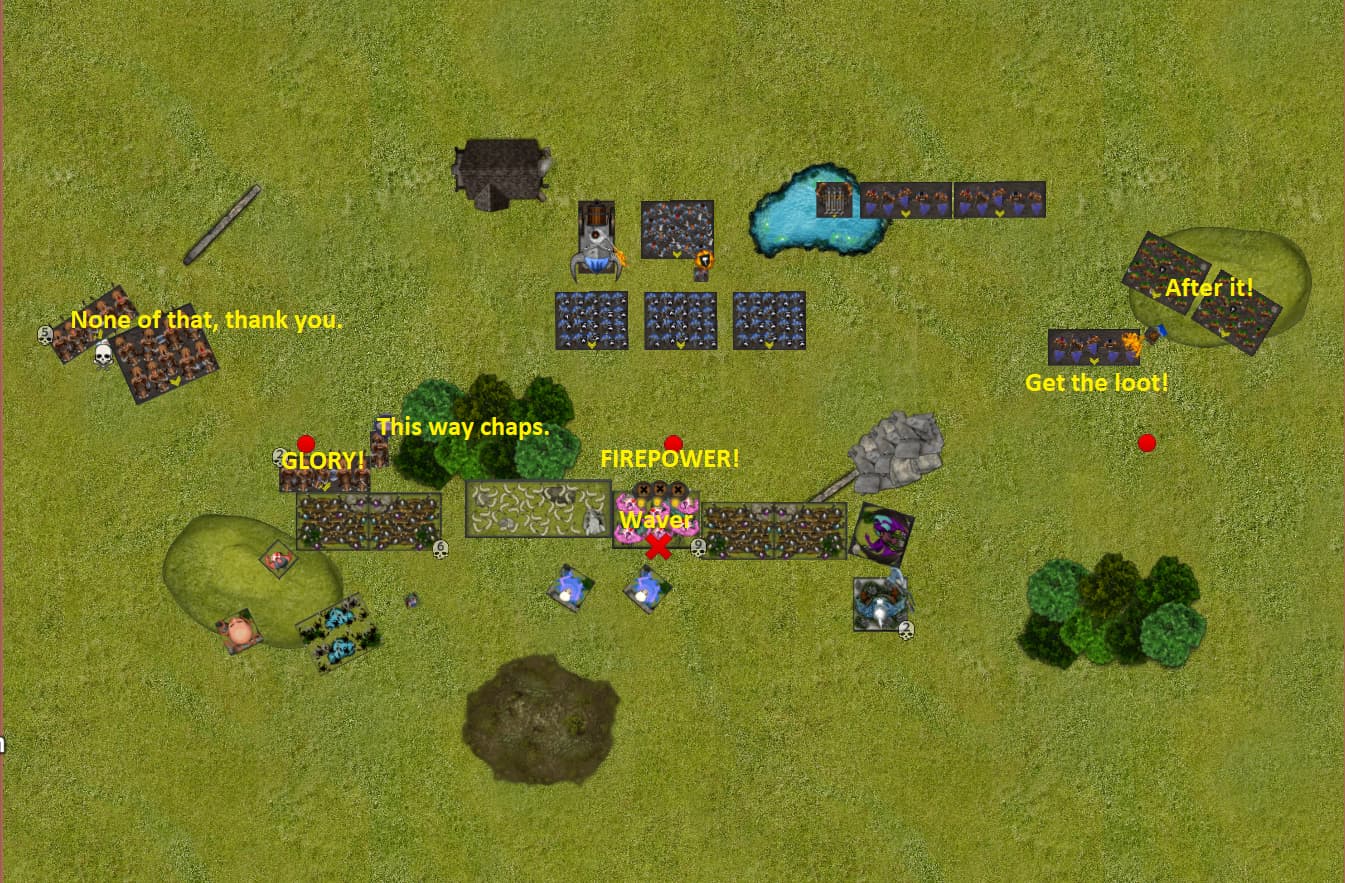
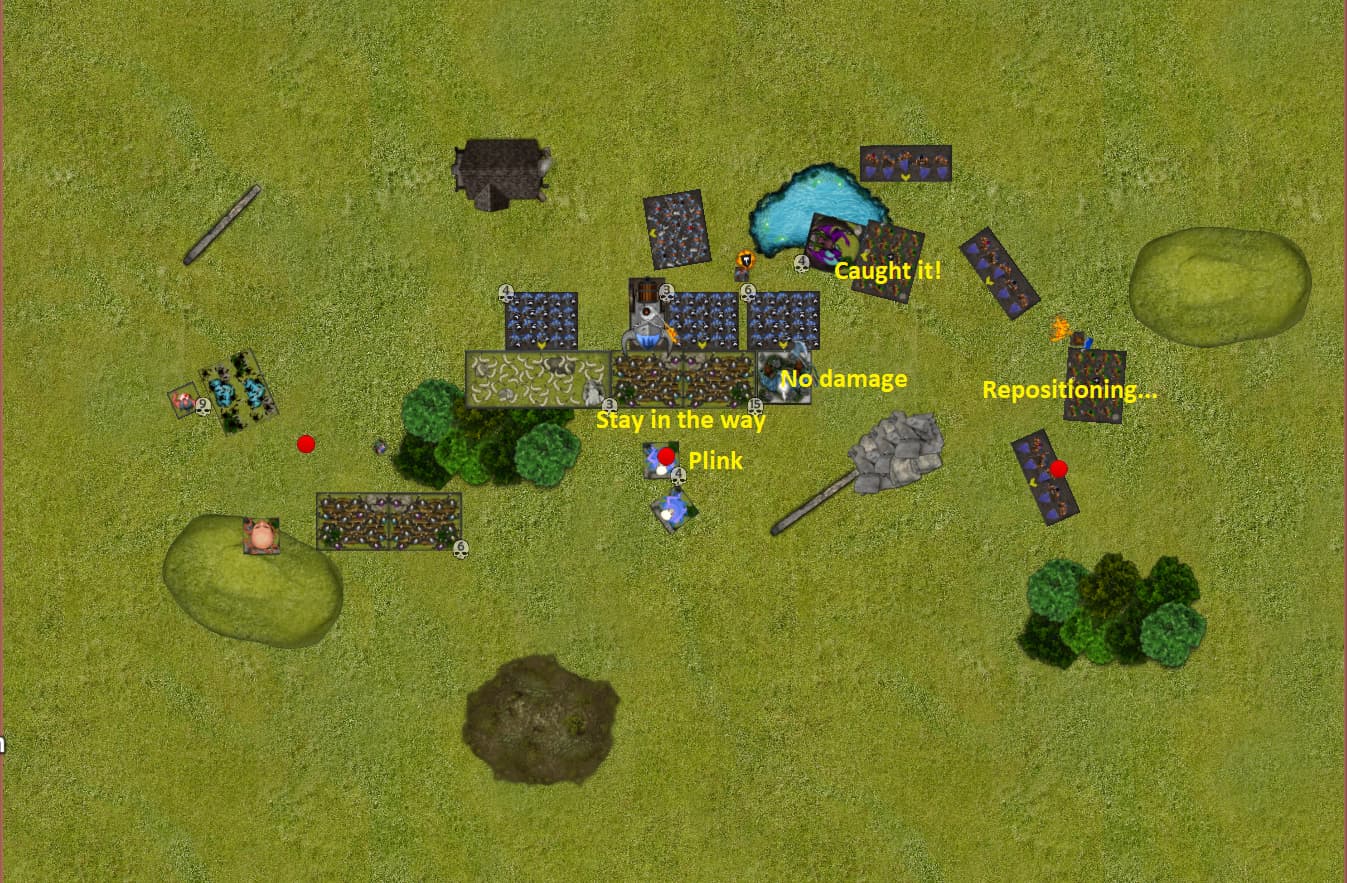
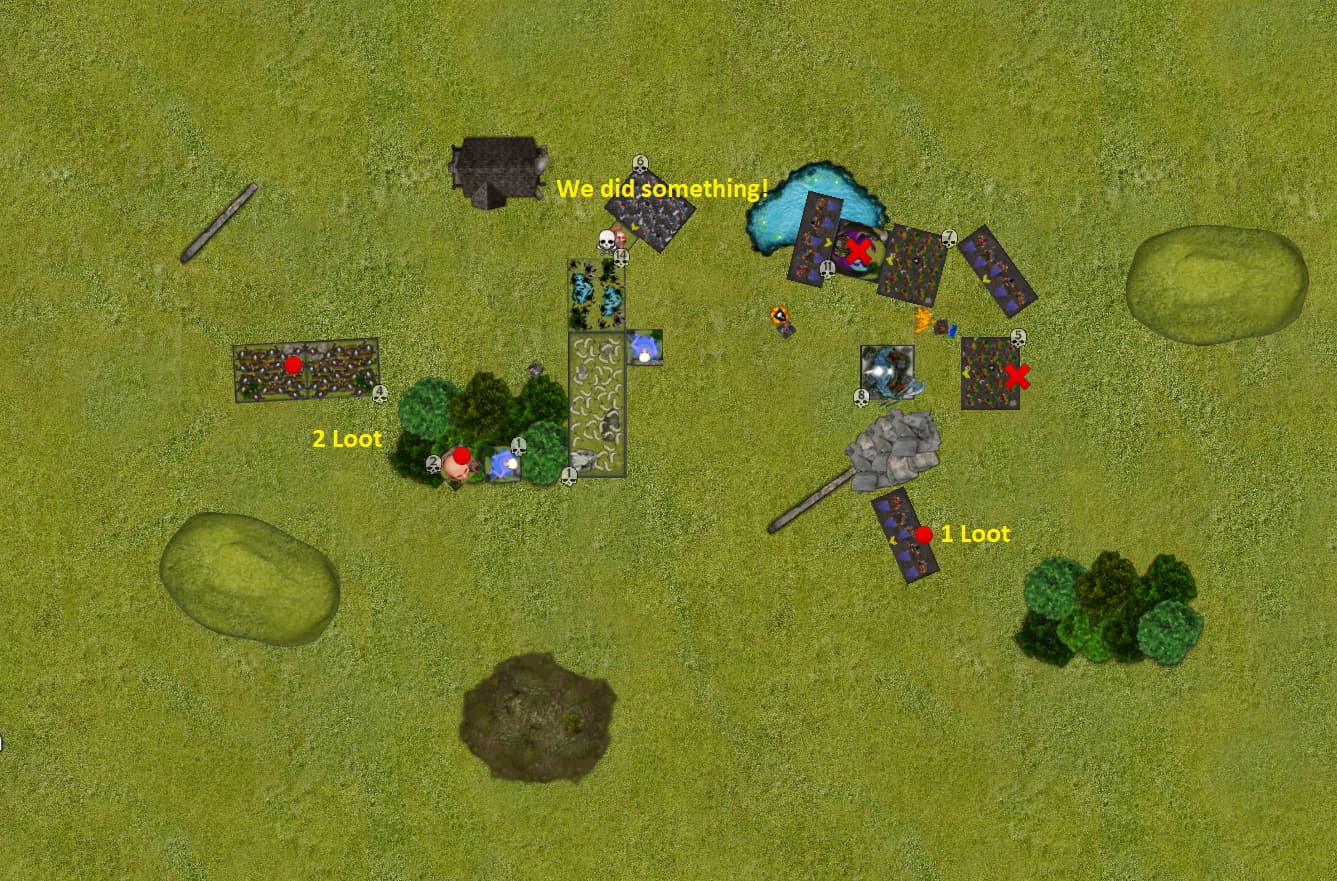
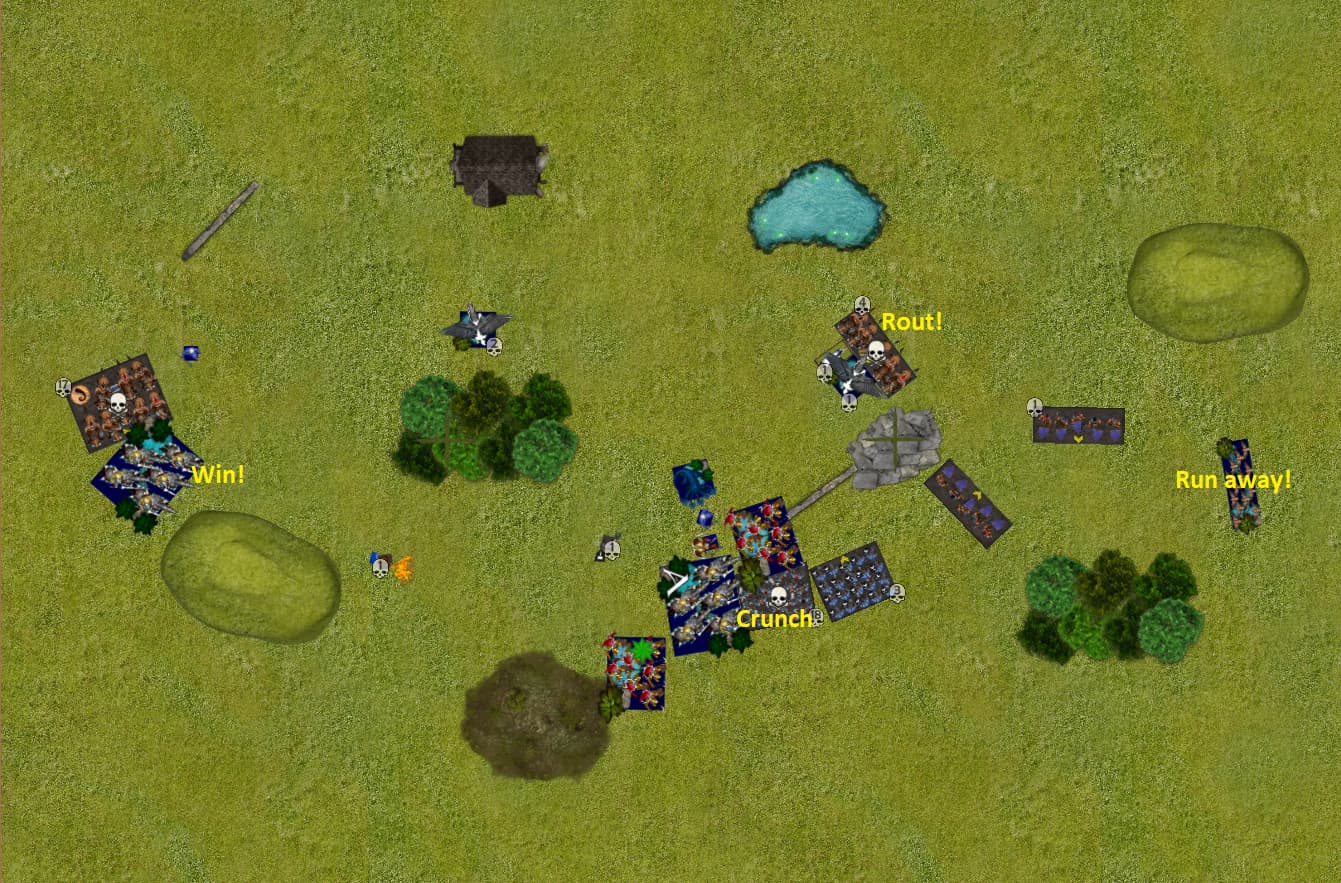
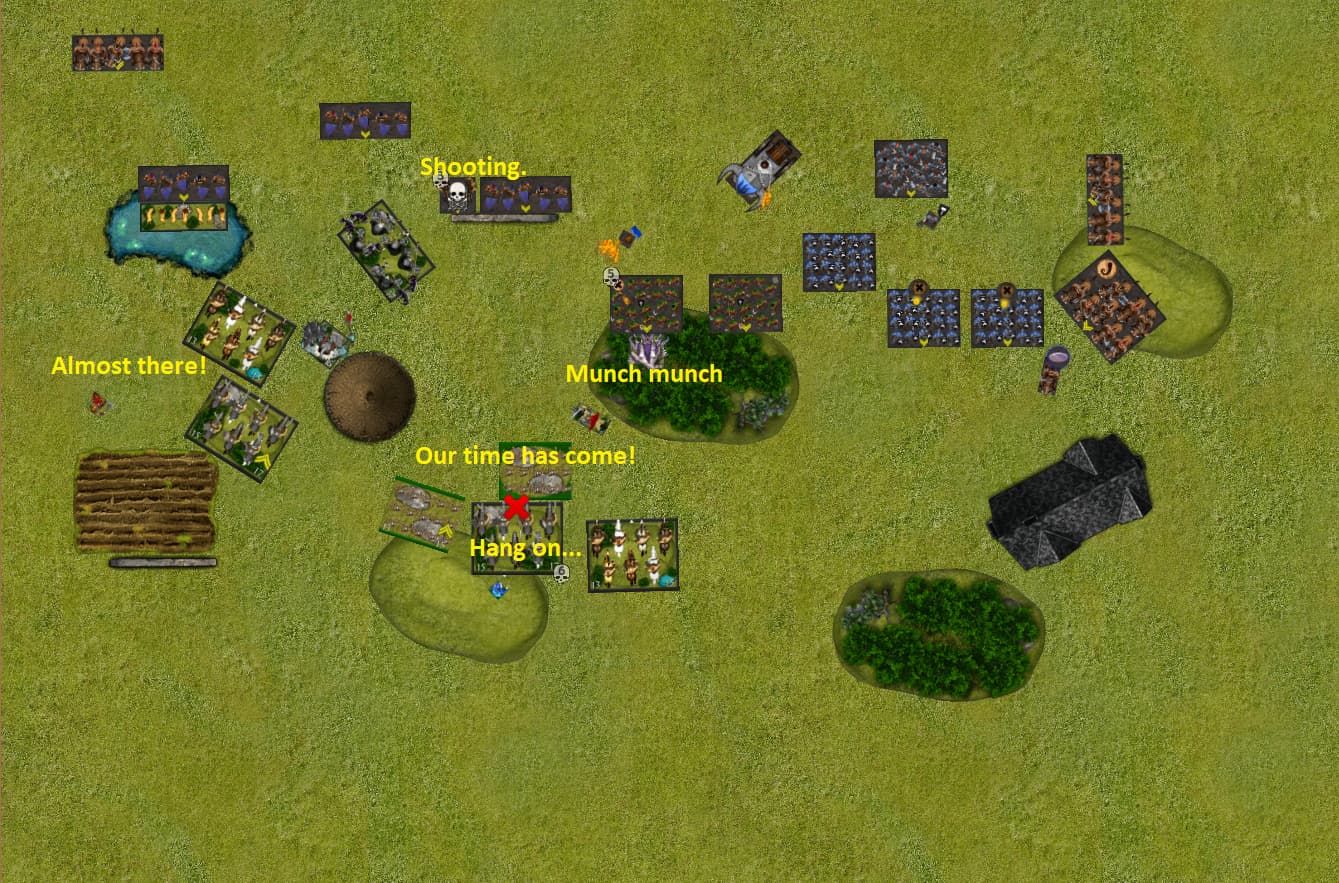
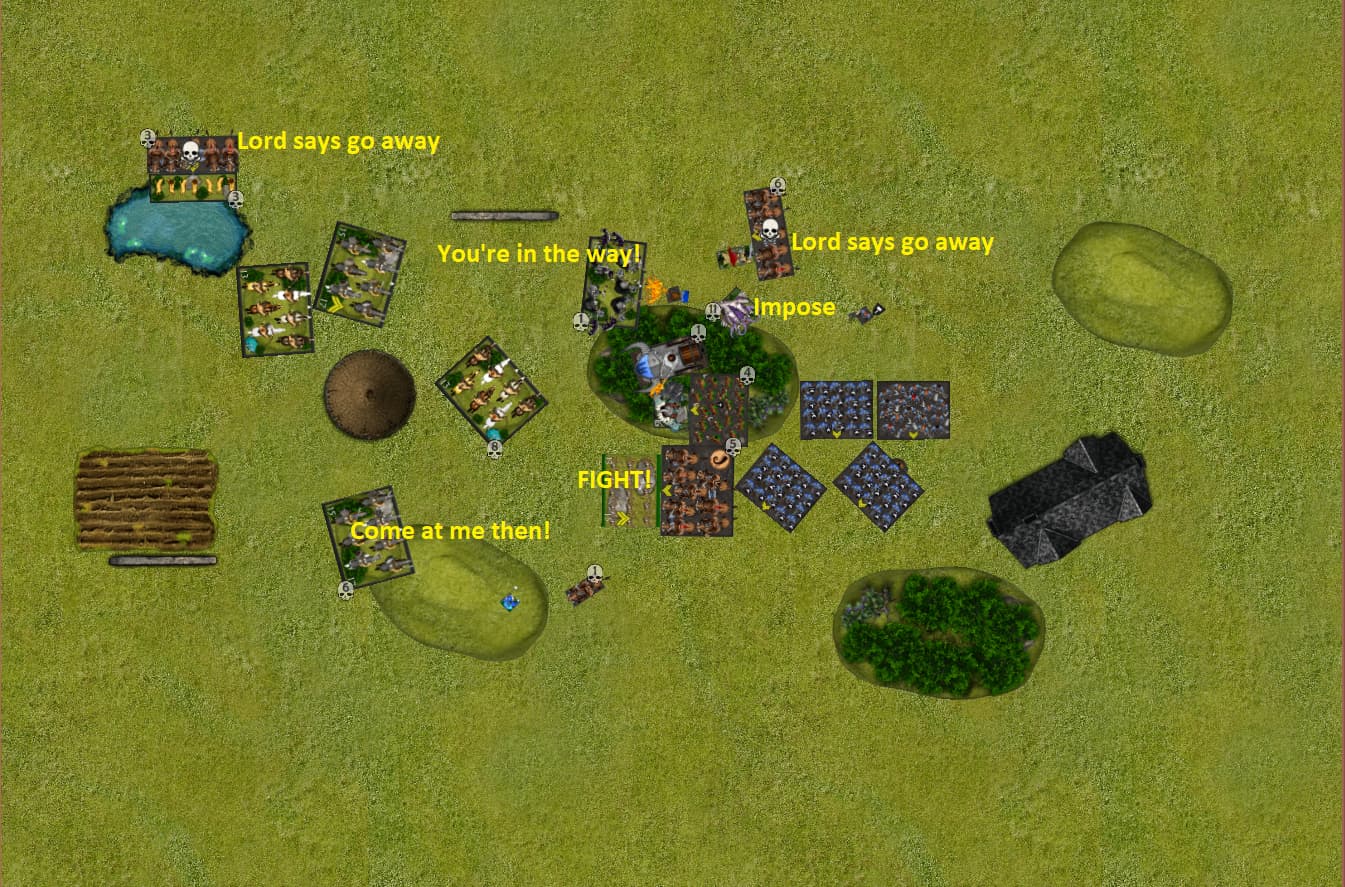
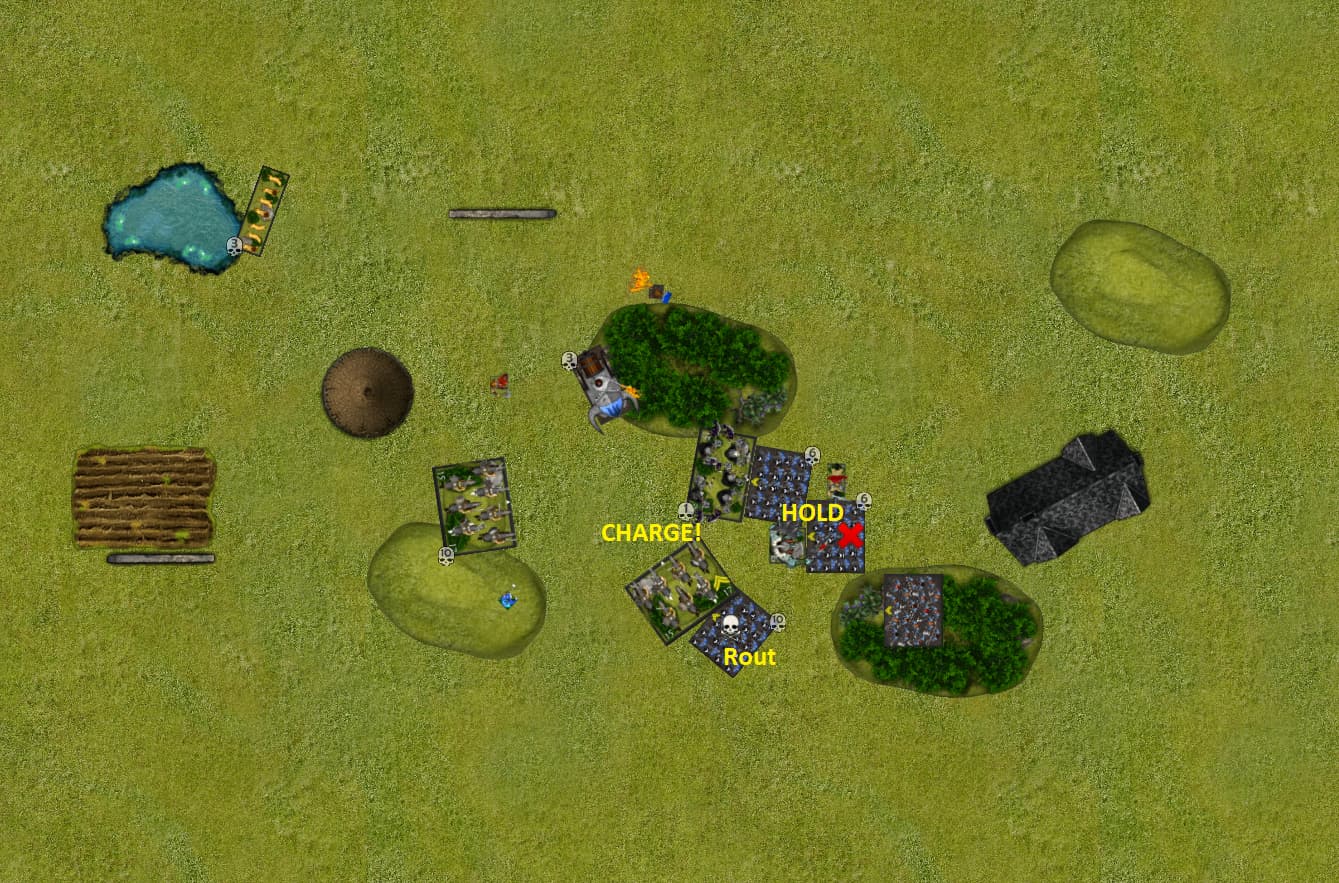
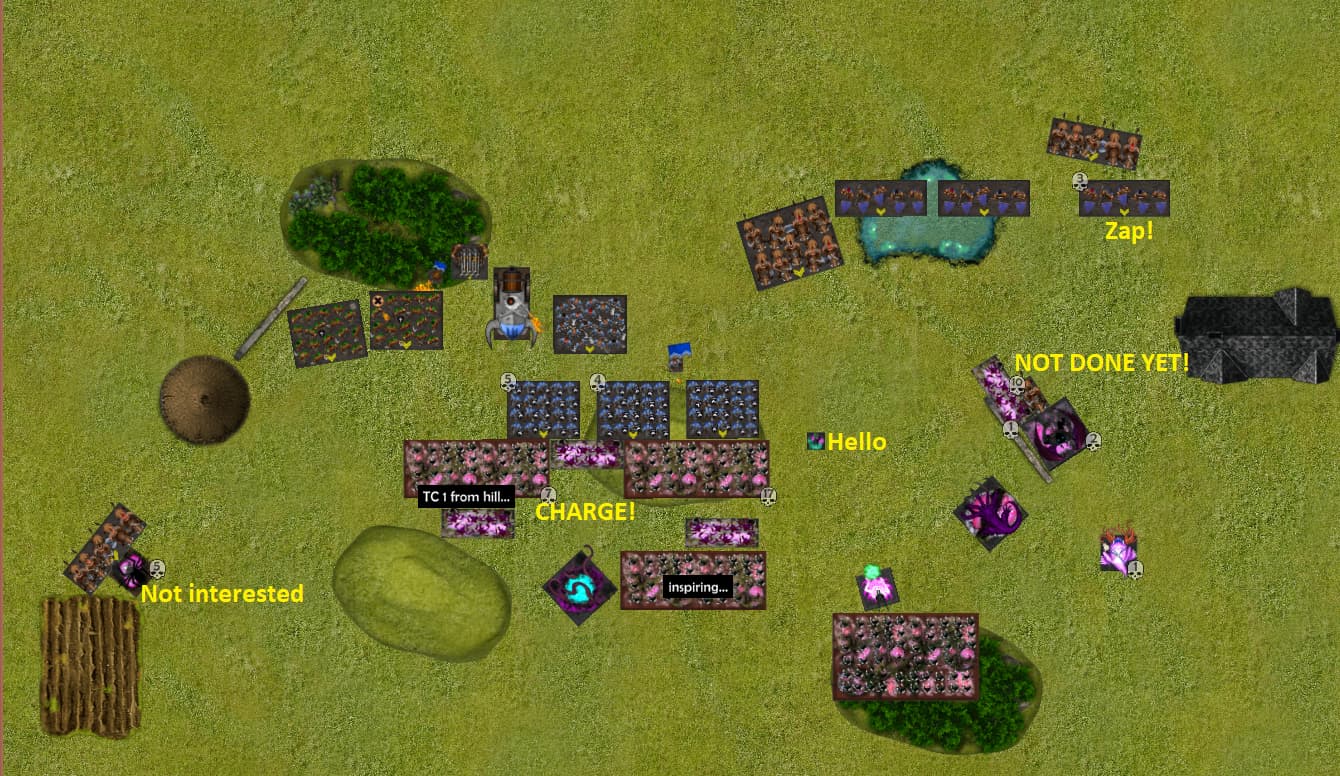
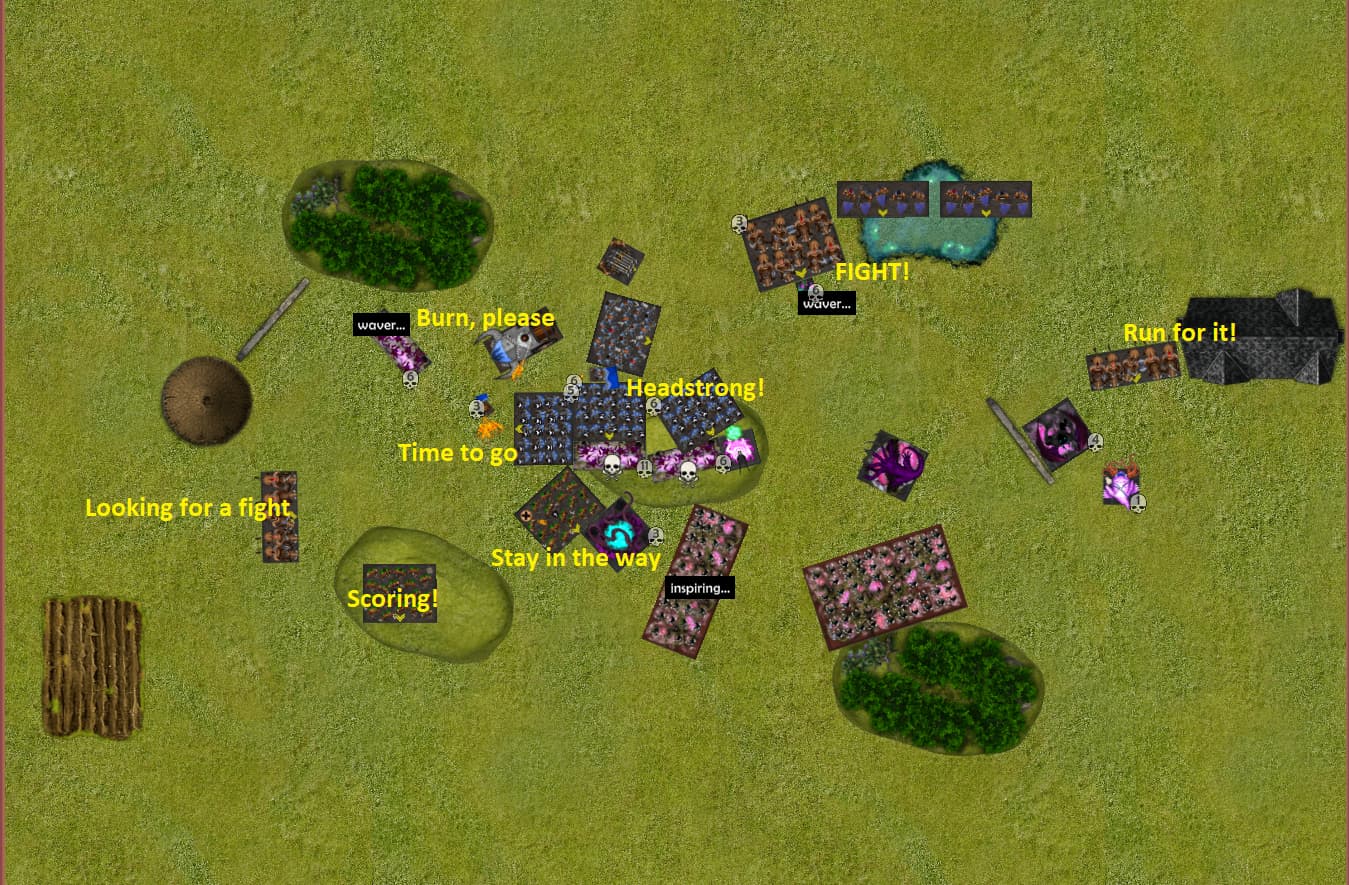
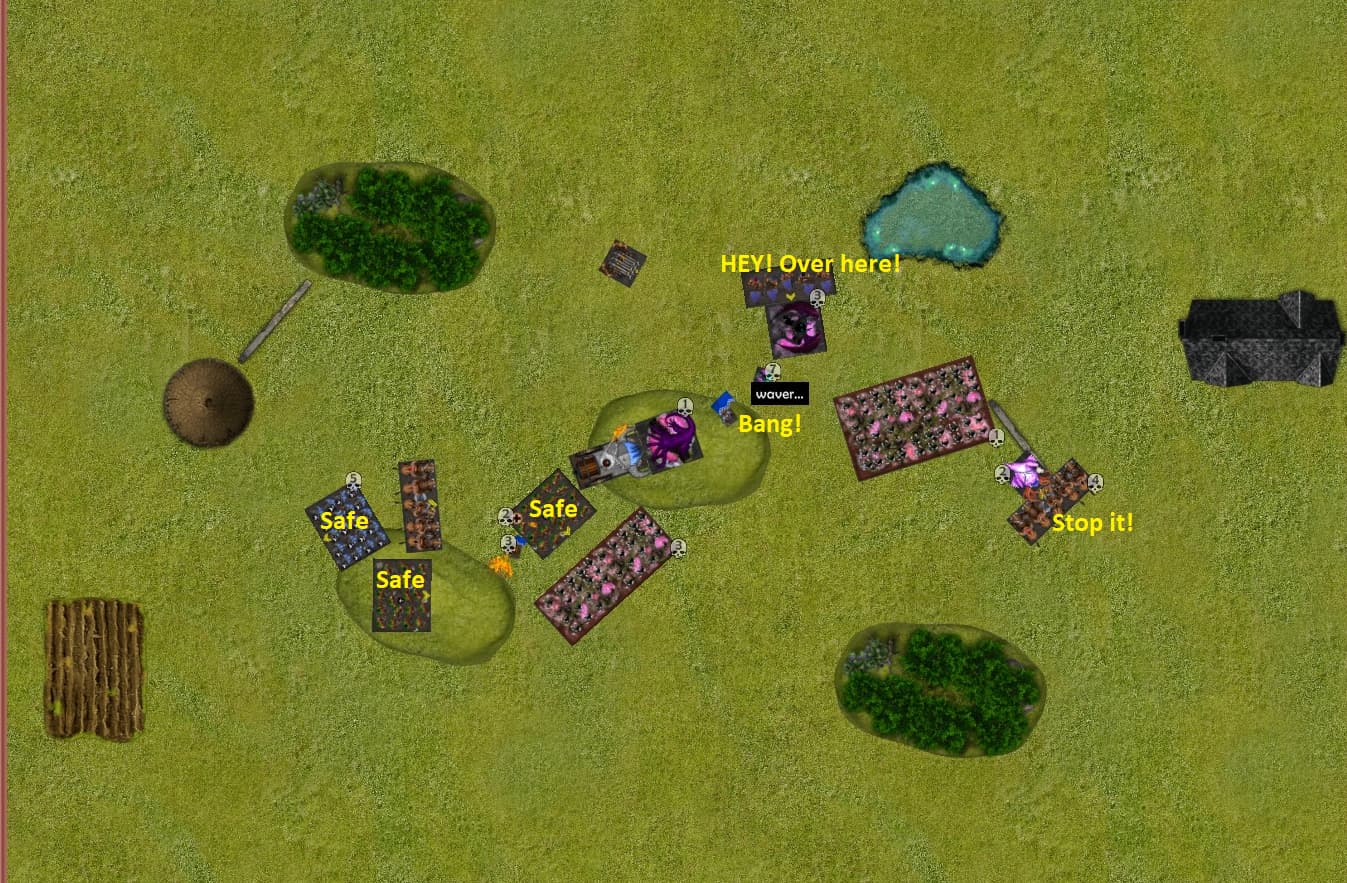
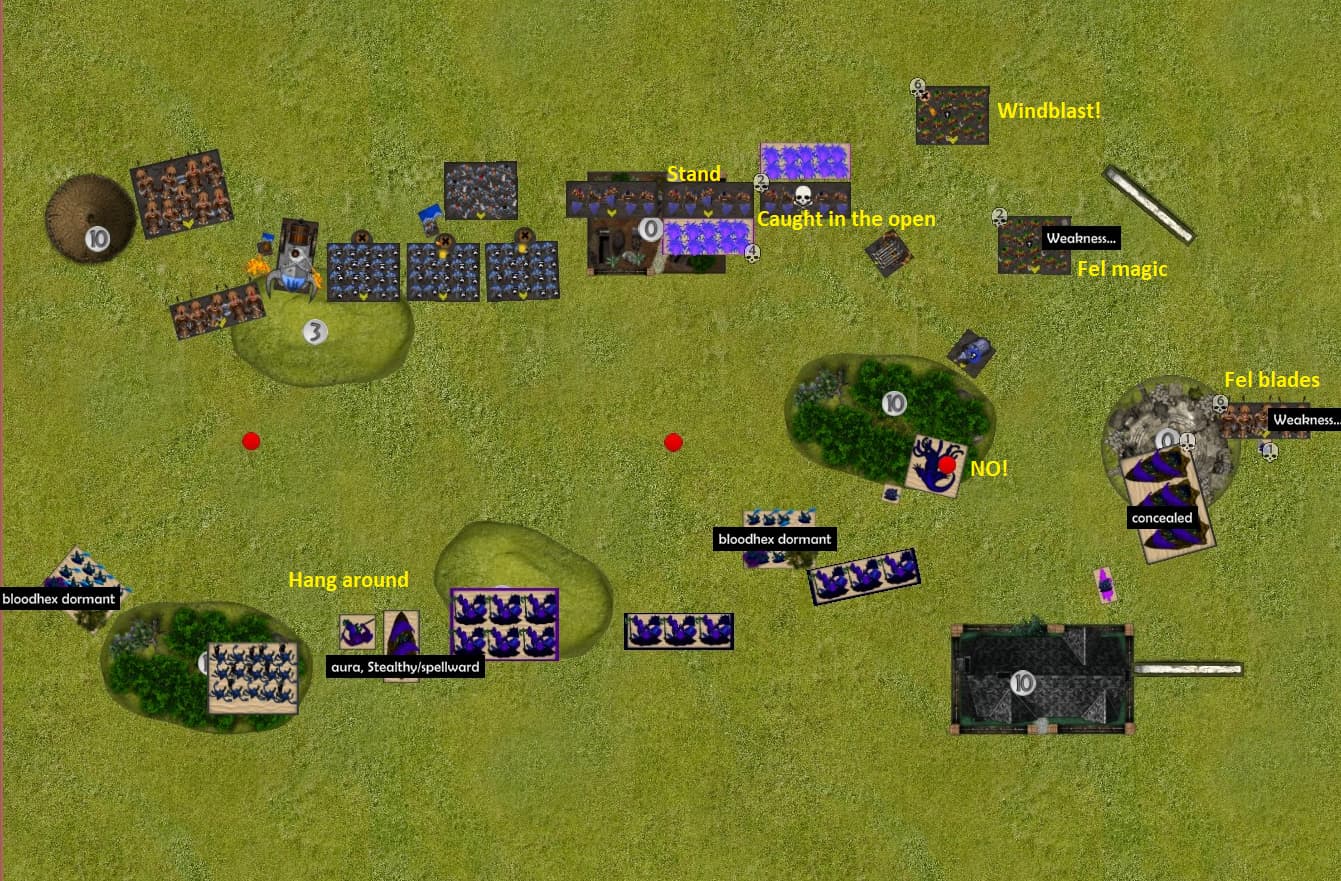
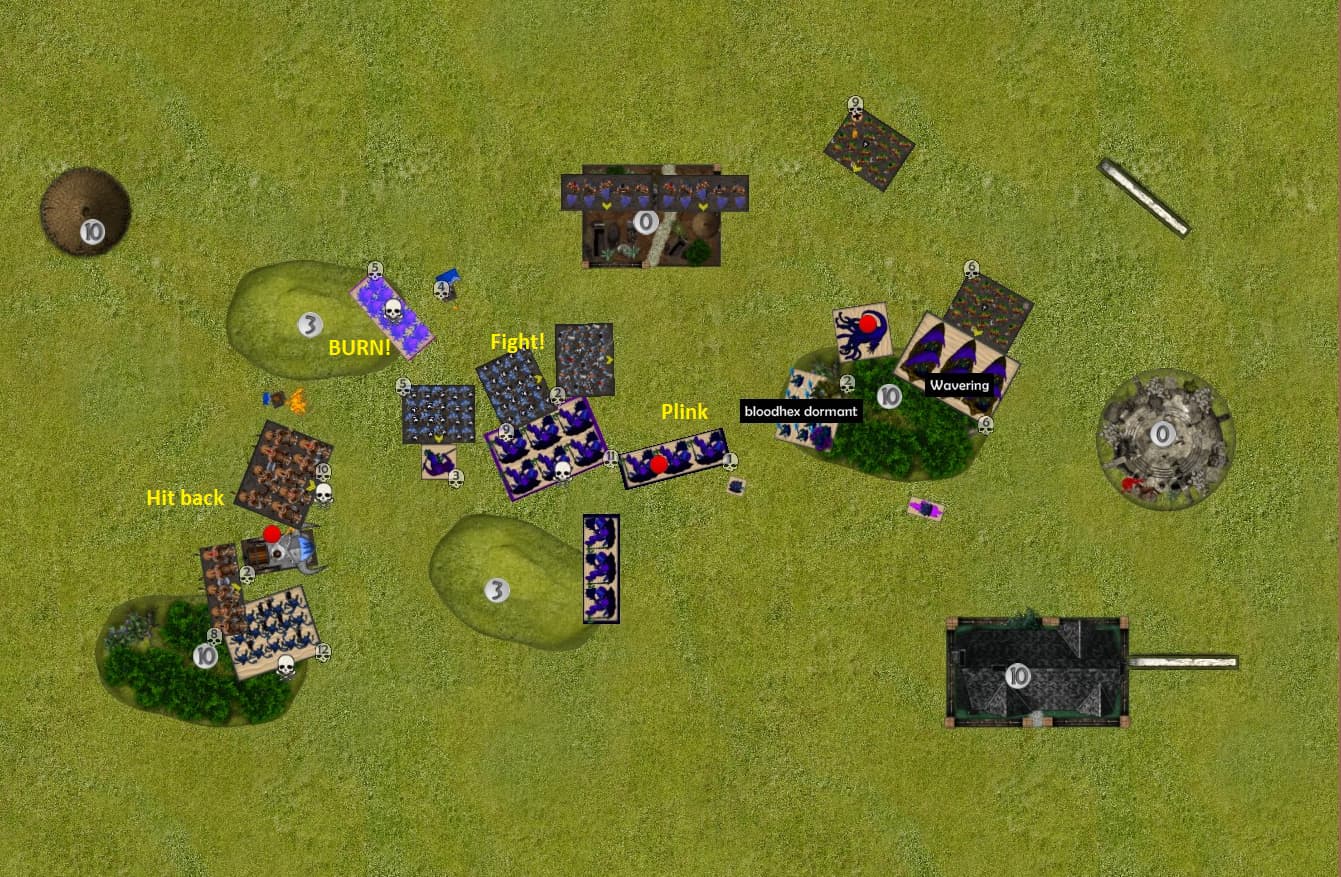
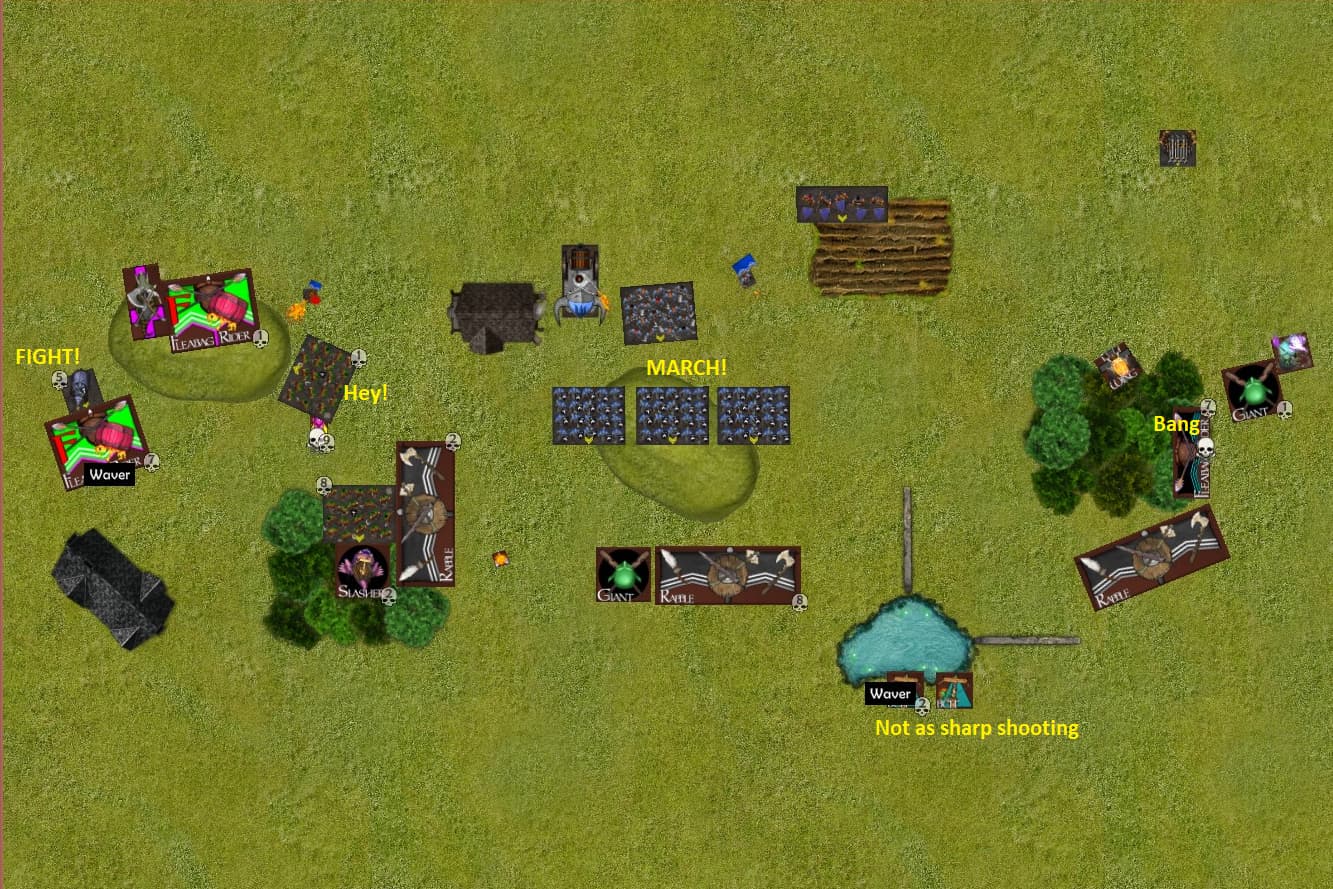
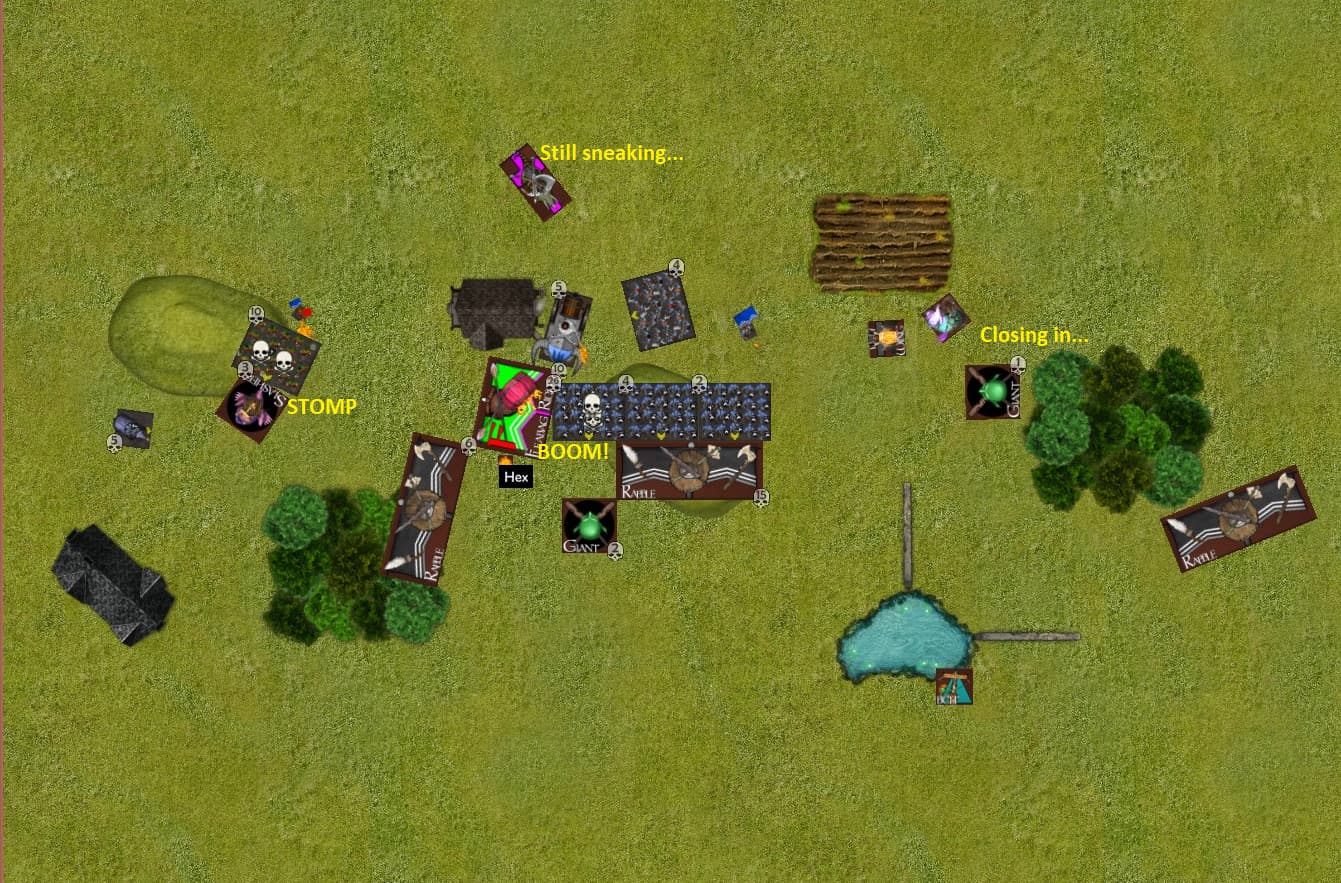
Dwarf Turn 3:
The Fools get to work and have a good turn.
The two damaged scarecrow hordes are seen of by ironclad counter charges and rangers getting stuck in.
The tormentors in the middle take some damage but are ok.
The tormentors on the right are not so fortunate though, the sharpshooters want none of that near them and all shoot that troop off while the brock lord keeps fighting the void lurker.
The counter charging, but not disordered, brock troop beats the dread fiend and steps out of the terrain.
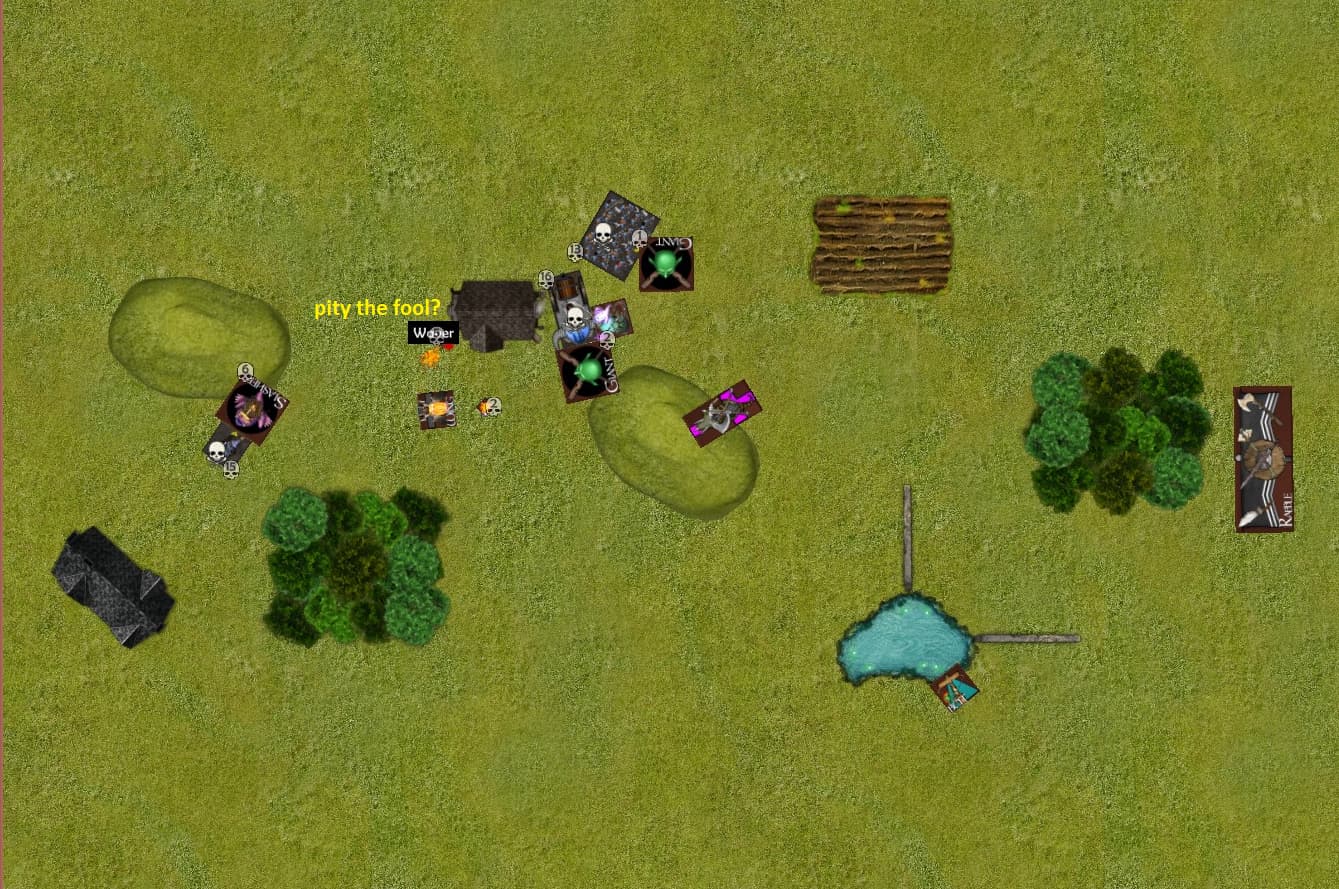
Nightstalker Turn 3:
An error on my part is revealed.
I carefully positioned the flame priest so that the tormentors could not land and contact them… then proceeded to turn them carelessly for a bane chant that didn’t help and giving the tormentors a charge behind my line. Fortunately Mendeleev holds them off.
The rest of the tormentors and the horror riftweavers charge up the hill and waver the right two ironclad regiments.
The scarecrow horde that got left behind turns to face the dwarfs coming from the left. This will help support the attack, but also means that the horde will stay stuck behind the lines for the rest of the game. The dwarf infantry’s objective is to score or protect units that are scoring, so if the scarecrow horde went to score on the right I would only have a brock troop to stop it.
The void lurker puts down the brock lord while the dream hunter keeps the brock regiment in place.
The mindscreetch picks off a troop of sharpshooters.
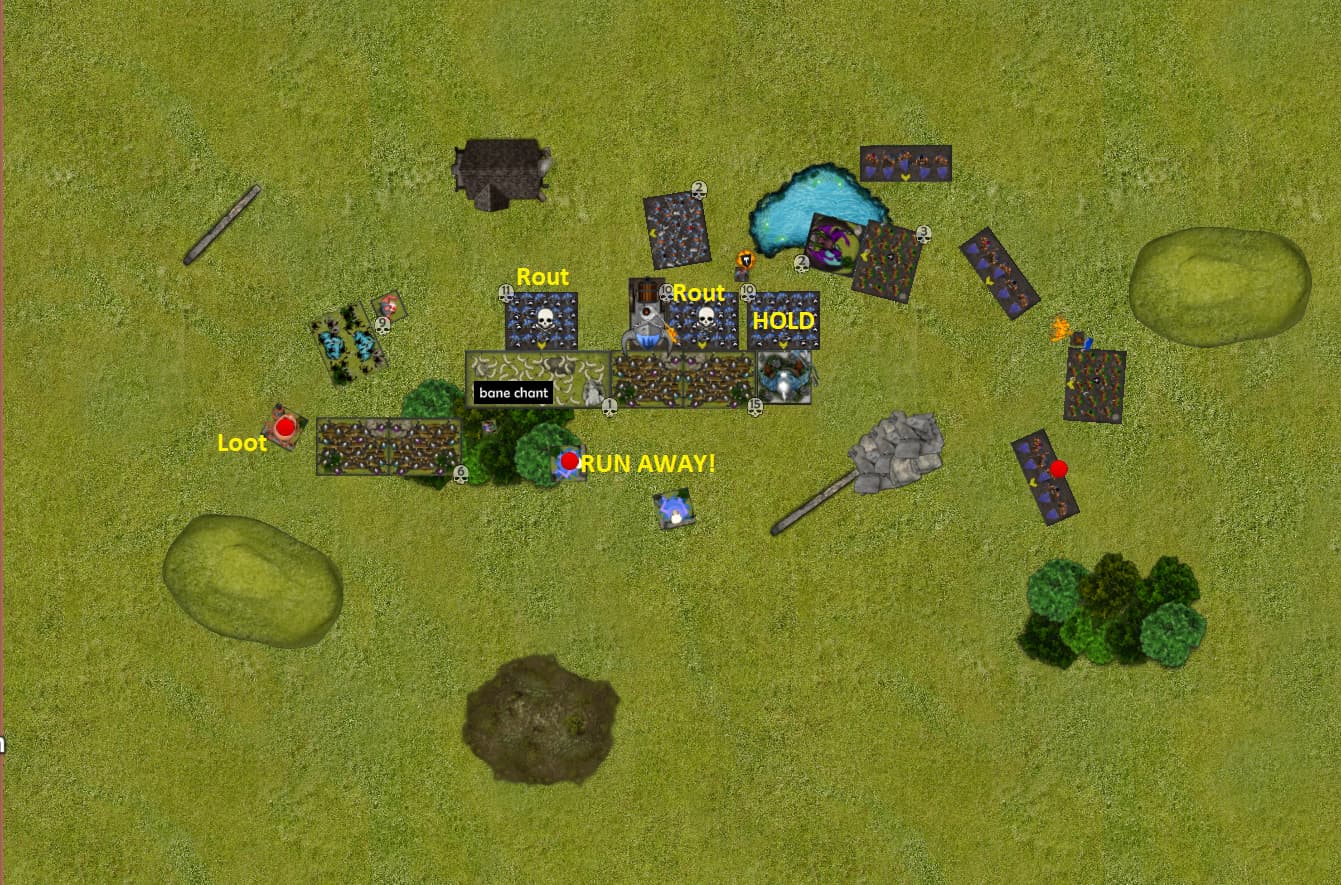
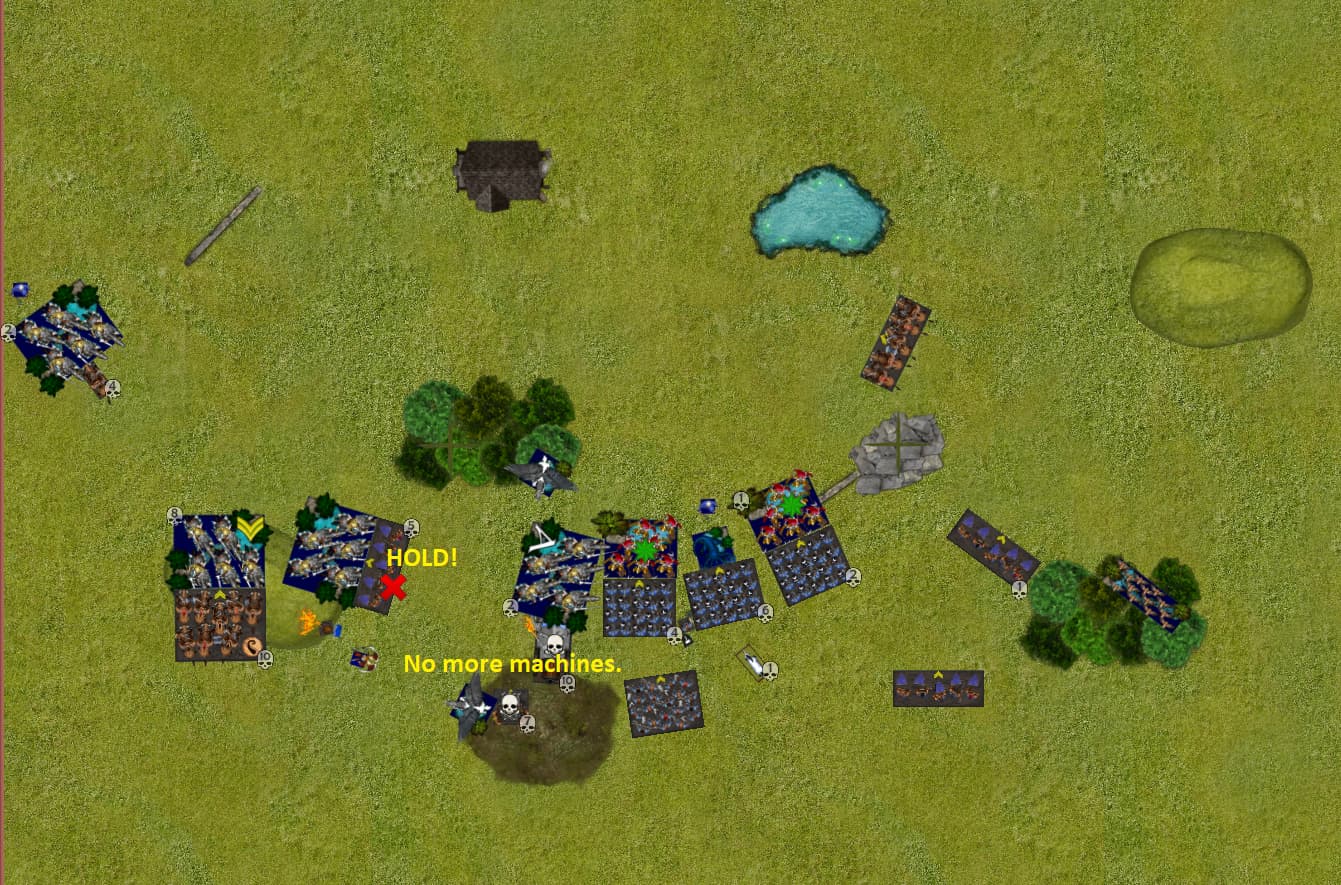
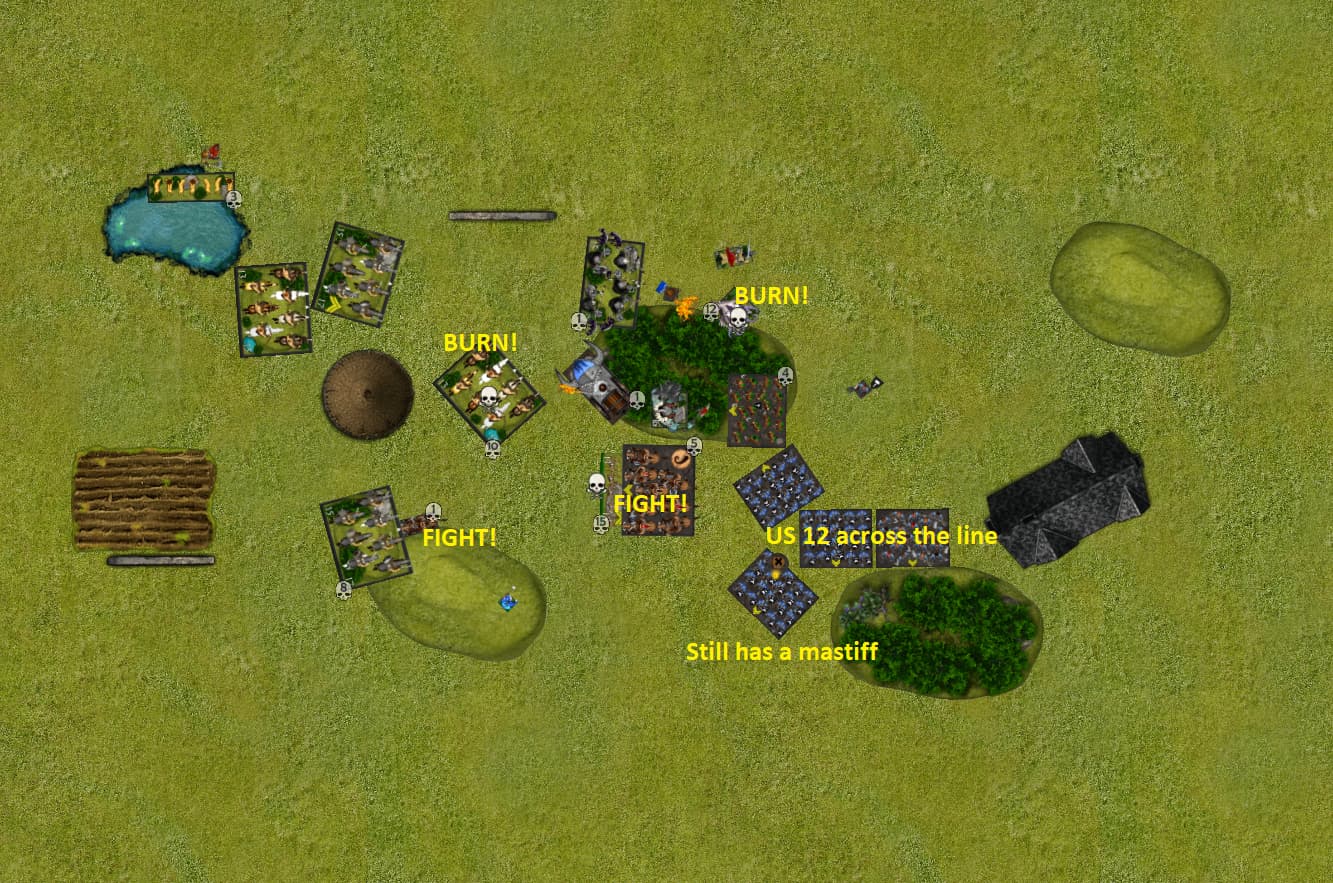
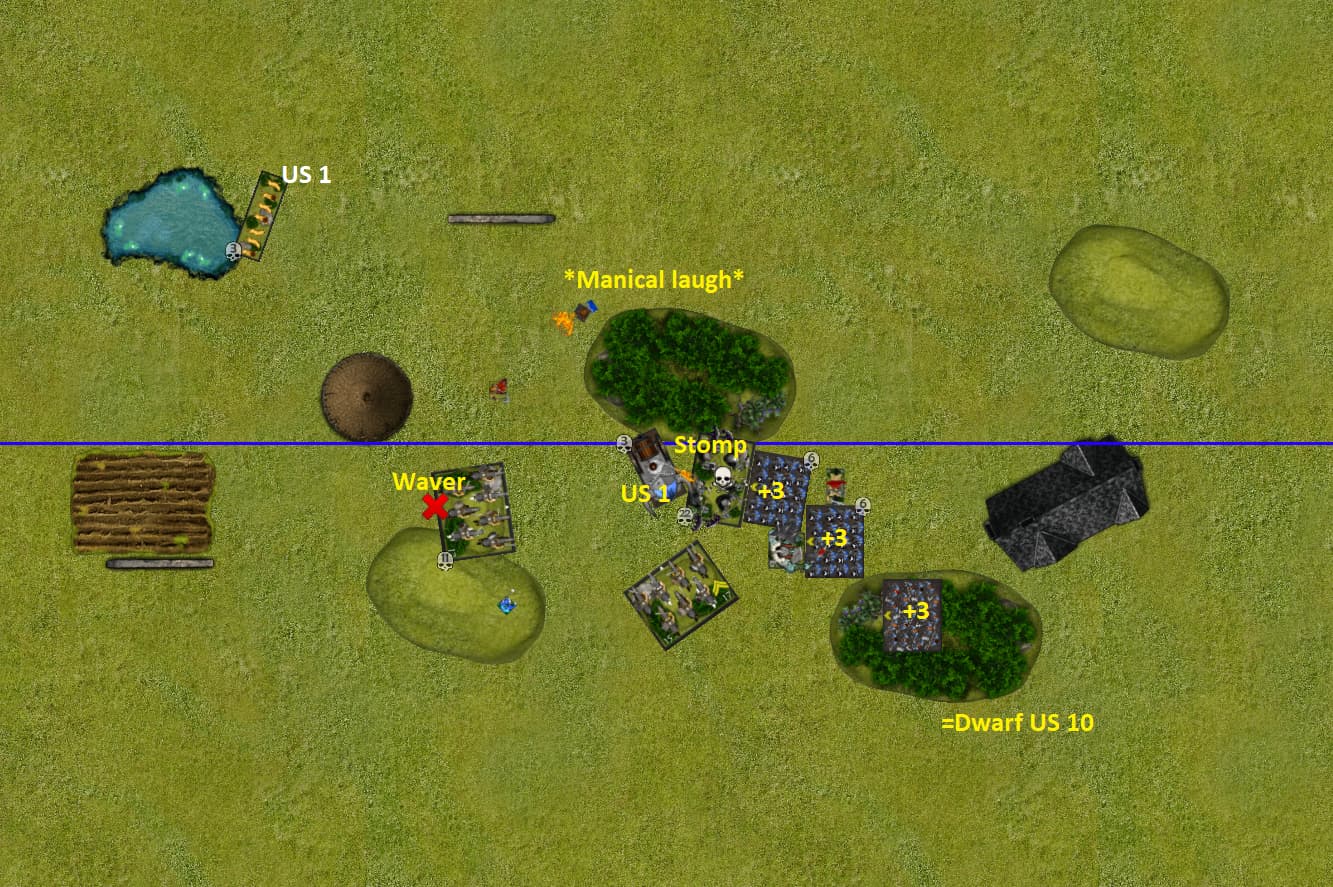
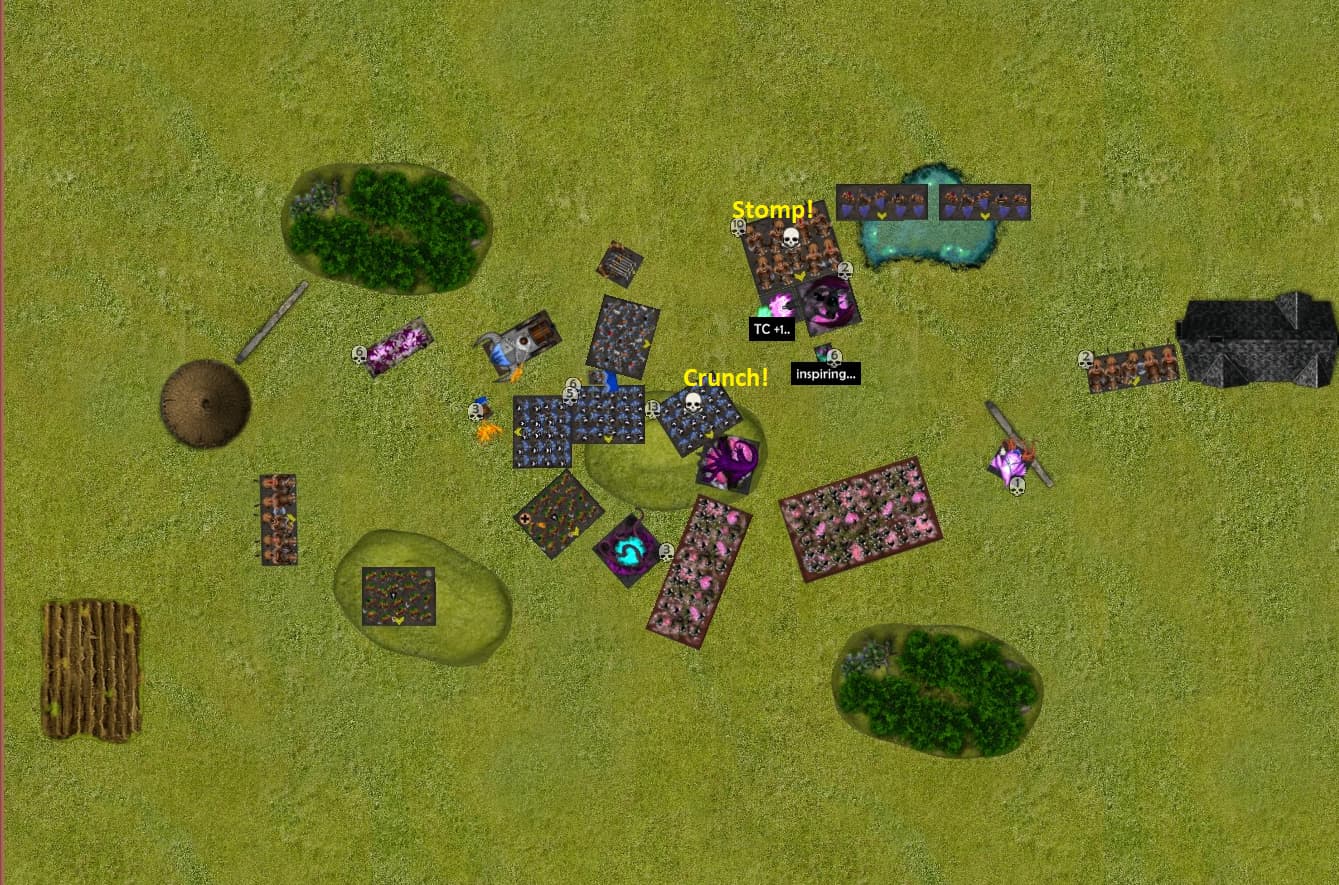
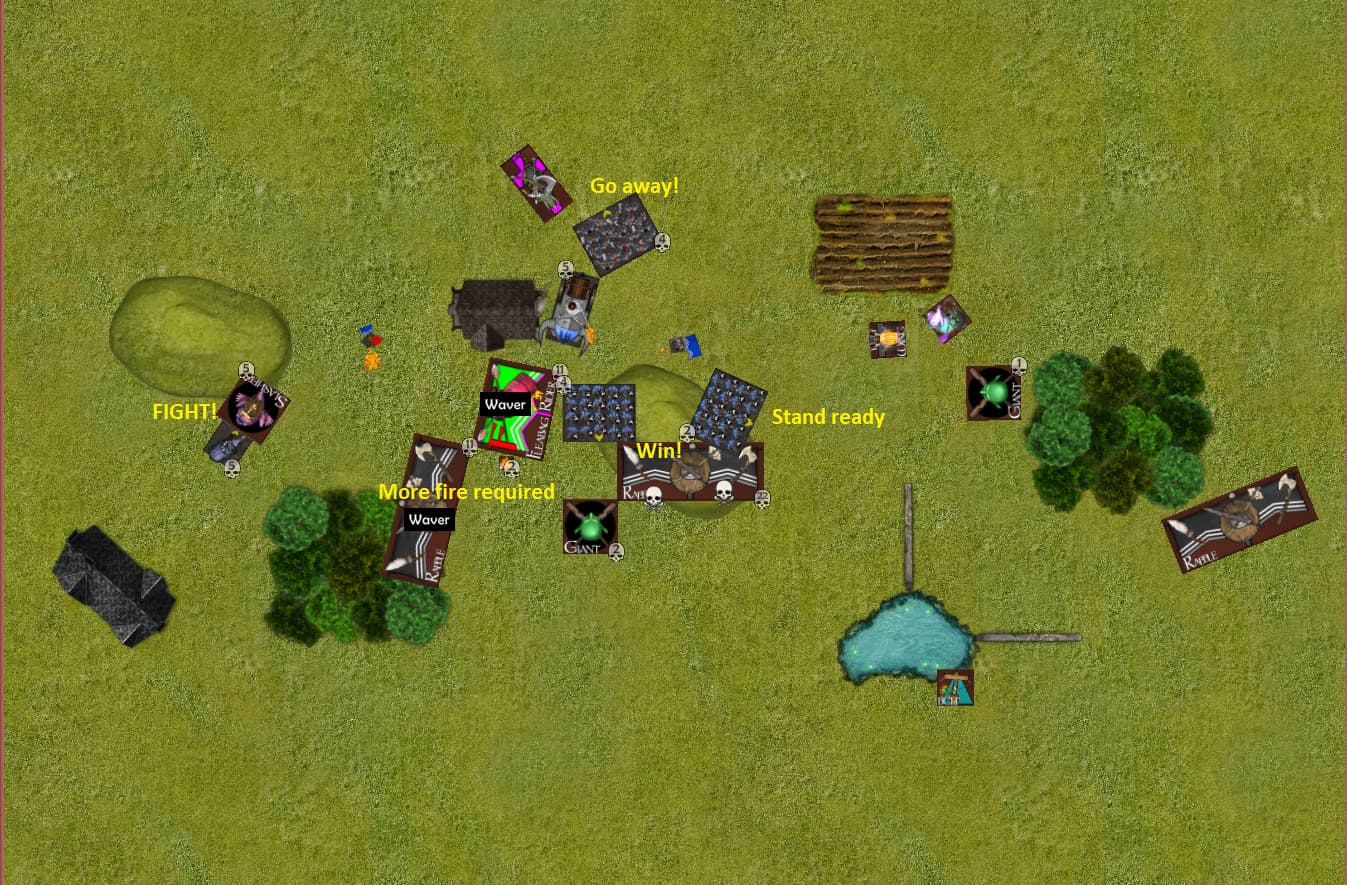
Dwarf Turn 4:
The ironclad are all headstrong and clear the tormentors off the hill.
Two reform for a delaying action while one turns to secure an escape (i.e. go score).
All the ironclad have taken enough damage that one charge from the terror probably takes then off.
Steel behemoth is still in the second line so dealing with the tormentors behind the dwarf line falls to them.
The tormentors survive the shooting attack and waver
It is an example of why monsters that can fight and shoot are great to have backing up a line.
That leaves supporting the top flank (it’s slmost that stage of a denied flank game  ) to the shieldbreakers though.
On the left flank; the brock troop endeavours to become relevant, one regiment of rangers goes to spend the rest of the game on the hill where they score and the other rangers charge the portal of despair.
Mostly to hold up the scarecrows behind the portal, but also because not having dread would be nice.
On the right, the brock regiment gets a lucky waver on the dream hunter and the brock troop sneaks past the void lurker (hoping it will chase them).
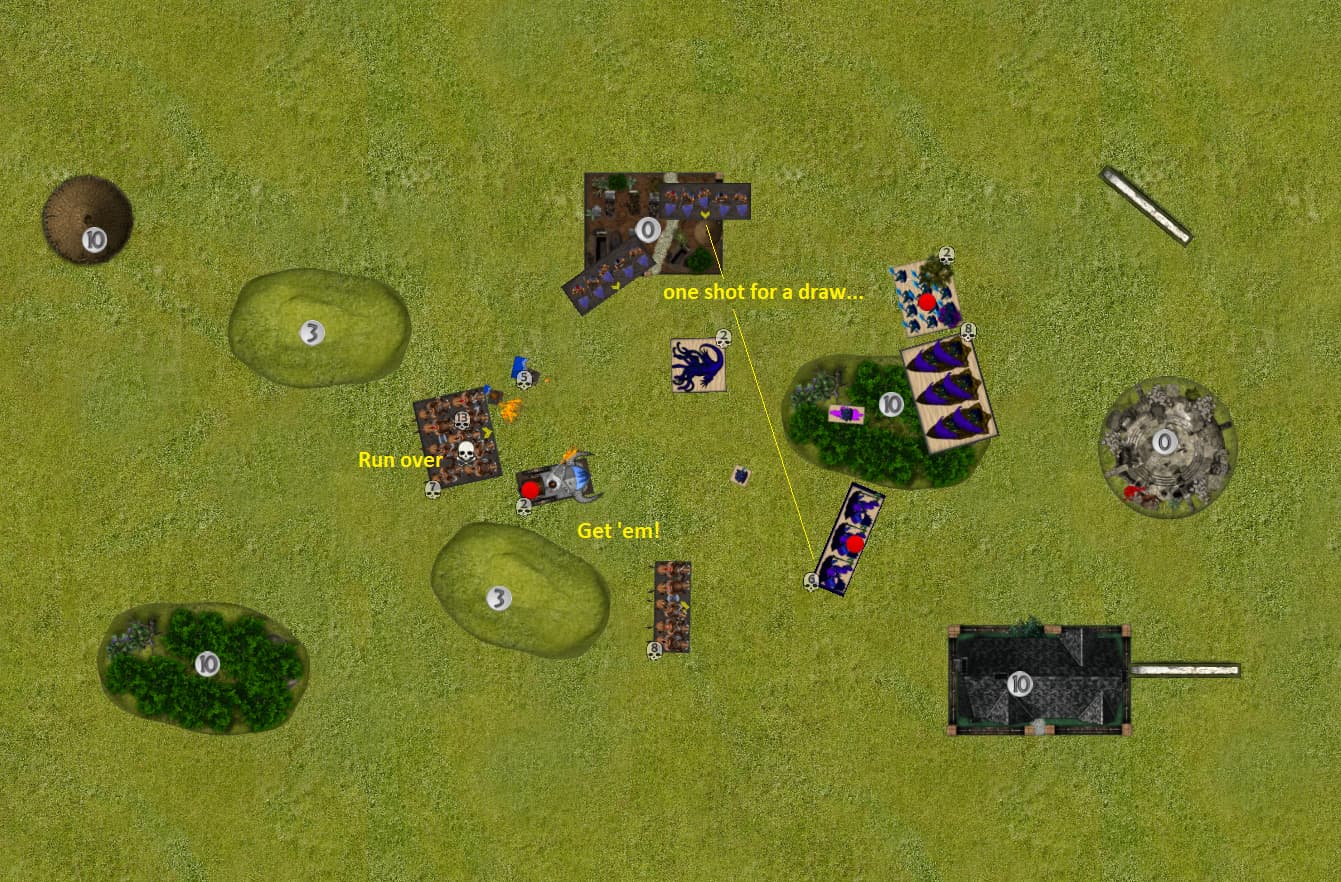
Nightstalker Turn 4:
The titans get to work, both routing a regiment.
The void lurker with some help from the horror riftweavers.
The dream hunter and portal back up.
The mindscreetch starts targeting the brock troop on the right.
The legion creeps closer to scoring.
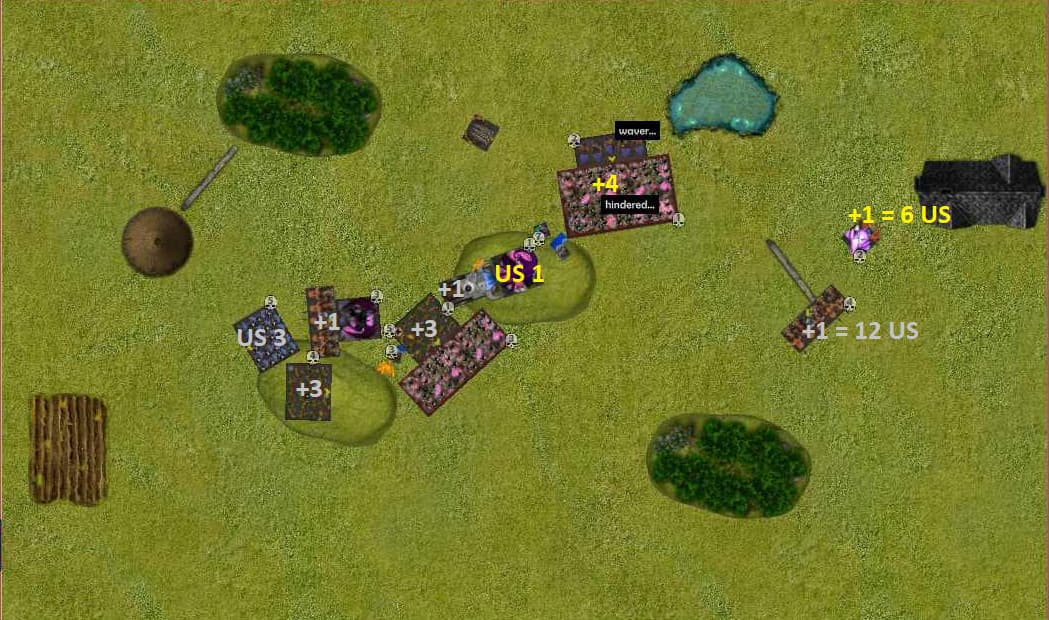
Dwarf Turn 5:
Time for desperate delaying actions!
The shieldbreakers rout the riftweavers and stand in the voud lurker’s way (so that the void lurker can’t make any charges after turning to get past them.
It has flying though, so both troops of sharpshooters take hindered rear charges to disorder the titan.
The manage only one damage between them, but that’s enough. In my mind they ran up and shot at it’s wings.
The behemoth needs to turn around, so stomps on that damn tormentor troop and uses the reform to turn around.
Rangers and ironclad close the portal.
The ironclad probably can’t survive a front charge from the terror, so might as well leave thier flank exposed to cover for the rangers (who are also US 3 and less likelyto be threatened by the scarecrows.
The other ironclad get out of the terror’s charge range.
The brock troops try to set up chatge targets for next turn, but are mostly interested in scoring.
Nightstalker Turn 5:
The titans both rout another regiment!
I was hoping for another turn from the shieldbreakers.
The scarecrows also charge. The sharpshooters consider their work done, but the rangers continue to be badass.
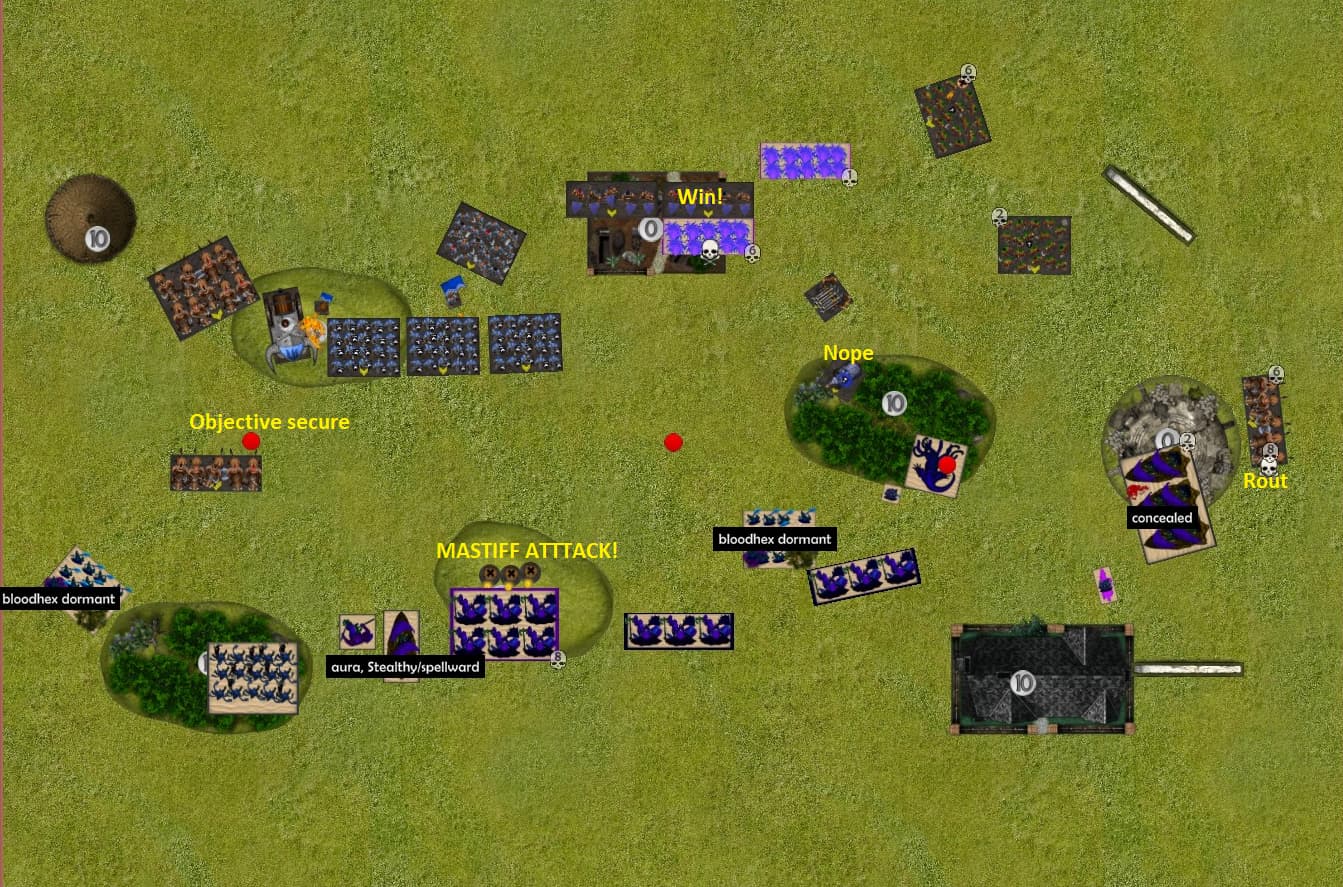
Dwarf Turn 6:
This turn is all about protecting unit strength.
Each of the regiments is US 3, the brock troops and behemoth US 1.
The ironclad get out of the void lurker’s charge range, but doing do doesn’t leave room for the brock troop to get out of dodge.
The sharpshooters disorder the void lurker again, but it’s not blocked, just doesn’t have TC to hite the behemoth with.
The steel behemoth charges the terror on the hill!
This sounds like an epic monster vs machine fight, but it’s defense vs defense.
The behemoth is Me 4+, so ensnare is effective and then rolls low for attacks and with those attacks. Deals 1 damage.
The terror is geared toward stomping on infantry, with rampage and only CS (1), it’s not effective against a De 6+ monster.
As it happens; they are both already scoring too.
What the behemoth does achieve is being height 7 on the hill and creating a ranger regiment sized spot that the void lurker doesn’t have LoS to.
The right brock troop stops the lightning and the Boomstick wavers the dream hunter.
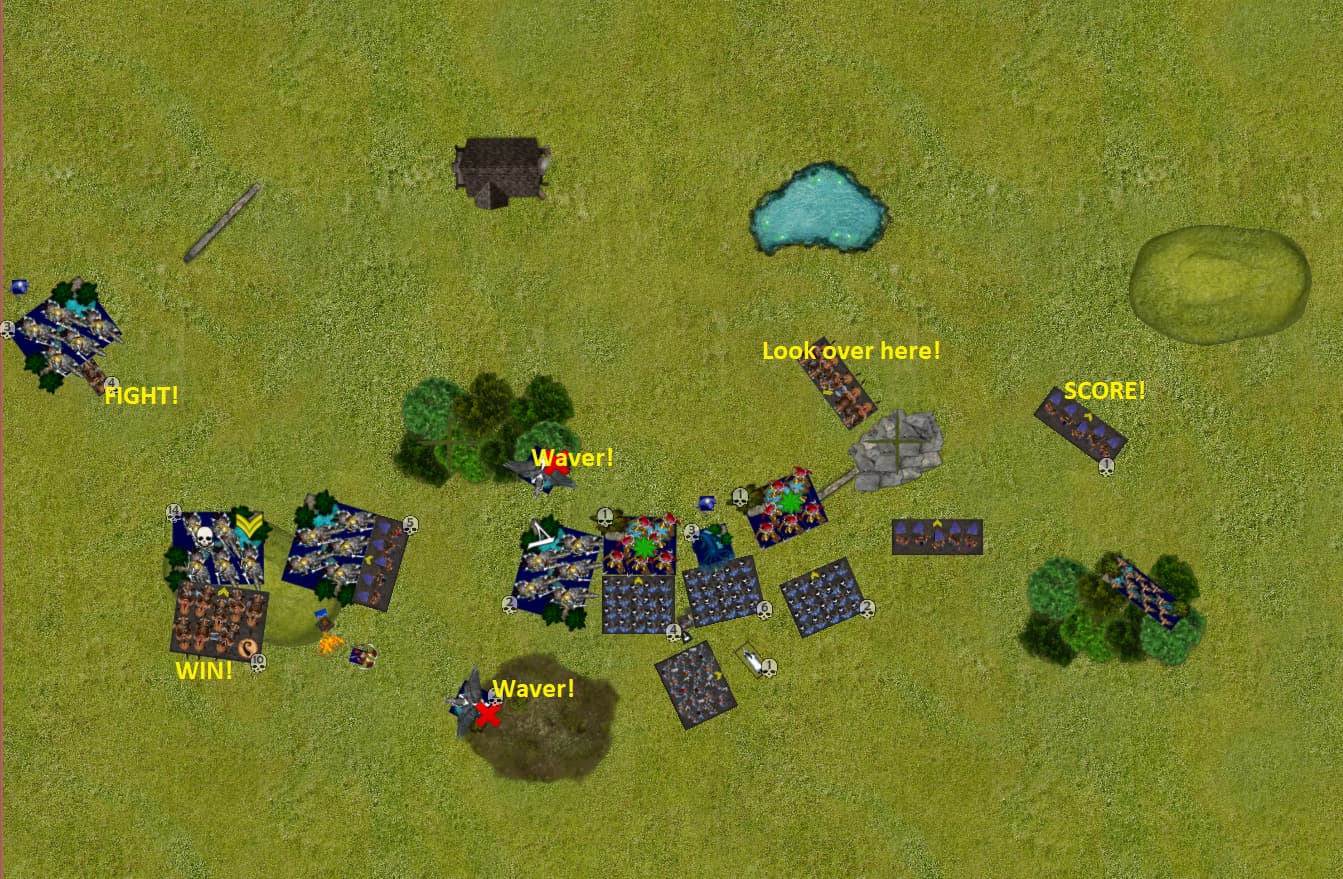
Nightstalker Turn 6:
The last sharpshooters stand up to the legion!
The brock troop survives a charge from the void lurker, which feels lucky, but routing -/15 nerve with 10 attacks takes a good roll.
This puts the void lurker in a bad position for turn 7, but there is no turn 7.
The terror does 1 damage back.
The mindscreetch goes to score. I imagine it going woop woop woop as it does.
That means a dwarf victory!
My plan worked and I had a good match up.
My opponent’s list looks experimental (he usually plays Twilight Kin) and based on a game plan that my (kind of unusual) list just didn’t allow.
It also helped that the brock troop dealt with the dread fiend so easily and that the brock lord hung on for an extra turn.
I just barely kept the titans from my scoring units, by giving them each 6 unit strength!
That also means my contribution to Shadowed Horizons is a win for “Good”.
With the portal closed and the attack stalled, the nightstalkers were defeated, but their dread still hung over The Fools.
It felt distant, but still there.
This attack was strategic for nightstalkers, usually they preyed on the vulnerable and had to be hunted and brought to battle. This time they had a target, a military objective.
Something larger must be afoot and that means dwarfs will be fighting.
Those dwarfs will need all the supplies they can get.
The Fool’s Hold got to work making sure they could send as much black powder West as possible.