3 → Duncan Shabb’s Varangur
Scenario: Invade
2300 points
Another game against Duncan, who’s trying out a Varangur list for a tournament.
There was a harsh, cold and bitter wind blowing.
The dwarfs who had travelled in the north whispered about the Northern Winds and the warriors of the dark and old god, Korgaan. Could Varangur have come this far East?
Sure enough, smoke rose from the villages near the coast and the rangers sent to investigate reported brutal human raiders.
The Fool’s Council met and decided that dwarfs would meet the threat; for several reasons.
Some needed nothing more than to know that innocents were suffering.
Many felt duty bound to protect the villages. The Fools had seen the need to foster good relations with the town and villages nearby. Hostility, as with the Order of the Green Lady, served none but nightstalkers.
Many dwarfs had grown fond of the trade partners and customers within the, mostly human, villagers and townsfolk.
That same trade was also represented an economic interest. Not only did the dwarfs trade with the villages, the town has a port which, if the Fools can negotiate it’s use makes it far easier to send powder to and receive supplies from Golloch’s Empire
Even the most conservative and insular dwarfs recognized the security concern. The lumber camps are at risk and, most on mind, terrified villagers attract nightstalkers.
If the Varangur find easy pickings here they will return.
Finally, the more cynical dwarfs noted that there is also a political interest.
The town and villages struggled to protect themselves against threats like this. If the dwarfs dealt with the invasion then the humans would have more reason to look to the dwarfs for protection.
While still weary of Golloch, the town would be more willing to accept a dwarf presence; giving The Fool’s Hold better access to the port, a link the Golloch’s Empire and a potential imperial outpost.
The Varangur had to been seen off without what they came for. Glory and loot.
While mounted warriors are usually difficult for dwarfs to come to grips with, the Varangur will have a camp where they keep their plunder and prisoners by now. The Fools’ plan is to march on that camp and offer the Varangur only fire, smoke and impassive steel.
Varangur [2300 / 2300]
Night Raiders (Infantry) Regiment (20) [145] Bows [0] - Fire-Oil [5]
Night Raiders (Infantry) Regiment (20) [140] Bows [0]
The Fallen (Large Infantry) Horde (6) [260] - Healing Brew [5]
Mounted Sons of Korgaan (Cavalry) Regiment (10) [240] - Brand of the Warrior [10] - Sir Jesse’s Boots of Striding [15]
Mounted Sons of Korgaan (Cavalry) Regiment (10) [225] - Brand of the Warrior [10]
Snow Foxes* (Swarm) Regiment (3) [80]
Snow Foxes* (Swarm) Regiment (3) [80]
Jabberwock (Monster) 1 [165]
Magus (Hero (Infantry)) 1 [140] - Lightning Bolt (4) [0] - Bloodboil (0) [30] - Inspiring Talisman [20]
Lord (Hero (Heavy Infantry)) 1 [130] - Snow Fox [10] - Brand of the Warrior [10]
Kruufnir [1] (Hero (Monster)) 1 [160]
[F] Mammoth Steppe Horse Raiders (Sliksneer’s Shriekers)* [1] (Cavalry) Regiment (10) [175]
[F] Mammoth Steppe Horse Raiders (Sliksneer’s Shriekers)* [1] (Cavalry) Regiment (10) [175]
[F] Sliksneer (Sliksneer’s Shriekers) [1] (Hero (Cavalry)) 1 [185] - Snow Fox [10] - Brand of the Warrior [10]
That looks threatening and aggressive.
With a good amount of nimble mobility and more shooting than one might expect.
The brutal +1 aura applies to all the cavalry and the night raiders, plus a lot of brutal throughout the list.
Which means everything is potentially more dangerous than it looks. The Mounted Sons potentially have brutal 2, which means they have good odds of rouring ironclad on the charge.
Which is concerning for me because my list is designed to punish an opponent doing average damage, but this list nudges it’s average up without paying for overkill.
The monsters don’t look particularly big and stompy, but will be more of a problem than I would like in a list that has a lot of threats to deal with.
To heed my own words in reply to @TastyBagel :
This list looks like it will be coming to get me.
Mobile and with buffs to make it hit even harder.
There’s also a good amount of nimble and shooting.
Which means it can get where an opponent doesn’t want it and make you deal with units that are not priority targets.
The night raiders look handy, but I’m not sure what they’ll be doing or how to deal with them.
They don’t look especially durable, but stealthy makes shooting then inefficient and going to get them (presumably in terrain) doesn’t sound great either.
They’re too capable to ignore, but in a list that already has a lot to deal with.
My list is the same, here it is again do that don’t have to scroll up for it.
The difference is the list I’m dealing with.
It’s more threatening, but I’m better able to deal with the threats. Duncan can’t afford to be quite as careless and there isn’t wound recovery.
The other difference is that there isn’t solid infantry to engage my infantry, so my centre can deal with a threat instead.
It’s more mobile though, so can dictate where it engages.
Fool’s Hold [2300 / 2300]
Ironclad (Infantry) Regiment (20) [125] - Throwing Mastiff [15]
Ironclad (Infantry) Regiment (20) [125] - Throwing Mastiff [15]
Ironclad (Infantry) Regiment (20) [125] - Throwing Mastiff [15]
Shieldbreakers (Infantry) Regiment (20) [125]
Rangers* (Infantry) Regiment (20) [190] - Fire-Oil [5]
Rangers* (Infantry) Regiment (20) [185]
Sharpshooters (Heavy Infantry) Troop (5) [100]
Sharpshooters (Heavy Infantry) Troop (5) [100]
Sharpshooters (Heavy Infantry) Troop (5) [100]
Berserker Brock Riders (Cavalry) Troop (5) [125]
Berserker Brock Riders (Cavalry) Troop (5) [125]
Berserker Brock Riders (Cavalry) Regiment (10) [205] - Mead of Madness [10]
Ironbelcher Organ Gun (War Engine) 1 [90]
Steel Behemoth (Monster (Chariot)) 1 [245]
Dwarf Army Standard Bearer (Hero (Infantry)) 1 [65] - Talisman of Silence [15] - Mind Fog (2)
Berserker Lord (Hero (Cavalry)) 1 [150] - Brock Mount [30] - Gnome-Glass Shield [10]
[Mendeleev] Flame Priest (Hero (Infantry)) 1 [120] - Fireball (10) [15] - Bane Chant (2) [20] - Inspiring Talisman [20]
Deployment:
We did blind deployment for this game.
It’s expedient and disadvantages both of us.
I have 3 more drops, which usually means that I get to deploy a few units (typically brock riders) after my opponent has everything down.
It’s not great for Varangur either though.
It’s a mobile army with high value units that need to be in the right place.
When I played Varangur (a long time ago) I relied on getting a sense of where my opponent is deploying and what they intend to do to deploy my Mounted Sons of Korgaan in the right place.
My foremost concern is that I can’t take charges from this list like I could other lists, I want to avoid and/or hinder charges rather than having the ironclad take it on the chin.
Strangely for dwarfs in invade, I have an advantage in the scenario. Usually part of my challenge is to force my opponent to engage my ironclad and then get counter punched. Usually by being where my opponent has to deal them.
In this case; I have more units and unit strength (US). The Varangur have to engage my infantry or let a lot of US walk across the line. I can put them somewhere that’s difficult to charge and play the scenario.
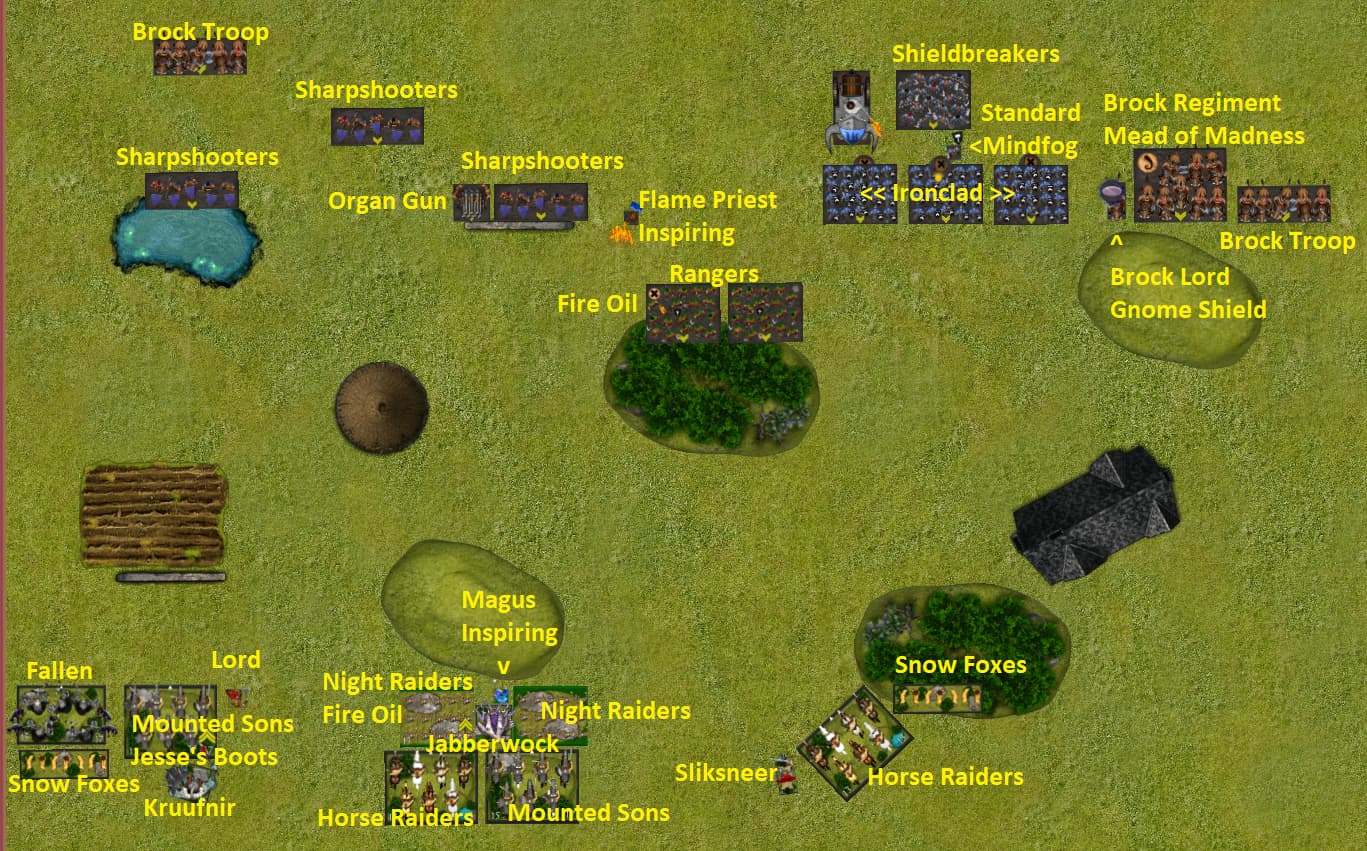
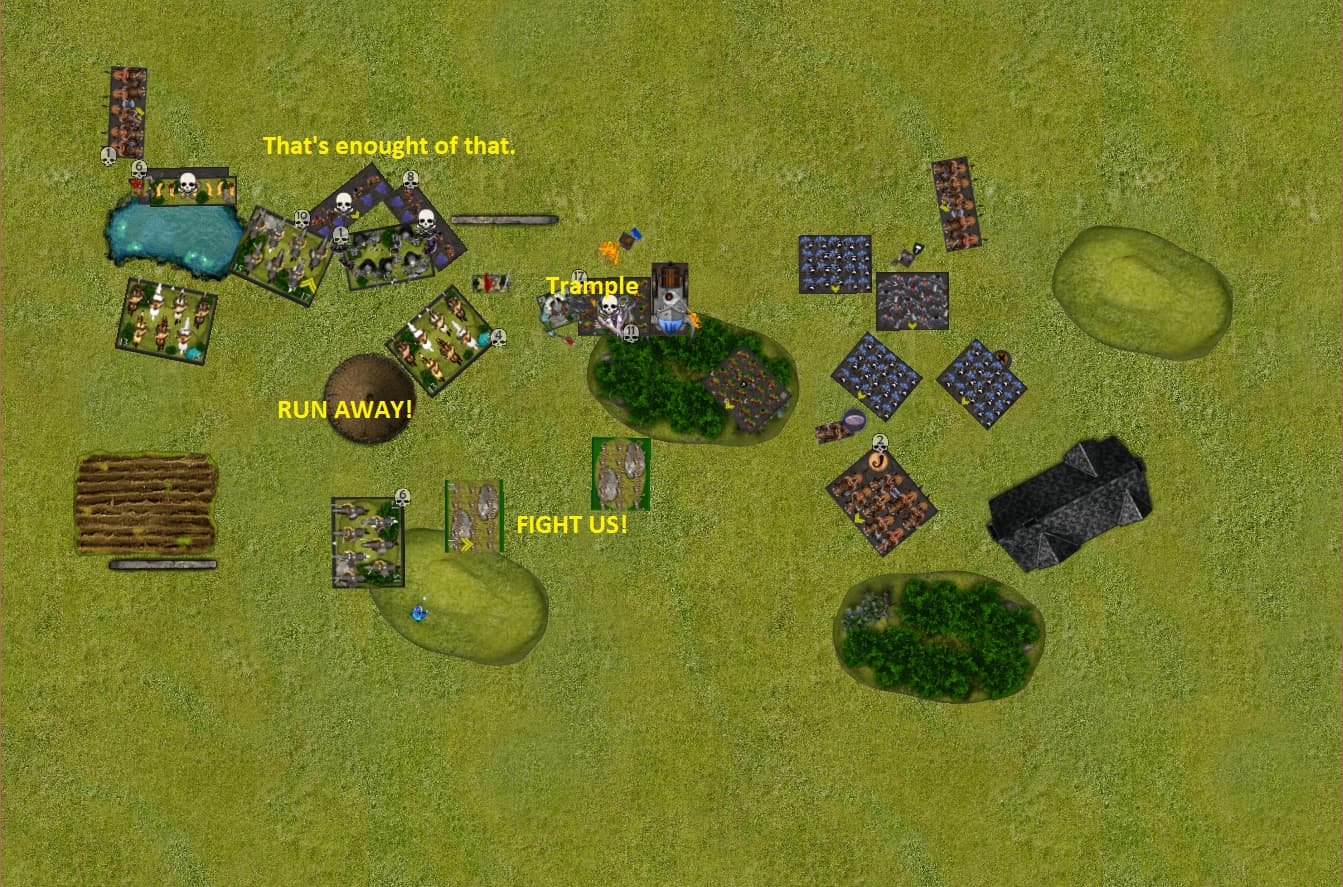
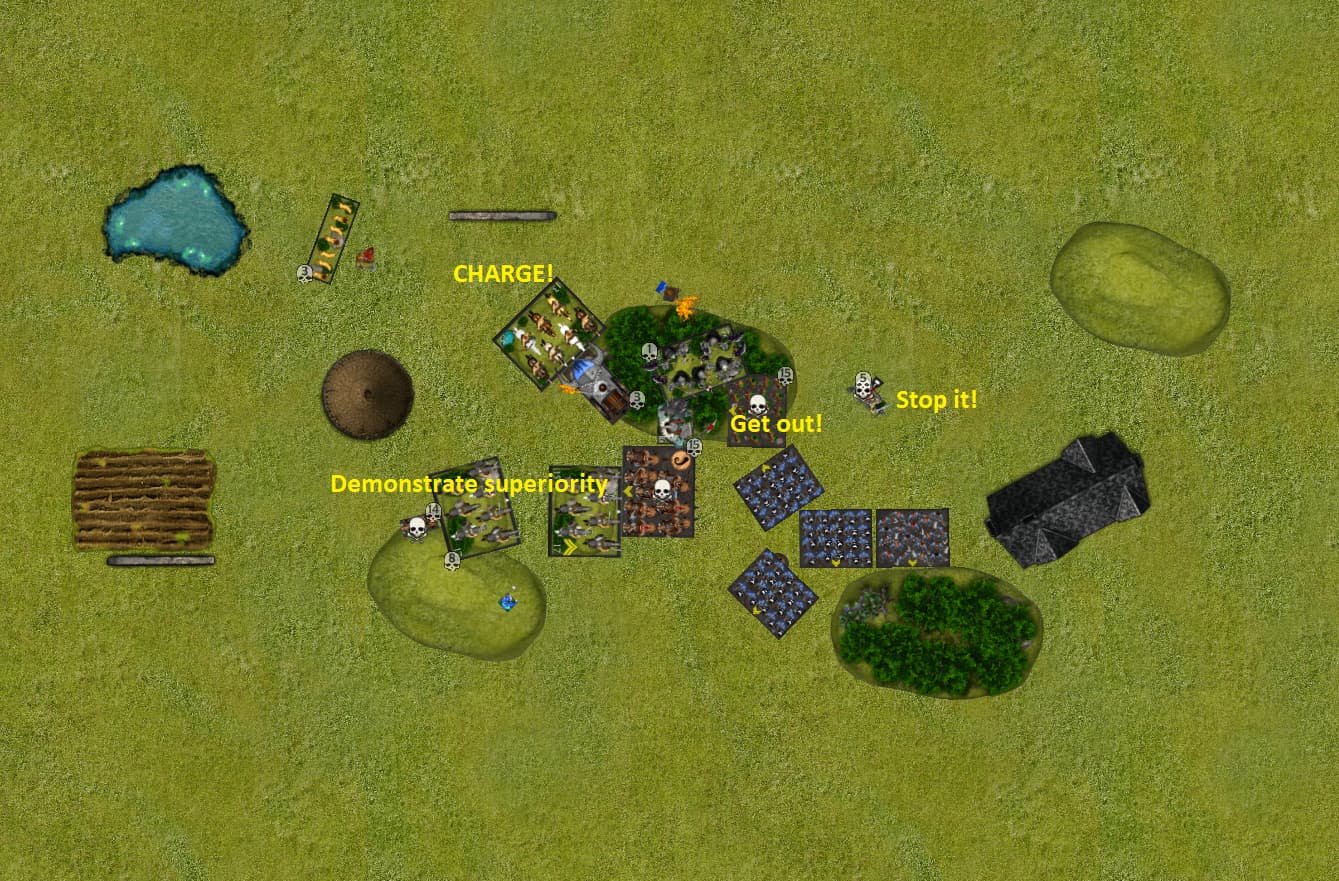
I picked the top.
On the left the blocking tower and obstacle would trip up and congest an advance.
On the right the wood and blocking make a zone that looks difficult to attack from the bottom, but easy to get to and score in from the top. I can also scout into and project threat from the central woods with my rangers (controlling the centre, as one wants to in chess).
Accordingly; I deployed my infantry core on the right (hoping to simply advance and score), rangers in the middle (scouting after seeing the Sons with Jesse’s boots and fallen were not threatening the woods) and guns on the left.
Again heeding @TastyBagel; I deployed the sharpshooters back on the left; using the terrain for cover and hindering charges. The sharpshooters not in terrain want to maximize the shooting either side of the tower (round thing is H9 blocking).
The idea also being that units that deal with the sharpshooters are then as far away from my infantry doing the scoring as possible.
Varangur Turn 1
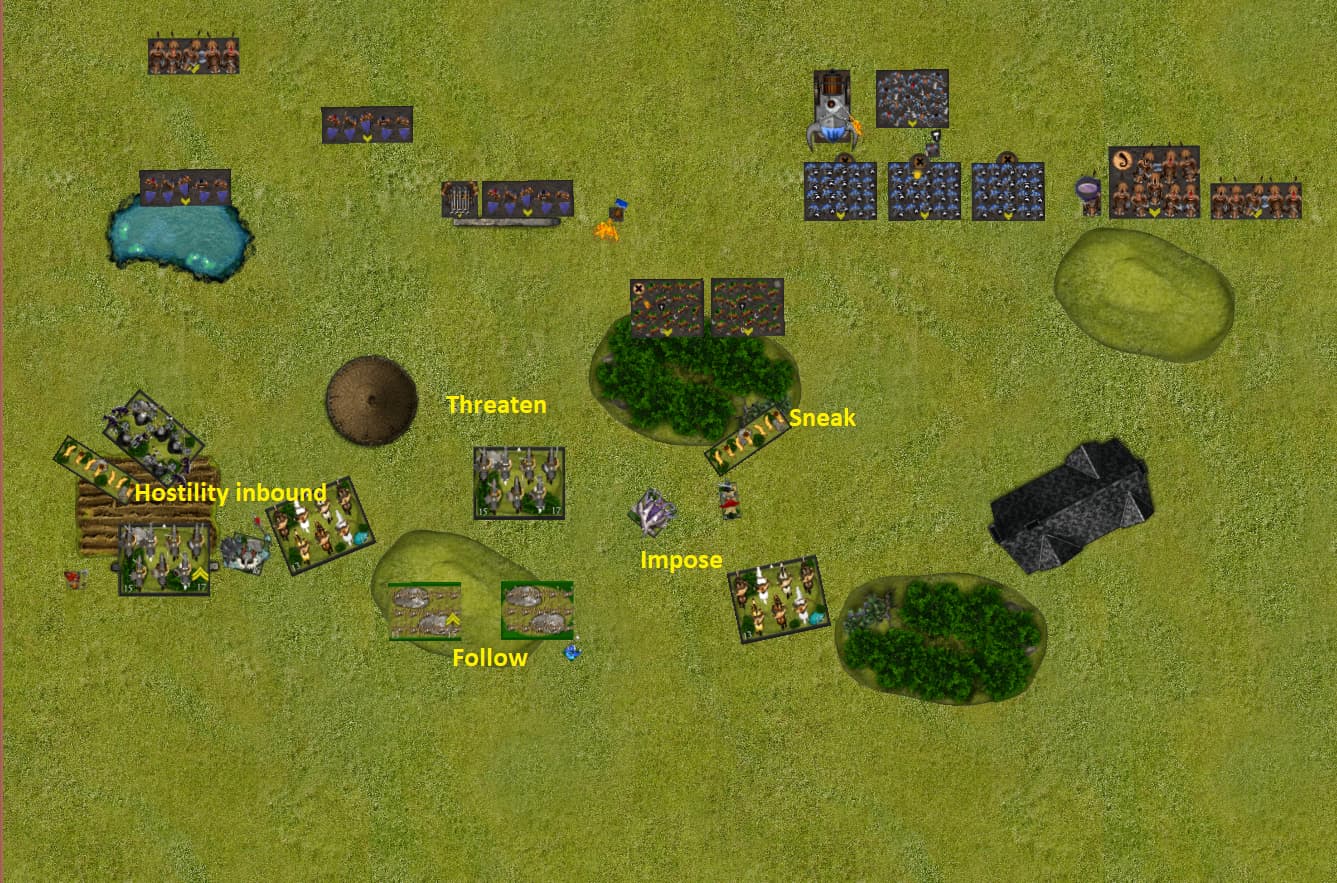
The Varangur come forth to please Korgaan.
Korgaan doesn’t seem to like the idea of using bows though. No shooting damage.
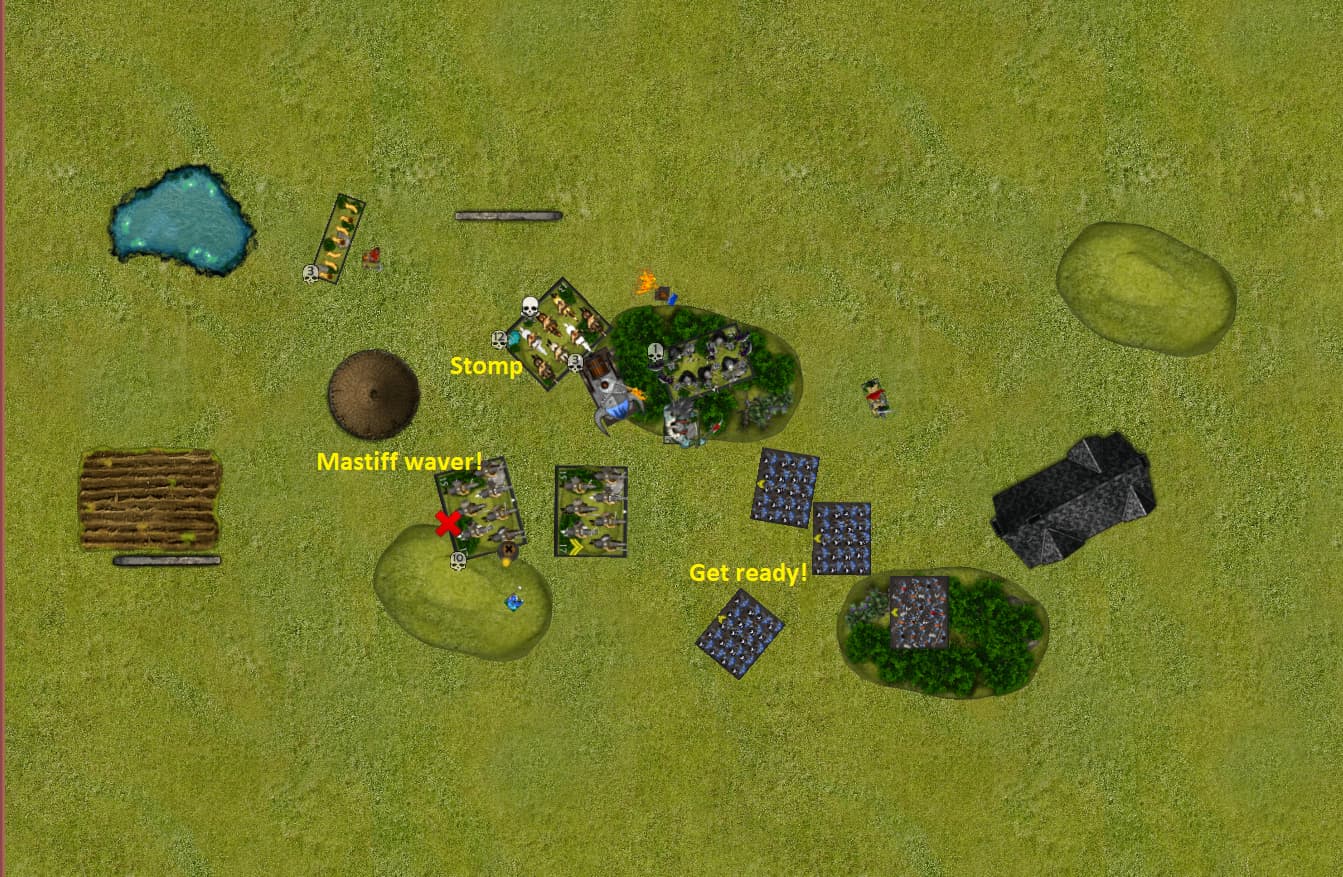
Dwarf Turn 1
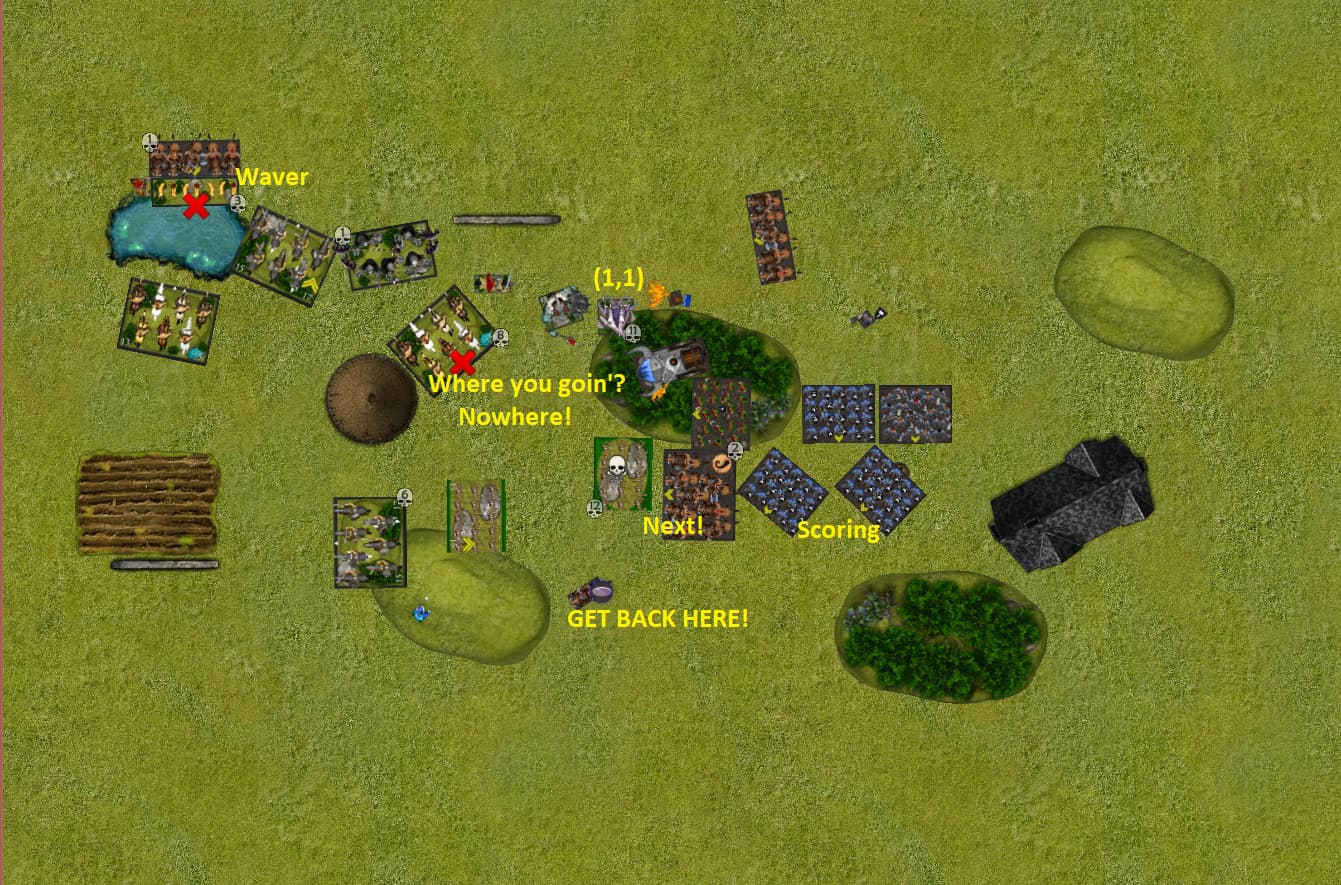
I start pushing up on the right (my left flank).
The left looks like trouble, but… that’s only 10 US left of the tower (round thing is H9 blocking).
My ironclad alone are 9 US and there isn’t much to stop them from walking over the line.
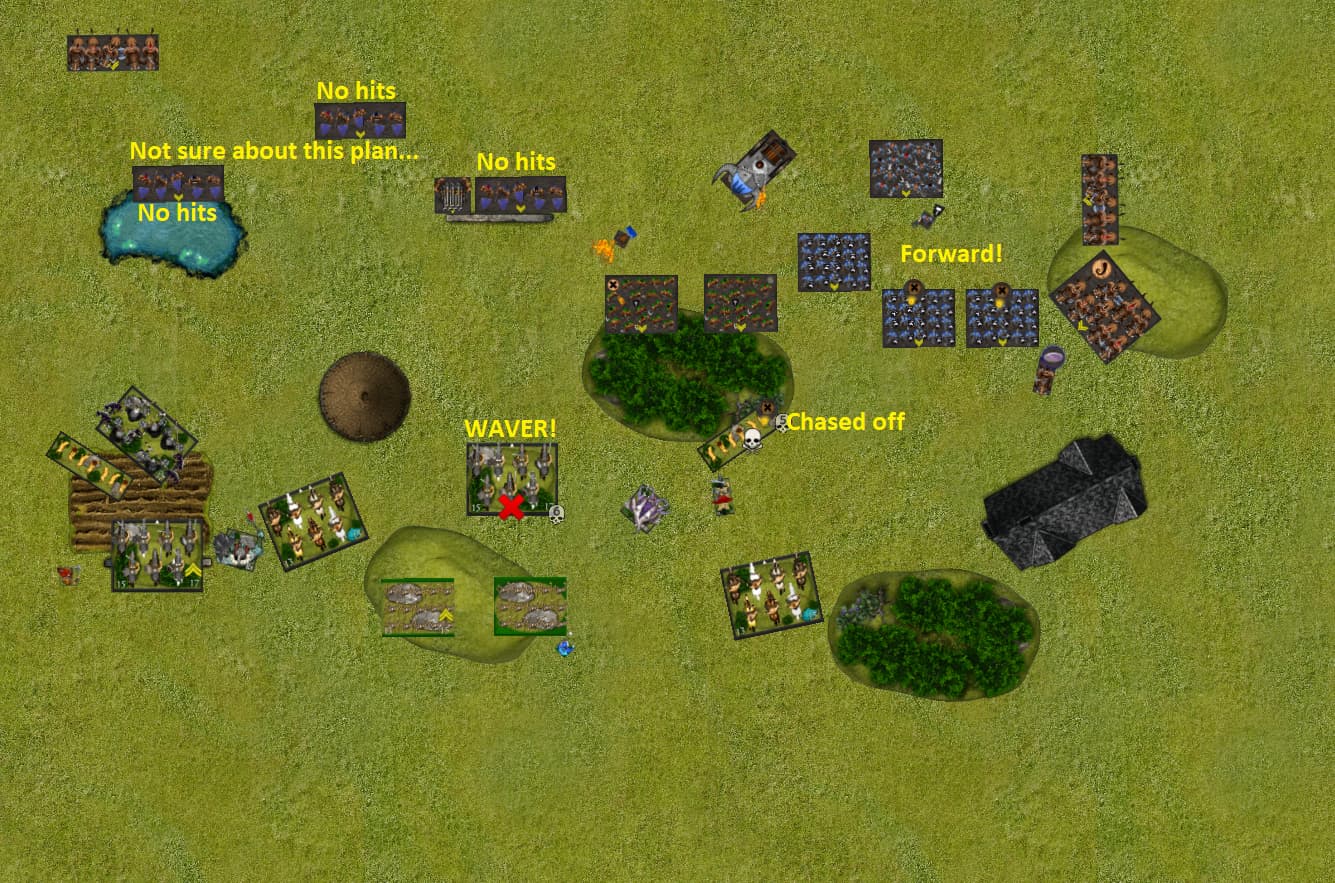
As much shooting as possible goes into the Mounted Sons in the centre. All sharpshooters miss, but the rest (gun, fireball and rangers) get some damage and a good nerve roll for a waver. Already going better than the last game and these guys don’t have headstrong. ![]() Or wound recovery!
Or wound recovery!
The steel behemoth carefully manoeuvres to get a shot on the stealthy snow foxes in the woods… 1 damage
I throw a mastiff at them. 4 hits and (2,2,2,2) for damage. De 2+ means 4 damage…
Shattering for the Talisman of silence…
Second nerve roll is a 5, which is exactly enough to rout them. Teamwork makes the list work.
Importantly, the now wavered Sons of Korgaan were in my rangers’ flank arc, so they side stepped to avoid a possible flank charge that would rout them even if hindered.
The sharpshooters took aim at the approaching horsemen, ready to show them why they should be far more concerned when riding up to dwarfs.
The bitter and icy wind disagreed. No fuses would light or aim stay true. As if the wind was Korgaan’s voice commanding brutal and glorious combat.
Machine and flame did not heed the wind. As if a defiant roar from Fulgria that gave Korgaan’s most faithful pause.
Both smiled upon a brave mastiff sent to scatter a pack of foxes.
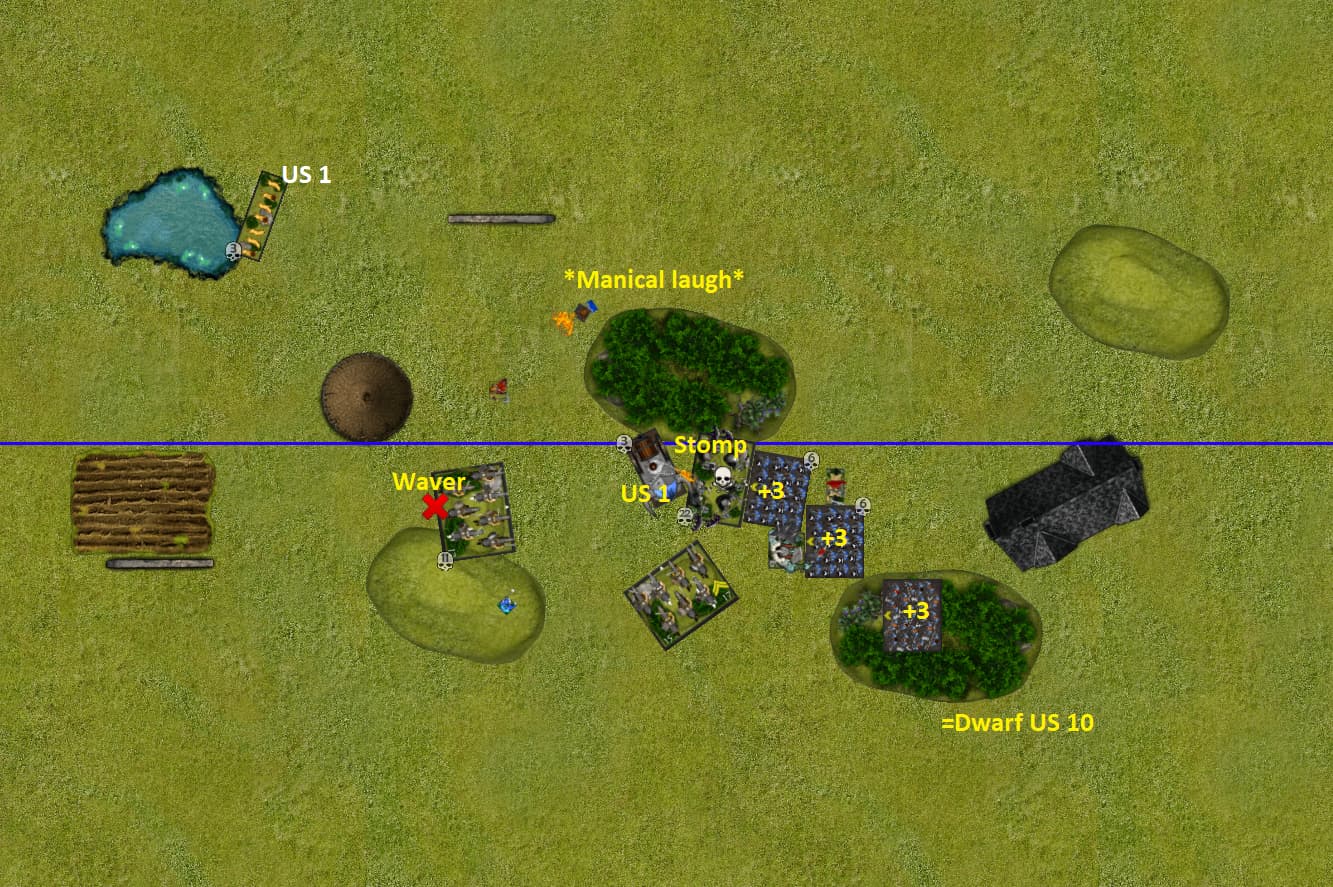
Varangur Turn 2
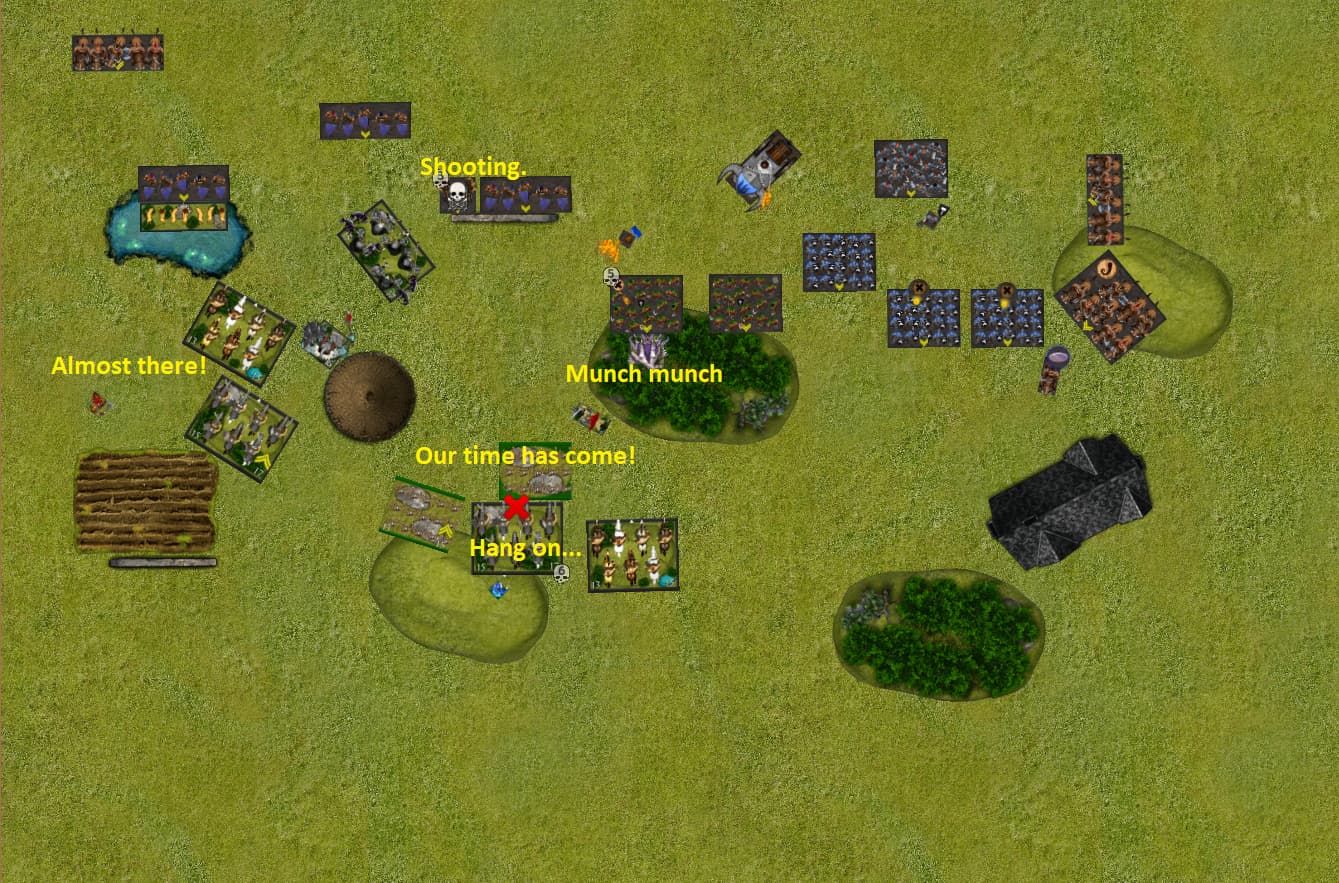
The wavered Sons of Korgaan rethink things and back up, sending the nigh raiders in first.
The rangers’ sidestep means that the jabberwock can charge them and not get flanked by the other rangers next turn.
The left flank (mostly) clears the obstacle and field.
With no apparent glory from fighting an organ gun, the Varangur shoot it off instead.
Dwarf Turn 2

The jabberwock can get charged by the steel behemoth though and it goes big for 9 damage.
Rangers only add 2 damage despite bane chant and a 3 for the nerve roll means the jabberwock stays to continue it’s violent rampage in the woods.
Which makes me glad that I sent two troops of sharpshooters to bog down the fallen (engaged on more than one facing, to stopwithdraw on the nimble unit) and keep them off my rangers’ flank.
The other sharpshooters do no damage and the left brock troop threatens the flanks of units trying to pass.
On the right: my brock regiment moves to get in the fight while my infantry move toward scoring.
A mastiff puts some damage on the right horse raiders, so that both cavalry units on the right have to be careful about getting charged.
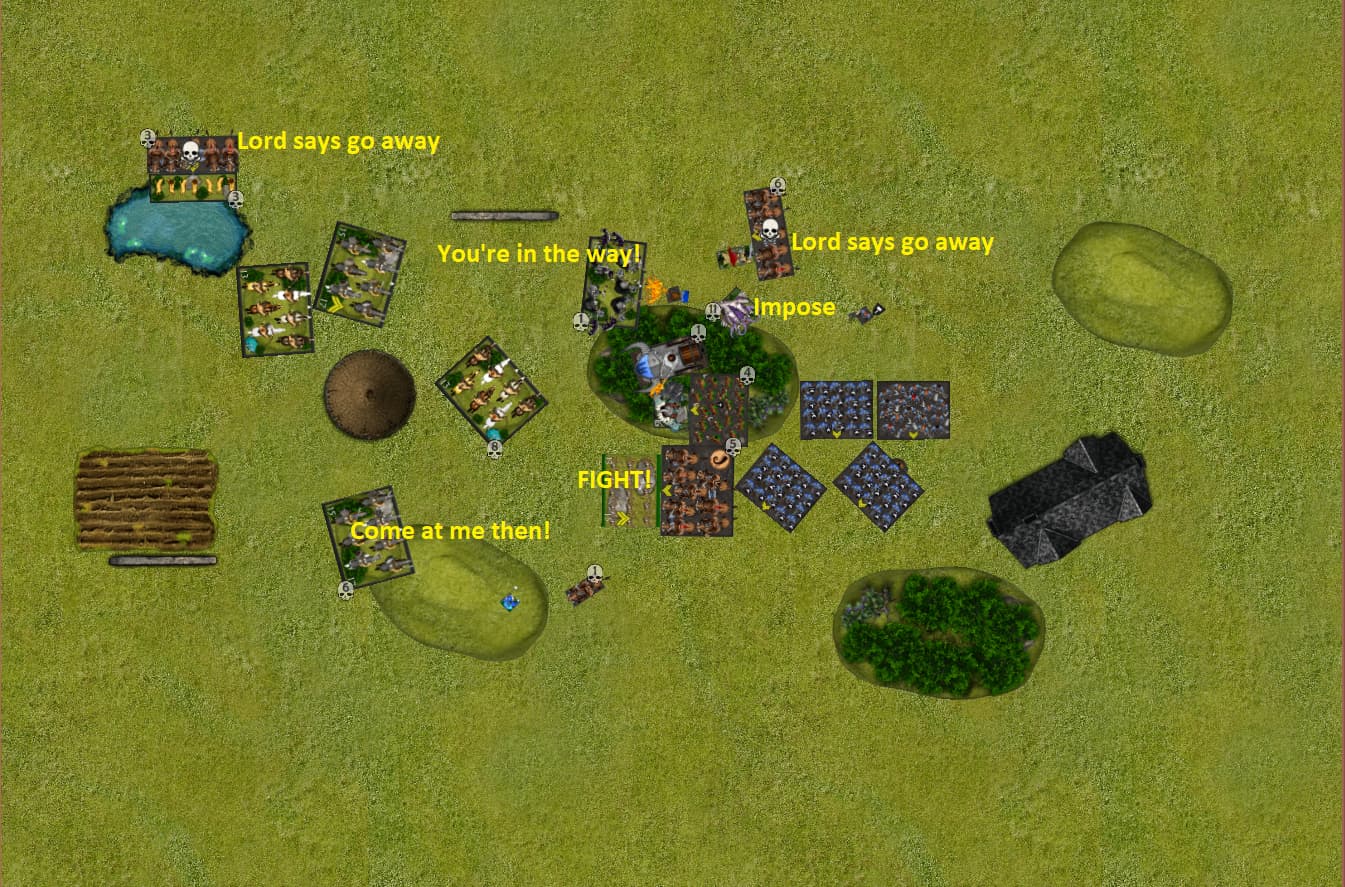
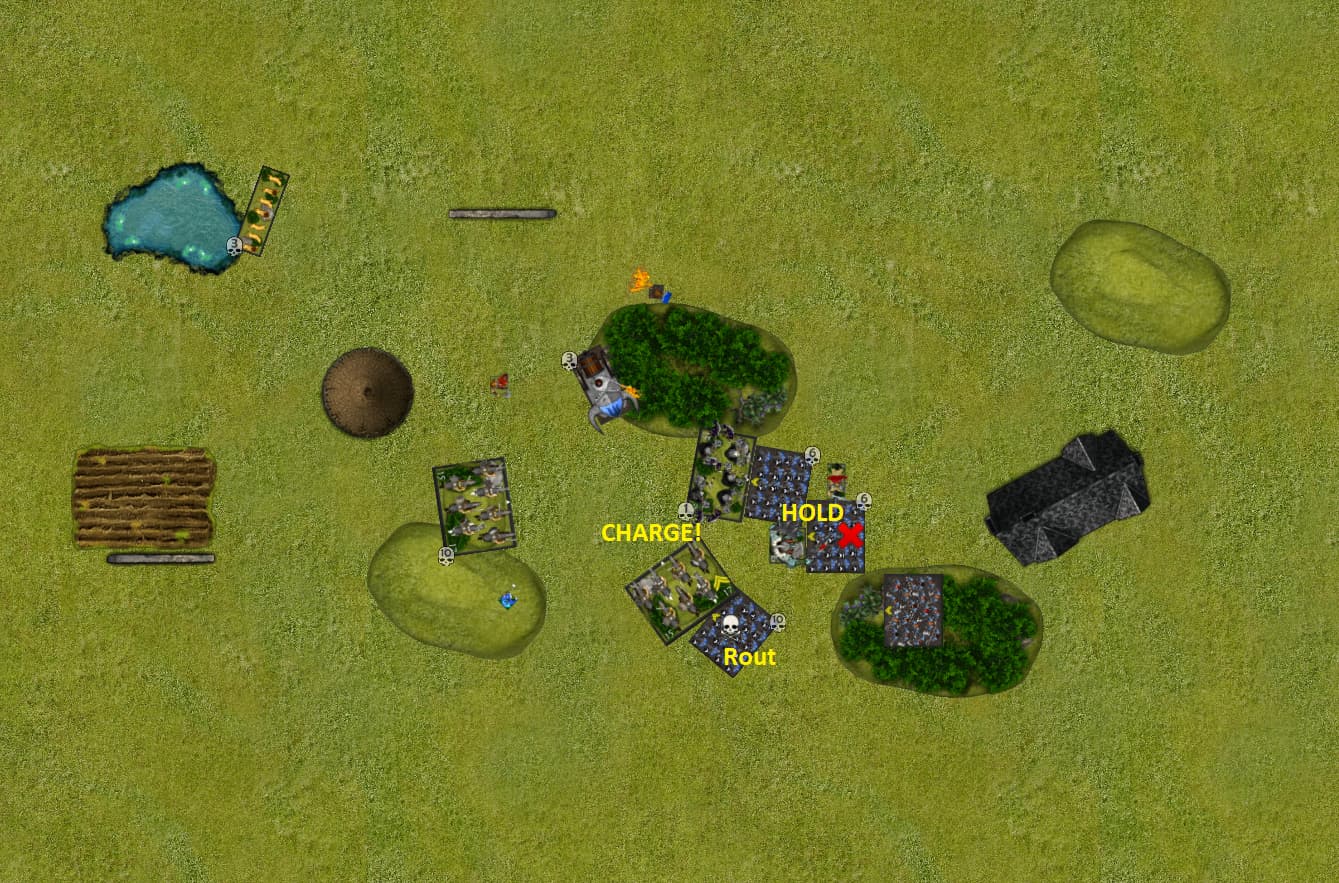
Varangur Turn 3
Turn 3 is earlier than usual for all the sharpshooters to be routed.
This is an aggressive list.
Note the Varagnur lord is fighting and doing most of the damage on the far left.
However, most of the power and US is now in the top left corner, opposite to where I plan to score.
The jabberwork and Kruufnir (with wild charge) team up and rout a regiment of rangers,
The closest I have gotten Fire Oil to a unit with regen so far…
The cavalry on the right flank run away (Korgaan does not smile on them for the rest of the battle), sending the night raiders to engage the right.
The right flank is not a friendly place for the cavalry to be, but they’re leaving a lot of US unopposed.
The sharpshooters, being under order to get as many of their number out alive as possible and seeing the threat to the line’s flank (again) decide it’s time to pull their stunt.
They fire to draw attention and the make as much smoke and confusion as possible before leaving the battlefield.
Dwarf Turn 3
With the left flank cleared out; the plan is to delay the units that cleared out the left flank as long as possible while removing as much Varangur US as I can. Preferably with my US 1 or 0 units doing the work.
Ironclad start plodding over the line.
The brock troop on the foxes only manage a waver (hindered), but the brock regiment absolutely shreds the De 3+ night raiders.
The jabberwork doesn’t take any damage form fireball, mind fog gets a nerve test though, but it’s a double 1.
The big deal is that a bit of shooting wavers the horse raiders in the middle, which is great for holding up units trying to get to the right flank.
Varangur Turn 4
The wavered horse raiders in the middle mean that the Mounted Sons of Korgaan and The Fallen don’t get to go on a murderous rampage just yet. The Varangur get moving to deal with my scoring units, but it’s half way through the game.
The night raiders have a go at the brock regiment though.
Kruufnir punches some more rangers.
Both brock troops are routed by Varangur individuals.
Dwarf Turn 4
I take a few risks here.
I don’t want to let my infantry get bogged down or need to turn to face oncoming units before crossing the middle line, so they all walk over. Which means that we’ve effectively swapped sides, but I have more US.
Which exposes them to rear charges from the jabberwock, but a fireball should rout it. Fortunately Mendeleev gets it done.
My rangers back up to get the fallen in their front arc, which is unnecessary in hindsight because they probably can’t take a front charge from the fallen either.
That opens up a flank charge on the brock riders, unless they rout the night raiders and advance two inches.
The brock riders do better in combat than when they had TC and advance 2".
The behemoth is a bit stuck, so has to push past the Varangur units to avoid getting flanked. It then shoots off the damaged horse raiders.
The brock lord ties up the damaged Mounted Sons of Korgaan.
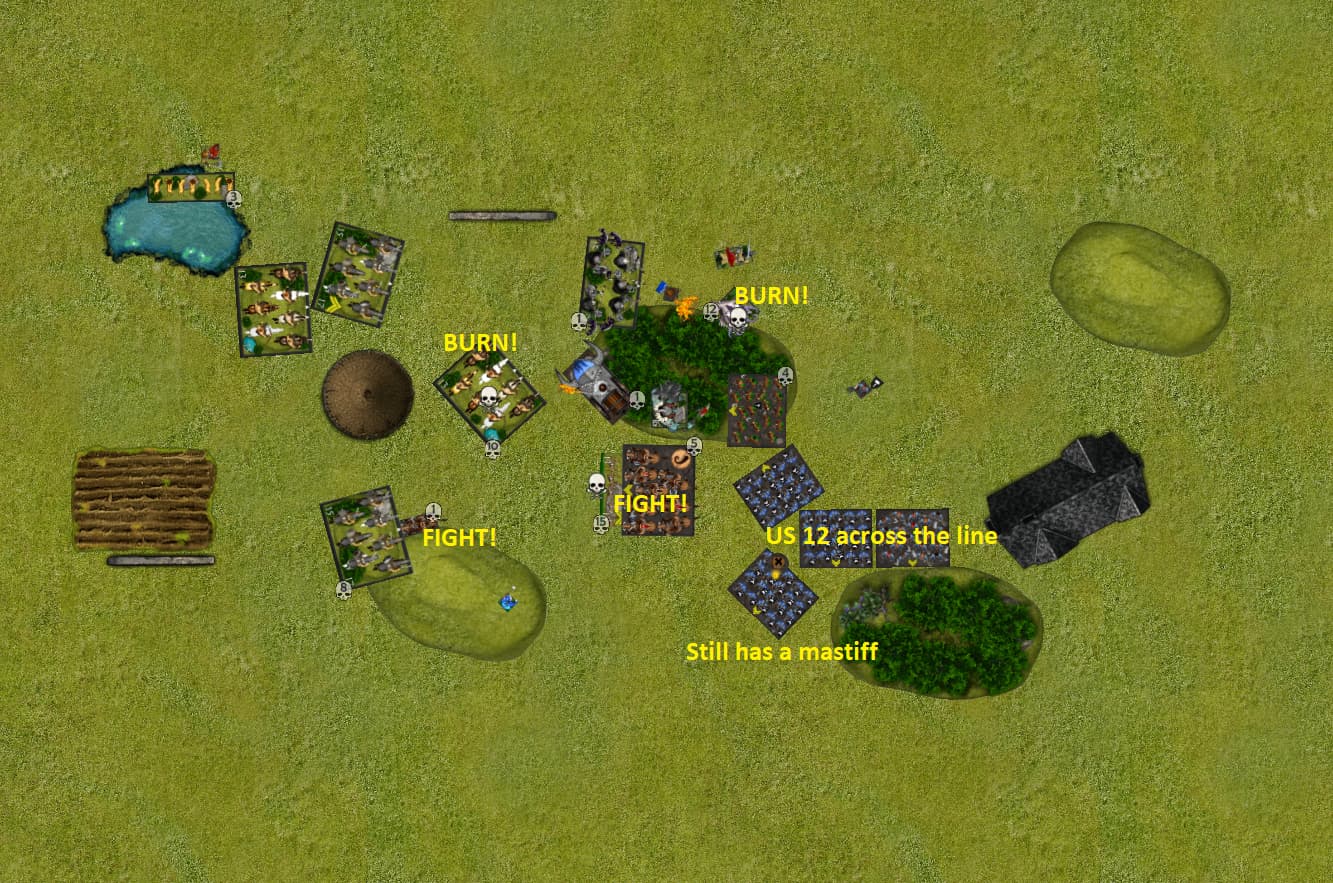
Varangur Turn 5
The Varangur do their thing.
Varangur charge and 3 units rout.
Horse raiders try to tie up the behemoth.
The fallen and Kruufnir see the last rangers disappear into the woods.
Which leaves my scoring units exposed to attack.
My risks from last turn pay off though. My opponent now has to deal with dwarfs that are already scoring in the late game (never ideal against dwarfs) and his units have to not score themselves to do so.
Dwarf Turn 5
I do as much damage as I can and move to make it impossible to charge my units and still score.
Remeber that the dwarfs started at the top and need to be at the bottom.
Things go my way this turn:
I get another waver on that poor unit of Mounted Sons of Korgaan, with a mastiff!
The steel behemoth continues making up for last game and routs the horse raiders in one go!
Those two things means that my behemoth can threaten the rear of anything that charges and fails to rout ironclad and that the Mounted Sons of Korgaan can’t sneak off to score.
Varangur Turn 6
Unfortunately Duncan only has a long shot. He has to charge and rout three units and then get at least one unit back over the line.
Mounted Sons of Korgaan rout their unit, but have to turn to face the behemoth.
The other two regiments of ironclad take 6 damage and hold (one wavers though).
Dwarf Turn 6
A fireball wavers the battered regiment of Mounted Sons of Korgaan, meaning they can’t score in a potential turn 7.
The fallen pay for their failure and the behemoth gets in the way of ths other regiment of Mounted Sons of Korgaan, so that they can’t score in a potential turn 7 either.
No turn 7 is rolled anyway, making it a victory for The Fools!
After game thoughts:
My plan worked!
It was greatly helped by my opponent not being able to see what I was planning and respond during deployment though.
Duncan was also obviously trying out and getting the hang of the list.
Doing what would have worked for the Order of the Green Lady list, and did in the last game, turned out to be costly in this game.
The Fallen were a problem for me and I was lucky to get them.
I am very pleased with my mastiffs this game.
I don’t have a target for my usual concentrated fire to remove a problem unit this game, but instead had that little bit of extra damage where I needed it 3 times this game.