Using Twilight Kin 2023

Thanks for the report!

The Twilight Kin are cool and all, but I had settled in with my coffee this morning to see if I could pick up any tricks for my Herd. :stuck_out_tongue: I’ve been considering adding some Centaurs, and I’ve been struggling to make good use of my own Scorchwings and Hunters of the Wild. Unfortunately, not the best showing for any of those units here…

To commiserate with your opponent, my Hunters can’t hold the line either. They have good stats, but as regiments, just don’t have the staying power to be a main battleline unit. I have also found Scorchwing regiments to be difficult to use. They are versatile, but require a lot of brainpower to position things in order to get those shots off… but with only 7 shots and lacking Piercing, they can struggle against higher defense units. Your list is surprisingly tanky, so they didn’t have much to shoot at here it seems. Continuing, the Centaurs look scary on paper, but the TK were able to grind down the regiments and delay the horde very well. Overall, maybe your opponent should have tried to delay things more? Nature / Herd / Sylvan Kin seem to be quite fragile, and most list really need to get those pathfinding and flanking charges in, in order to be effective.

Your new and improved TK list is quite scary! Everything is just so unexpectedly sturdy! The Corsair Voidwalkers are a bit complex, but very strong if you can time the Bloodhex correctly, and three hordes of Impalers is crazy strong if you can get the Big Shields facing right. Doubling up on the Crones with Weakness seemed to be a great addition, and I’d like to see how they do in other match-ups. I feel like they should fly under the radar a lot of times and really do some work for you. The Assassin does seem like an odd man out in an otherwise defensive list, but honestly, having something to hunt individuals should be helpful, and I am sure you’ll find a use for him in most games. I hope he sticks around! Lastly, unrelated to the list-building, but that was a neat trick using the Terrors as line of sight blockers to protect your flanks.

Very well played! Thanks again for the report!

Thanks for the feedback. On the game, yes, said list need to stall others hammers to get their’s in. In this game unfortunately, his hammer was stalled with the help of hus own units, a big footprint like that is tough to get through from behind the lines.
I’m not sure the crones are flying under the radar anymore, certainly seem to be a lot of claims they are OP. I guess everyone has forgotten about ogre warlocks :D.
And yes, this list was made to be a super tanky list.
The assassin is indeed an odd choice fir this list, but I’ve had one in evrry TK list I’ve run since I started playing TK (behinning of 3rd ed), so he is my signature character :wink:

1 Like

Next Game is against Daniel and his Undead. A semi-speedy list with a lot of flyers and two vampires on dragons. Is this list a perfect counter to my very tanky (in front) TK list?

My list

My opponent’s list

After deployment

I chose table sides, and took the top for easier access to the centre token. After the troops are down we both have some big slow elements on opposing flanks, so who can bring them to bear in the centre first might determine the winner of the game. The dragon on his left flank might slow me down more than my voidwalkers on his right though! Hopefully Mikayel can deal with that dragon.

After T1


Moved up agressively on the left and grabbed a token with the terror, feels quite safe, as the dragon will be -2 to hit against it. A bit of damage was done on the right, and the rest of the line advanced carefully.

After B1


He turns the left dragon to the centre. The right flank shuffle slowly forward, except for a regiment of zombies that are surged ahead to dig from the stockpile.

After T2


Terror grab the second token on the left and turn to the centre, as the dragon has as well. I try to put some pressure on the dragon now, it can easily get away, but hopefully not also to where it want to be. All other elements move to reinforce the centre. More shooting do more damage, I had hoped to rout the zombies there, but lucked out on that. I’m keeping the wraiths weakened to reduce chance of popping assassin shield if they go for him.

After B2


Left dragon circle around for a cheecky Icy breath in the impalers’ flank. It also puts itself safe for counters, and in a bit troublesome spot. Voidwalkers are charged by wraiths, and will hopefully survive a few turns before dieing. All UD forces on right flank push up, and one wraith troop positioned itself to sow a heap of trouble, while my impaler horde is threatened by multiple hammers. I have to work next turn to stall the undead advance.

After T3


I struggled a bit to find a position to defend against the encroaching undead hordes. My center impales could advance while the Voidwalkers protect their flank, the left Impaler horde is not so lucky and has to turn away from the main fight to face the dragon. The terrors shuffles and turns while grabbing another token. The center wraith troop is causing me headache and I send the assassin in on what is probably a suicide mission to block them, he proceedes to walk right through the ethereal foe! Mikayel charges down the centre to rout some zombies. The zombies I have harrased with shooting from T1 finally withers to dust. Phantoms move in to block a double charge on the impalers on the right, but will it be enough to keep them alive?

After B3


The Dragons keep circling , but the wight hordes got to fight this turn. They didn’t do very well however, and the assassin’s shield stopped a ton of dmg, preserving his life, but leaving him quite shaken. Phantoms survived a flank from banechanted wraiths as well, so it was a really bad turn of combat for my opponent here.

After T4


The assassin steps nimbly out of the way to let the phantoms block the wight horde this turn. In the forest I move around several units to block a charge to my impaler’s rear. The dragon is out if the forest, so LOS is blocked from other dangerous charges. One terror runs away with the loot and it is protected as well by impalers and Mikayel. The impaler horde that was charged by the wight horde could charge the wights on the flank, as they couldn’t centre, and routed the wights. Both dragons was hit by weakness.

After B4


Dragon and wight horde combine their forces to take down an impaler horde. The other wight horde is not so lucky and the phantoms survive again! Terrible for my opponent to have to use three, or more?, turns to clear one piece of chaff. The dragon on the left circles some more and puts a couple of dmg on the terror with it’s icy breath. He gets a waver on the voidwalkers, but I’m just happy they are still alive.

After T5


The assassin’s way to Morgoth is clear and he goes for the prime target for assassin’s, even though it might not be the best tactical choice. Mikayel go to face a wight horde, and with some nice dice and help from the crone, he routs them!. The dice in this game is quite unfair, but all I needed was to block them for a turn. On the left the planar apparition charge his dragon to finally pin it down, and I just barely mange to do it. Other units there have closed in to make sure it cannot escape. One terror keep running away with the tokens. It is a very expensive, but also durable loot holder.

After B5


Both dragons get to fight this turn, but none of them mange to scare their opponents. The other undead units are more successfull, phantoms and voidwalkers finally succumb to the relentless assault.

After T6


Mikayel does his crazy thing and one-shots the dragon that attacked him! The trapped dragon is wavered and also out of the fight for a turn. Impalers that held a token in the forest dropp the token and rush out to block up the wight horde, while the final impaler horde grab said token. Assassin keep Morgoth busy.

After B6 (end of game)


Wight horde try to punch through the impalers’ shields, but can’t get them good enough. The zombies grab another token, I believe with the help of an illegal surge. However, my opponent could’ve dropped the token and picked it up with the wraiths, to achieve the same result :wink:

End of game thoughts.
I think one mayor key to victory this game was the huge blocking terrain piece in my opponent’s centre. It forces him to split his army, or focus on a limited part of the battlefield. I was hindered by the big forest in my centre as well, but got where I wanted in the end. Ofcourse the dice from turn 3 and on, when the real fighting started, helped as well. The planar didn’t do much healing this turn, but was a great help to block charges and to pin one dragon in place, so still did a lot of important work. The assassin did good work as well this game, blocking up a wight horde for a turn and then keeping Morgoth busy. All in all I felt my army performed well in this game, even against a supposed hard cpunter with a lot of flying and surge shenanigans to get in my flanks. Might not go so well if terrain/dice help less though. We’ll have to see in future games. Thanks again to my opponent for an interesting game.

3 Likes

A new battle is underway, this time against Mike. It seems my tanky list is about to face another tanky list, let’s see how that goes.

My list

His list

After deployment


I picked top to avoid blocking terrain in my centre deployment, but the forest might hurt me as much if I choose to be offensive. I spread out across the board to stop him from getting around my flanks with his soulflayers.

After T1 (which I got, I think he won the roll)


I moved carefully forward across the board. A bit of funny situation on the left where I did 0 dmg to the Soulflayers, but I got Mindfog in and rolled a 6,6 for a waver. The crone on the right did 3dmg to butchers.

After B1


He shuffles forward slowly and carefully as well, heals some dmg on the butchers.

After T2


More careful positioning, Voidwalkers on the right make a move to get closer to the centre. I keep harassing the Soulflayers with shooting, still donpoor dmg, but st least some. I fail to cast weakness on the right Soulflayers, which leaves my impalers slightly more voulnerable.

After B2


Most of is stuff is still very careful, except dreadfiend pn the left which forces my hand. He also made a move on the right on my impalers, but his butchers fluffed it up. His soulflayers are still not tempted to go after the assassin, and stay put for better opportunities.

After T3


Impalers on hill went down to rout the dreadfiend. The assassin moved up to their side si there would be room for no more than one unit to fit in front for the counter punch. The phantoms move up on the hill and does a very effective block all the charges from the side. Impaler on the righ counter charge the Soulflayers, before I move the crone, to keep them from shuffeling. This keep their flank safe in case they fail, which they did. I also threw weakness on both the butchers and soulflayers over there, another precation that worked out. Last, but not least, the impalers also got healed by the planar. A turn where all the tankyness of the list got to plsy together nicely. Voidwalkers attack the phantoms, but are very uneffective. Terror rout his phantom block. Rest in centre stays safe.

Ill also put a highlight here about footprint size. My impalers on the right have so large footprint, that the butchers and soulflayers are both in front. Had they been regular large infantry, they would have both units in flank in this case! The downside ofcourse is that I have trouble fitting an impaler horde to my opponent’s perfectly staggered line.

After B3


The lines clash, phantoms are routed as expected, but the rest if the line holds for now. Many thanks to weakness on the right I guess. He get some wavers in on the assassin an the navigator, which will give me trouble on the left flank, but his right flsnk is now exposed…

After T4


Both the terror and impalers in the forest had a flank on the butchers, si they took it to rout them, while the engaged impalers took care of the soulflayers. My units are a bit out of position after this move, but I’ve removed the threats on that flank, and barely avoided possible counters from his centre. Mikayel had to attack the Soulflayers on the left to stop them where the assassin failed. Impalers countercharged the butchers with hrlp of the terror, but without the help from the navigator they couldn’t rout them. The voidwalkers went in to block up counterpunches. Planar moved up to heal the impaler on the left flank rather then the right flank.

After B4


He routed to voidwalkers with the butchers and shadwhulk, turning one to each side after. Now the Shadwhulk is on the hill, and facing my impalers, good move by him. The terror run up to block the same impalers, inviting them to a -2 to hit charge. The fighting on the far left flank is still a stalemate.

After T5


The last elements of rogue nightstalkers on the right flank are removed. The impalers on the right doesn’t tak the bait, and brace for impact. I get a weakness in on the Shadwhulk to reduce the effect of its attack. On the left flank, the terror attack the central butchers, while the planar throws itself infftont of the butchers rrafy to flank the terror. Impalers buffed with BC and vicious aura finish off the butcher horde they were fighting, Mikayel and the assassin finish off the soulflayers. The impalers turn to face the centre, but that might’ve been a mistake as they open their flank to the planar.

After B5


The terror and shadwhulk slam into the impalers, but fail to rout them, same goes for the planar that puts a couple of dmg on my impalers on the left. Now all my impalers are heavily damaged, eith no healing left, how many will survive the battle?
My planar is routed by a horde of butchers, while the other horde fails to impress my terror.

After T6


I used some time trying to figure a way to ensure victory, and maybe mistakenly decided to srnd Mikayel to score in another zone rather than help finish off the butchers. Impalers routed the planar and the shadwhulk got routed as well by terror and impalers. My crone put herself in front of a butcher horde to stop charges on my terror’s rear. She also threw weakness in them in a hope to survive their onslaught. I look to have a good postition here, but if Mike is lucky he could turn this completely around…

B6 (end of game)


Mike found the mistake I knew I had left for him; the assassin! Counter charge, overrun into the impalers and wham he scores that zone instead of me, huge blunder by me. Fortunately, his terror couldn’t rout my other impaler horde to take control of my centre as well, so I just held on to a 4-2 victory. Great game, exciting to the end, thx Mike!

End of game thoughts
I knew my biggest problem going into this game was his healing battery. In my playstule I usually prefer to chip away at the enemy before committing my forces, but that was difficult here. I think I was really helped out with having banechant to assist in killing stuff in one go, however, Trickster’s Wand to hex his healers might’ve helped as well…

3 Likes

New game against Mike, I’m using my balanced TK list, while Mike got a shooty shenanigans NS list. Scenario is invade.

After deployment/scouts.


I have not played against this type of list before, neither did I have the time to properly read/understand Mike’s list before the game. This resulted in a deployment by my part that was too easily exploited by Mike.

After T1 (which he got)


Shenanigans see my hardest/fastest hammer routed. I am going to be completely honest here and say that I am a bit of a weak person and this opening to a game fills me with a host of negative emotions. Mainly I am angry at myself for starting a game unprepared, also it makes me feel like I look a fool. I shall ty to overcome these feelings and get on with the game. I want to make clear this is no fault of my opponent here, he knows I usually know what I’m doing, and is correct to play at the best of his abilities.

After B1


No idea what to do, so try to go for cover, even though it is usually a bad idea. Get a waver and hex on mindscreeches so might slow him down a bit there. Shaff move up to block pulling my better units.

After T2


I gambled with the impaler horde and lost to shenanigans. The chaff did their job in staving off for a turn. Nothing much else happened.

After B2


I though about where to put the assassin, stop shenanigans or the safer way, attack soulflayers. That failed. Skiffs soared down to rout a Mindscreech. The last unit of phantoms attacked the right ravagerss to stop any ravagers from turning and shooting down the skiffs. La’theal enthralled some ravagers to try to force a fight. It woulf have been much better if the SFs were dead and the impalers free for a pincer move on the left flank, but this is not my day.

After T3


His tag team on the left flank continue to rout my units there, tius time fleetwardens were removed. In the centre I pushed forward with the terror. He decided to attack with all he had, probably a decicion influenced by the scenario; invade. Getting his stuff over and jamming me in my side is a good idea, if I don’t win the combats tio quickly. On the right flank his Dice let him down dealing with the skiffs, which gives me many options for them next turn. Phantoms survived as well as had hoped against weakened ravagers.

After B3


On the left flank I had hoped for a waver on the ravagers, but at least I finally routed the Soulflayers over there. I was lucky to rout one of the ravagers in the centre though, and even though my other fighting units there are in peril, there is now plenty of backup. I opted to rout the ravager horde with skiffs, rather than the Soulflayers, It puts them in a much safer position than they would’ve been after routing the Soulflayers. The terror might suffer from that choice though.

After T4


The ravagers on the left move up to fire from around the impalers’ shields, but put themselves in a dangerous position when they fail to rout them. On the centre though, he does much better, getting a surprise kill on the skiffs, and also routs yhe terror, Soulbane and phantoms, cutting off all the support I was hoping for.

After B4


The impalers flank and rout the ravagers on left flank, finally tuting that one around. With some spells I manage to turn the situation in the centre to managble. Navigator charge phantoms to block them from charging impalers in flank. Fleetwardens rout MS and activated their bloodhex. Assassin moves to be able to charge esenysrhra should she gi for either impaler regiments. US on both sides is dropping fast, might this end in a draw with no US left to score?

After T5


Esenysrhra got one impaler regimrnt, the other unis survived, but a few lucky waver makes it difficult for me next turn. He pushed and pulled to get fleetwardens out of inspiring range, but they managed to hold their neeve on their own.

After B5


Impalers did the job on their own, routed the ravagers and overran safely out of sight from esenyshra. Assassin moved into the forest and ha and La’theal did ranged attacks on the Mindscreech to no avail. The wavered crone moved to block fleetwardens from beeing 1pushed back to my half of the board.

After T6


His shooting didn’t get to do more than a waver on my fleetwardens, but the phantoms routed the navigator. Esenyshra went for the assassin and shattered his shield.

After B6 (end of game)


Assassin countercharged Esenyshra, and La’theal moved to block her from potentially get to the impalers (if they routed the Mindscreech) the impalers only got a waver on the Mindscreech, but the assassin routed Esenyshra! Finally dread worked in my favor. Spells sent the phantoms off as well, leaving no enemy units in my table half. A hard fought victory in the end.

End of games thoughts.
To think I almost gave up after a terrible start, but I owed it to Mike to keep playing. For the first few turns of the game I was trying different desperate moves to try to mitigate his shenanigans, but it was not before he stopped shooting and started fighting I felt somewhat in control of the game. Due to the scenario invade, he had to push forward eventually, and I forced the issue by pushing my units up, disregarding the shooting. It worked out, but could have gone disasterous as well. Thanks to Mike for a very tough game!

3 Likes

Currently I am playing against the free dwarfs, and the objective is clear to see; dominate. Lists below.


After deployment


A more tight formation this time, befitting the scenario. Some voidwalkers and assassin far off to exploit the hill for TC bonus.

After T1 (which I got)


Moved up carefully, squeezed thecterror in between voidwalkes and impaler on the left. Did some plinky dmg to Craggoth and to rangers.

After B1


Dwarfs move carefully up and takes positions on their hill. Rangers get a lucky waver on the crone that weakened them. Craggoth try to flame the assassin, but stealth and shield keep him safe.

After T2


I work hard to find a defence from the dwarfs ready to chsrge down the hill. In the end I move the phantoms up to block a double charge on my impalers, even though it leaves his spear levy free. Other units on the left also moves to form a defensive line. The terror in the centre shuffles slightly to have a free path past the phantoms, this will be important later! The assassin move up to plink more on Craggoth, and also bait it to attack, while Mikayel and Voidwalkers move in to support. My hexxed crone casts weakness on the rude dwarf that hexxed her, takes 6 dmg but wavers the dwarf in turn!

After B2


The dwarfs make their move on the left, but the attack is ineffective as they were forced to attack different targets. But the biggest threat, the shieldbreaker horde is coming closer. In the right, Craggoth goes for the assassin and fails! I didn’t count for the mastiffs joining the party, and it was down to a lucky 1,1 there for me. As the saying goes, it’s better to be lucky than good.

After T3


The centre terror sees a great opportunity, the dwarf flagbearer. He is reachable, and with a 2+ overrun the terror ran straight into the threatening shieldbreaker horde and routed them as well. A huge swing on that side. Healing and regen alsi took care of most dmd to my units there. On the right flank, Mikayel did his job and crushed Craggoth to bits.

After B3 (end of game)


The dwarfs does a last effort to get back in the game after the horrible turn of events in the previous turn. They get a surprise kill on the phantoms, but the terror can’t be shifted. The dwarfs capitulated shortly after.

End of game thoughts.
Really good learning point in this game about the dangers of individuals in the wrong spot. Even if the assassin was slain and Craggoth alive, it still might’ve been too rough on the dwarfs to continue the game. I learned from last game to not give up too soon, but this seems to be the right time to start a new game. Thanks for the game, looking forward to the next one!

1 Like

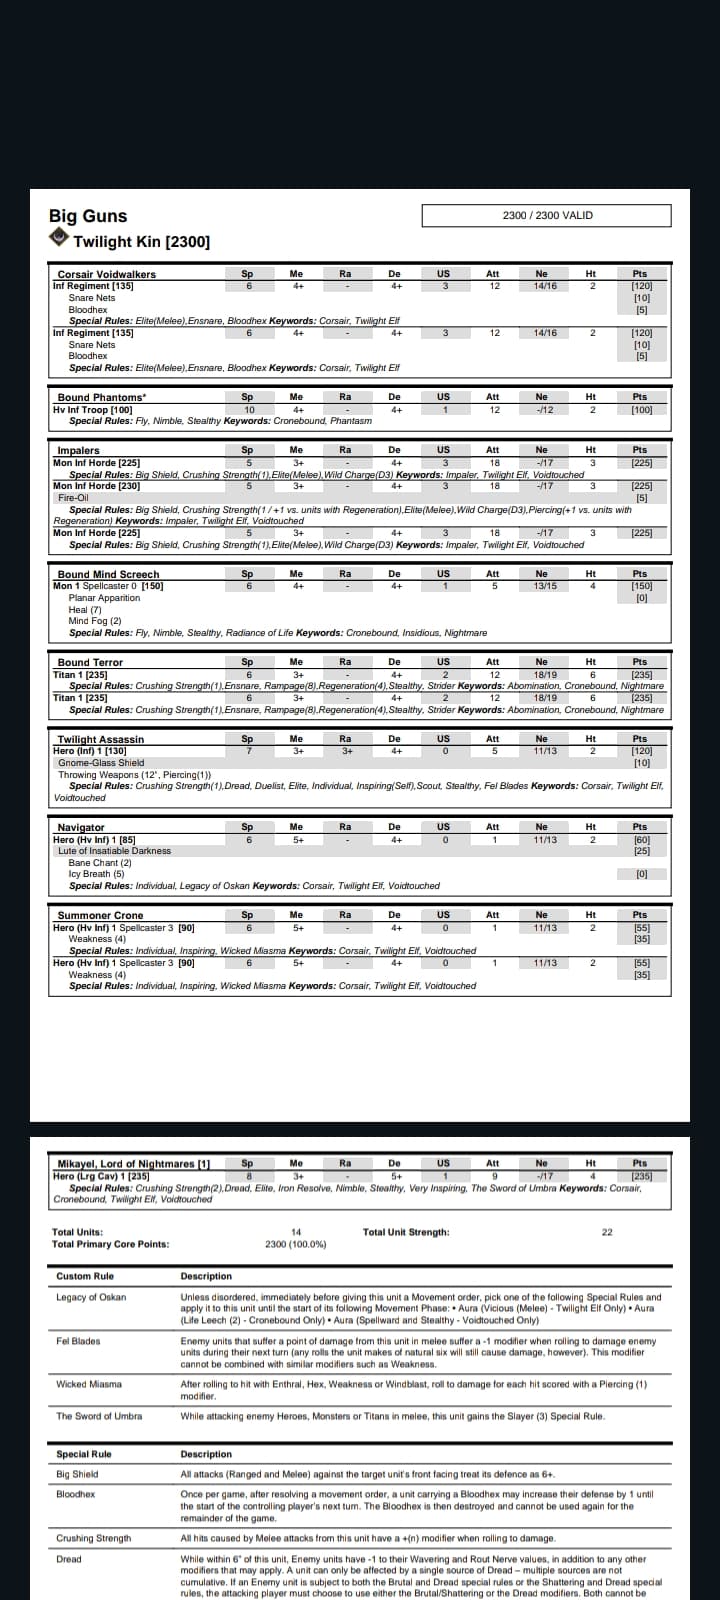
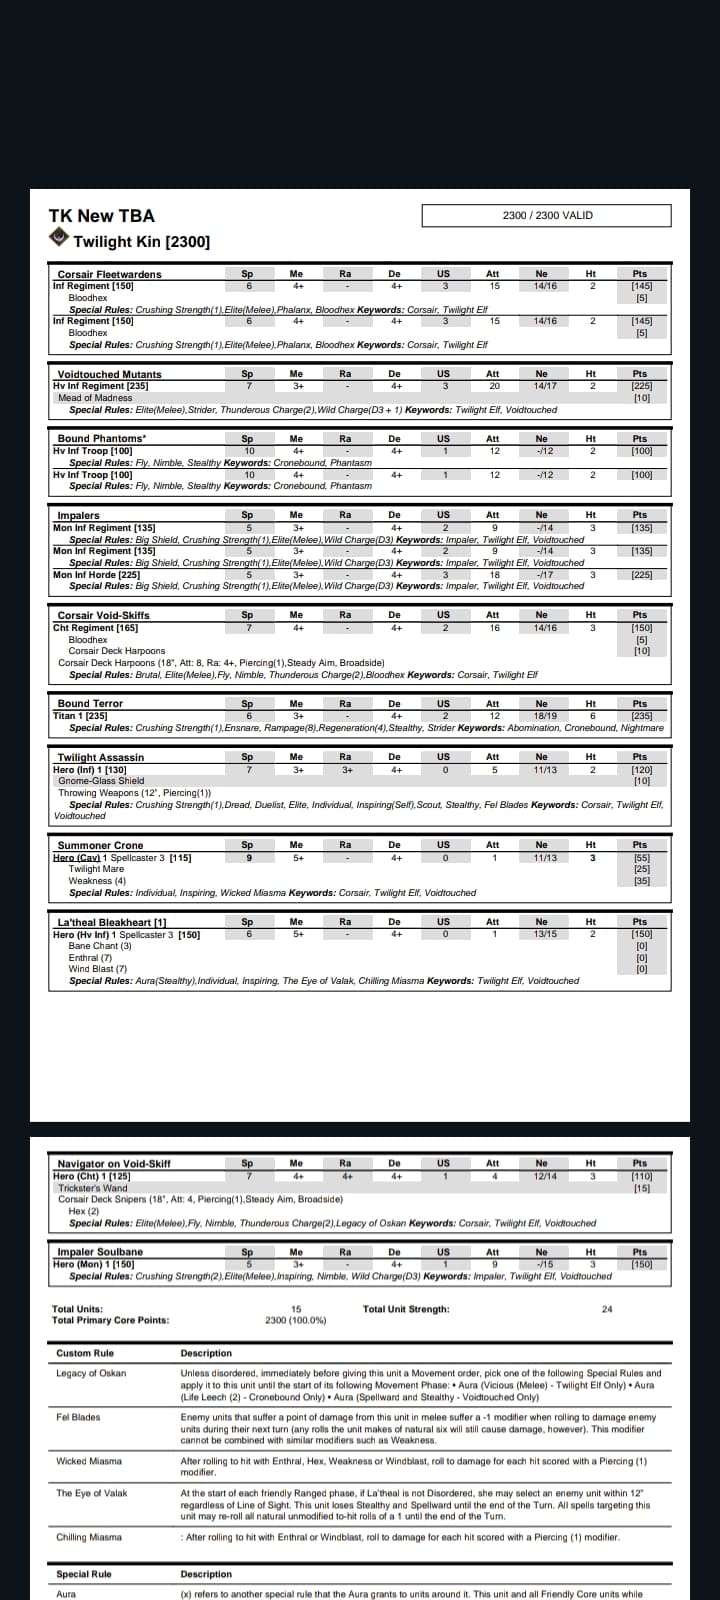
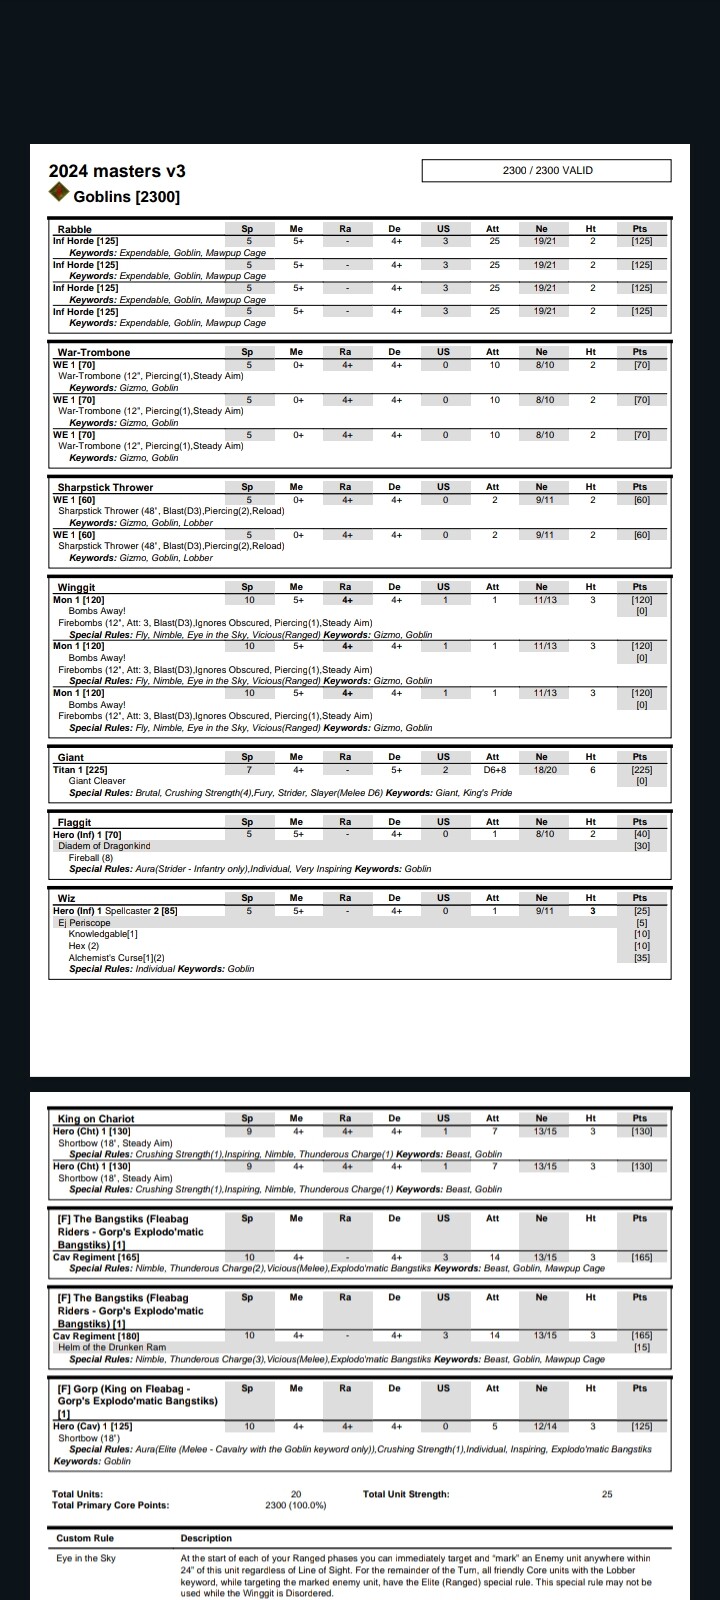
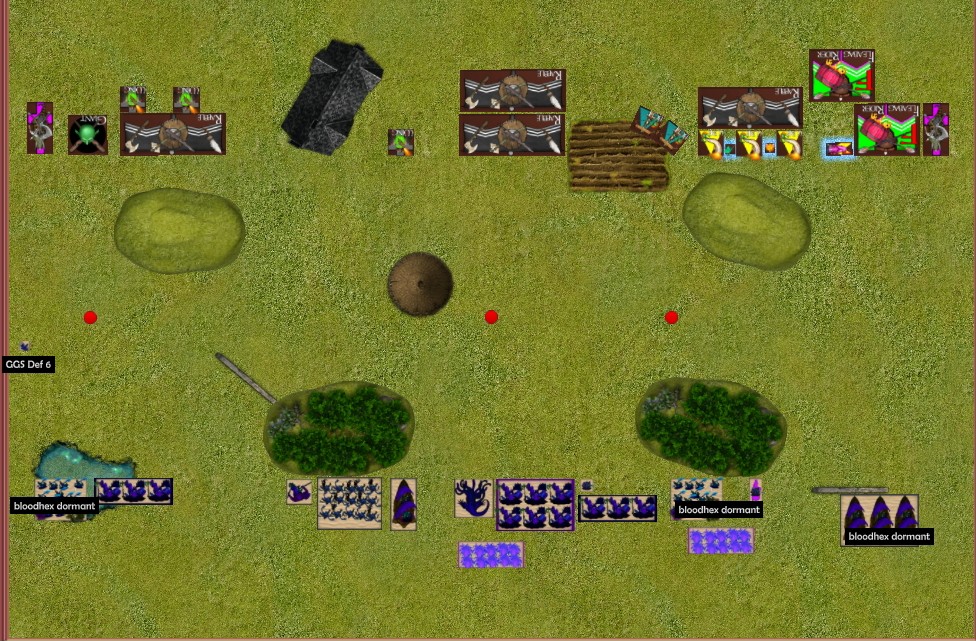
Time for a new game, this time against Cyle Pool. He is perfecting his goblins for US Masters and I just hope to do better than last time we clashed. Scenario is stockpile, lists below.
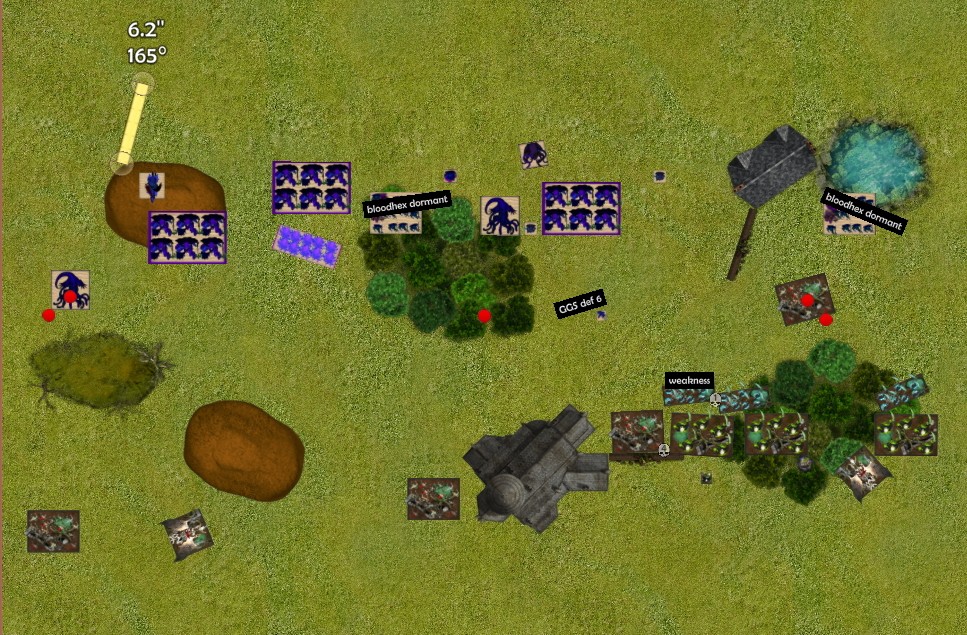
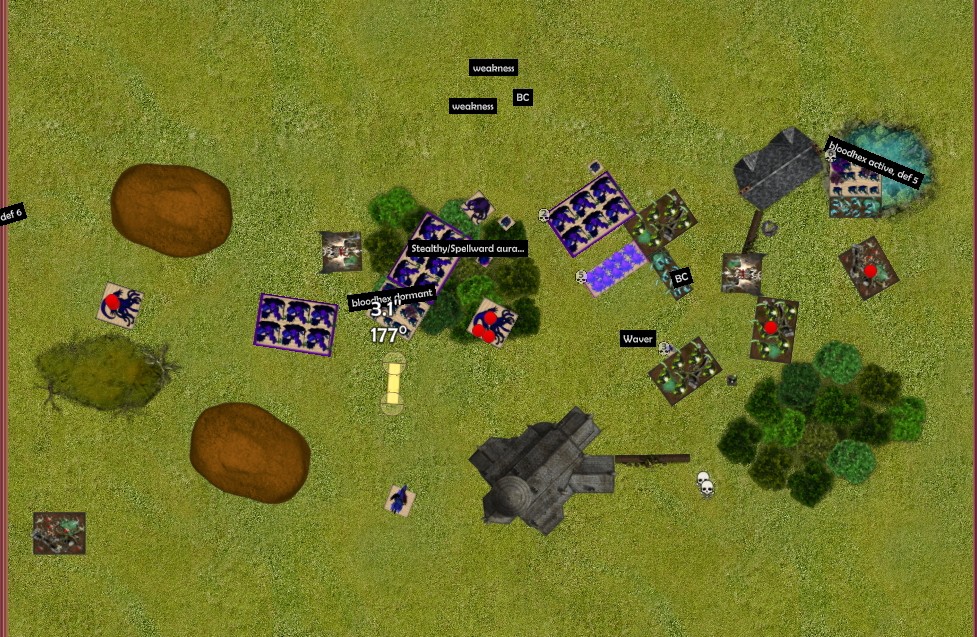
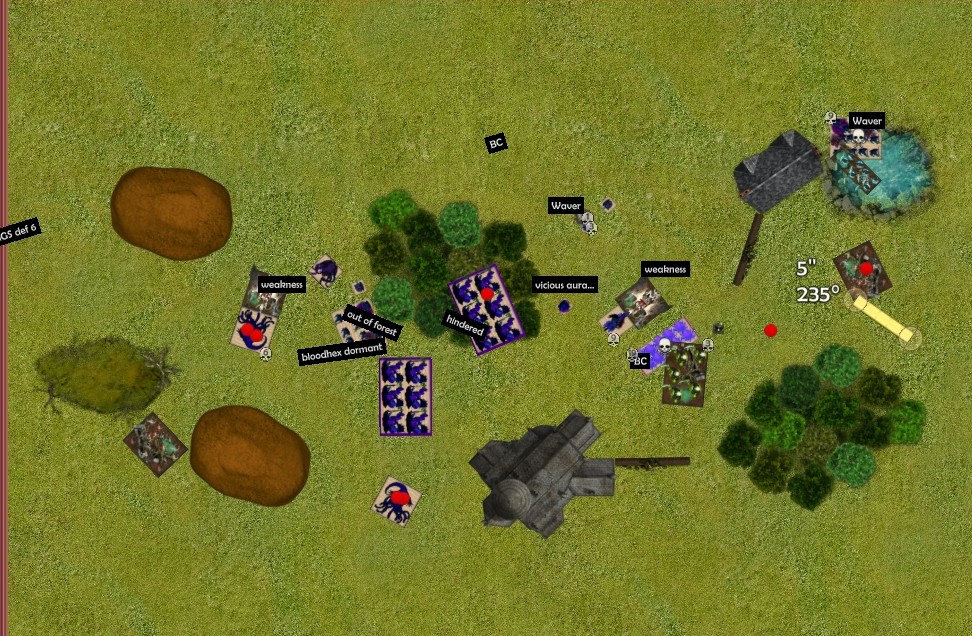
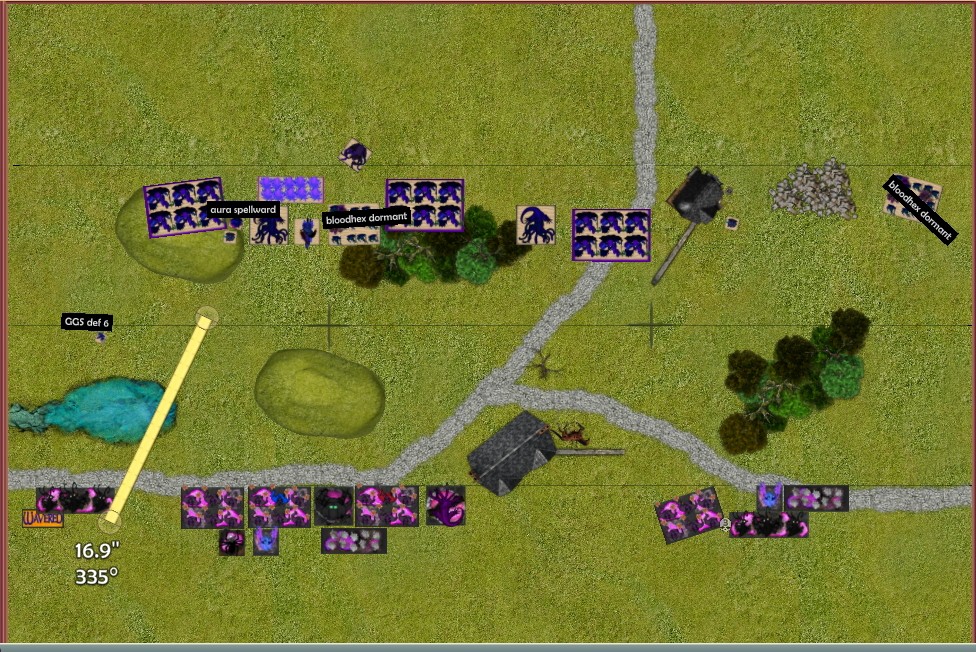
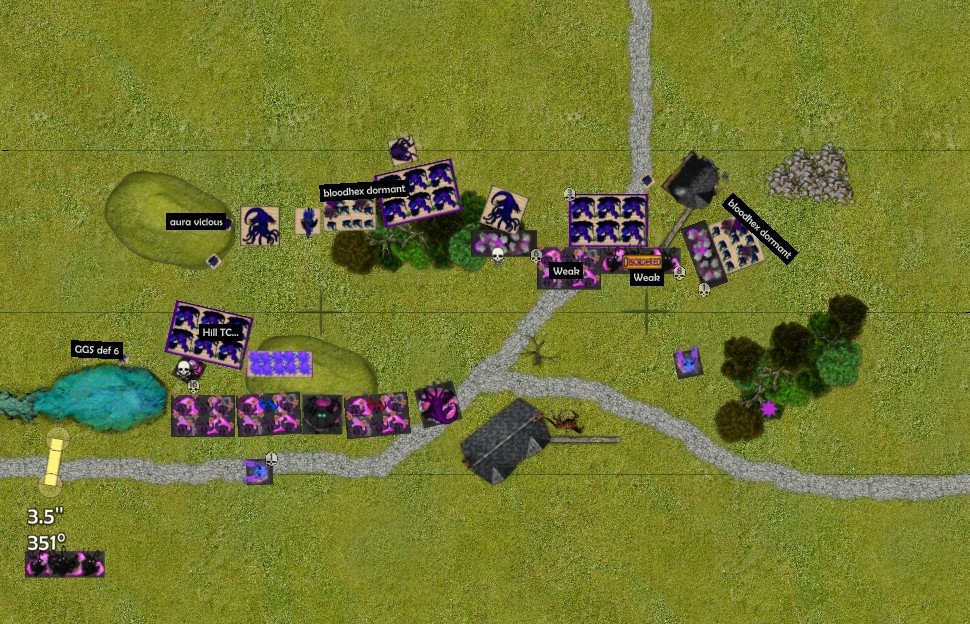
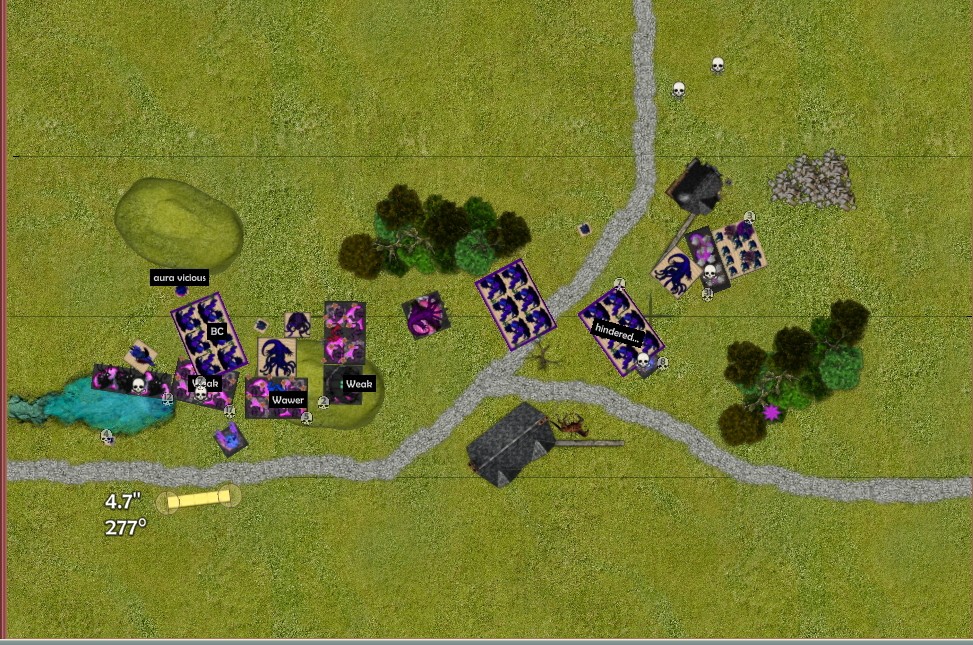
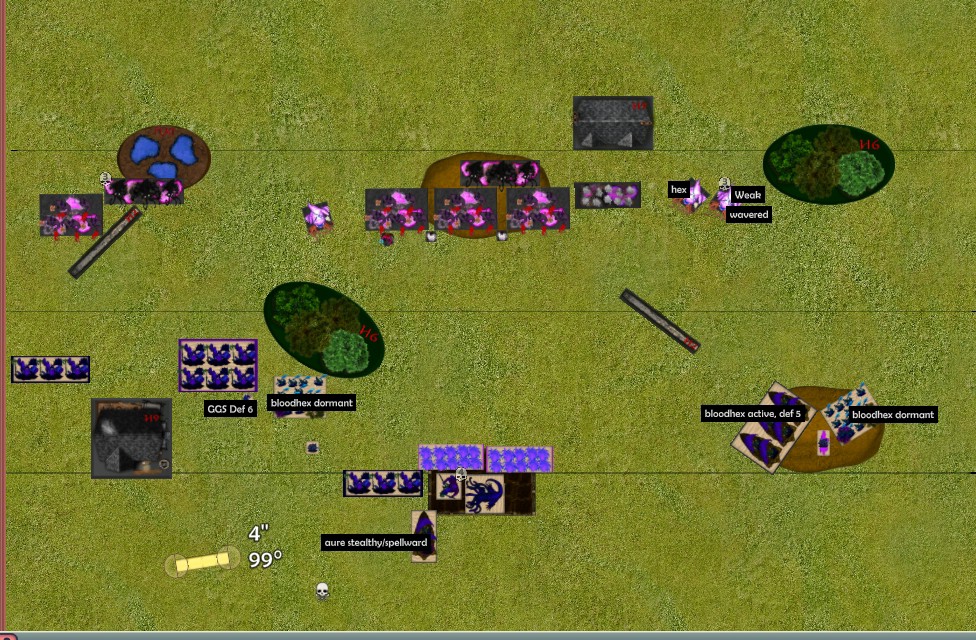
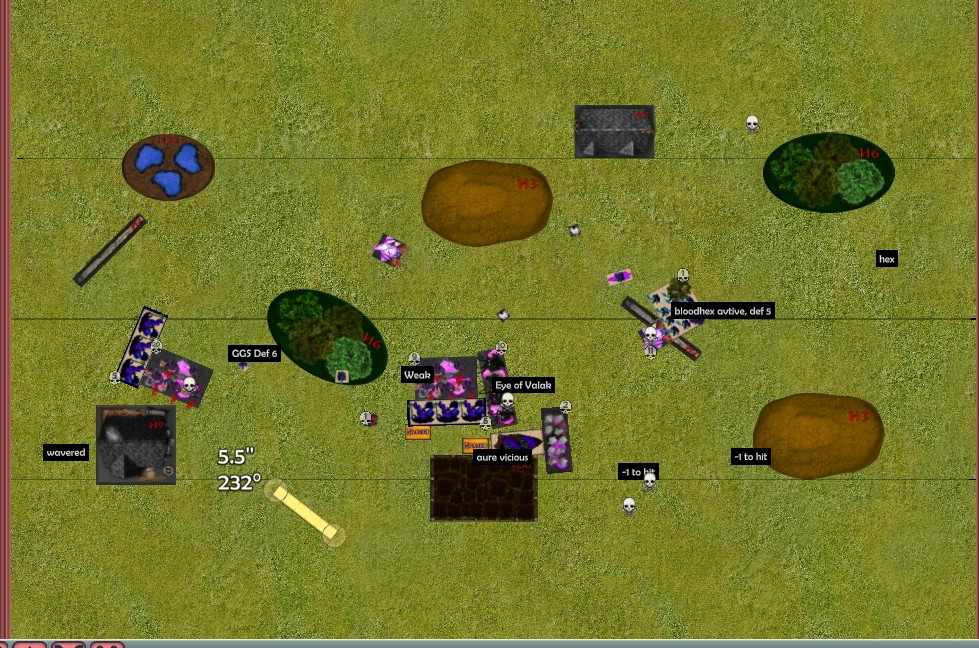
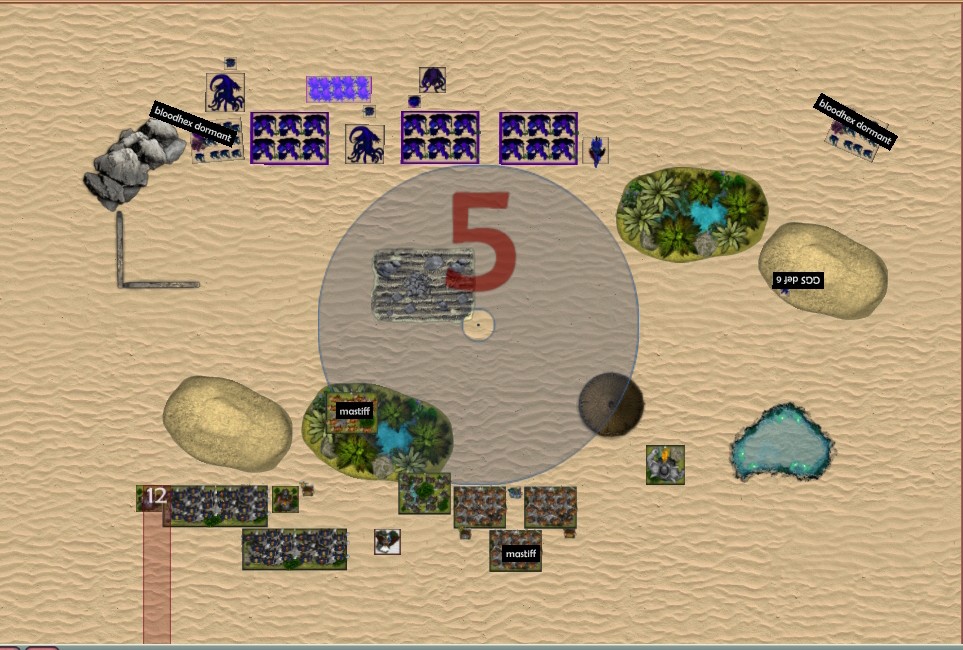
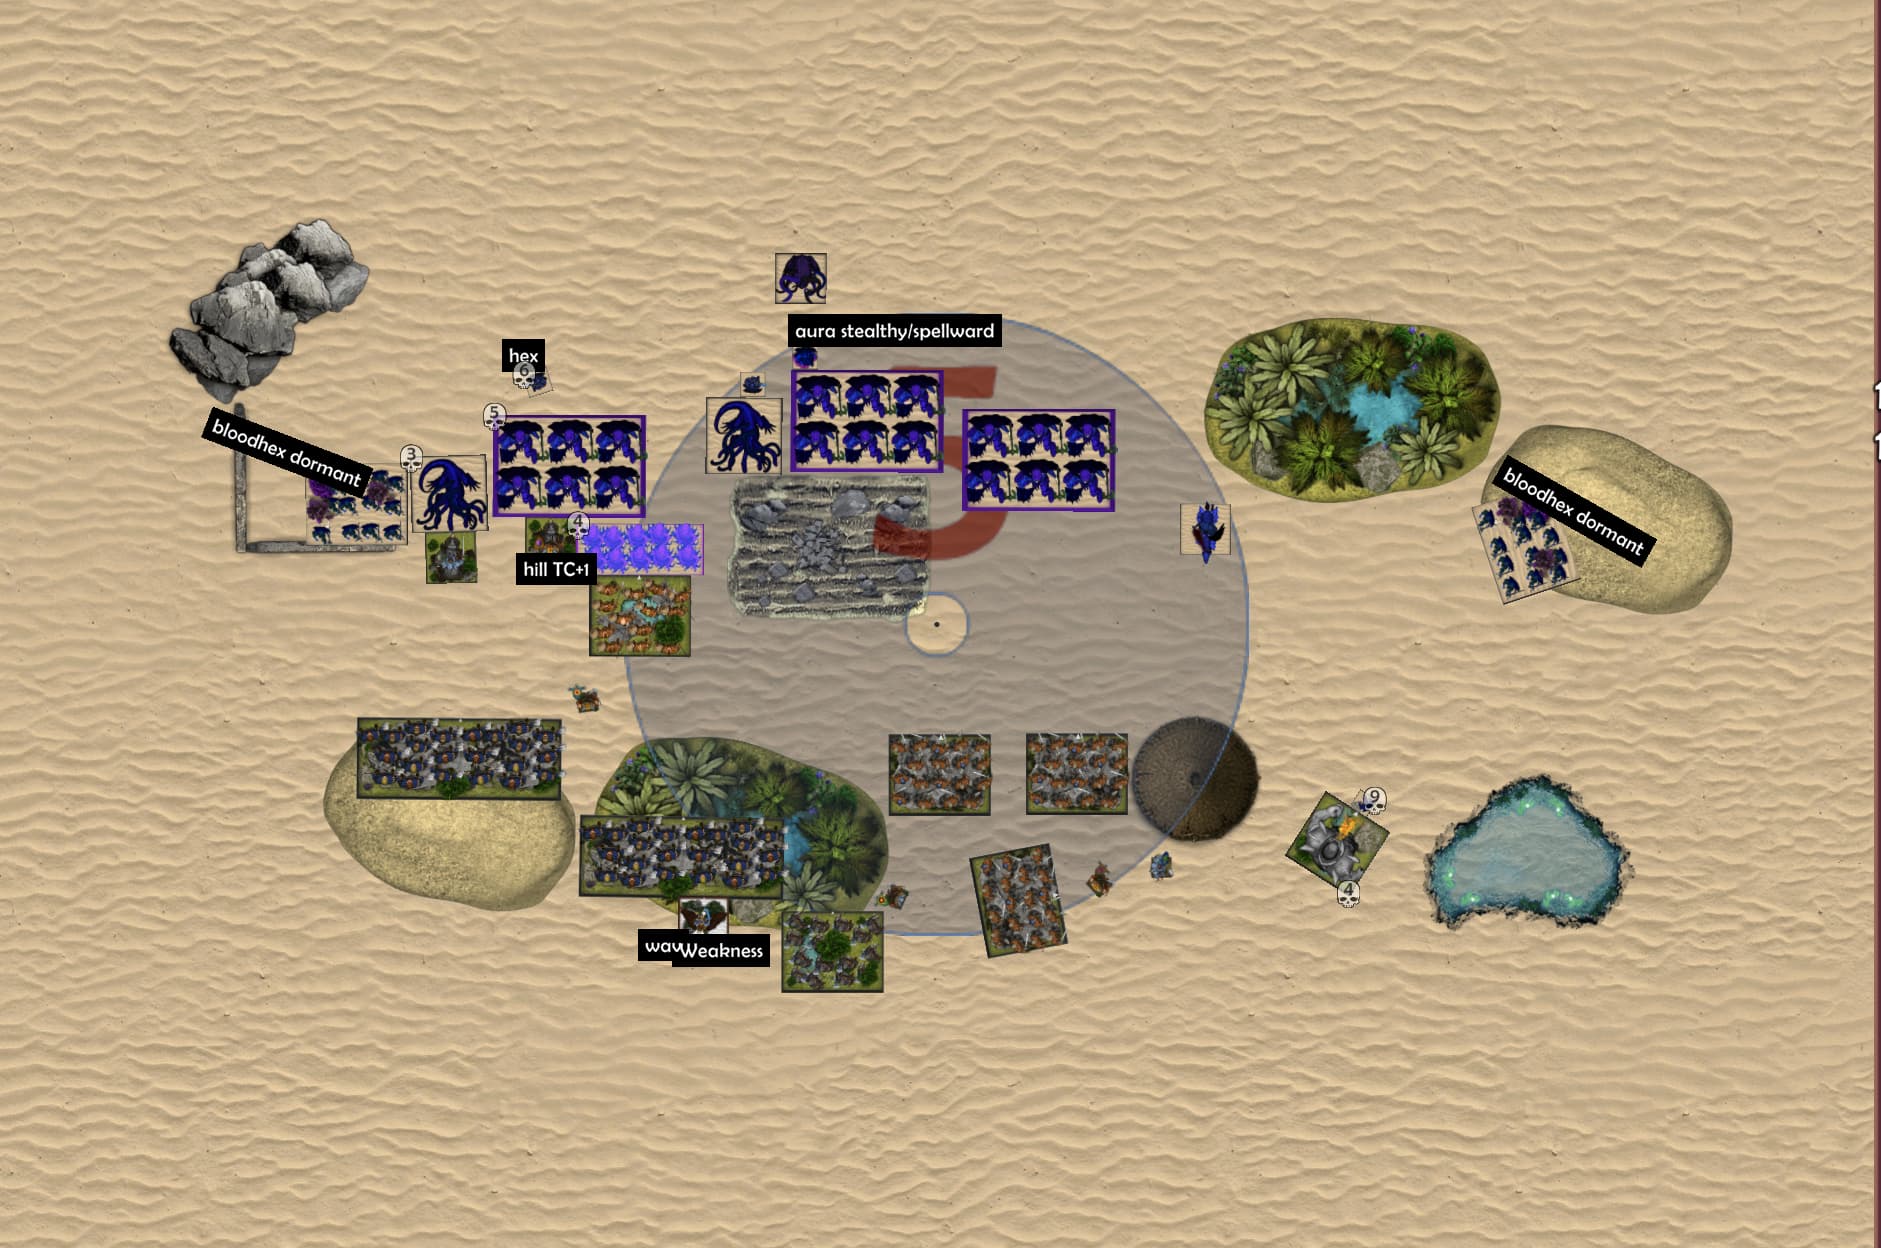
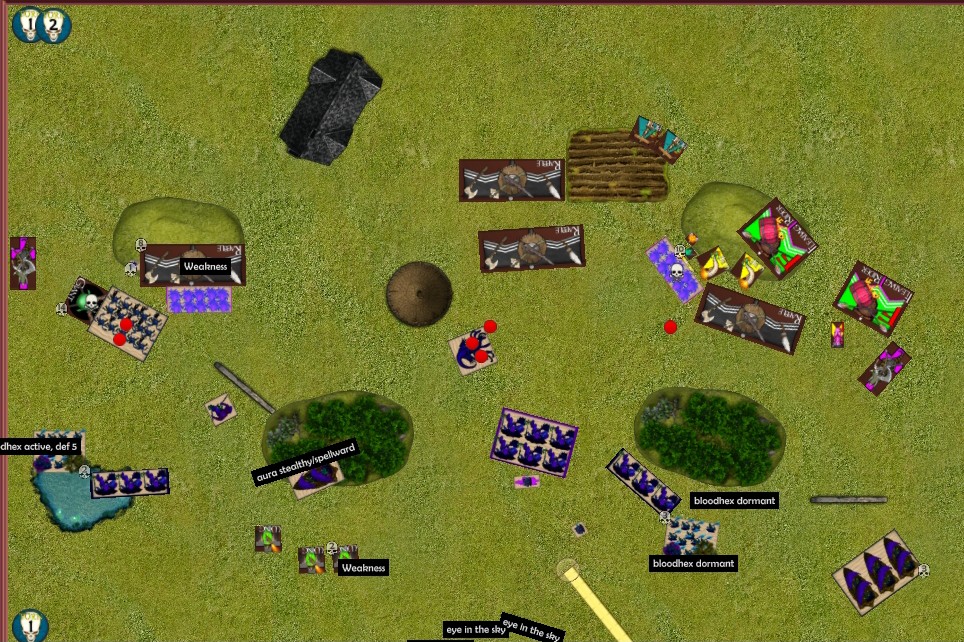
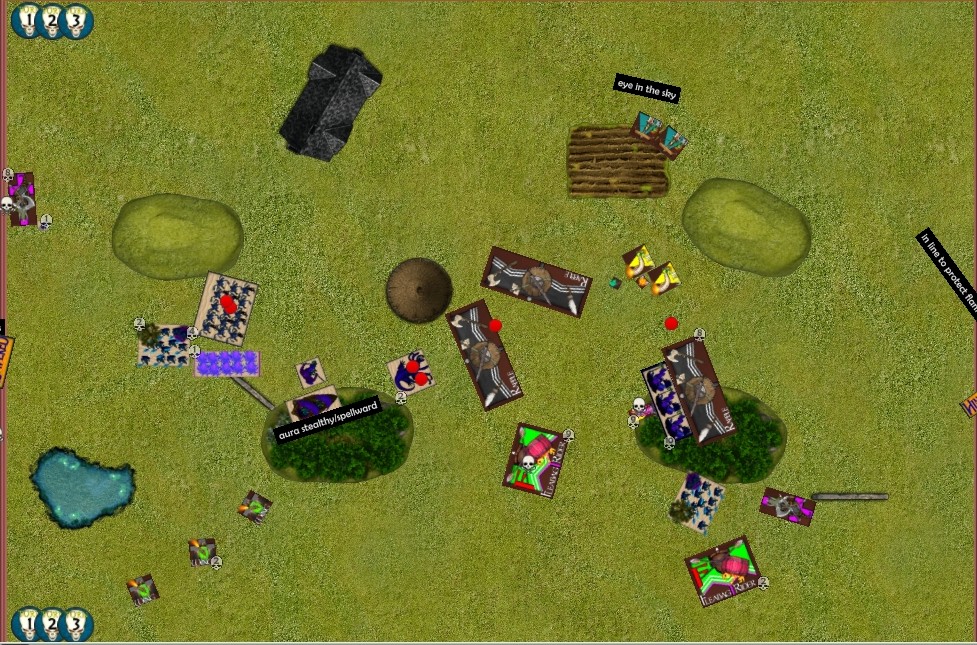
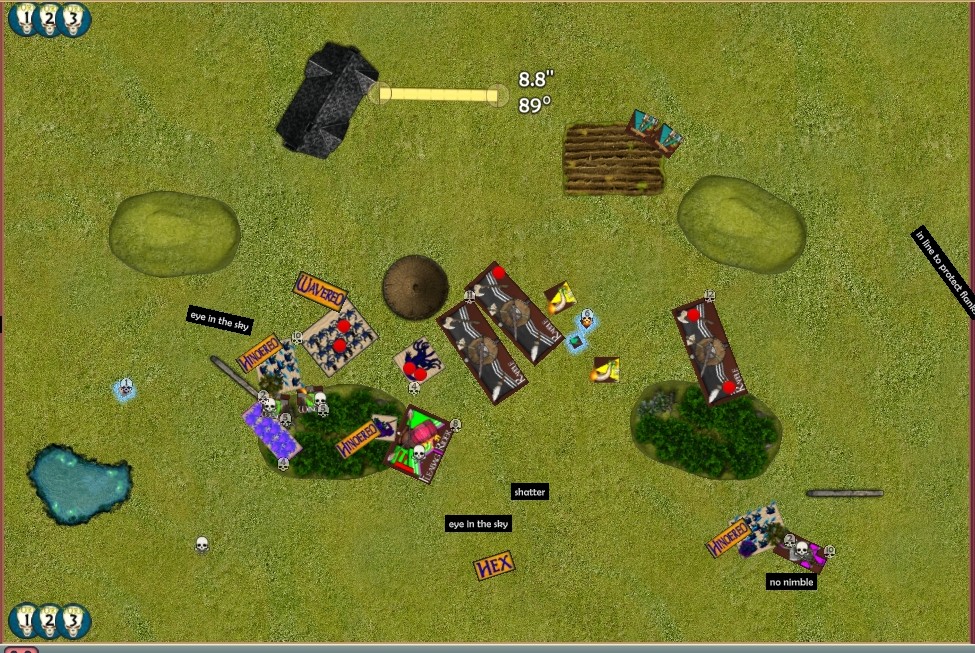
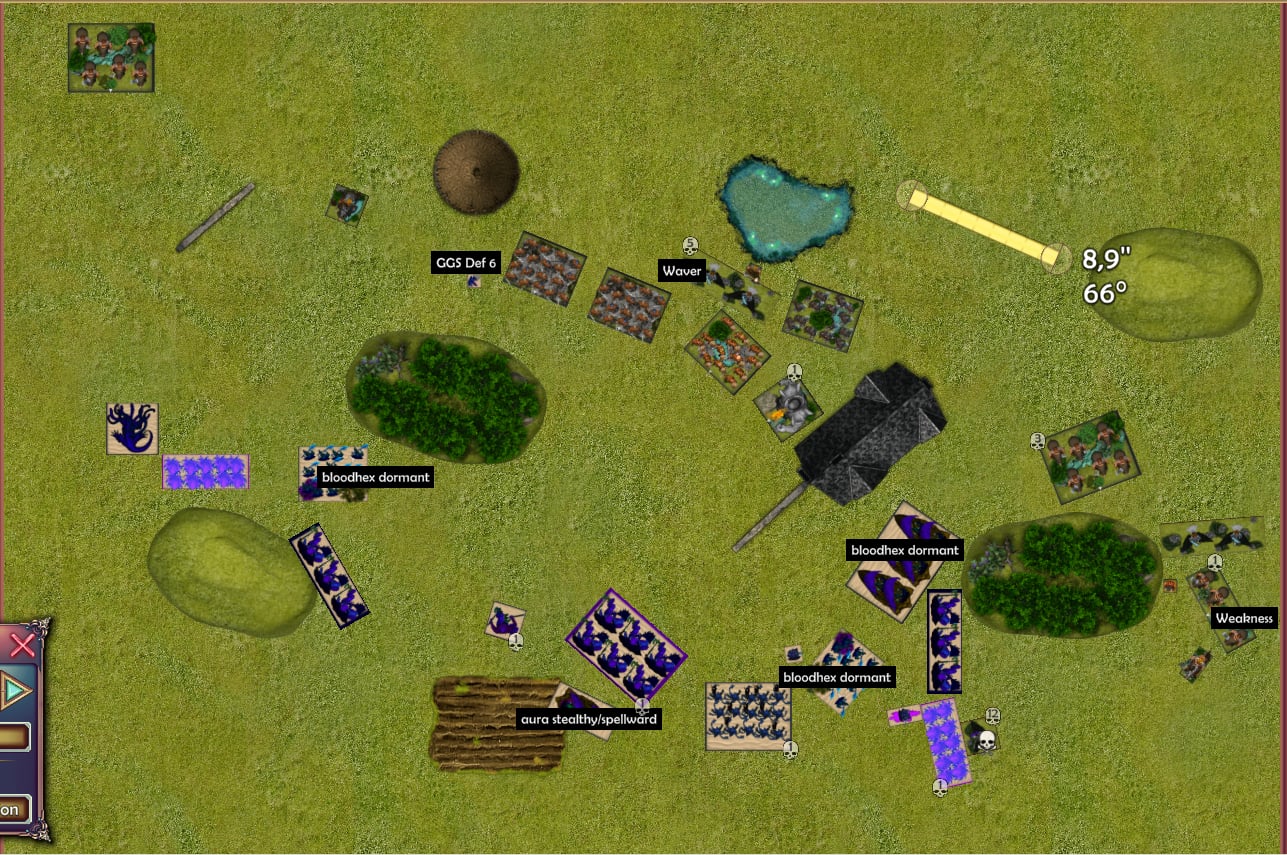
After deployment


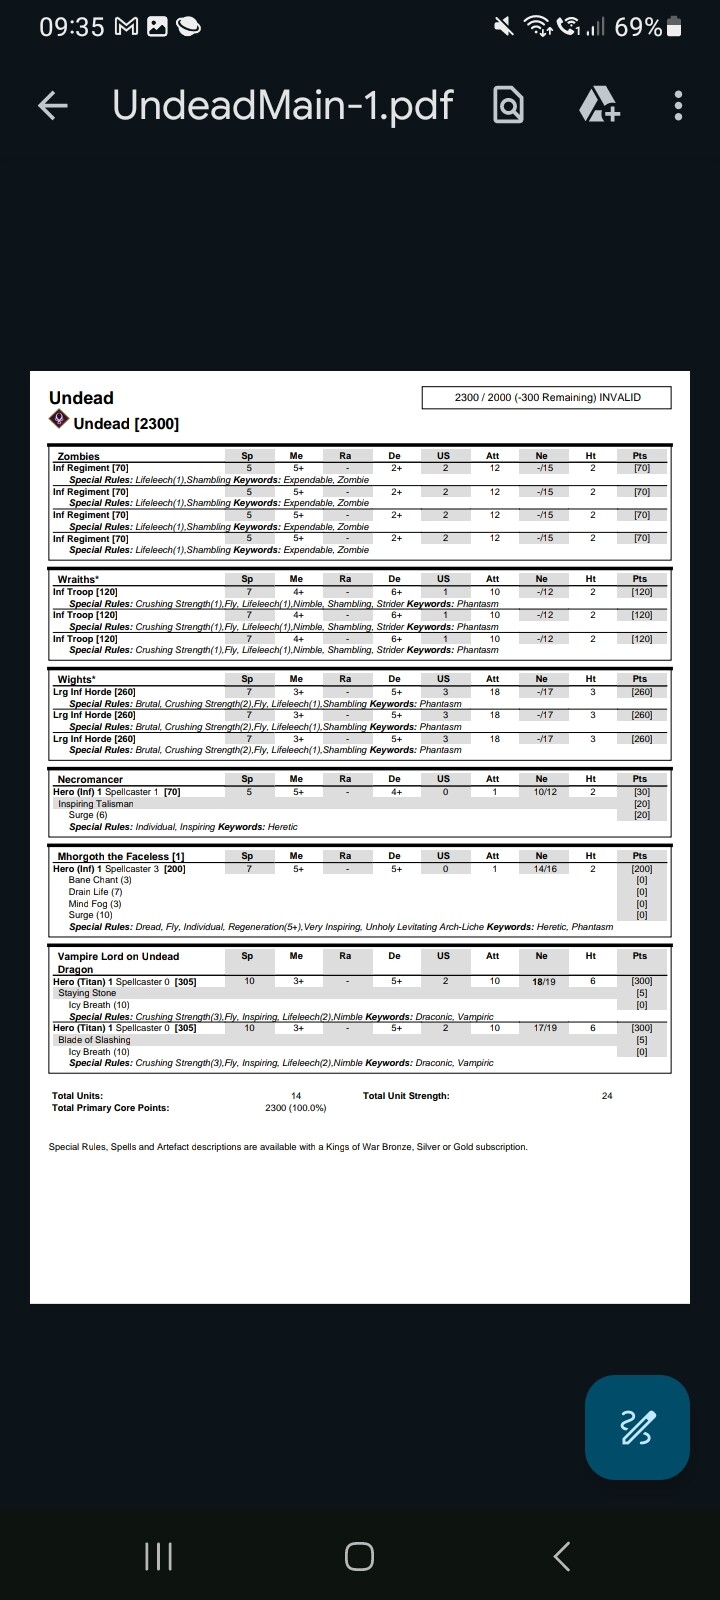
He got to choose sides and went for the one with two hills. At least that leaves me with a lot of leaves for cover against his shooting. I decided to make a strong bid for the centre, and put a strong left flank as well. The assassin is off running, hoping for that T1 charge.

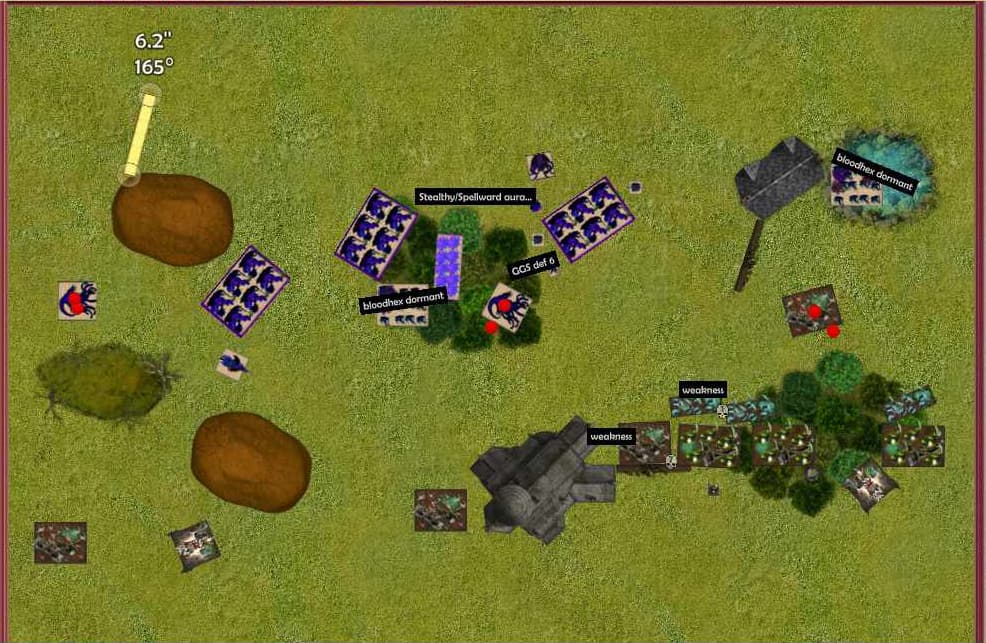
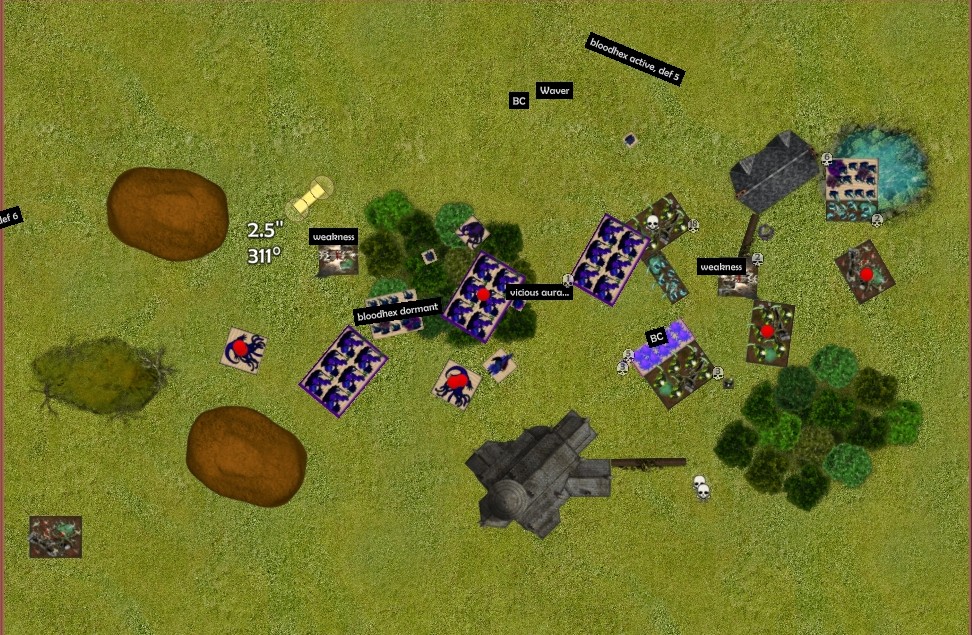
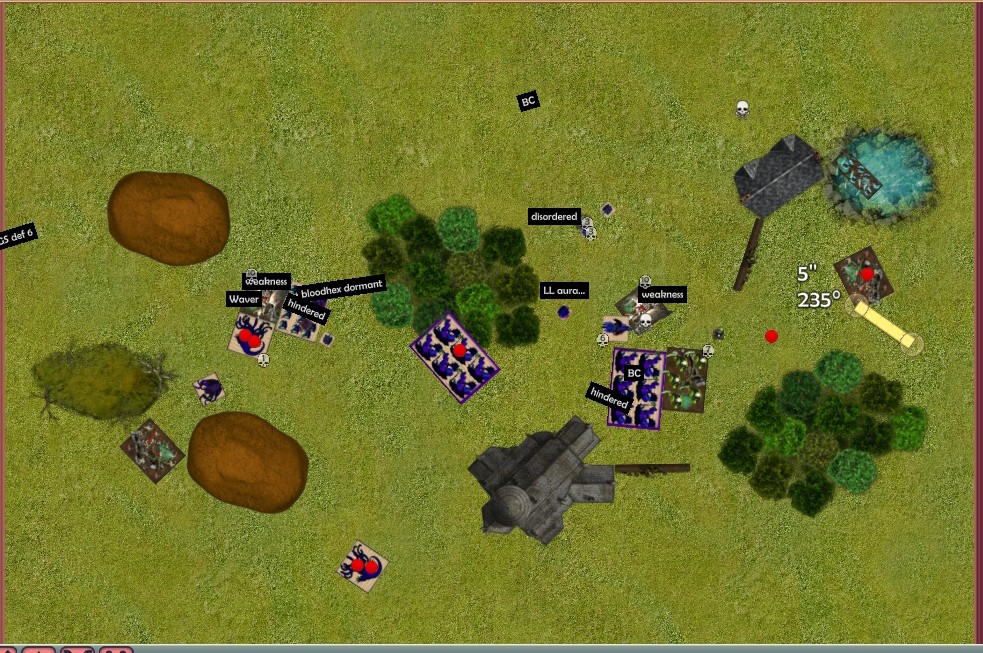
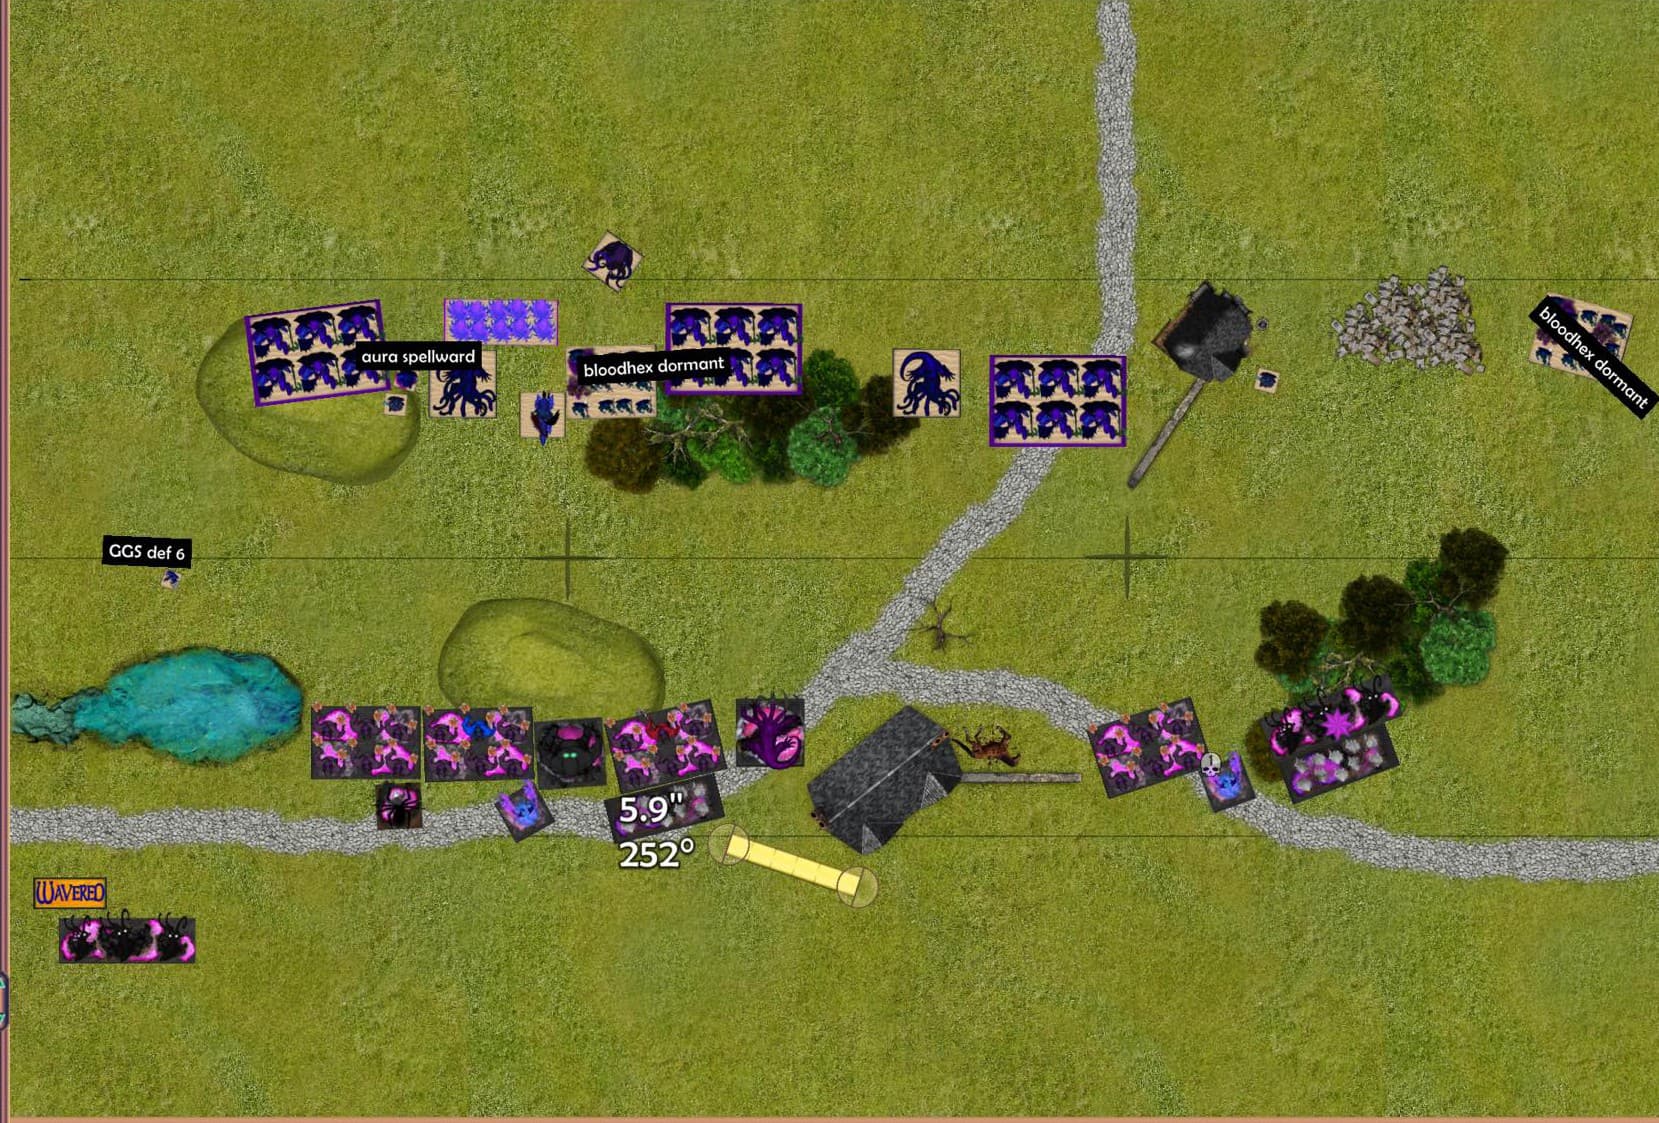
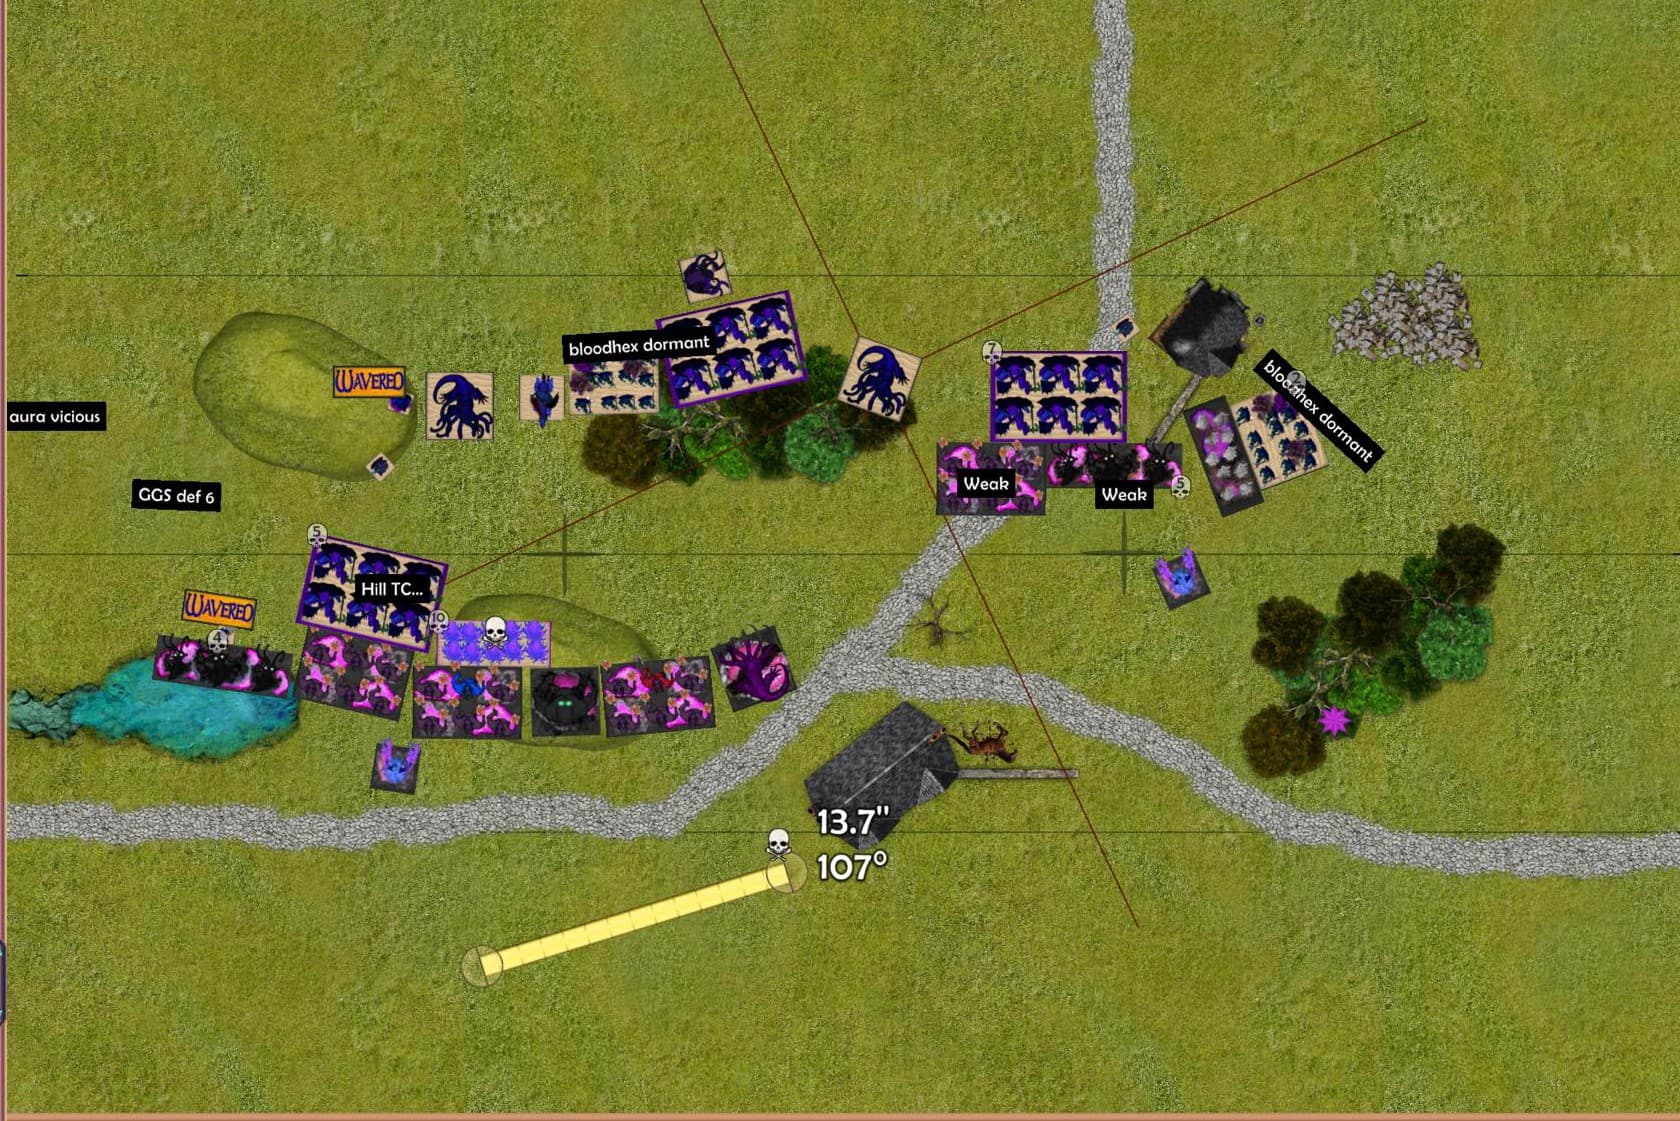
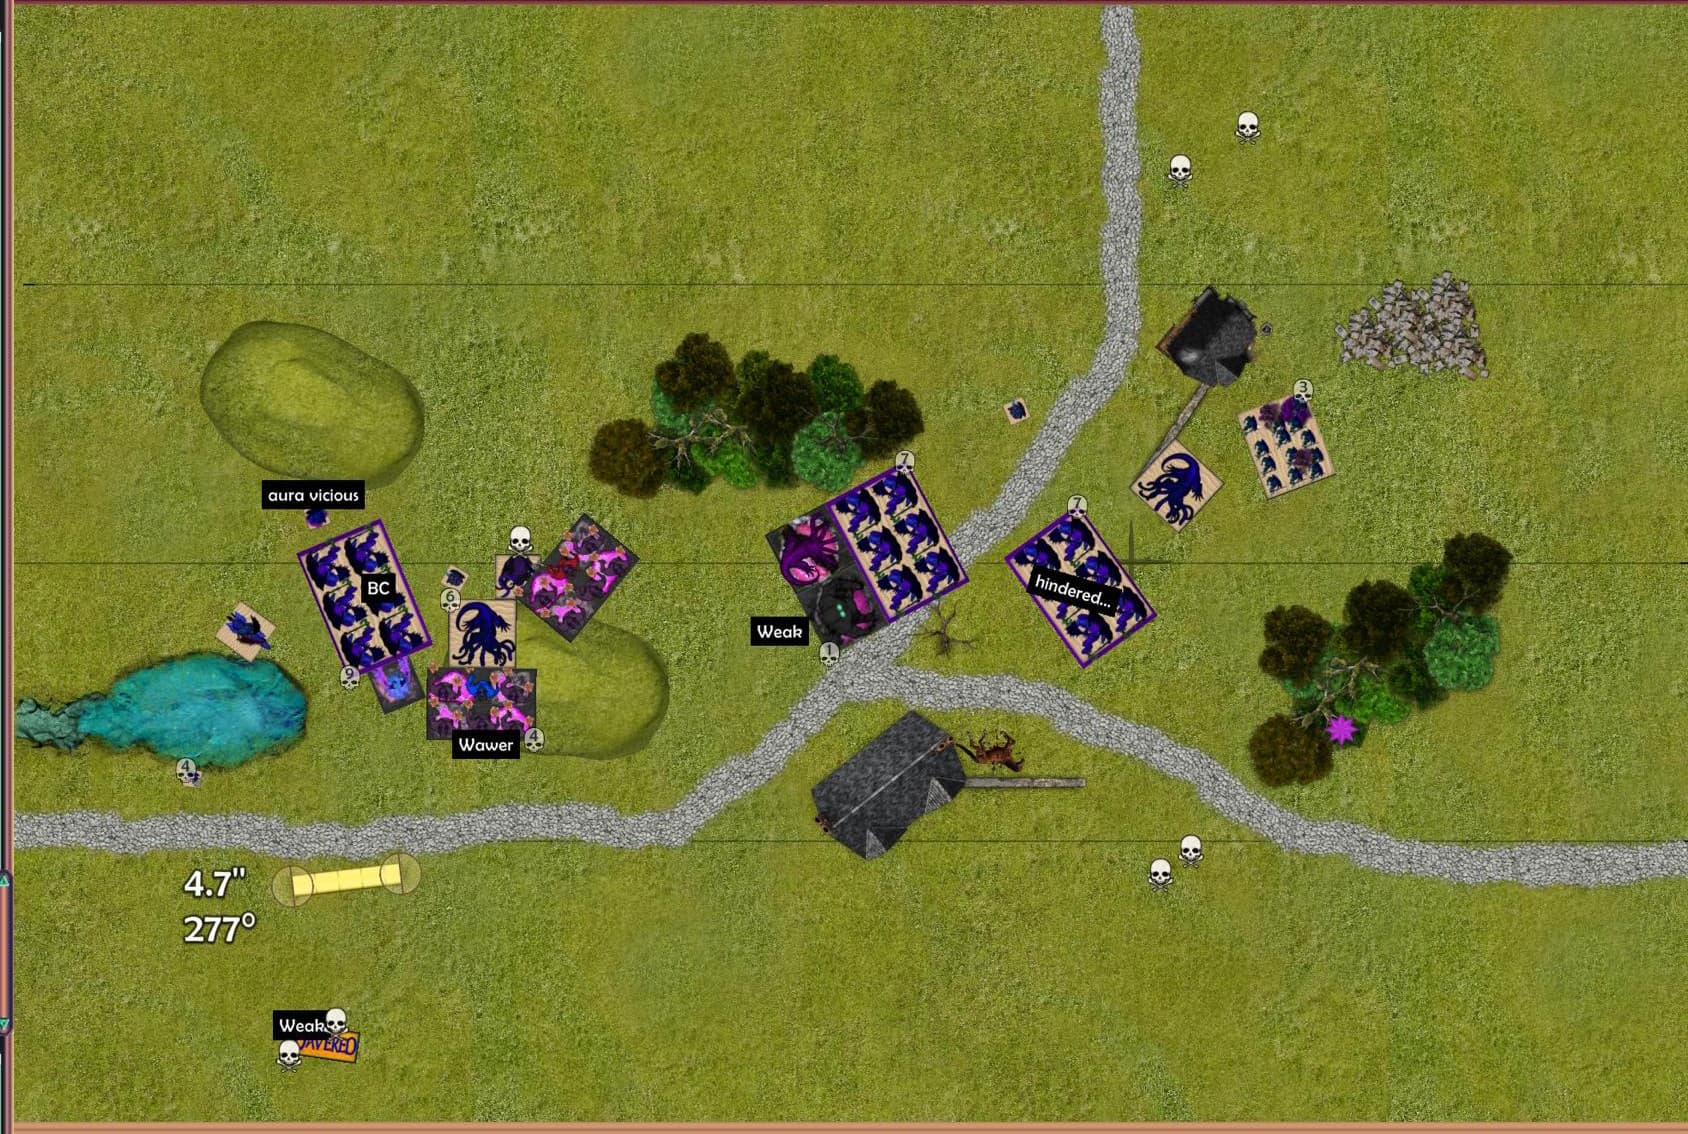
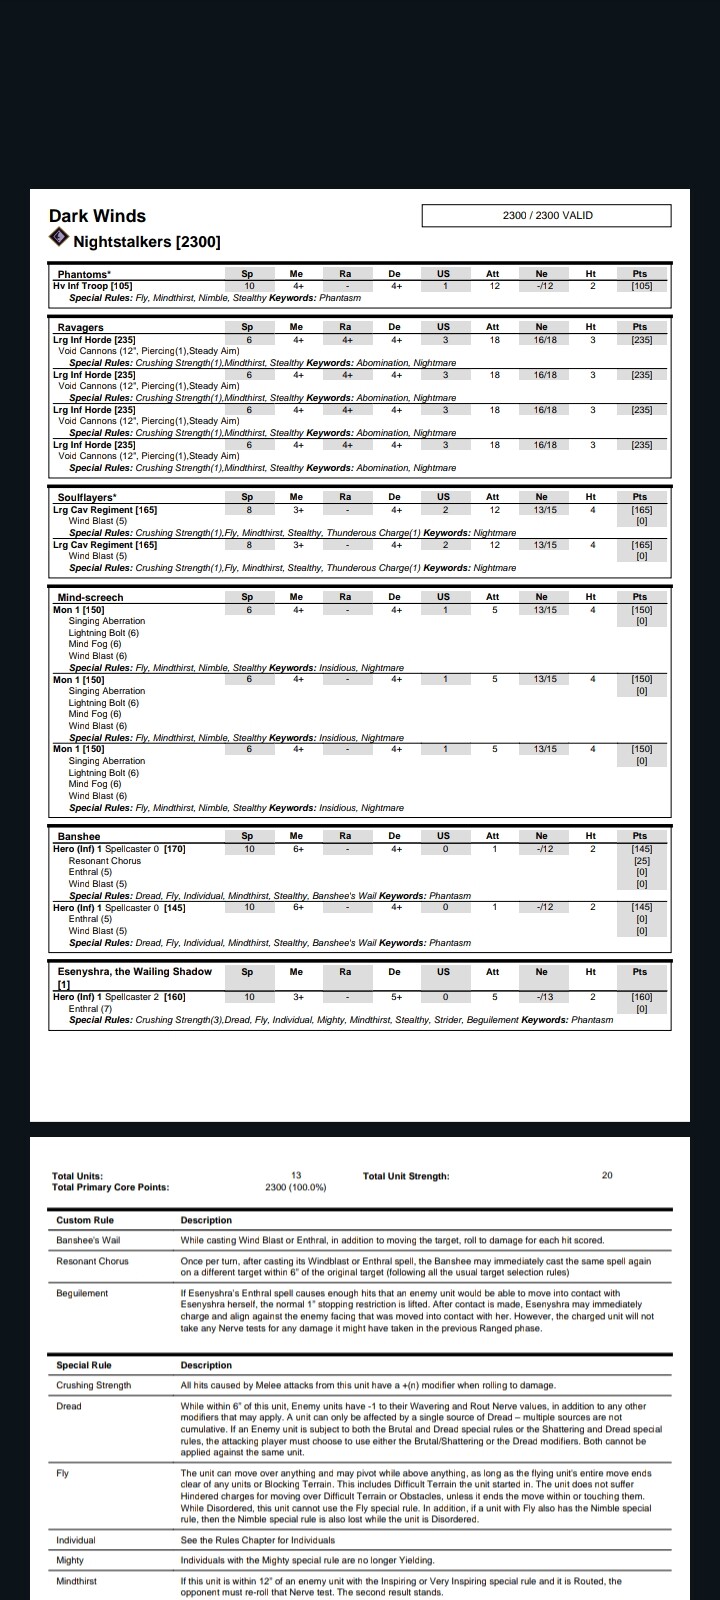
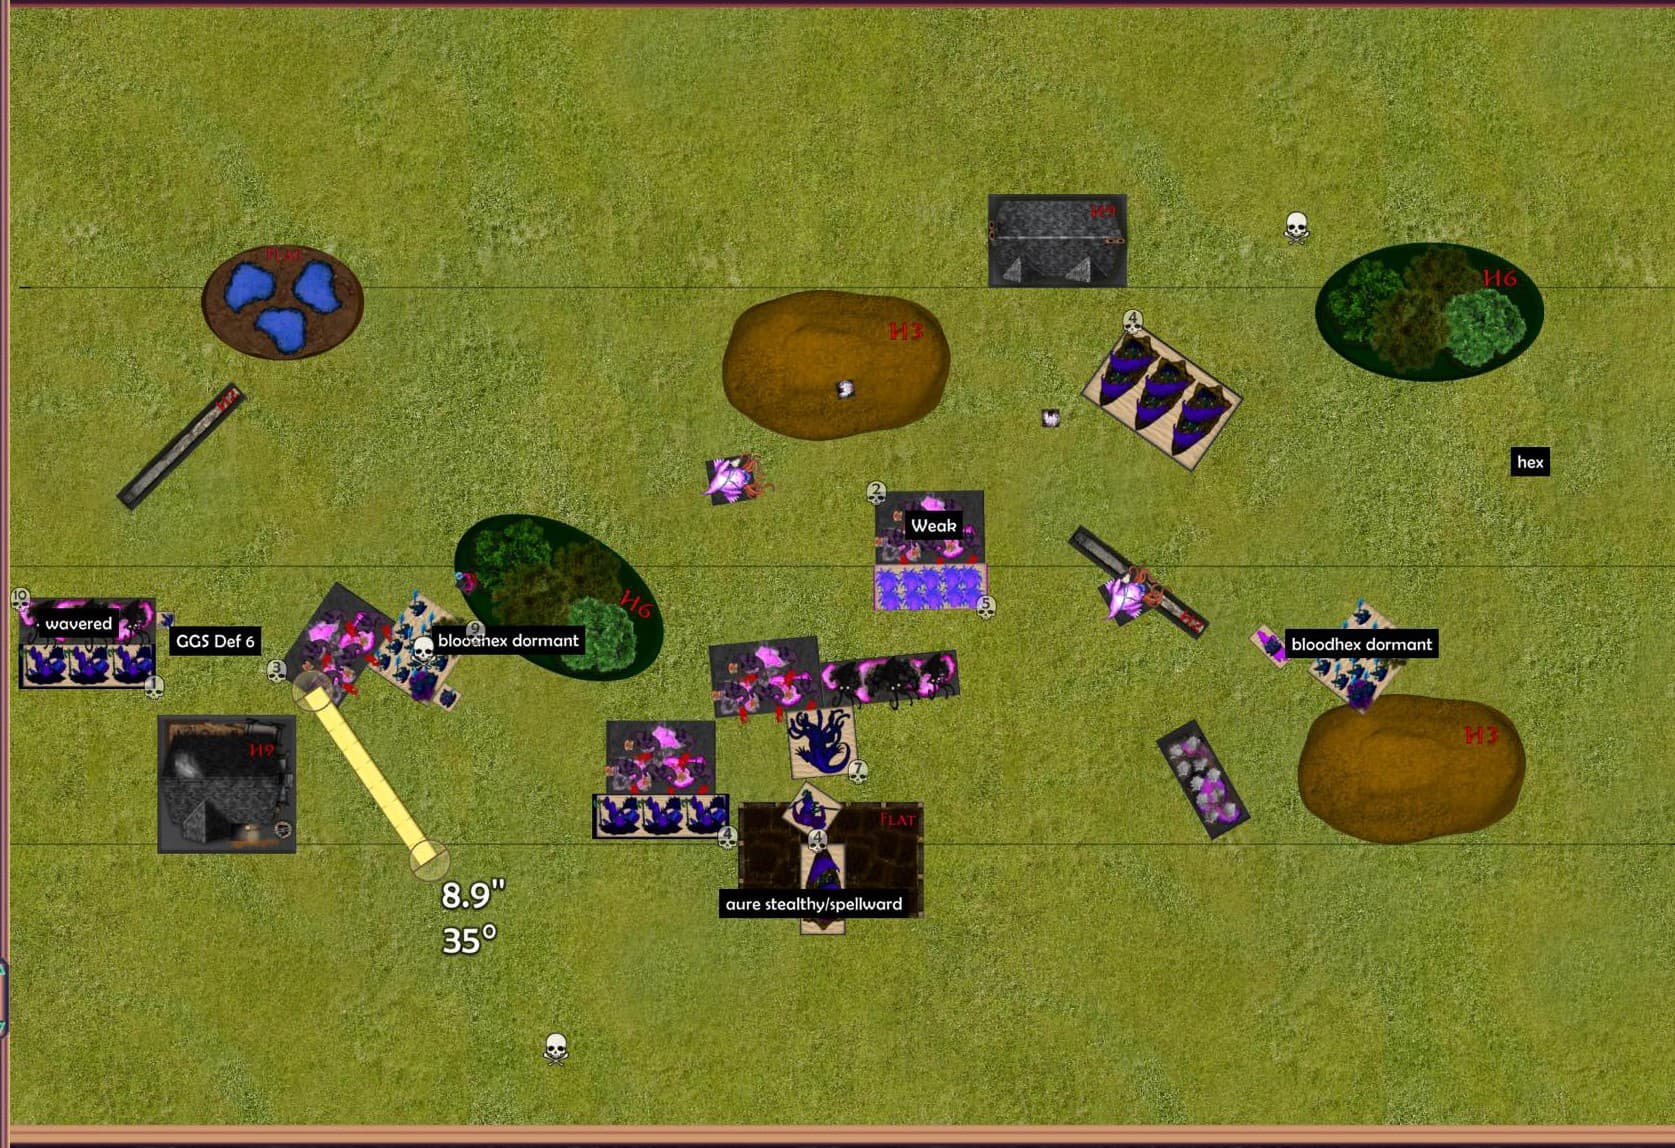
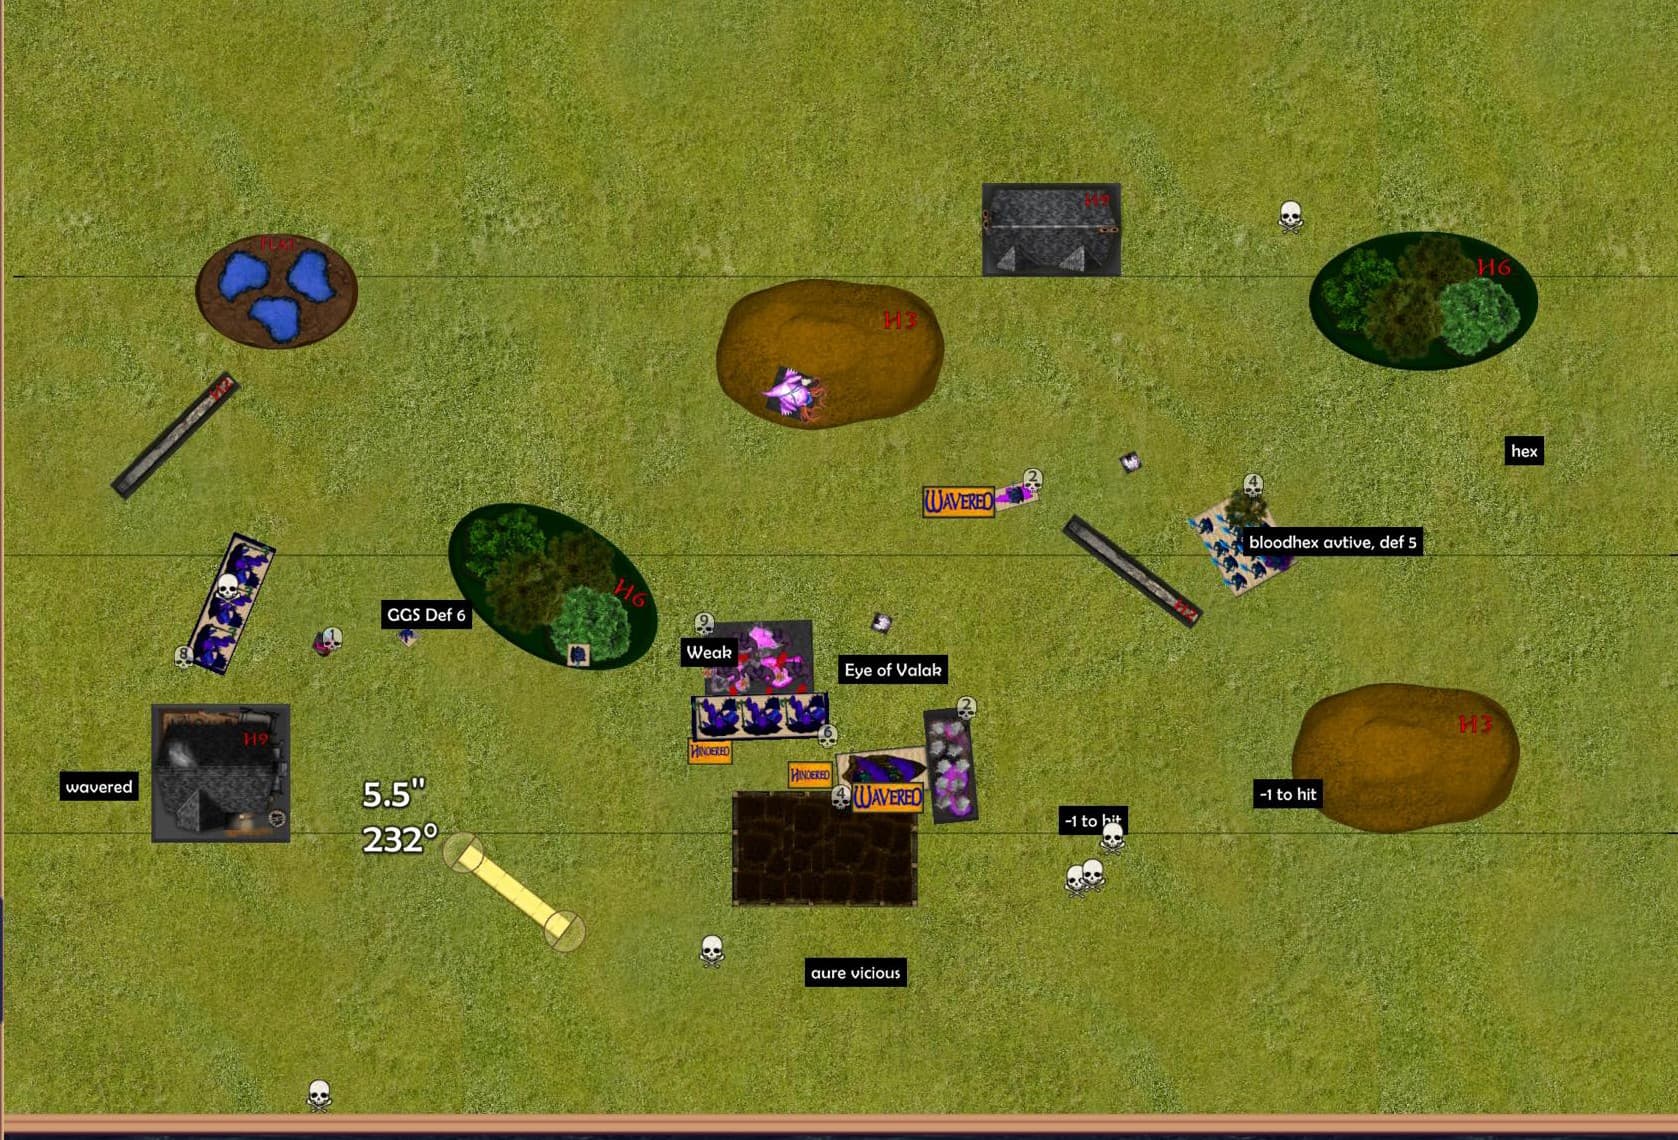
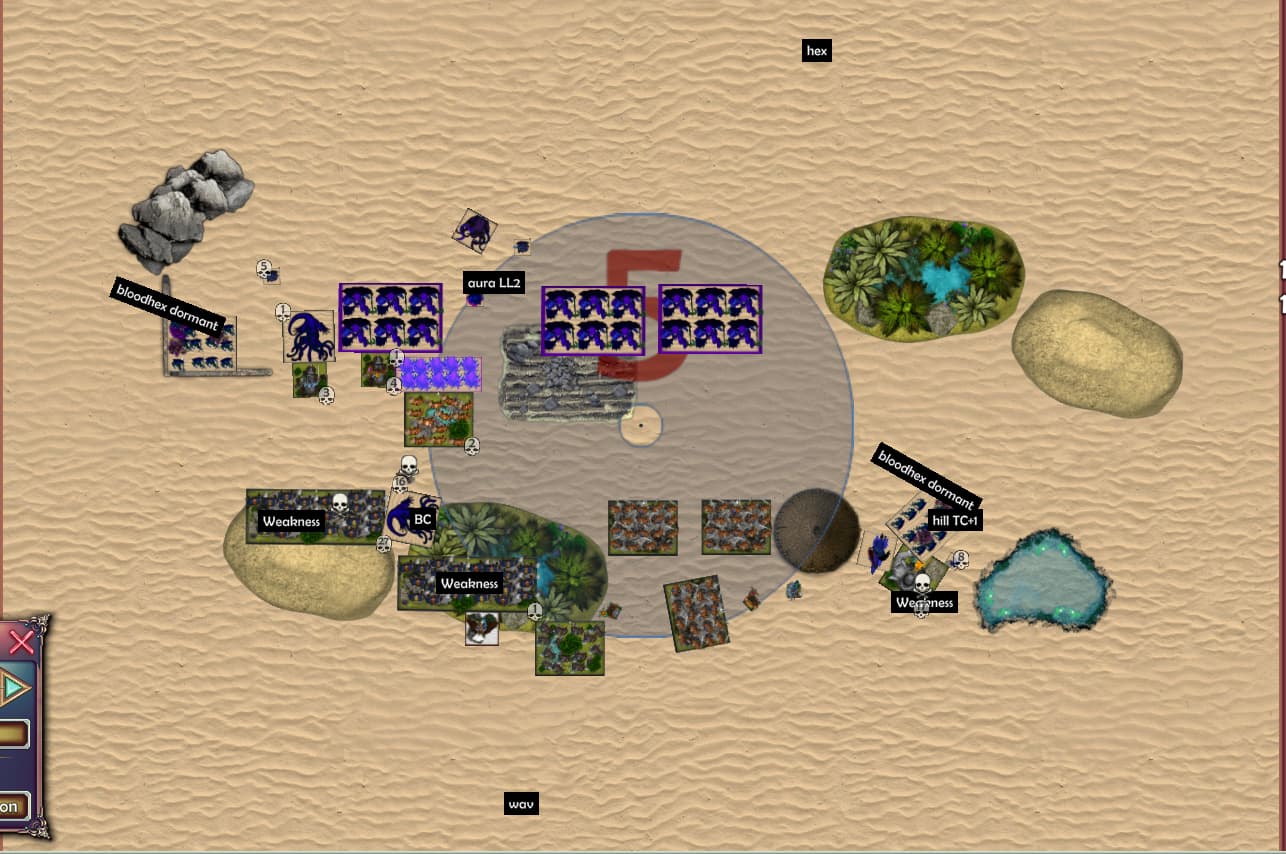
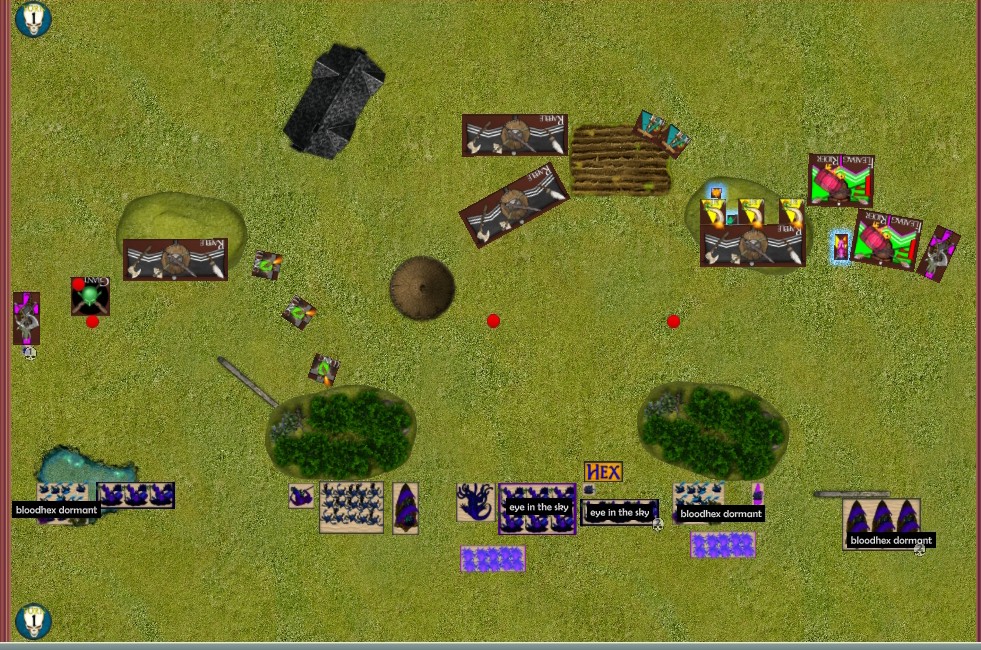
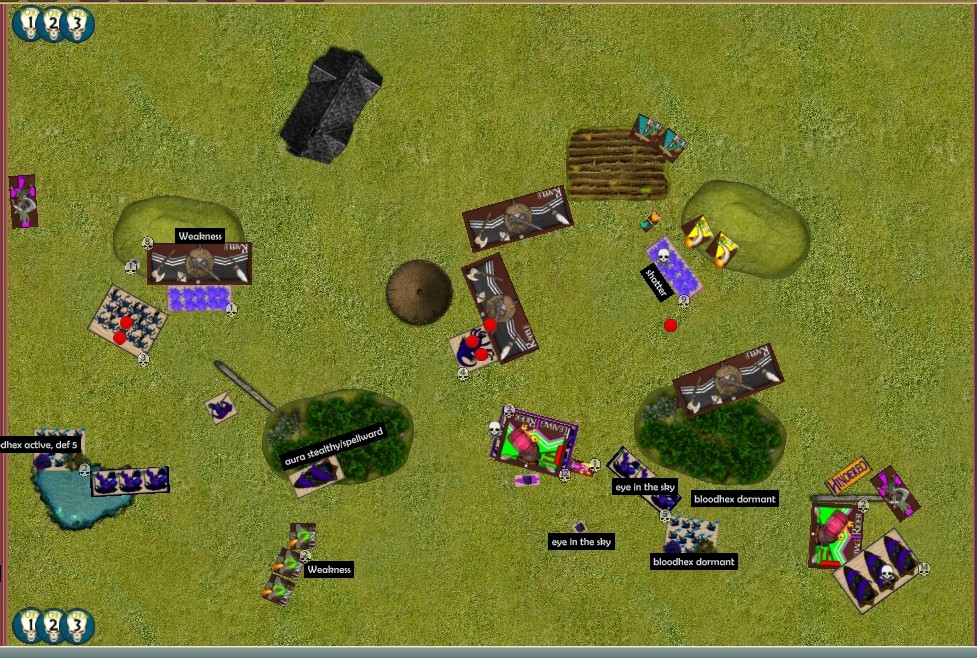
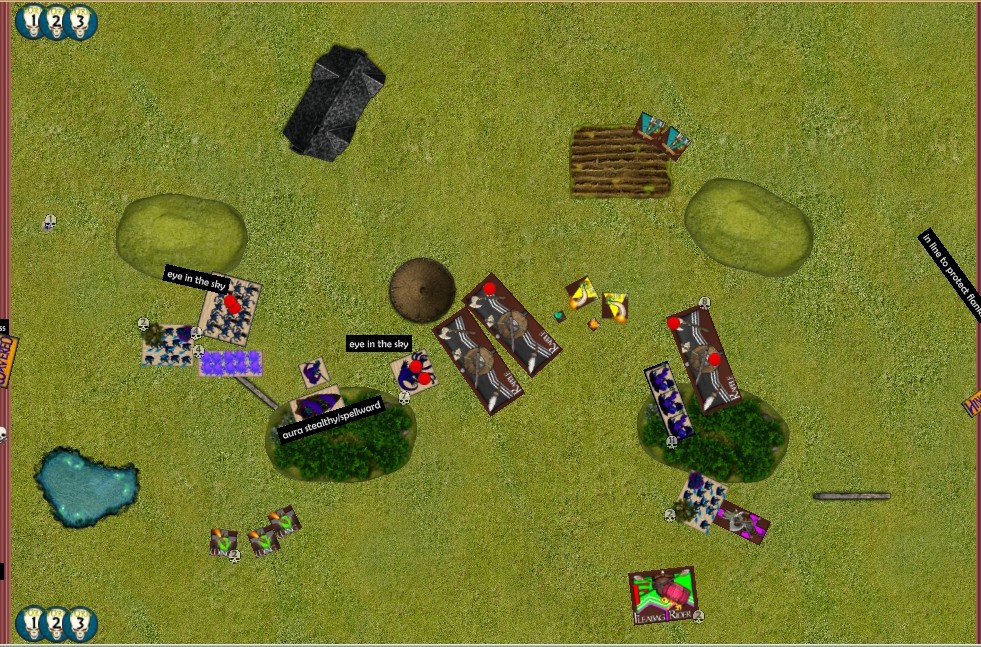
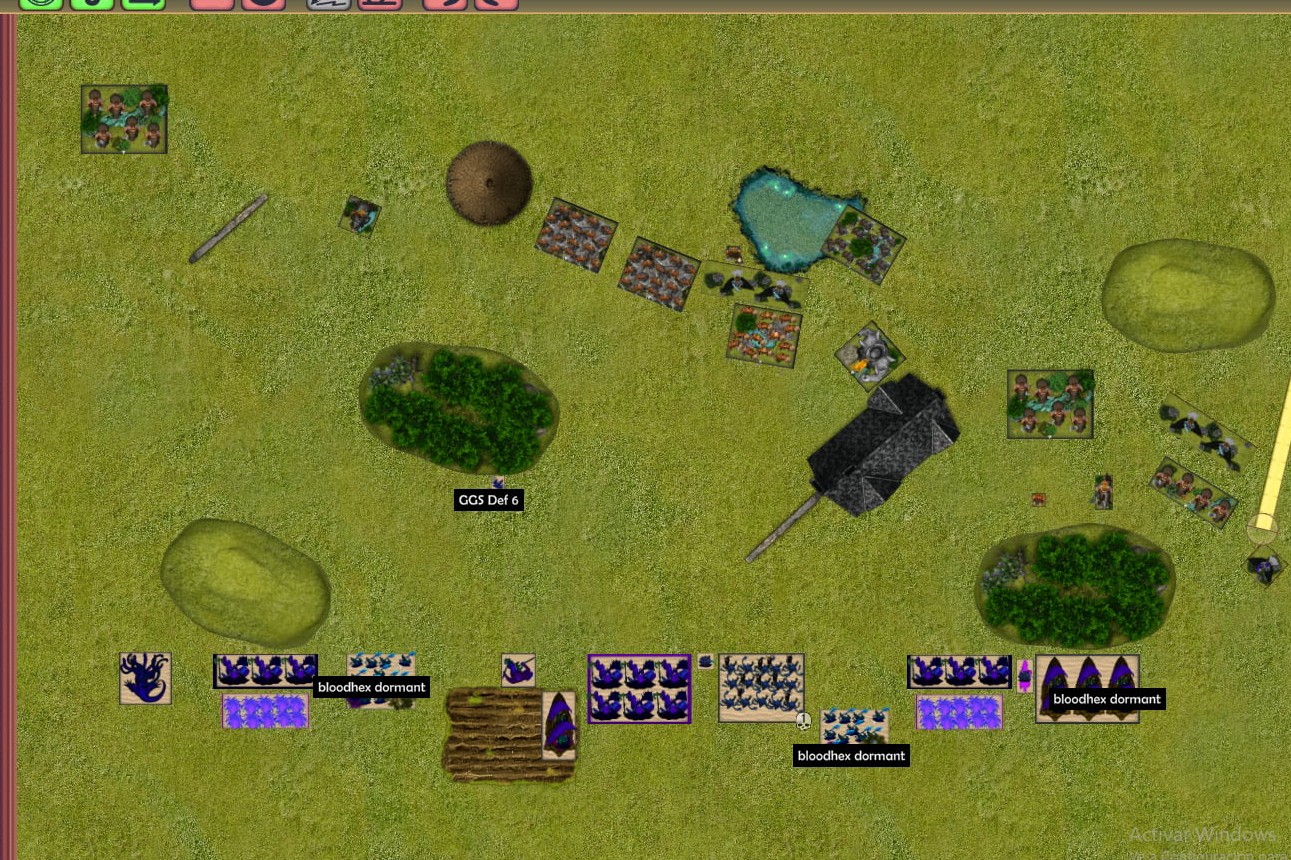
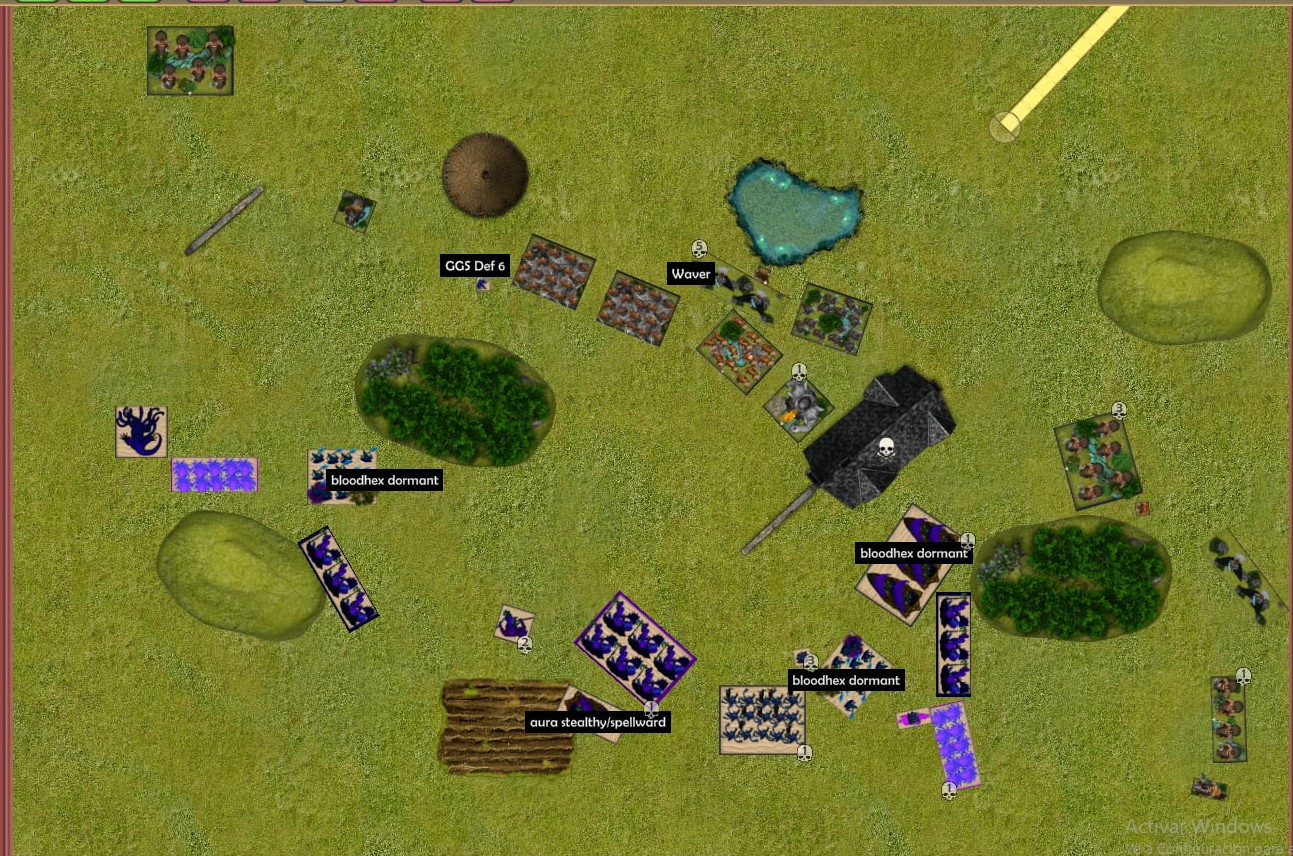
After T1 for Goblins


A clever ploy on the right hill, where his shooting platform is safe behind the rabble, even better, his wiz with ej Periscope can see all, but only H6 stuff can see him. He gets the Hex on La’theal and scores a couple of dmg in the impaler regiment. On the left, the giant ran forward to loot the stockpile, while the king charged the assassin and broke his shield. Wingits fly up and form a weird line. It almost looks like they are performing an airshow.

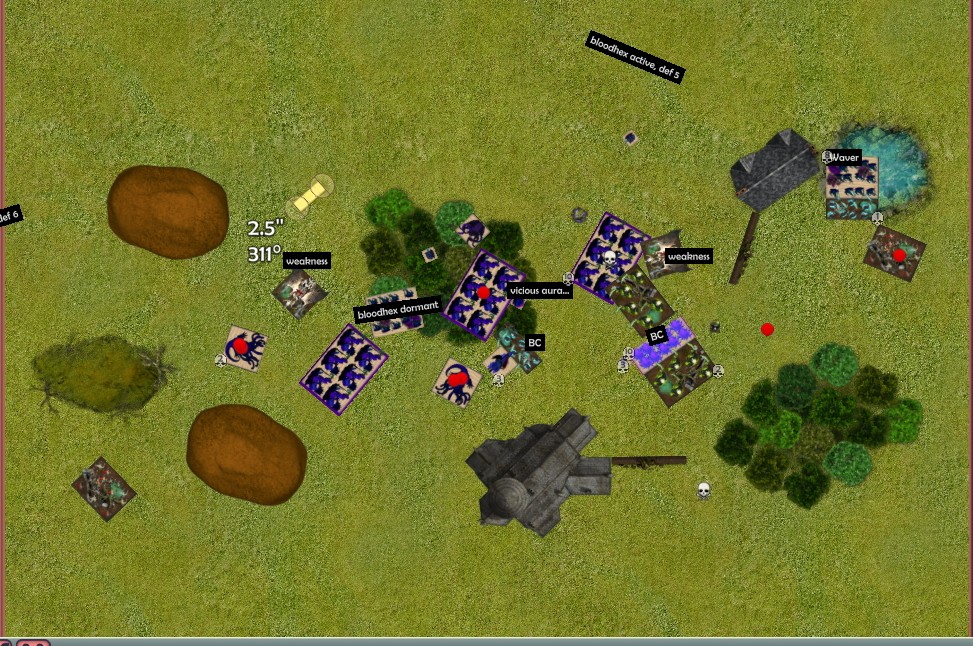
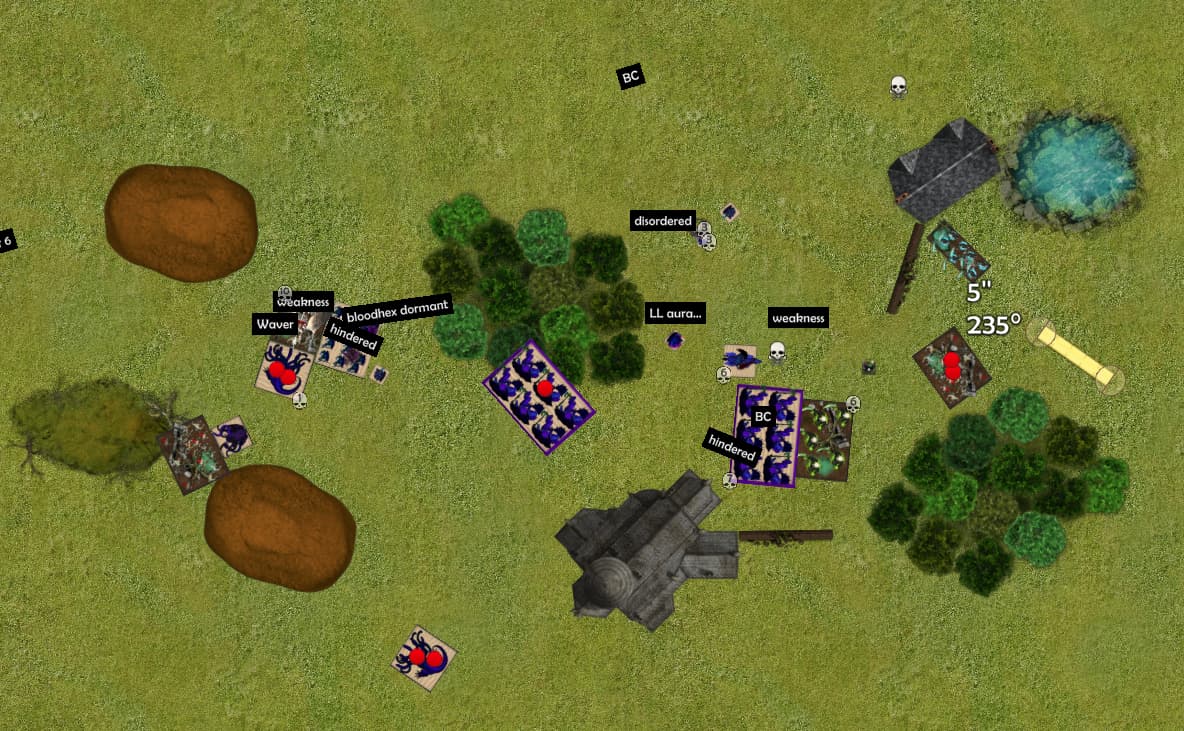
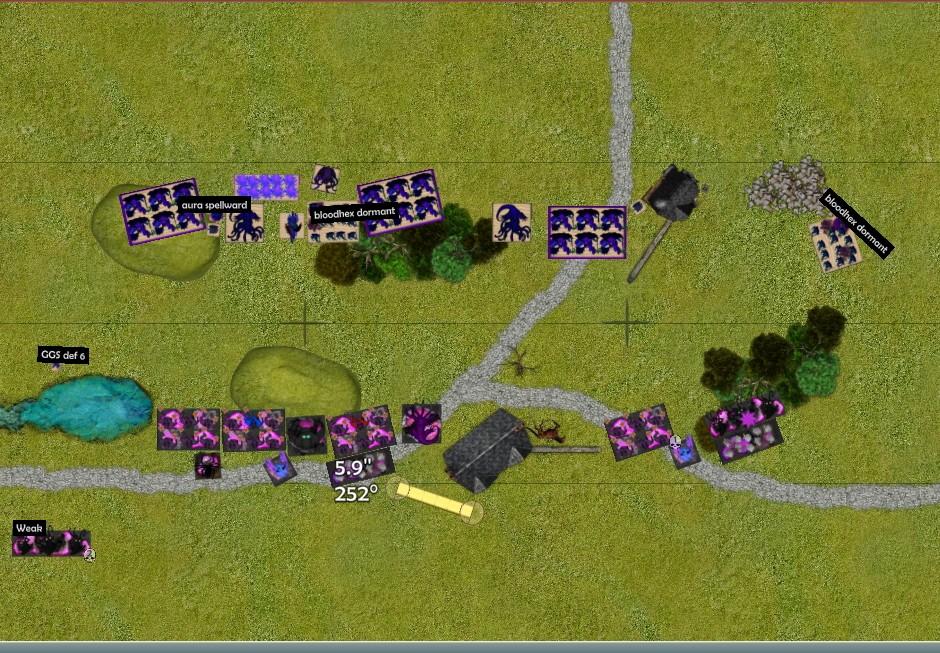
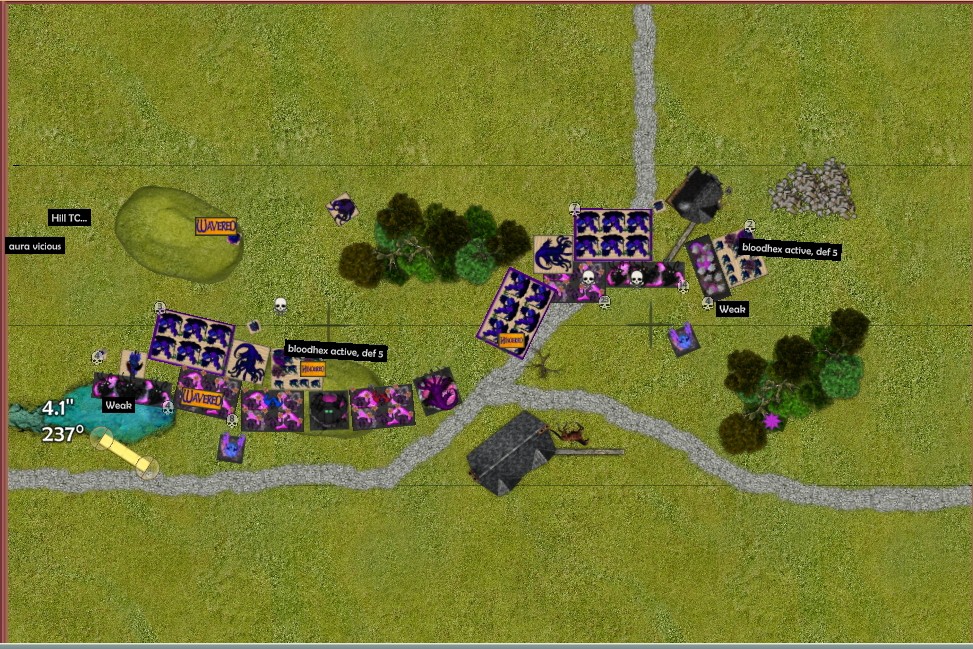
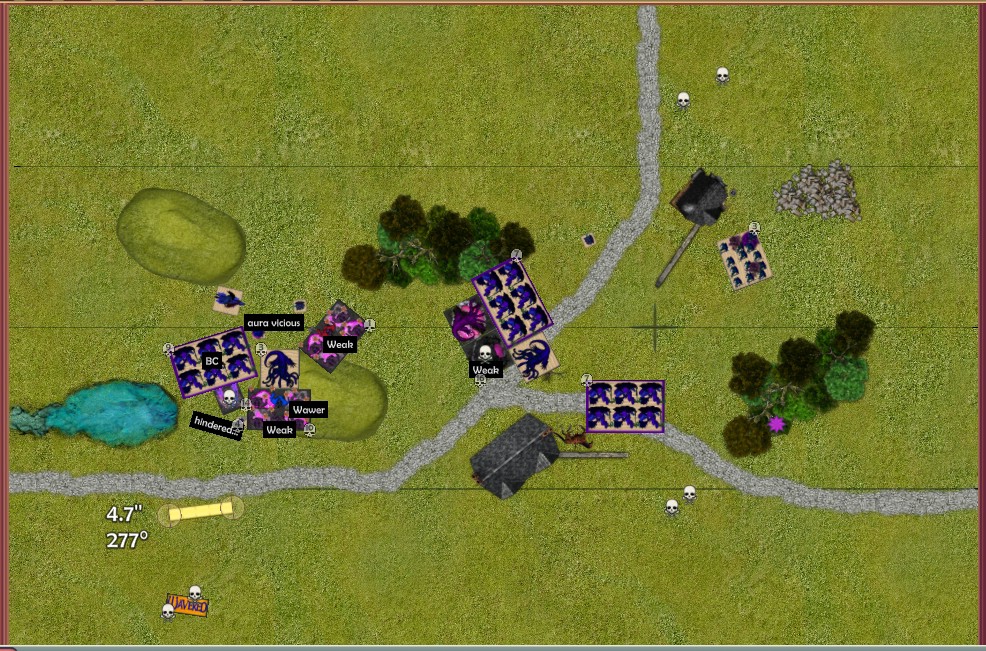
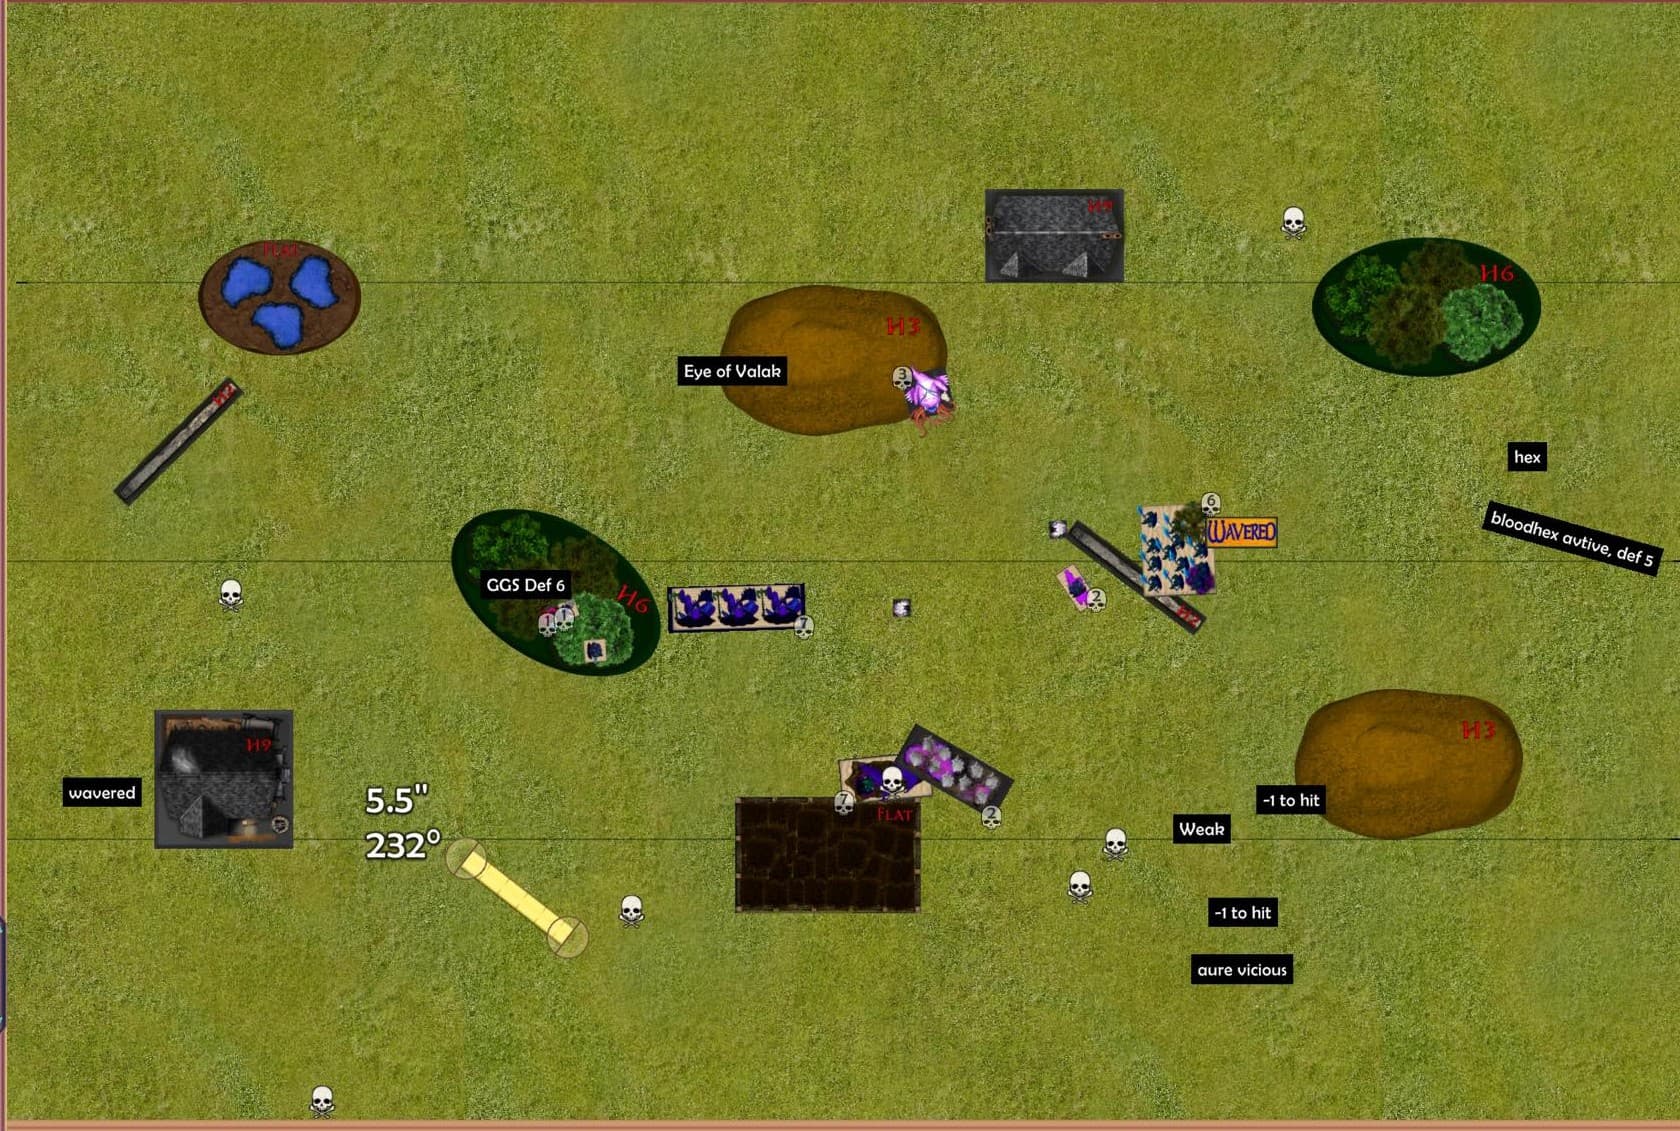
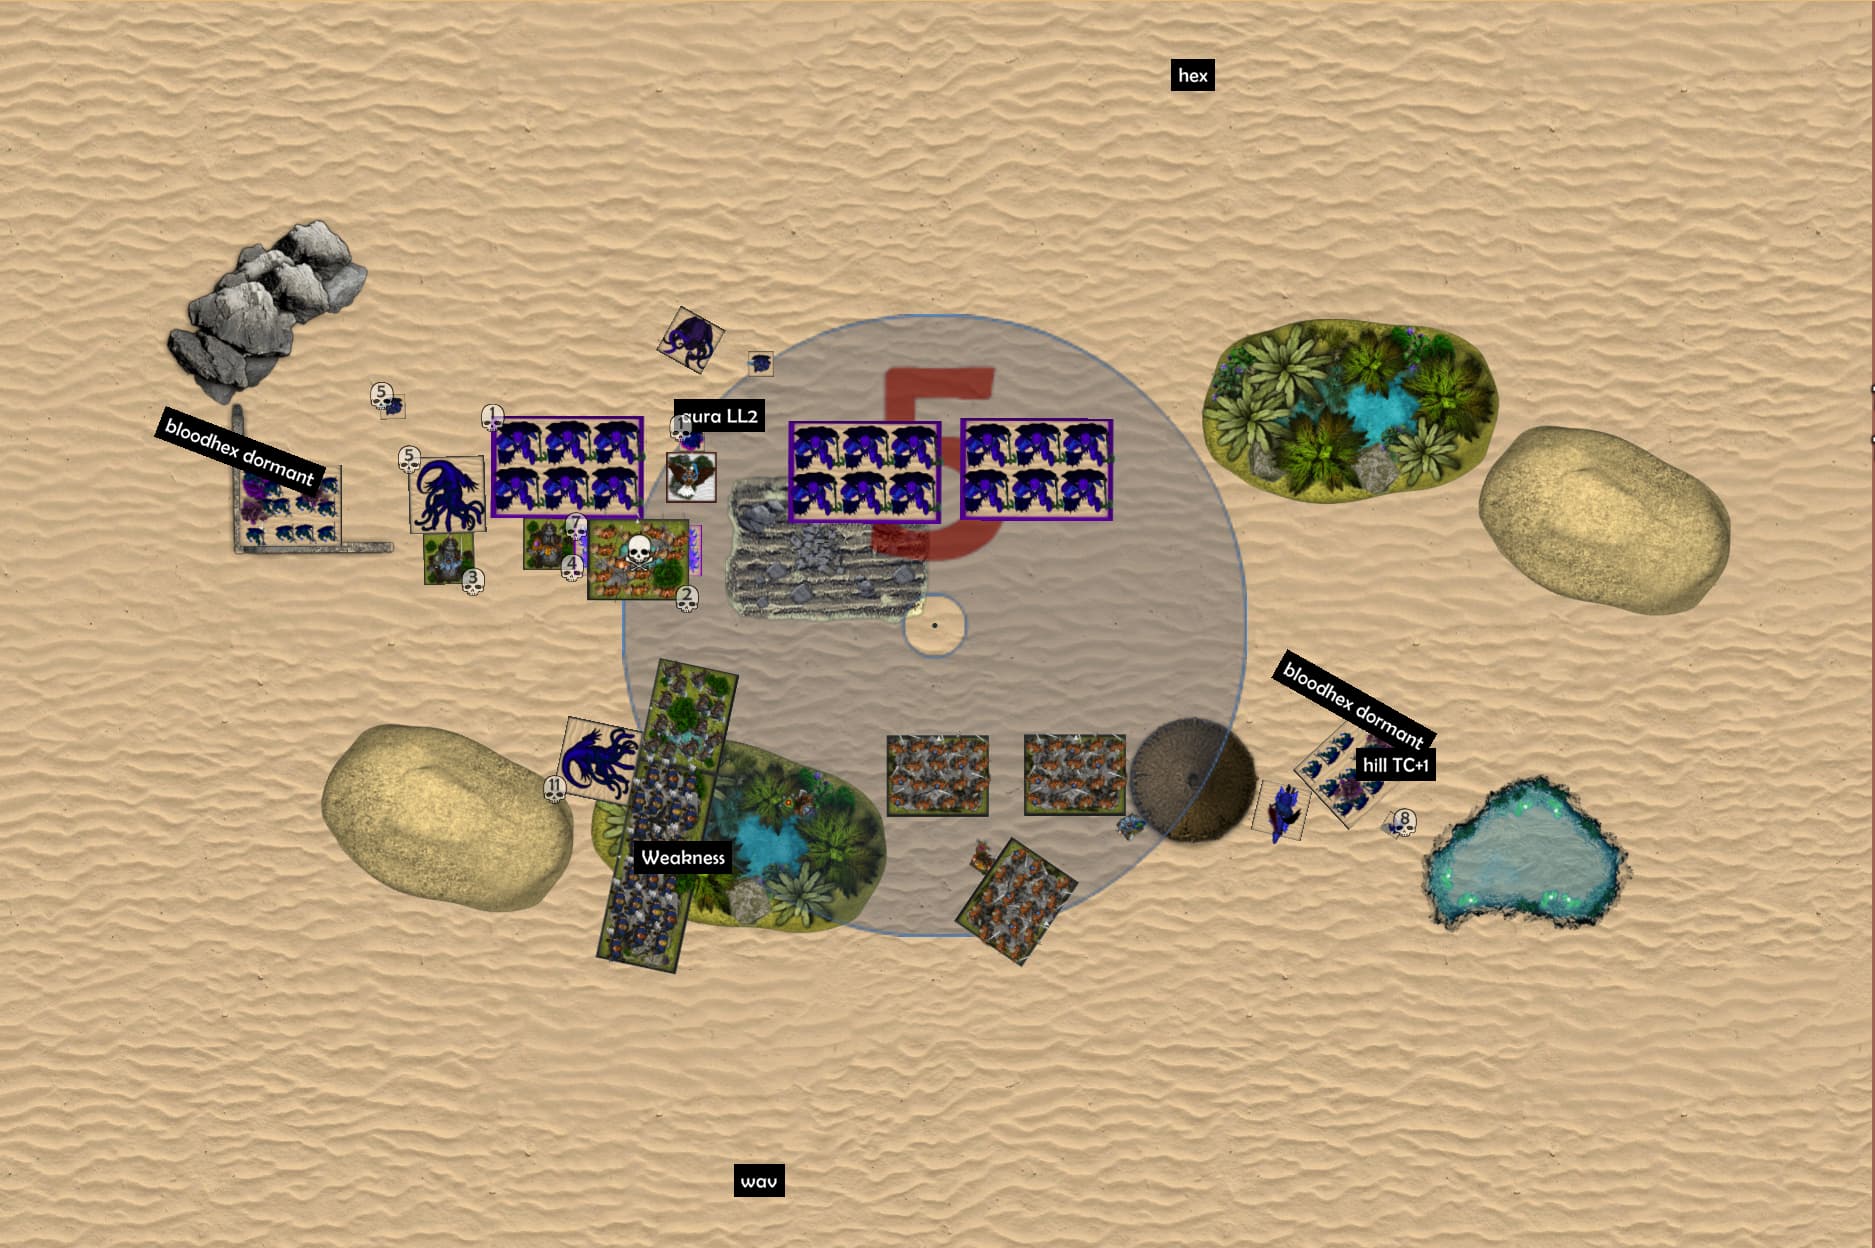
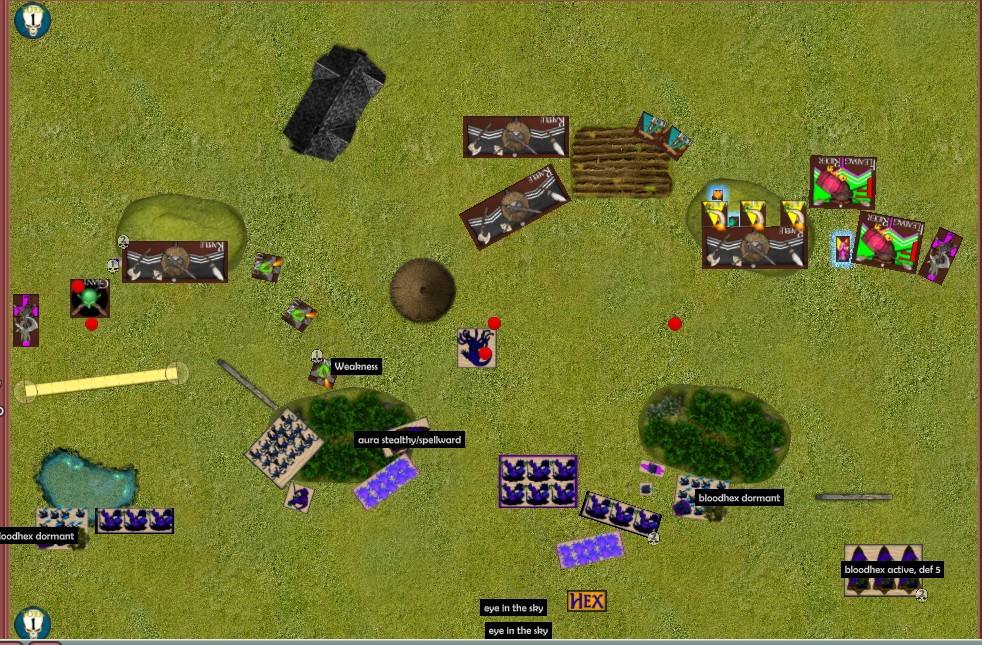
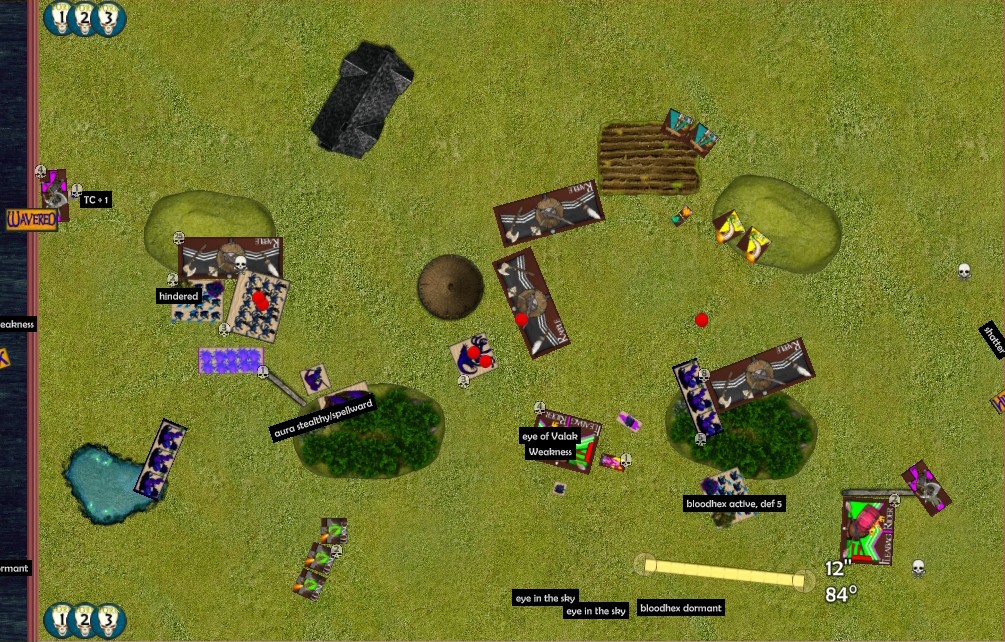
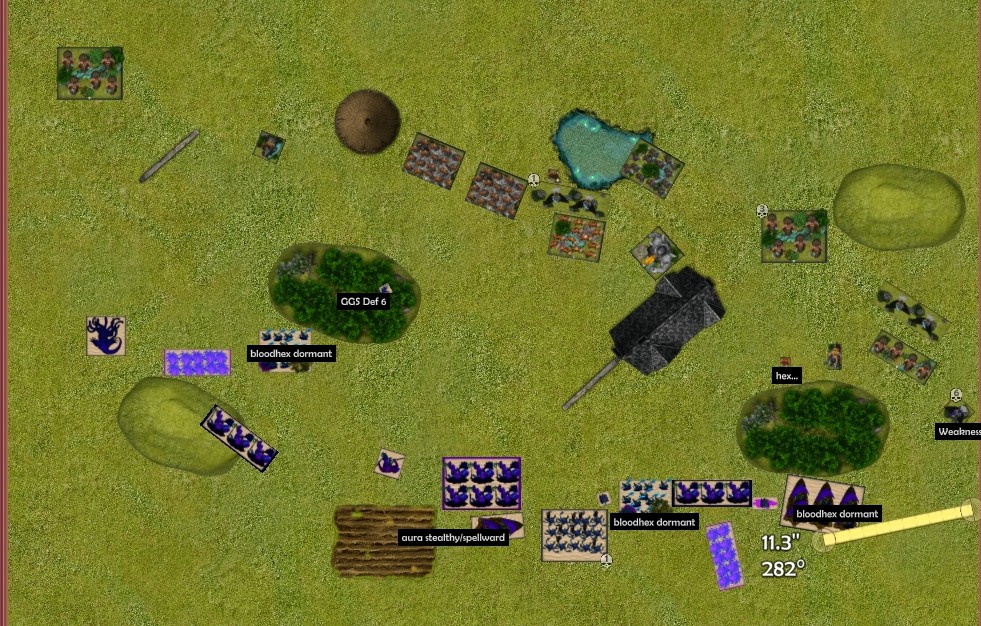
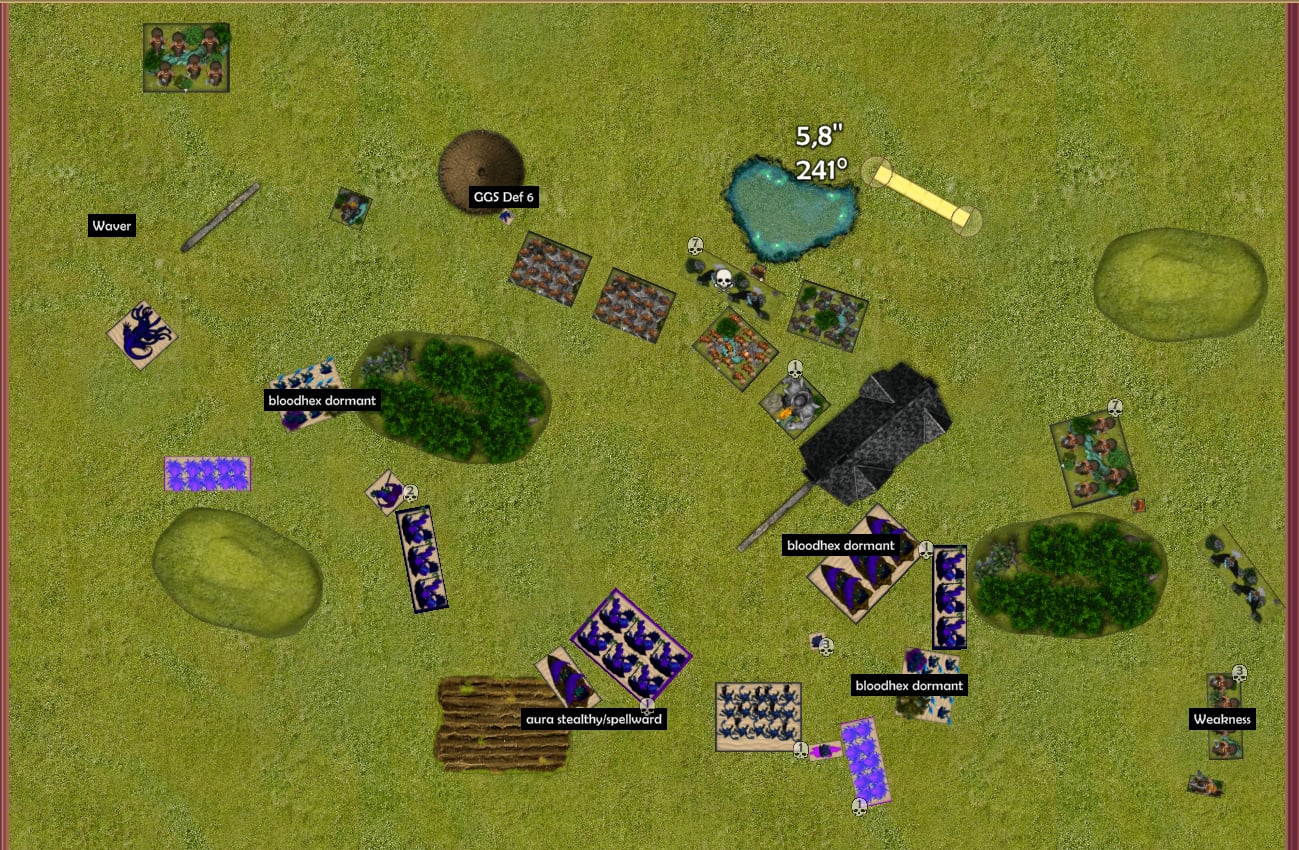
After B1 for Twilight Kin


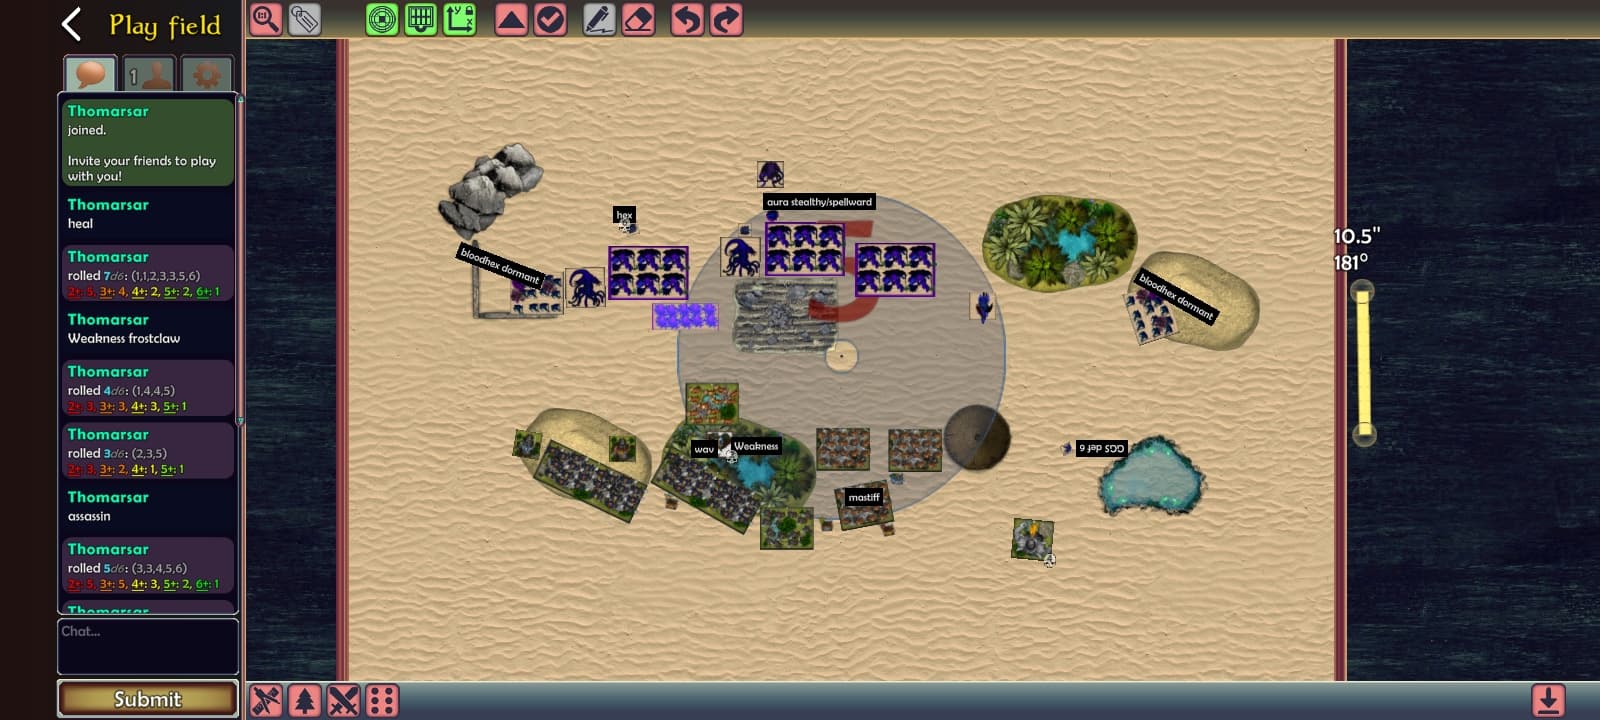
On the left, the assassin runs past the king and into the flank of the rabble horde. He really didn’t want to stay in the giant’s arc. The other units pull back out of range of giant, while the mutants, phantoms, and Soulbane move to support the left flank. The phantoms will get a rearcharge on rabble horde if they should cc assassin and fail to rout him, so I feel the assassin will be safe for a turn. The navigator and crone team up on a wingit, but only score 1 dmg. Skiffs back away out of range of the fast goblin cavalry, popping bloodhex to reduce the chance of bad things happening. La’theal dives for cover as she got no other options after getting hit by a hex. Terror moves up and grabs a token, 1-1 so far.
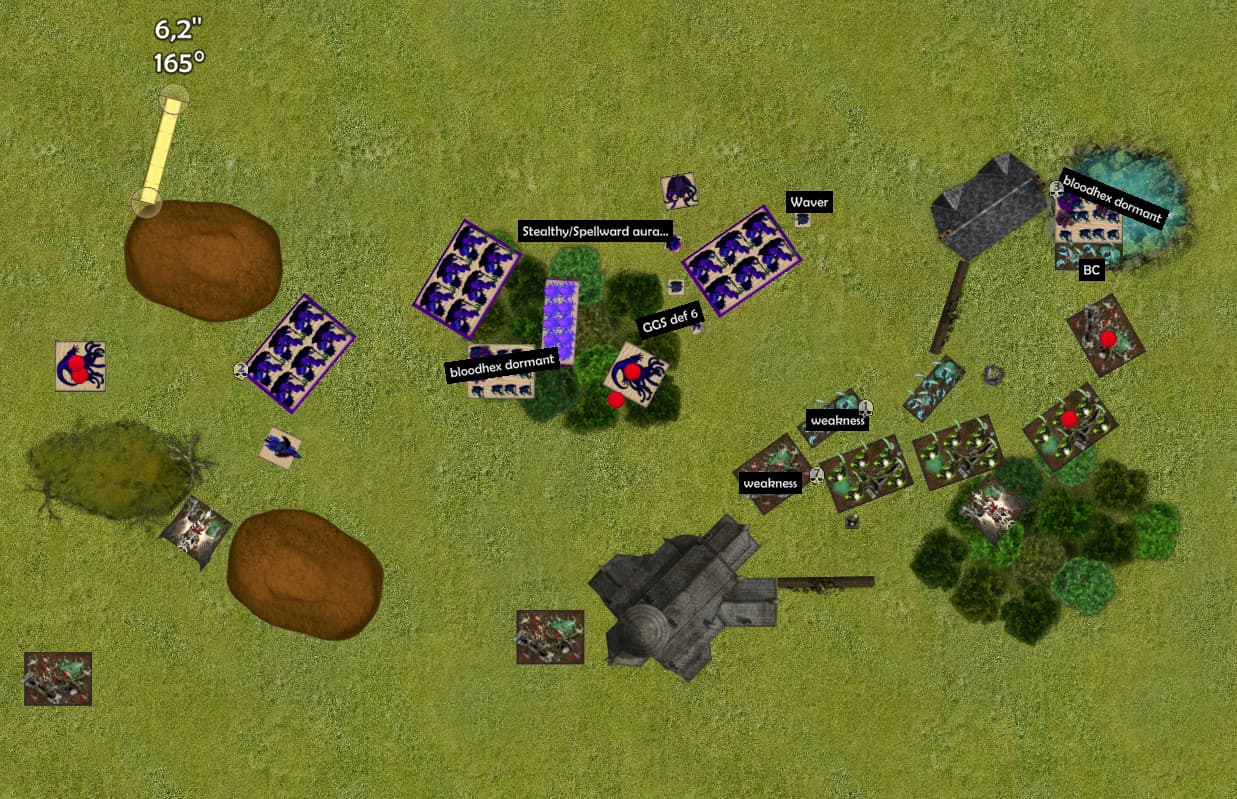
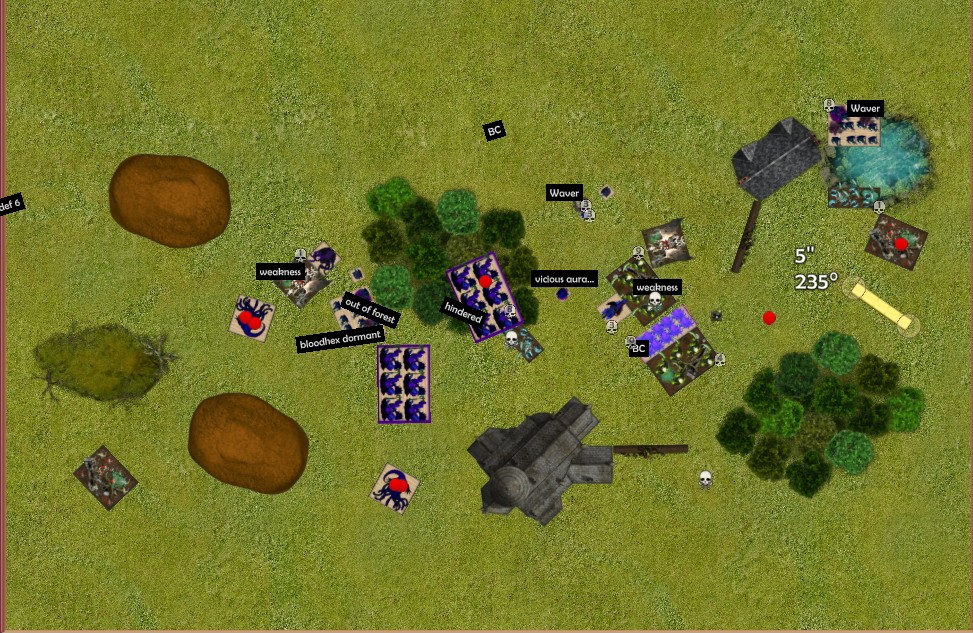
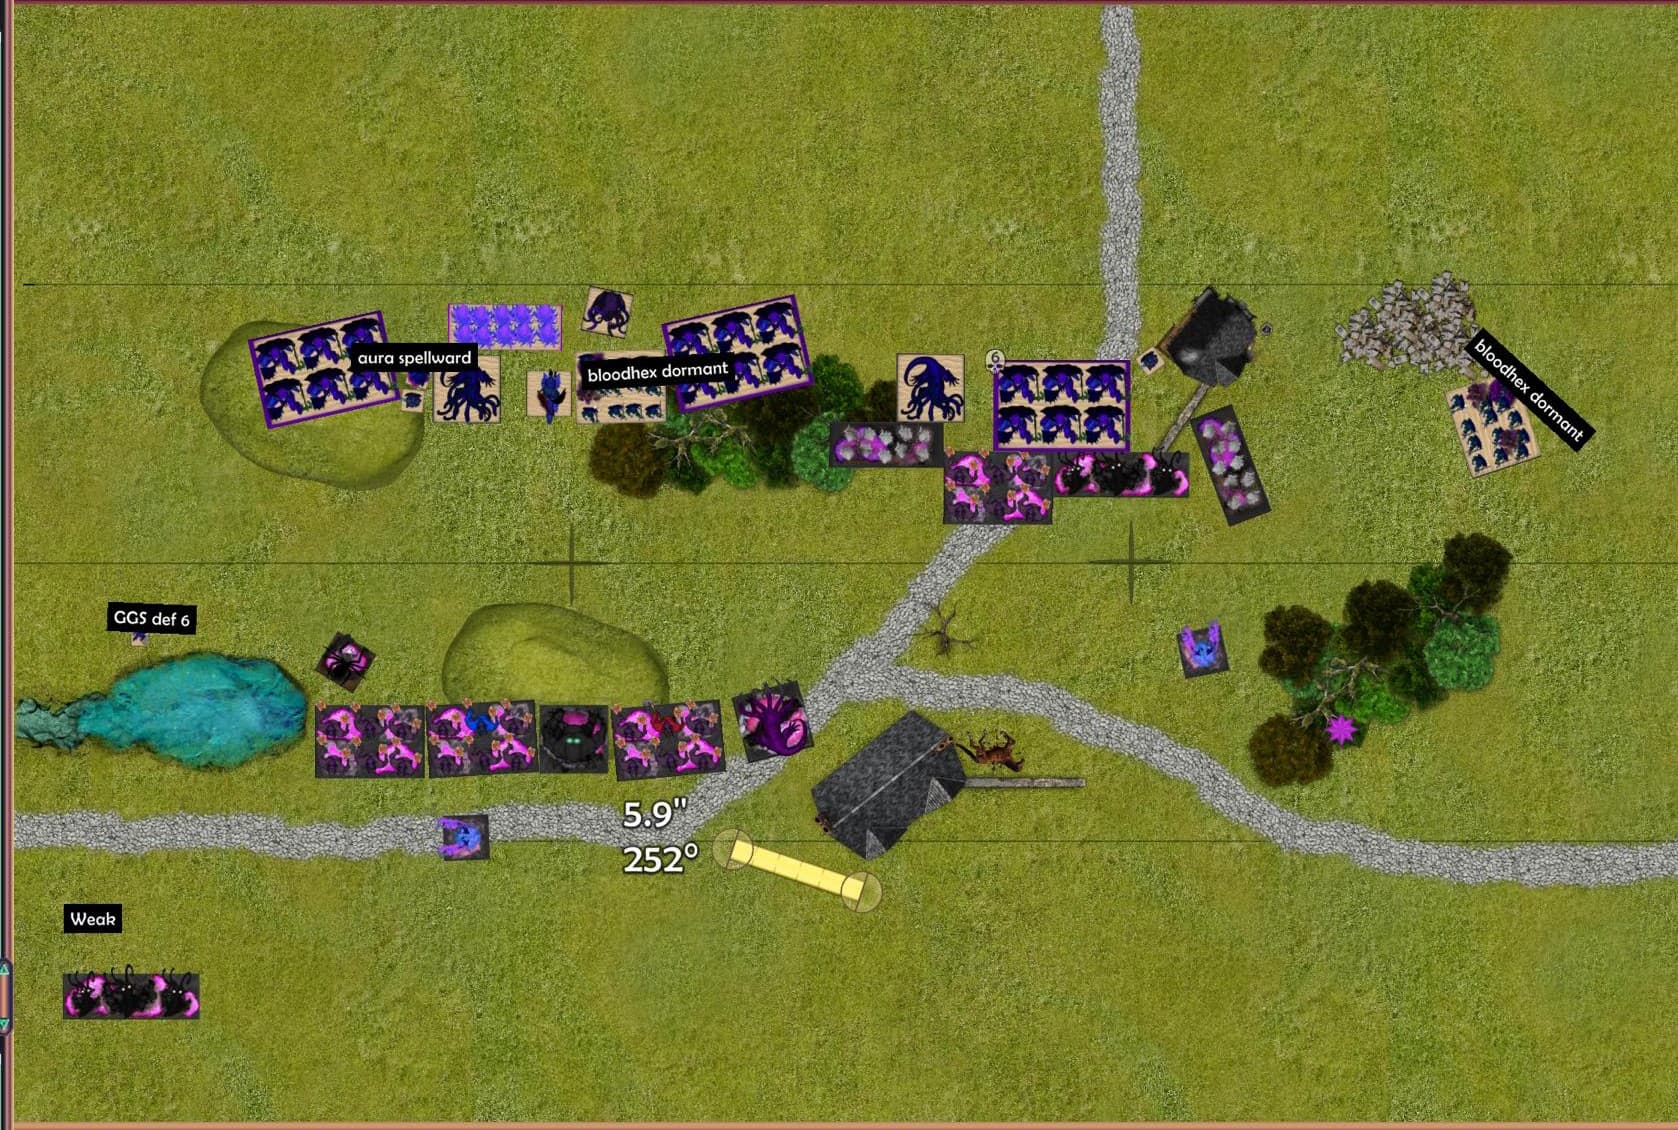
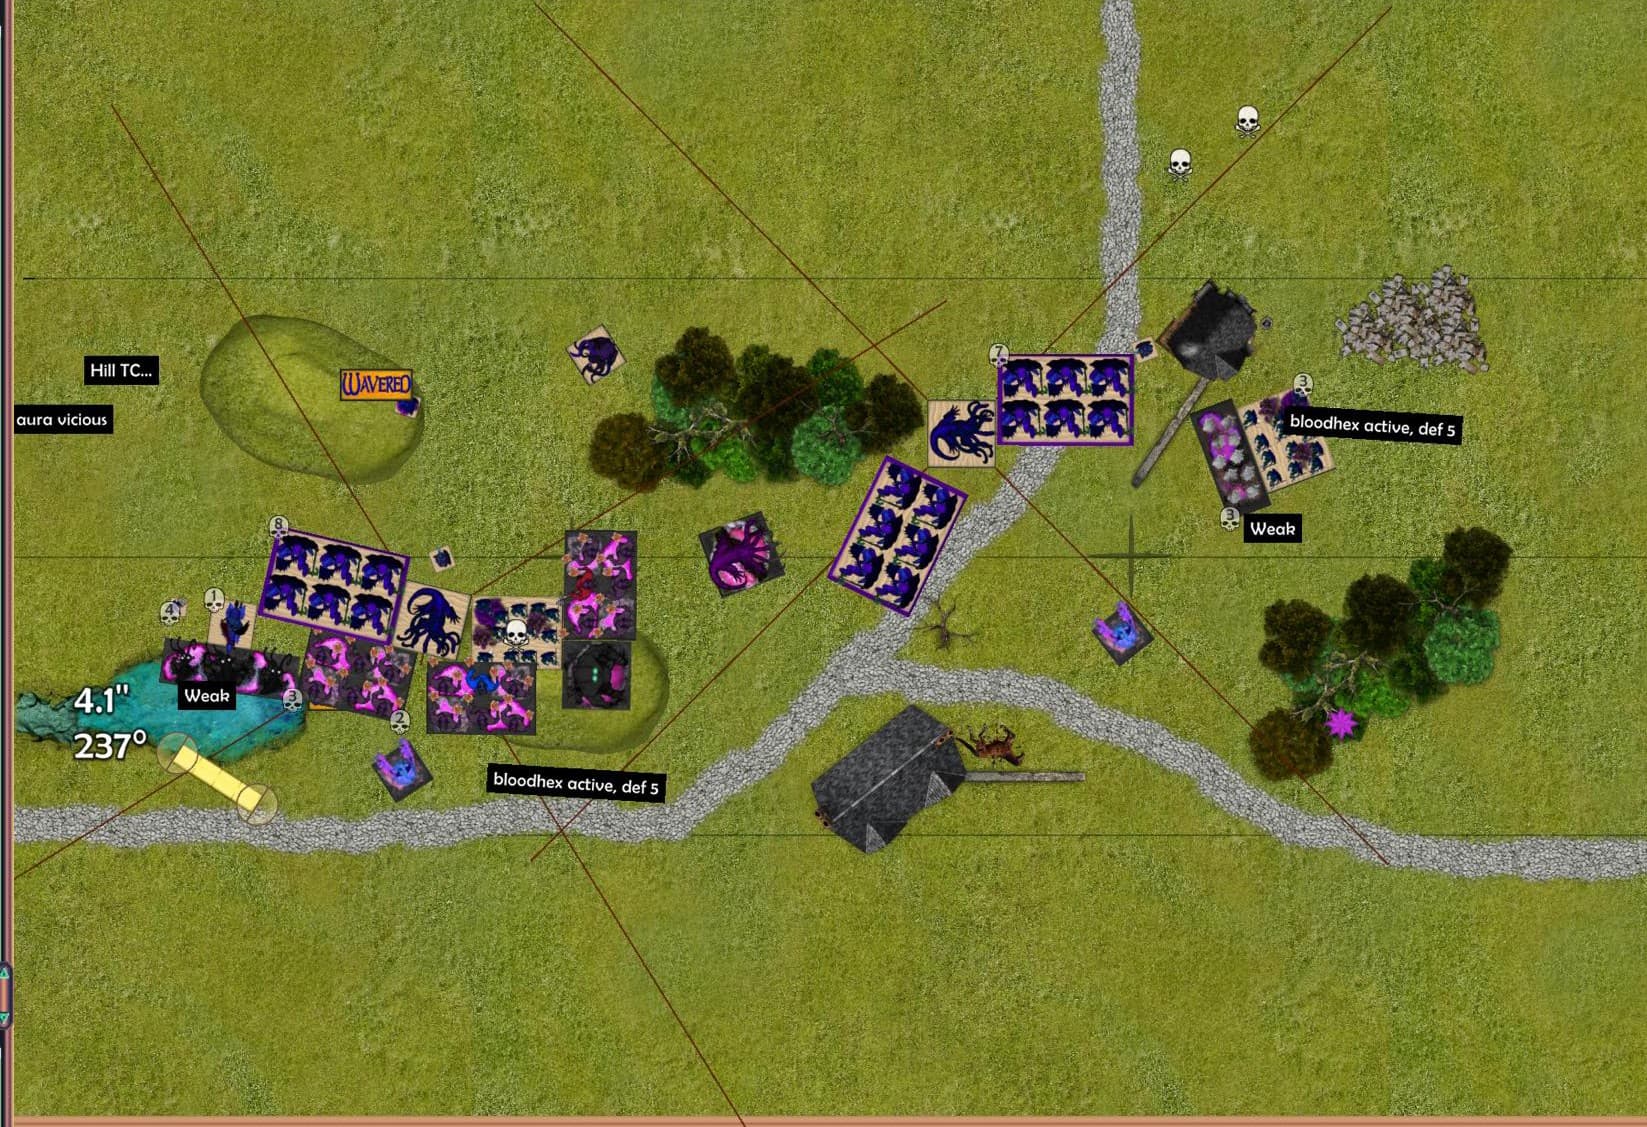
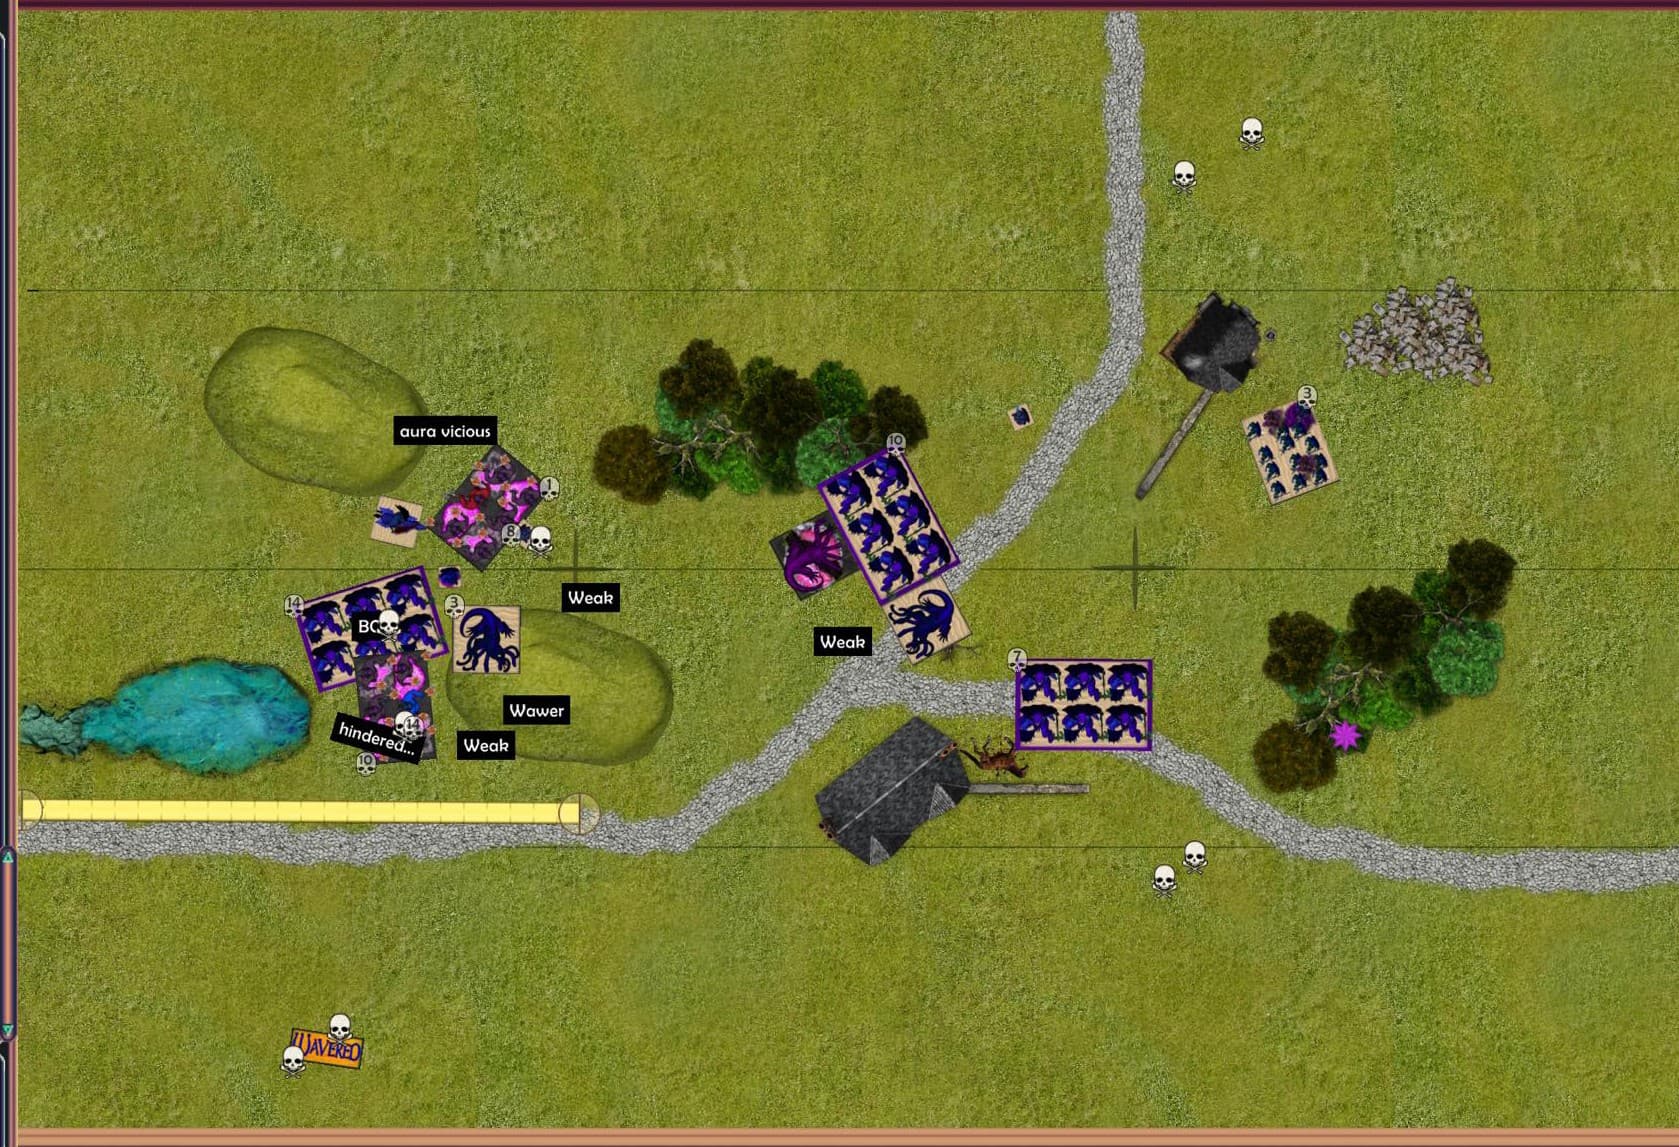
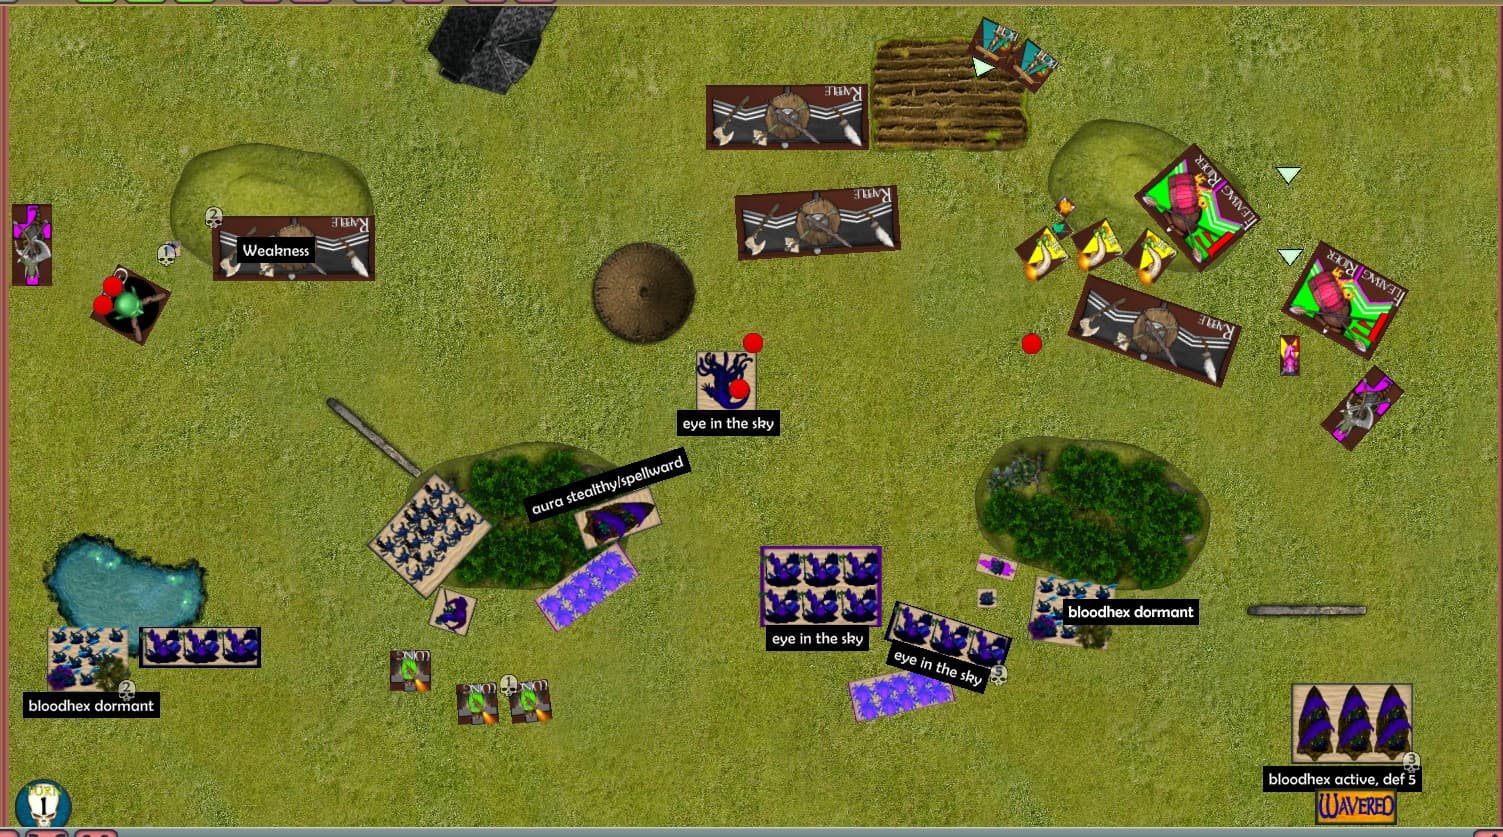
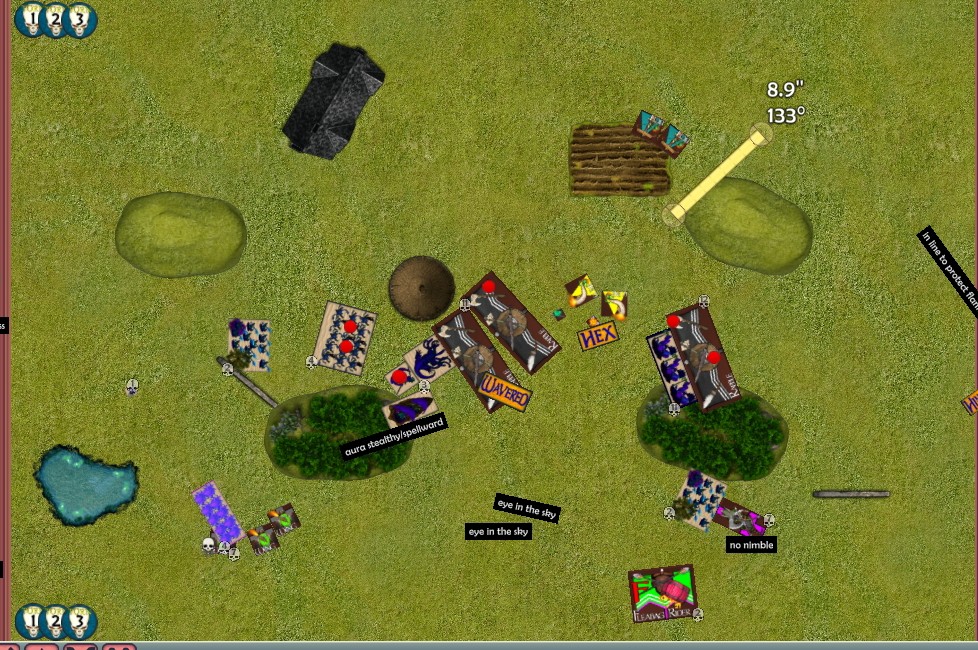
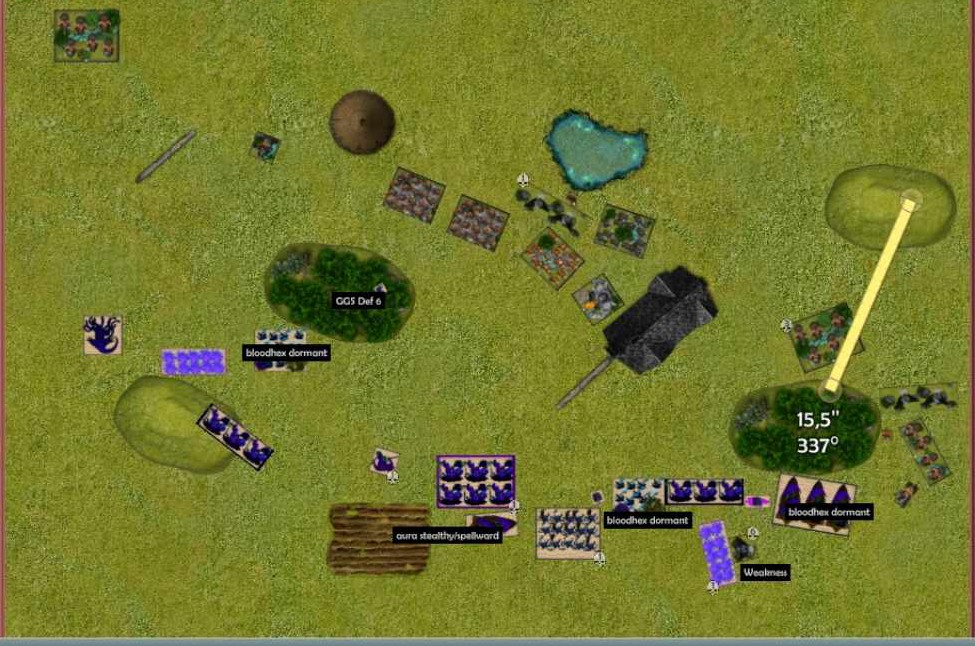
After T2


Disaster strikes as he rolls up a 6 6 on the skiffs! Without the bloodhex, they would be dead, so at least that was a relief to have in place at the right time. On the left the king decides to not go on a suicide mission, the giant picks up the other token and turns to face the mutants. He saw the danger to the rabble horde and wisely avoided counter charging the assassin. I left litte room for wing-its to stop and shoot, so they just flew past and into my back field. His trombones move off the hil to get closer to the centre, while the sharpsticks continue to pelt the impalers. His rabble hordes move closer to my lines.
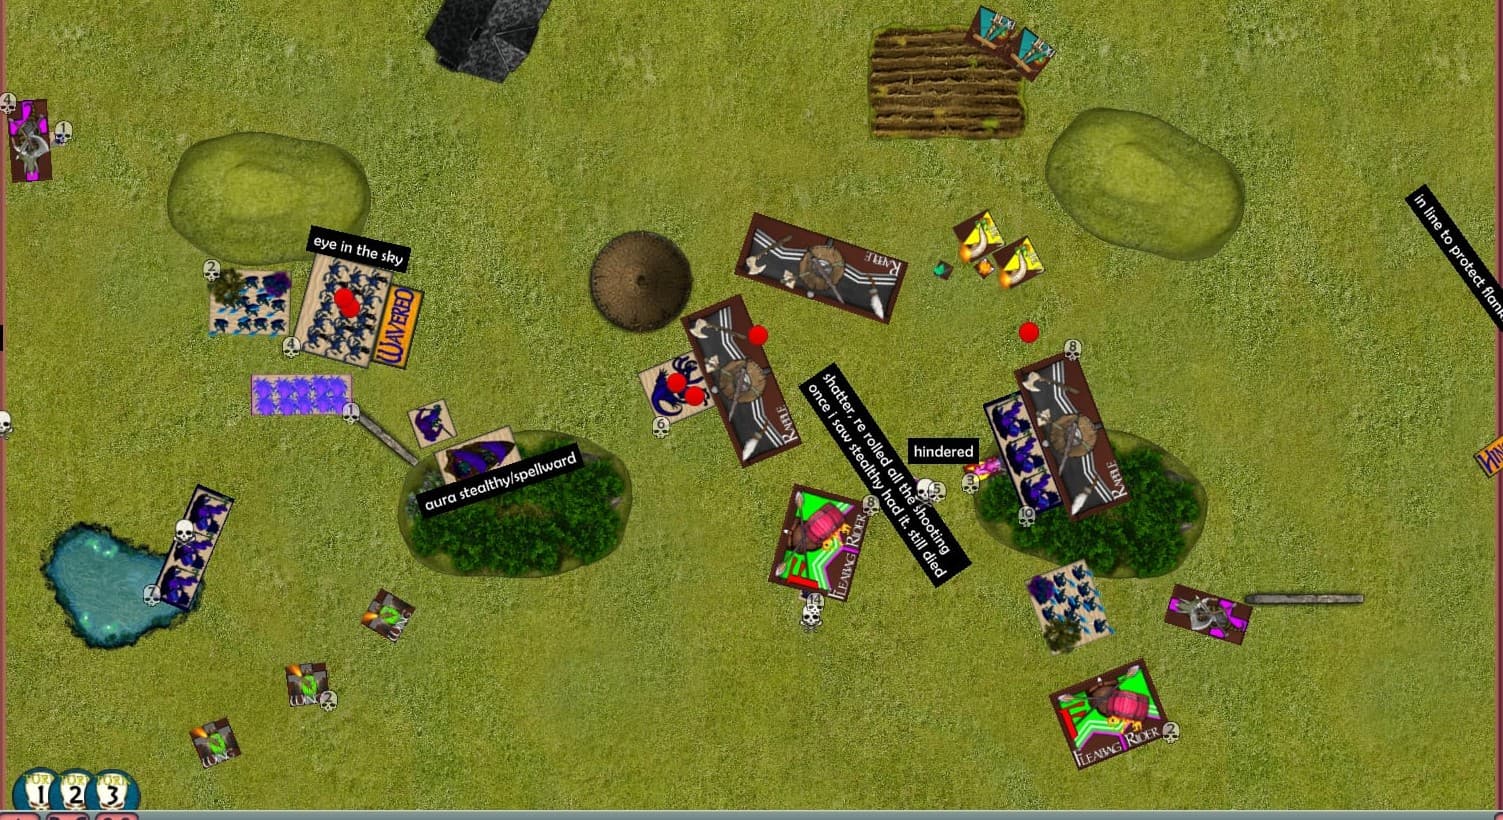
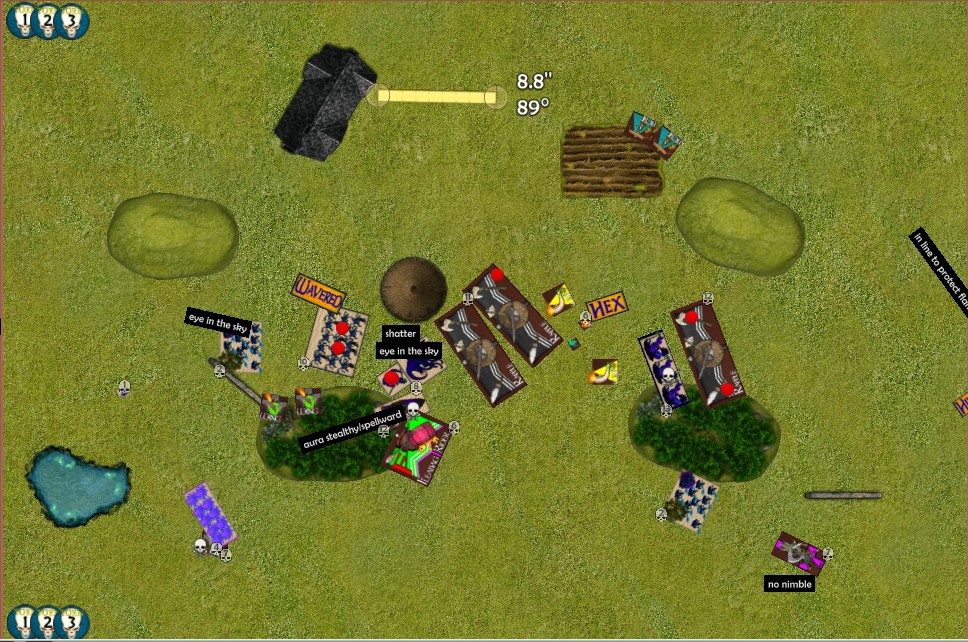
After B2


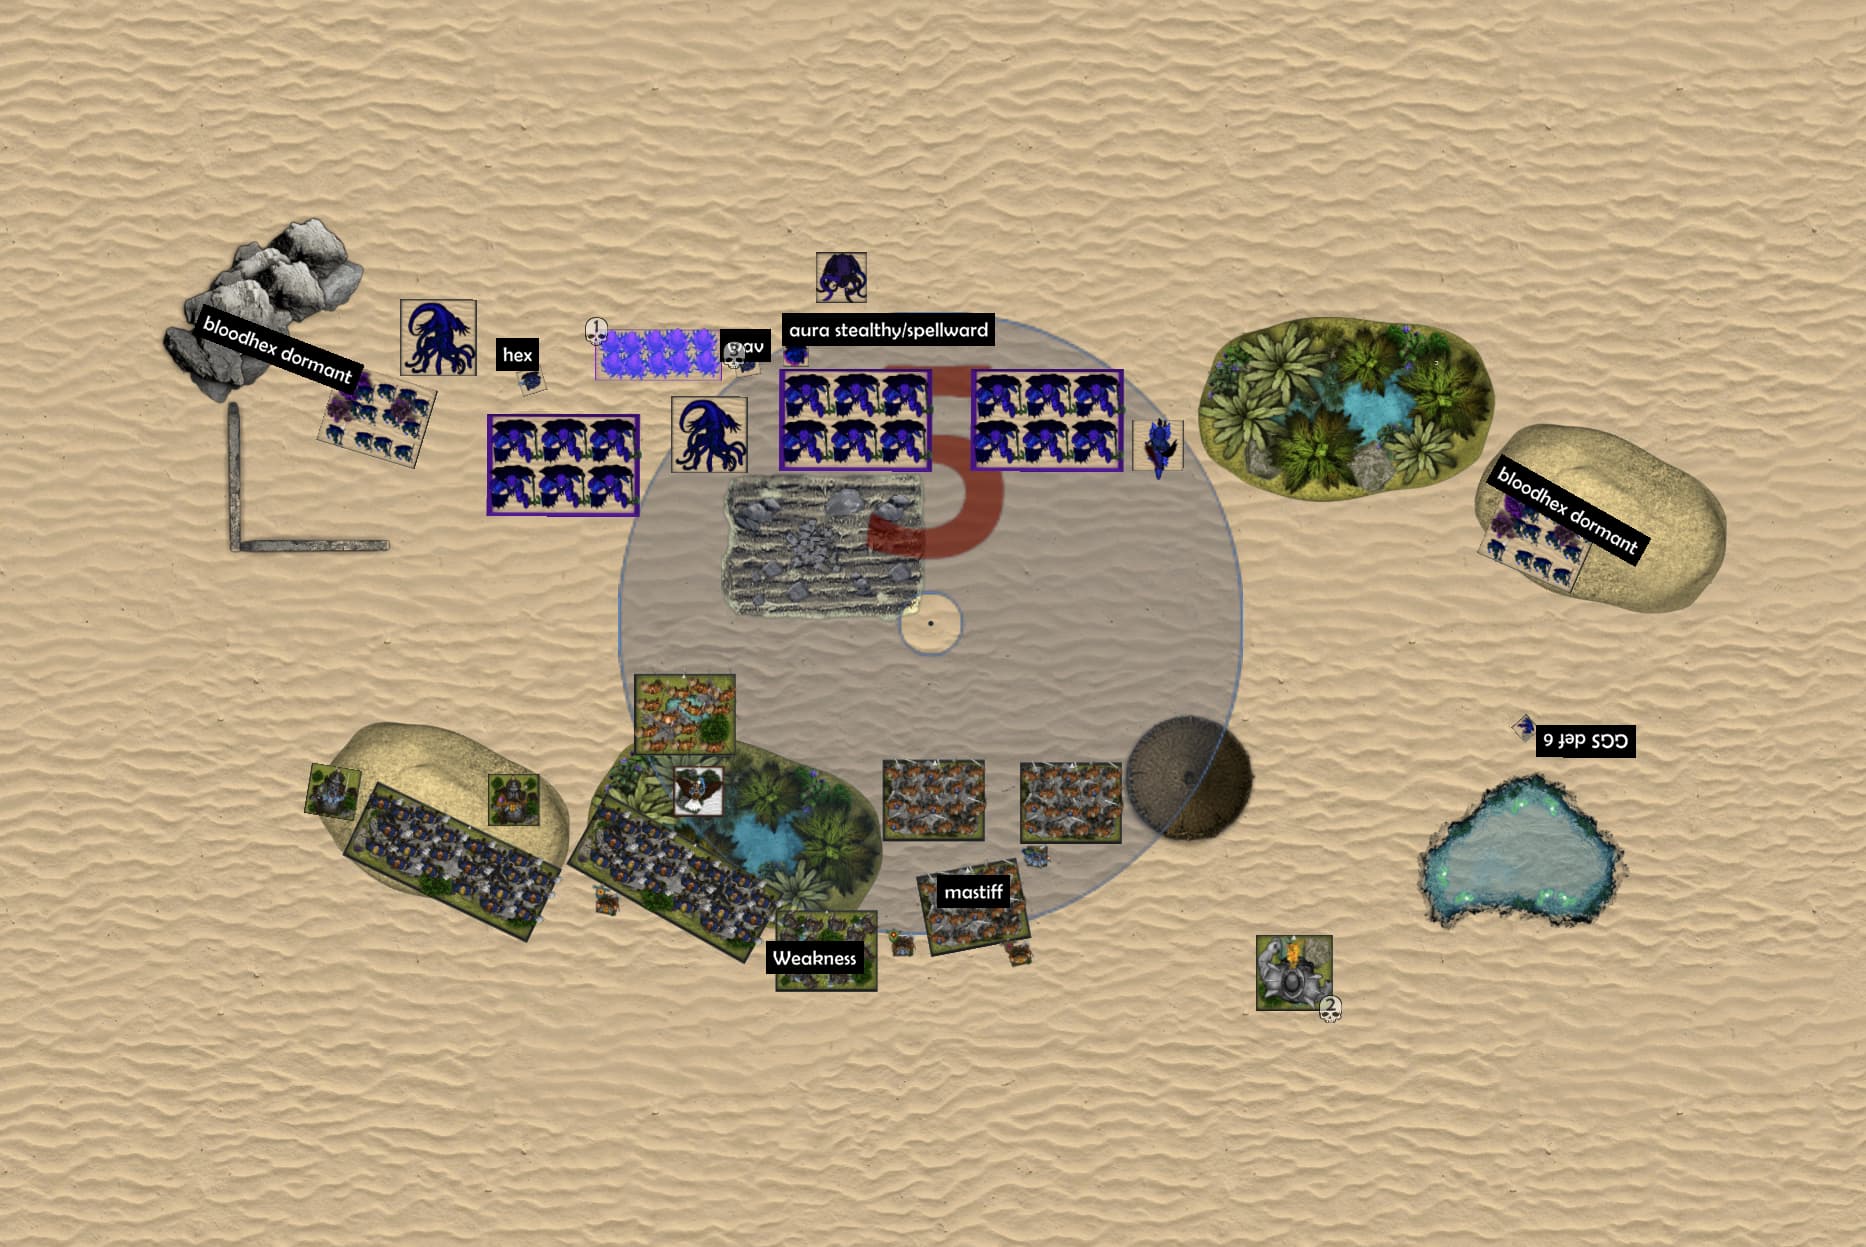
Terror picks up a second token and turn to face the oncoming goblins. The impalers move up to block the first rabble horde from sliding far enough to allow the second rabble horde to connect with the terror’s flank. I combine all the shooting I got on one wingit, and do 1dmg… BUT mutants tore apart the giants in one turn so I’m still very happy with this turn. Left flank seems much more secure, but who knows what the wingits will be up to next turn. On the far right, skiffs have bo better option to turn to make all potential charging units hindered. In h spend a lot of time shuffling about to clear LOS for phantoms to go after a trombone. Most importantly this halts his shooting units getting closer to the terror, but removing one trombone is good too.
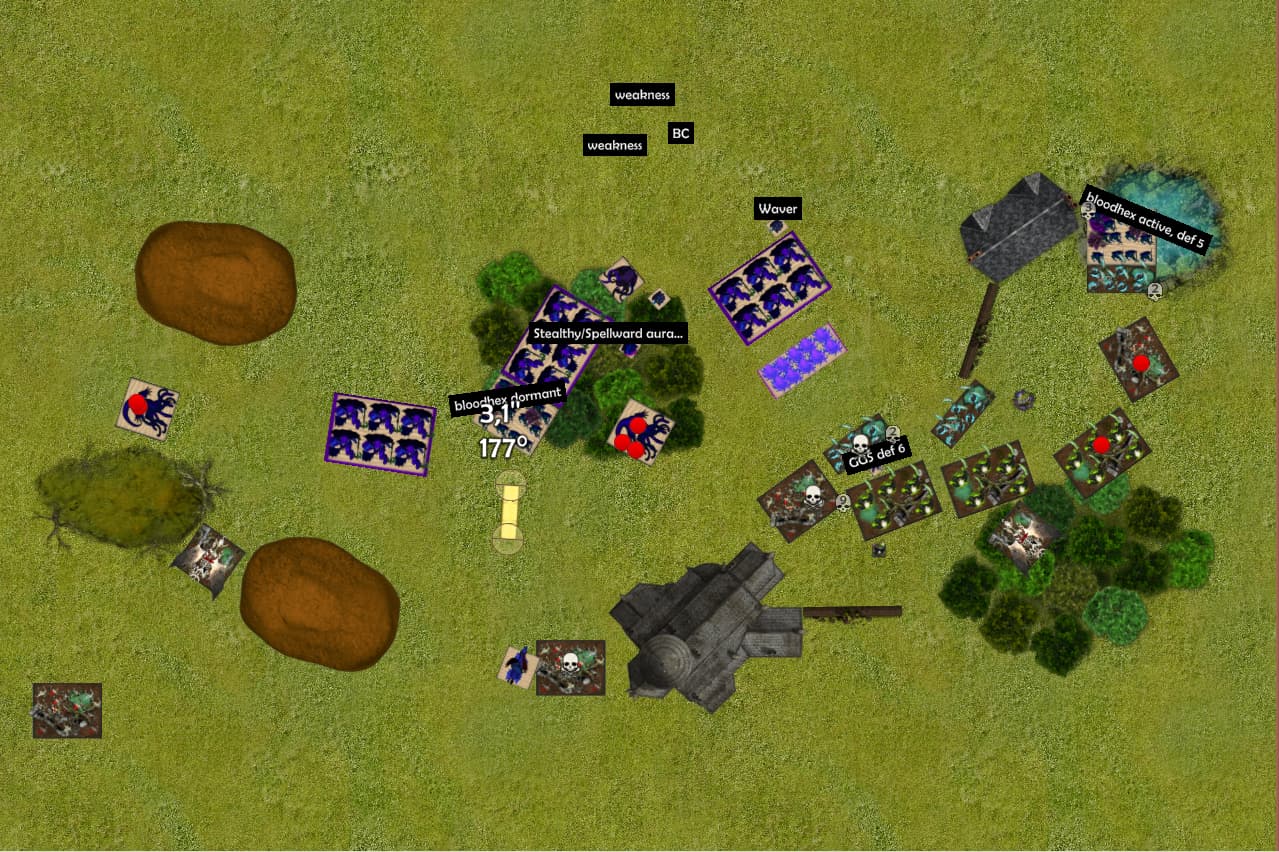
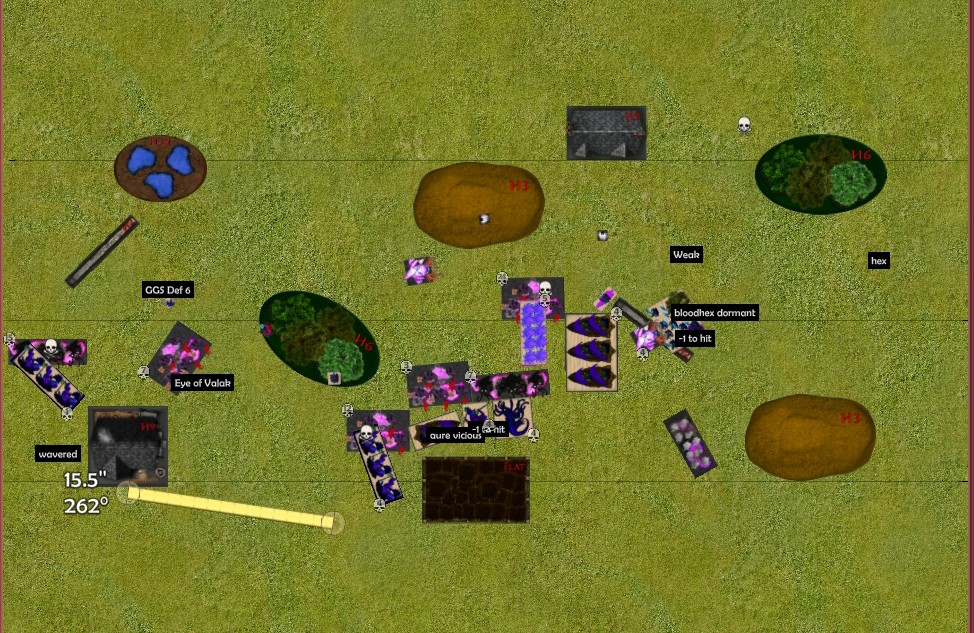
After T3


Unfortunately, the impaler horde that kept the terror safe, was themselves put un a prilous situatin, that Cyle exploited to great effect. He did his charge on terror with rabble in front, to less effect. The other weakened rabble horde failed to rout my phantoms as well. On bottom right my skiffs that got wavered had no way to escape and was routed. On the bottom left, wingits failed to impress the impalers.
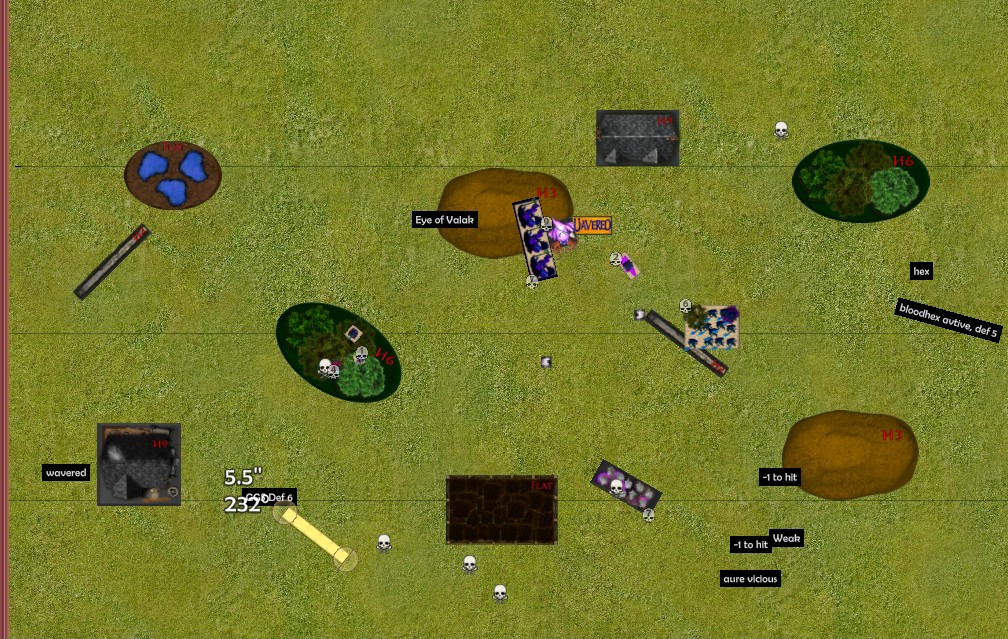
After B3


In the centre, the terror does the clever thing and back away, out of range from shooting. Unfortunately this leaves my crone a target. The crones also fail miserably in their attempt to stop the fleabags. Assassin get a lucky waver on chariot king after a down hill charge.

After T4


This time the wingits get the better of the impalers, and routs them. The unflinching fleabags kill La’theal and turn to face the terror, but they rolled up a lot of 6s and some were killed by their own exploding bangsticks. The other crone was routed as well from shooting. Rabble horde go in again on terror and put more damage on it. The impalers in the forest barely survive. The impalers on bottom right are getting surrounded, as the cav reguse to charge their front. The sharpstick throwers also manage an annoying waver on my mutants.

After B4


On the right, the impalers turn and kill the king, before turning back again to face the rabble horde. The fleetwardens were given a juicy flank of the rabble horde, but as routing them don’t really impact the game, they rather rotated to block the fleabags possibilities to effectively move towards the centre. That they managed to get them in front as well was a nice bonus. In the centre the terror keep backing to reduce shooting, and to get closer to the reinforcements. The navigator stays perfectly still to aim the killing shot on the rabble in the centre. It was very important that they were removed from play. The assassin routs the king on chariot, making the left flank more secure, but the wingits are still at large.
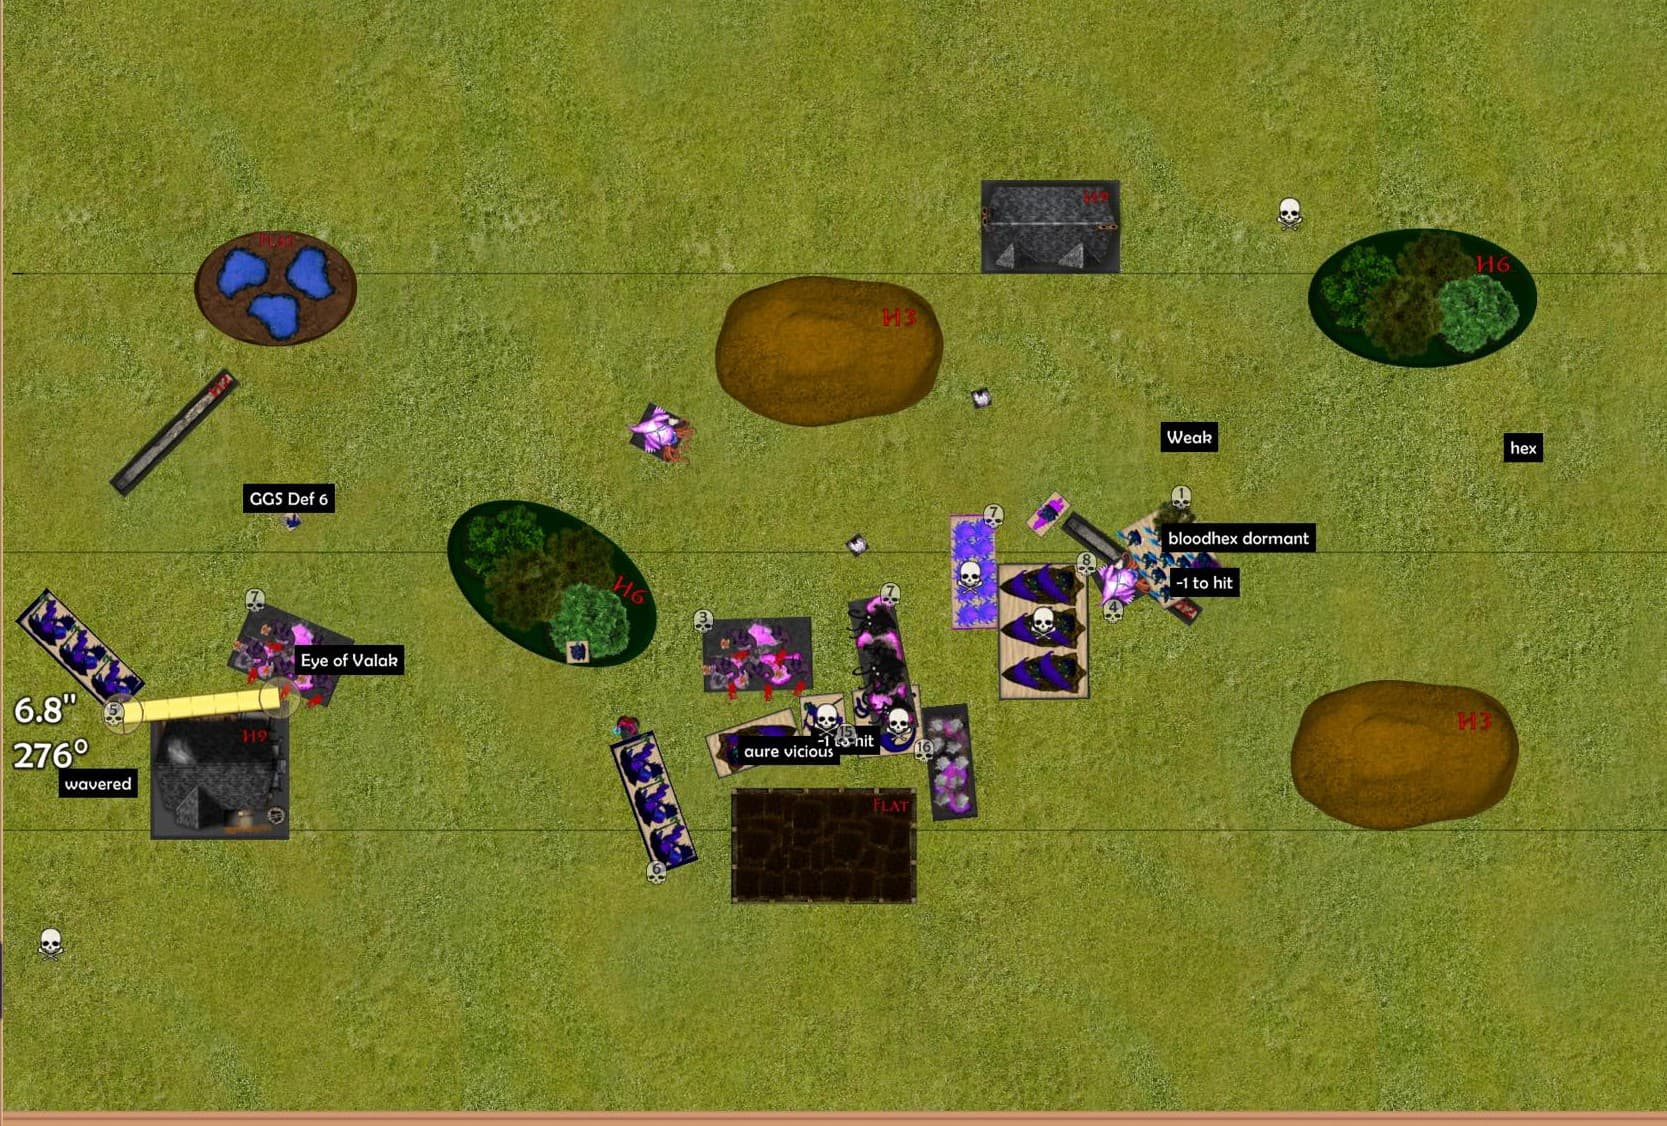
After T5


He decides to stop fighting the terror and shoot at it i stead with fire, curses and trombones. It us not impressed. The stealthy kerp mutants and phantoms alive, while the impalers are saved by a 1,1. All my units are fine. Fleabags decided to step around the fleetwardens to get in range to charge something in the centre next turn.

After B5


The terror that has been riled up for several turns finally has had enough, and charges the rabble horde. The goblins gets really scared by this monstrosity, and wavers. The terror dropped the tokens behind it for the Soulbane to pick up. Along with the navigator, the terror has made a safe little cubby for him. Navigator also get a hex on the wiz, limiting his options. Phantoms rout one annoying wingit, while the assassin runs as fast as he csn to catch up. Mutants move to get cover from building. I’m not as lucky on the right flank, despite inflicting heavy damage, the goblins there are of solid nerve.

After T6


Fleabags charge up to rout the navigator that has been shrouding my army all game. The hexxed wiz ignores his hex and csdt AC to rout the impalers, suffering 6dmg himself (but is in no real danger). He shoots a lot at the terror, but it is too well hidden by its stealthy nature. The wingits fly in to terrorize ghe mutants, does a gret deal of dmg amd wavers them.

After B6 (end of game)

Pesky goblins are routed across the board. Terror grabs hold of tokens again, as the safest option for a possible T7. Assassin sat this one out.

After game thoughts.
The big swing in this game was when the mutants one-shotted the giant, the other was when I got phantoms in to rout a war trombone. Theese thjngs put Cyle on the back-foot. I had my bouts of bad luck as well, though, but not as decicive. A fun thing with this scenario is when I took two counters from the centre and left thr third, as I didn’t need it for the win. It would be very risky to try for one more! Thanks to Cyle for a very good game.

2 Likes

I (finallly) remembered to check if any new reports were complete here and found 3!

Thanks for keeping it up. It’s still intetesting to see how TK actually play, rather than trying to guage by the whinging.

On that note, it has occured to me that part of the complaining about TK could be due to their theme being done well.
Having some kind of scheming ruin your plans or finding less strenght than you usually have sounds thematically right when fighting TK, but having units pushed around or less effective than one is used to can also be a negative play experience.
What do you think?

On the games match ups:

It’s interesting to see how well matched nightstalkers are.

Dwarfs seem to be gaving a hard time though. I can see how stealthy, big shield and terrors would be hard for dwarfs to deal with.

Cyle is a tough opponent, well done!
It was interesting to see how the mutants did in that game. They did a lot of damage, but were also repeatedlywavered by a bit of shooting

1 Like

@DarkBlack

Thanks! Ironically it has been a while since I’ve posted, as I’ve been playing other armies for a change.

I think my TK list is less abusive than the worst TK can offer, and also less annoying than goblin shooting and trident realms ensnare across-the-board. But I’m probably biased XD.

1 Like

After a long time of testing other armies, I am once again using my TK. No changes to my list, but I will link as reference. This time I am playing against Juan Pablo García and his free dwarfs. We are playing kill, let’s see how that turns out!

Pre-game thoughts:
We both have some shooting, but will we be content to stay at range? We both want to play a fun game, and there is no tournament points to think of. That said, my shooting might be slightly better at range, so he is the one that will have to make something happen in melee.

After T1 which he got.

He moves agressively up the right flank while pulling back from my terror on the left. I have to give chase if I want something out of my big monster. His shooting is ineffective due to my stealthy aura.

After B1


I focus fire on his stormclaw champ, while keeping the rest if my units safe. I do good dmg, but no waver as hoped. Terror give chase on left, phantoms follows to be able to flank the brocks if they should turn and run towards the centreCentre move carefully up. I spread some more damage around, but nothing major happened.